
Popular categories
Looking for a yarn?


Comments / Questions (24)
![]() Barbara Bailey wrote:
Barbara Bailey wrote:
I need to use straight needles. Would that work out for this design? Thanks!
01.10.2022 - 18:48DROPS Design answered:
Dear Barbara, you can substitute the circular needles for straight needles, but you need to also use double-pointed needles for the part worked in the round. Happy knitting!
03.10.2022 - 00:59
![]() Anna wrote:
Anna wrote:
Dzień dobry. Czy w początkowym fragmencie robótki, kiedy już mam ją podzieloną i wracam do 9 oczek z drutu pomocniczego (na lewej stronie drugi rząd schematu A2) to biorę drugą nitkę do przerabiania czy kontynuuję tą samą, którą mam od początku robótki?
08.09.2022 - 12:13DROPS Design answered:
Witaj Aniu, musisz wziąć drugą nitkę. Miłej pracy!
08.09.2022 - 14:02
![]() Francesca wrote:
Francesca wrote:
Nella spiegazione del. Modello c'è scritto "COSTA/MAGLIA LEGACCIO (avanti e indietro): 1 costa = 2 ferri diritto." ma nella descrizione del lavoro non trovo nessuna costa. Dove si trova?
04.01.2022 - 21:06DROPS Design answered:
Buongiorno Francesca, è semplicemente la spiegazione della lavorazione a maglia legaccio. Buon lavoro!
05.01.2022 - 10:38
![]() Francesca Guarneri wrote:
Francesca Guarneri wrote:
Non mi è chiara la spiegazione della prima parte del lavoro sopratutto in questi punti: - COSTA/MAGLIA LEGACCIO (avanti e indietro): 1 costa = 2 ferri diritto. Cosa devo fare? Vorrei realizzare la prima parte sui ferri dritti per comodità, il motivo è: Primo a dritto Secondo ferro 1 dritto 1 rovescio (con vivagno a legaccio) È corretto?
04.01.2022 - 11:24DROPS Design answered:
Buonasera Francesca, il diagramma si lavora in modo diverso a seconda che si trovi sul diritto o sul rovescio del lavoro: deve seguire la legenda per proseguire correttamente. Buon lavoro!
04.01.2022 - 21:00
![]() Estela Sidotti wrote:
Estela Sidotti wrote:
Hola, cómo estás........quería saber como se puede tejer este modelo con agujas rectas comunes. Desde ya muchas gracias desde mi lejano país.
03.04.2021 - 17:17DROPS Design answered:
Hola Estela, puedes leer la siguiente sección para ver cómo adaptar a agujas rectas. https://www.garnstudio.com/lesson.php?id=13&cid=23
07.04.2021 - 23:48
![]() Carolina Palacios wrote:
Carolina Palacios wrote:
PUNTO MUSGO (de ida y vuelta): 1 surco = tejer 2 hileras de derecho. no entiendo, podrían ayudarme, en general es muy claro pero estoy confundida cual es el punto musgo
22.07.2020 - 04:38DROPS Design answered:
Hola Carolina. Punto musgo = punto bobo = punto santa clara = todas las filas se trabajan de derecho.
19.08.2020 - 17:58
![]() HARCQ DOMINIQUE wrote:
HARCQ DOMINIQUE wrote:
Navrée, vos explications ne sont pas claires du tout !!!!!! ;-( Je viens de réaliser les deux bandes, et je déjà suis bloquée par les explications. Parfois de photos d'assemblage c'est plus efficaces . Question 1 : COMMENT ASSEMBLER LES DEUX BANDES ? Question 2 : COMMENT REPRENDRE LES MAILLES POUR CONSOLIDER LE BONNET ? Merci infiniment de m'éclairer pour que je puis finaliser au plus vite ce projet. Un TOUT GRAND MERCI A VOUS.
06.02.2020 - 18:28DROPS Design answered:
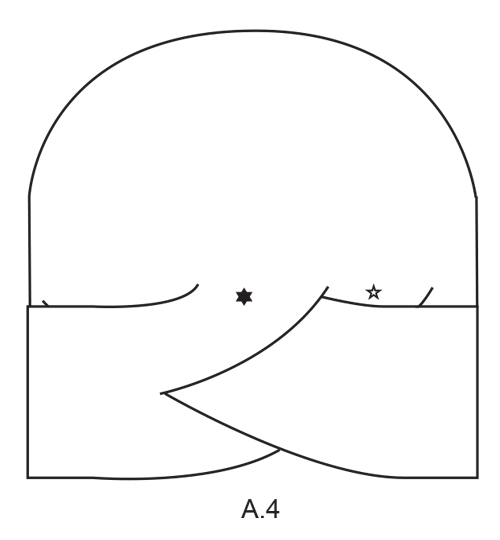
Bonjour Mme Harcq, regardez bien le schéma A.4: placez sur votre aiguille les 9 premières mailles de la 1ère partie (étoile blanche dans A.4), puis les 9 mailles de la 1ère partie (étoile noire dans A.4): vous avez une fente correspondant à ces 2 parties tricotées séparément; glissez sous cette fente la 2ème partie en passant par-dessus la 1ère moitié de la 1ère partie puis sous la 2ème moitié de la 1ère partie (au-dessus de l'étoile blanche et sous l'étoile noire) pour que les mailles de la 2ème partie soient placées juste après celles avec l'étoile noire. Bonne continuation!
07.02.2020 - 08:33
![]() Ann Kristin wrote:
Ann Kristin wrote:
Sammenstrikkingen av fletten gir ikke mening. Har dere laget videoene det er snakk om over her, eller kan dere forklare det på en bedre måte?
19.12.2019 - 08:51DROPS Design answered:
Hej Ann Kristin, Ikke endnu desværre, prøv at spørge i DROPS butikken hvor du har købt garnet :)
15.01.2020 - 12:08
![]() Heidi Hanssen wrote:
Heidi Hanssen wrote:
Hei Skjønner ikke hvor langt innpå langsiden jeg skal starte å plukke opp maskene på toppen av lua hvis man tenker fra midten bak og fremover ( for kan jo ikke starte rett etter der jeg har strikket de delene sammen foran hvor krysningen er/der de 2 delene strikkes sammen og krysser hverandre foran)
23.11.2019 - 07:20DROPS Design answered:
Hej Heidi, Du starter med de første 8 masker på den del med hvid stjerne. Vi skal prøve at få lavet en video som viser hvordan denne hue strikkes :)
04.12.2019 - 12:22
![]() Carmen-Gabriela wrote:
Carmen-Gabriela wrote:
Liest sich zunächst als kompliziert - ist es aber gar nicht. Super gelungen, sitzt + sieht klasse aus:)! Einfach mal nachmachen, Ihr Lieben:)
24.10.2019 - 17:20
|
||||||||||||||||
Garbo#garbohat |
||||||||||||||||
 |
 |
|||||||||||||||
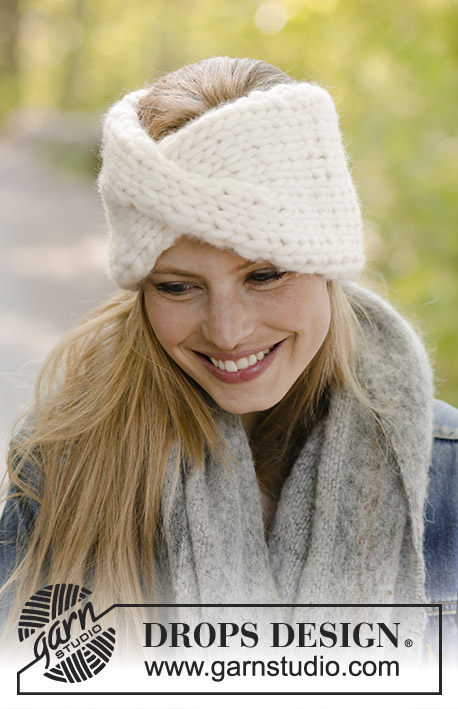
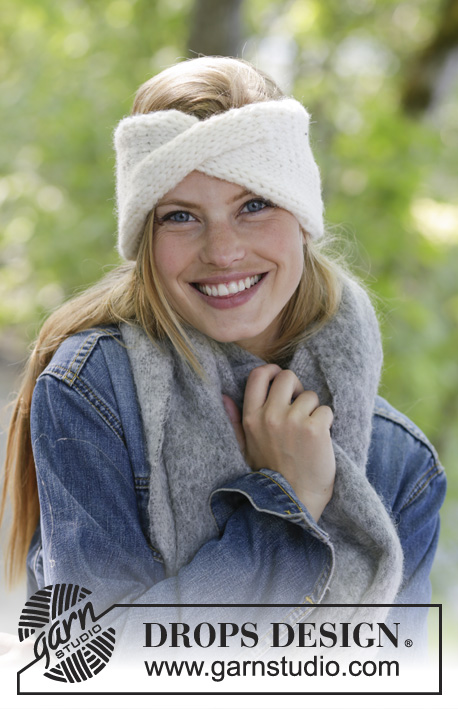
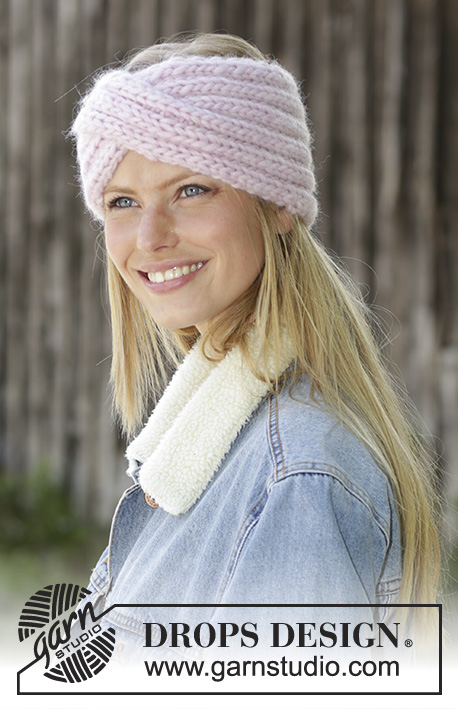
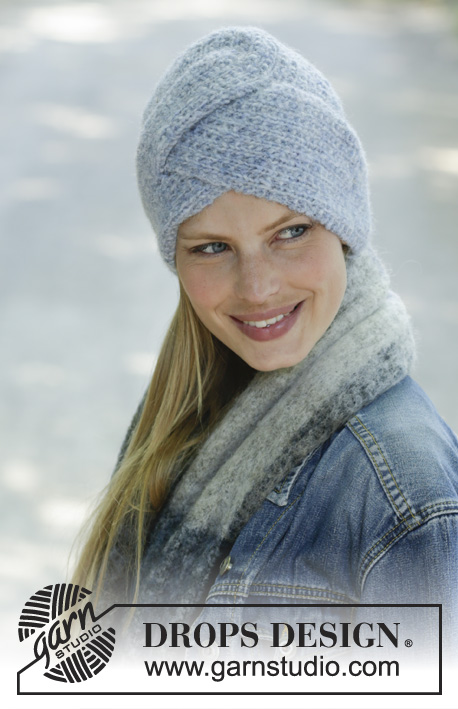
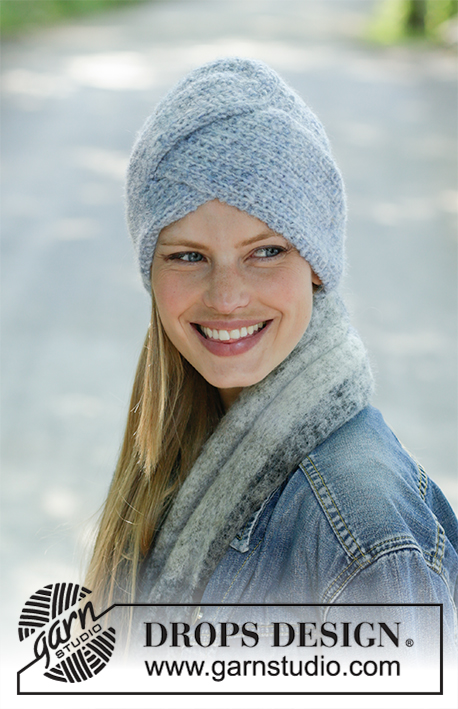
Knitted hat in DROPS Air. Piece is knitted with texture and cables at the front.
DROPS 192-12 |
||||||||||||||||
|
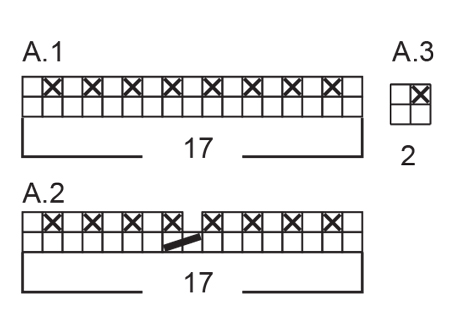
EXPLANATION FOR THE PATTERN: ---------------------------------------------------------- GARTER STITCH (back and forth): 1 ridge = knit 2 rows. PATTERN: See diagrams A.1 to A.3 and illustration A.4. Diagrams show all rows in pattern seen from the right side! DECREASE TIP: Work until 1 stitch remain before marker thread, knit the next 2 stitches together (= 1 stitch decreased). Repeat at each of the remaining marker threads = 6 stitches decreased on round. ---------------------------------------------------------- START THE PIECE HERE: ---------------------------------------------------------- HAT - SHORT OVERVIEW OF THE PIECE: First work piece back and forth on circular needle in 2 parts from mid back, then sew the 2 parts together mid back and plait parts together mid front, then pick up stitches around the edge and then work in the round and decrease for hat. Switch to double pointed needles when needed. HAT: Work first part as follows: Cast on 19 stitches on circular needle size 5 mm with Air. Work pattern back and forth as follows: 1 edge stitch in garter stitch, A.1 (= 17 stitches), 1 edge stitch in garter stitch. Continue back and forth like this until piece measures 21-22 cm, adjust so that next row is worked from right side. Turn and work 1 edge stitch in garter stitch, work the first 8 stitches in A.2 from right side before slipping these 9 stitches on a stitch holder. Work the remaining 9 stitches in A.2 (= 1 stitch decreased), 1 edge stitch in garter stitch = 9 stitches. Work last row in A.2 over the 9 stitches on needle. Continue back and forth with pattern as before over the 9 stitches on needle until piece measures 11 cm from division (approx. 33-34 cm from cast-on edge) - adjust so that next row is worked from right side. Slip stitches on a stitch holder. This part is marked with a black star in illustration A.4. Slip stitches from the other stitch holder back on needle = 9 stitches. Begin from wrong side and work last row in A.2, 1 edge stitch in garter stitch. Continue pattern back and forth until piece measures 11 cm (approx. 33-34 cm from cast-on edge) - adjust so that next row is worked from right side. Slip stitches on a stitch holder. This part is marked with a white star in illustration A.4. Work second part as follows: Cast on 19 stitches on circular needle size 5 mm with Air. Work pattern back and forth as follows: 1 edge stitch in garter stitch, A.1 (= 17 stitches), 1 edge stitch in garter stitch. Continue back and forth like this until piece measures 33-34 cm, adjust so that next row is worked from right side. Cut the yarn. ASSEMBLY AND PLAITING: Sew together the 2 cast-on edges mid back. Slip stitches from the different parts worked on circular needle as follows: Slip the first 9 stitches from first part (= white star) on needle, then slip the next 9 stitches from first part (= black star) on needle, place the 19 stitches on the second part over the first 9 stitches (white star) and under the next 9 stitches (= black star) and slip stitches on to needle. Parts cross mid front as shown in A.4. TOP OF HAT: Now work in the round from right side on part with white star as follows: Knit the first 8 stitches, knit the next 2 stitches together (= 1 stitch decreased in transition between part with white and black star), knit the next 7 stitches, knit the next 2 stitches together (= 1 stitch decreased in transition between part with black star and next part), knit the next 3 stitches together (= 2 stitches decreased), knit the next 15 stitches. There are now 33 stitches on needle and pattern fits every other knit stitch and every other stitch in garter stitch. Now pick up 24-26 stitches inside 1 edge stitch in garter stitch along the first part until seam mid back, then pick up 25-27 stitches the same way from seam mid back and until beginning of round = 82-86 stitches. Continue in the round with pattern A.3, and adjust so that pattern fits the entire round and over stitches on parts plaited mid front. When piece measures 5-6 cm from where stitches were picked up, insert 6 marker threads in piece as follows: Insert first marker thread after 13-15 stitches (i.e. before a knit stitch), then insert the next 4 marker threads after 14 stitches, 13-15 stitches now remain on round after last marker thread and there are 6 marker threads in piece, before 1 knit stitch. On next round, decrease 1 stitch at every marker thread – read DECREASE TIP! Decrease like this every other round 10 times in total = 22-26 stitches. Knit stitches together 2 by 2 = 11-13 stitches. Cut the yarn and pull it through the remaining stitches, tighten tog and fasten. Hat measures approx. 24-25 cm. |
||||||||||||||||
Diagram explanations |
||||||||||||||||
|
||||||||||||||||
 |
||||||||||||||||
 |
||||||||||||||||
Have you finished this pattern?Tag your pictures with #dropspattern #garbohat or submit them to the #dropsfan gallery. Do you need help with this pattern?You'll find 19 tutorial videos, a Comments/Questions area and more by visiting the pattern on garnstudio.com. © 1982-2026 DROPS Design A/S. We reserve all rights. This document, including all its sub-sections, has copyrights. Read more about what you can do with our patterns at the bottom of each pattern on our site. |
||||||||||||||||


With over 40 years in knitting and crochet design, DROPS Design offers one of the most extensive collections of free patterns on the internet - translated to 17 languages. As of today we count 324 catalogues and 12272 patterns translated into English (UK/cm). 12272
We work hard to bring you the best knitting and crochet have to offer, inspiration and advice as well as great quality yarns at incredible prices! Would you like to use our patterns for other than personal use? You can read what you are allowed to do in the Copyright text at the bottom of all our patterns. Happy crafting!
Post a comment to pattern DROPS 192-12
We would love to hear what you have to say about this pattern!
If you want to leave a question, please make sure you select the correct category in the form below, to speed up the answering process. Required fields are marked *.