
Popular categories
Looking for a yarn?


Comments / Questions (234)
![]() Annki wrote:
Annki wrote:
Är ärmen verkligen rätt? Så snäv blir den
02.11.2025 - 08:35DROPS Design answered:
Hei Annki. Skal være riktig. Husk å les STICTIPS-1. Har du riktig strikkefasthet? Målene til ermet finner du på målskissen nederst på oppskriften. mvh DROPS Design
17.11.2025 - 08:12
![]() Yolanda wrote:
Yolanda wrote:
Tengo dudas con las disminuciones del ranglan, estoy haciendo la talla xxxl y me dice que disminuya cada 2ª vuelta un total de 39 veces pero si cuento las vueltas del esquema no hay suficientes vueltas, cada cuantas vueltas tindria que dusminuir? Muchas gracias anticipadamente
14.10.2025 - 19:58DROPS Design answered:
Hi Yolanda, if your row count is correct (26/28 sts for 10 cm in hight) it will be ok, you do raglan decreases every second round. Please tell me how many rows your swatch has. Happy knitting!
30.10.2025 - 12:12
![]() Beth wrote:
Beth wrote:
Hi there! I’m currently knitting the first sleeve size XL, increasing 2 stitches every one and a half cms. I’m approaching the arrow where I’ll need to start casting off but will only have increased 16 times by then rather than 19! So not sure what to do now!
10.10.2025 - 10:51DROPS Design answered:
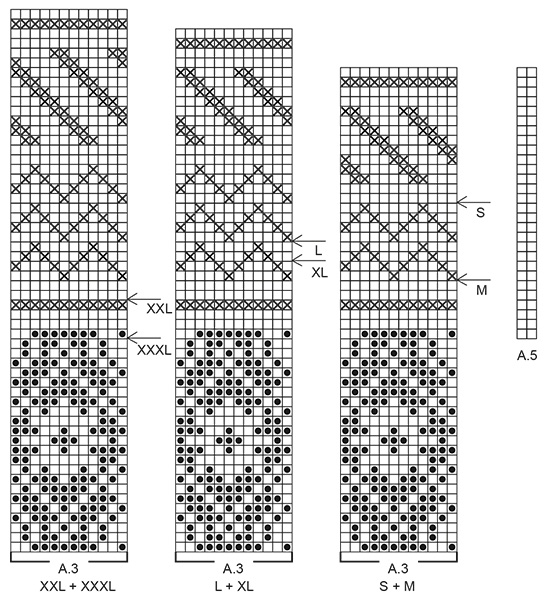
Dear Beth, if you are working the sleeve take into account that the complete sleeve measures 42cm. Meanwhile, you start increasing when the sleeve measures 10cm and you increase over approx. 29cm. That's 39cm. Also, in the pattern it states: "When all the stitches under the sleeve are increased, work A.3 a total of 6-7-7-7-8-8 times in width. When you have worked as far as the arrow in A.3, work the next round as follows.". So you start with the last repeat of A.3 once you have worked all increases. Happy knitting!
12.10.2025 - 20:55
![]() Marianne Gaarder wrote:
Marianne Gaarder wrote:
Er usikker på ærmerne. Har læst tidligere spørgsmål og svar, men forstår stadig ikke. Skal jeg strikke både A4 a, b og c samtidig ? Der står S og M ved alle tre, men forstår ikke beskrivelsen. Håber at I kan hjælpe . Marianne
28.09.2025 - 11:58DROPS Design answered:
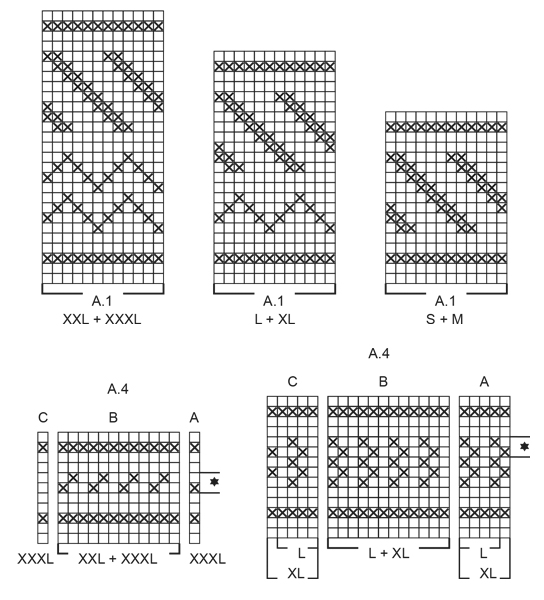
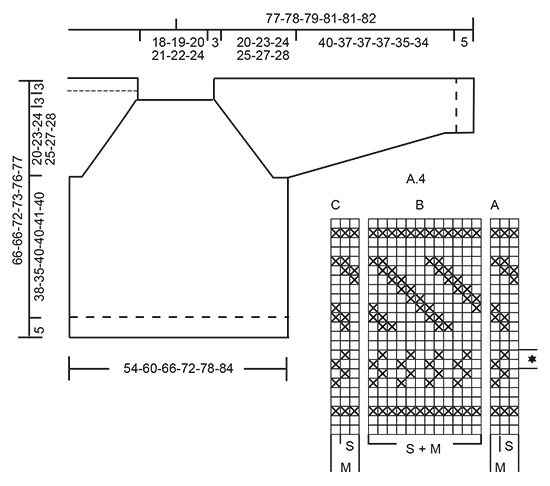
Hei Marianne. Ja, du strikker diagram A.4a, A.4b og A.4c samtidig. Om du ser på diagram A.4a så består diagrammet av 2 masker i str. S og 3 masker i str. M. Diagram A.4b er lik i str. S og M, men i diagram A.4c så er det 2 masker i str. S og 3 masker i str. M. mvh DROPS Design
06.10.2025 - 15:18
![]() Adrienne wrote:
Adrienne wrote:
Hi there,Im increasing on the sleeves and am confused how to work the increased stitches into the pattern of A3.Thank you for your help
18.08.2025 - 01:14DROPS Design answered:
Dear Adrienne, at the beginning of the round work the new stitches as a new repeat, reading the diagram from the left towards the right, and at the end of the round work the new stitches as a new repeat, reading diagram from the right towards the left, so that the pattern will extend mid under sleeve creating new pattern/repeat. Happy knitting!
18.08.2025 - 09:25
![]() Cherry wrote:
Cherry wrote:
Having knitted tension squares, I have got the correct number of stitches in 10cm, but the rows are not right. For textured I get 30 rows in 10cm, instead of 28, and for the Nordic I only get 21 rows instead of 26 (using 5mm needles). I am concerned this is going to make the body and arms the wrong length, and wondering what I can do to correct this. (Also puzzled how the number of rows can be so wrong when number of stitches is right. I am using the recommended yarn)
01.07.2025 - 20:05DROPS Design answered:
Dear Cherry, you can adjust the decreases for raglan on your own tension so you might decrease on a different rythm so that the yoke has the correct length after you have worked all raglan decreases. Happy knitting!
04.07.2025 - 11:28
![]() Doris Sommers wrote:
Doris Sommers wrote:
Ich bin gerade dabei diesen Pullover ( 197-1) zu stricken. Komme aber mit der Anleitung bei den Ärmeln nicht zurecht.Ich weiß nicht, wie ich die Maschen zunehmen soll und in das Muster integrieren kann? Gibt es da vielleicht eine andere Ableitung oder ein Youtube tutorial? Ich wäre sehr dankbar für Hilfe. Viele Grüße!
19.06.2025 - 13:58DROPS Design answered:
Liebe Frau Sommers, am Anfang der Runde stricken Sie die neuen Maschen wie im Diagram aber dann lesen Sie das Diagram rechts nach links; am Ende der Runde stricken Sie die neuen Maschen wie im Diagram, aber dann lesen Sie rechts nach links. Viel Spaß beim Stricken!
19.06.2025 - 17:22
![]() Michaela wrote:
Michaela wrote:
Wie bekomme ich die zu zunehmenden Maschen am Ärmel in das Muster intregiert? Gibt es da ein Tipp bzw. eine Vorlage?
17.06.2025 - 12:59DROPS Design answered:
Liebe Michaela, die Maschen am Anfang der Runde stricken Sie wie ein neues Rapport aber dann lesen Sie das Diagram links nach rechts; um am Ende der Runde stricken Sie die neuen Maschen wie ein neues Rapport, rechts nach links. So wird sich das Muster verbreitern. Viel Spaß beim Stricken!
18.06.2025 - 07:13
![]() Lynda Styles wrote:
Lynda Styles wrote:
I am making 2nd size and am at A6. After adding sleeves to body I had 380 stitches as per pattern instructions. All has been well up to now with decreasings which I am doing every other row decreasing 8 stitches each decrease row. I am half way through A6 but when I finish A6 I will still have too many stitches on the needle. Pattern says after last decrease to raglan I should have 132 stitches.
06.05.2025 - 12:04DROPS Design answered:
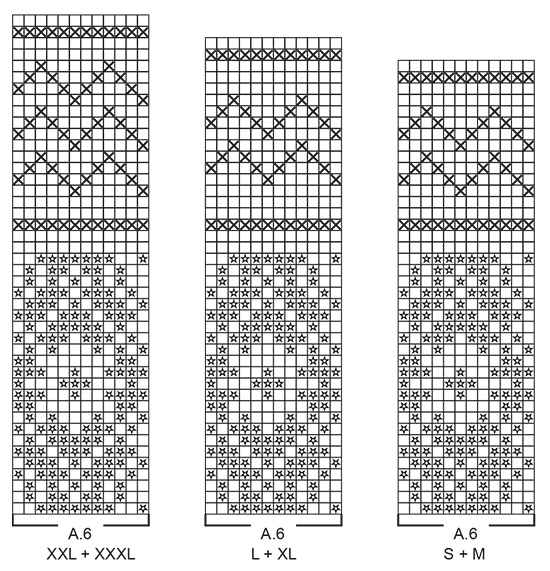
Dear Mrs Styles, there are 22 rows left on A.3 + 40 rows on A.6 = 62 rows in total and in size M you will decrease a total of 31 times on every other round= 62 rows; so that diagram is done when last decrease for raglan is worked; there were 380 sts - (8 sts decreased 31 times in total) = 132 sts left;. Happy knitting!
06.05.2025 - 13:39
![]() Robert, Martina wrote:
Robert, Martina wrote:
Hallo liebes Team, ich habe meinen Pullover Valdres fertig nach Anleitung gestrickt! Er ist wunderschön aber viel zu groß!!🥲 Er würde einem großen schlanken Mann von 1,80m passen. Ich bin ganz traurig!
09.04.2025 - 22:11
|
||||||||||||||||
Valdres#valdressweater |
||||||||||||||||
 |
 |
|||||||||||||||
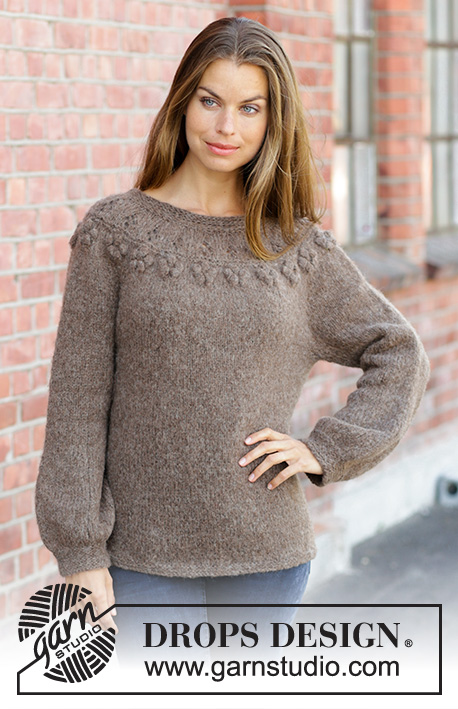
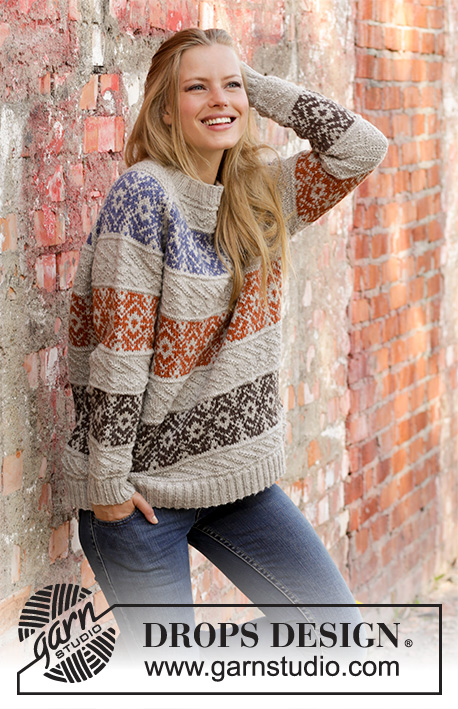
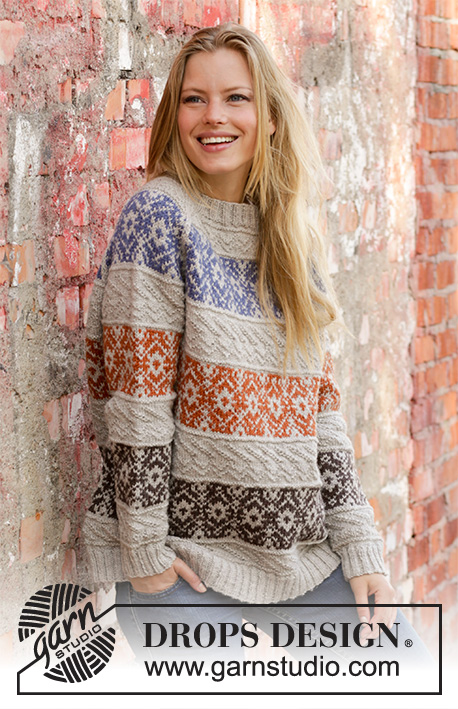
Knitted jumper with raglan in DROPS Karisma. The piece is worked bottom up with Nordic pattern and textured pattern in stripes. Sizes S - XXXL.
DROPS 197-1 |
||||||||||||||||
|
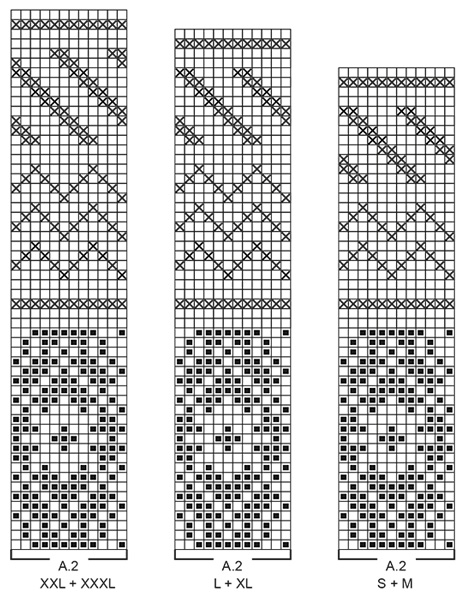
------------------------------------------------------- EXPLANATIONS FOR THE PATTERN: ------------------------------------------------------- PATTERN: See diagrams A.1 to A.6. Choose diagram for your size. DECREASE TIP (evenly spaced): To work out how to decrease evenly, count the total number of stitches on the needle (e.g. 260 stitches) and divide by the number of decreases to be made (e.g. 44) = 5.9. In this example, work together approx. each 5th and 6th stitch. KNITTING TIP-1: To avoid the knitting tension becoming tighter when working Nordic pattern, it is important that the strands at the back of the piece are not tight. You can use a size larger needle when working pattern if this is a problem. KNITTING TIP-2 (for yoke): If the knitting tension is not right in height and you work more rows on 10 cm than described in the text, the yoke will be too short and the armholes too small. This can be adjusted for by working 1 extra row of stocking stitch regularly on the yoke. INCREASE TIP (for sleeves): Work until there are 2 stitches left before the marker thread, make 1 yarn over (= 1 stitch increased), knit 4 (the marker thread sits in the middle of these 4 stitches), make 1 yarn over (= 1 stitch increased). On the next round knit the yarn overs twisted to avoid holes. RAGLAN: Decrease to raglan on each side of each A.5 as follows: Decrease 1 stitch after A.5 as follows: Slip the last stitch in A.5, knit 1, pass the slipped stitch over the knitted stitch (= 1 stitch decreased). Decrease 1 stitch before A.5 as follows: Work until there is 1 stitch left before A.5, knit the next 2 stitches together (= 1 stitch decreased). In other words you decrease 2 stitches by each A.5 and a total of 8 stitches on the round. ------------------------------------------------------- START THE PIECE HERE: ------------------------------------------------------- JUMPER - SHORT OVERVIEW OF THE PIECE: The piece is worked in the round with circular needle, bottom up. The sleeves are worked with short circular needle/double pointed needles. The pieces are placed together and the yoke is worked in the round. BODY: Cast on 260-288-316-344-376-400 stitches with circular needle size 3.5 mm and light oak. Work rib (= knit 2 / purl 2) for 5 cm. Change to circular needle size 4.5 mm and knit 1 round where you decrease 44-48-52-56-64-64 stitches evenly on round – read DECREASE TIP = 216-240-264-288-312-336 stitches. Knit 1 round as follows: Insert 1 marker in the first stitch, knit 107-119-131-143-155-167 stitches, insert 1 marker in the next stitch, knit to end of round. The markers mark the sides of the piece. Then work A.1 over all stitches (= 18-20-22-24-26-28 repeats of 12 stitches). REMEMBER THE KNITTING TENSION! When A.1 has been worked 1 time in height, insert 1 marker in the middle of the round (you will measure from this marker later). Then work A.2 over A.1- read KNITTING TIP-1. When A.2 has been worked 1 time in height, work A.3 over A.2. When you have worked as far as the arrow in A.3 (see arrow for your size) work the next round in A.3 as follows: Cast off 4 stitches, work the next 101-113-125-137-149-161 stitches as before, cast off the next 7 stitches, work the next 101-113-125-137-149-161 stitches as before, cast off the last 3 stitches. The piece measures approx. 32-29-32-32-31-30 cm from the marker (approx. 43-40-45-45-46-45 cm whole length). Lay the piece to one side and work the sleeves. SLEEVES: The piece is worked in the round with double pointed needles; change to short circular needle when necessary. Cast on 48-52-52-56-56-60 stitches with double pointed needles size 3.5 mm and light oak. Work rib (= knit 2 / purl 2) for 5 cm. Change to double pointed needles size 4.5 mm and knit 1 round where you decrease 8-10-8-10-8-10 stitches evenly on round = 40-42-44-46-48-50 stitches. READ THE WHOLE SECTION BEFORE CONTINUING: You work a pattern of approx. 8-8-5-5-4-4 cm, if you wish to adjust the length of the sleeve, do it now – see below. Then work the same pattern stripe as on the body (from the marker to the armhole = approx. 32-29-32-32-31-30 cm), i.e. the whole sleeve should measure approx. 45-42-42-42-40-39 cm. Work as follows: Insert 1 marker thread at the beginning of the round (= mid under sleeve). Work 1 round in stocking stitch, then work the next round as follows: Work A.4a (= 2-3-4-5-0-1 stitches), A.4b (= 12 stitches) a total of 3-3-3-3-4-4 times in width, A.4c (= 2-3-4-5-0-1 stitches). Continue until A.4 has been worked 1 time in height – NOTE: if you would like a longer sleeve, repeat the 2 rows marked with a star to desired length before continuing with the next round in A.4. If you would like a shorter sleeve, just work the desired number of rounds of A.4, but work a minimum of 1 of the purled rounds. – AT THE SAME TIME when the piece measures 10-9-9-10-12-12 cm increase 1 stitch on each side of the marker thread (= 2 stitches increased) – read INCREASE TIP! Increase like this every 2-1½-1½-1½-1-1 cm a total of 16-21-20-19-24-23 times = 72-84-84-84-96-96 stitches. The stitches in A.4a and A.4c and the increased stitches are worked into pattern A.4b as you go. When A.4 has been worked 1 time in height, work A.2 (= 12 stitches) over all stitches – A.2 is worked over A.4b and is adjusted out to each side; the increased stitches are worked into the pattern as you go. When A.2 has been worked 1 time in height, work A.3 (= 12 stitches) over A.2. When all the stitches under the sleeve are increased, work A.3 a total of 6-7-7-7-8-8 times in width. When you have worked as far as the arrow in A.3, work the next round as follows: Cast off 4 stitches, work the next 65-77-77-77-89-89 stitches as before, cast off the last 3 stitches. The sleeve measures approx. 45-42-42-42-40-39 cm. Work 1 more sleeve in the same way. YOKE: Place the sleeves on the same circular needle as the body, where you cast off stitches for the armholes = 332-380-404-428-476-500 stitches. Start the round in the transition between right sleeve and back piece. Work as follows: * A.5 (= 2 stitches, raglan line), continue with A.3 as before over the next 97-109-121-133-145-157 stitches (= front/back piece), A.5 (= 2 stitches, raglan line), work pattern A.3 as before over the next 65-77-77-77-89-89 stitches (= sleeve) *, work from *-* a total of 2 times – read KNITTING TIP-2. Continue this pattern and decrease to RAGLAN – read description above, every 2nd round a total of 27-31-32-33-37-39 times. When A.3 has been completed in height, work A.6 (= 12 stitches) over A.3. After the last decrease to raglan there are 116-132-148-164-180-188 stitches on the round. Continue until A.6 has been completed. The yoke measures approx. 20-23-24-25-27-28 cm. You can now work an elevation in the back of the neck so that the yoke is slightly higher at the back. This elevation can be left out; the neck is then the same both front and back. Work elevation in back of neck or go straight to working neck if you do not want an elevation. ELEVATION IN BACK OF NECK: Skip this section if you do not want an elevation. Insert 1 marker at the beginning of the round (this marks the start of the round after the elevation has been worked). Continue with light oak and knit to mid back, insert 1 marker. Start from the right side and knit as far as 30-30-34-34-40-40 stitches past the marker, turn, tighten the strand and purl 60-60-68-68-80-80 stitches back. Turn, tighten the strand and knit 54-54-61-61-72-72 stitches, turn, tighten the strand and purl 48-48-54-54-64-64 stitches back. Turn, tighten the strand and knit 42-42-48-48-56-56 stitches, turn, tighten the strand and purl 36-36-42-42-48-48 stitches back. Turn, tighten the strand and knit 30-30-35-35-40-40 stitches, turn, tighten the strand and purl 24-24-28-28-32-32 stitches, turn, tighten the strand and knit to mid back. Cut the strand. The round now starts at the marker, i.e. the transition between right sleeve and back piece. NECK: Continue with light oak and work the next round with decreases as follows: Knit * 40-46-54-58-66-70 stitches and decrease 0-6-12-13-19-22 stitches evenly over these stitches – remember DECREASE TIP, knit together the next 18-20-20-24-24-24 stitches 2 and 2 (= 9-10-10-12-12-12 stitches decreased) *, work from *-* a total of 2 times = 98-100-104-114-118-120 stitches. Change to circular needle size 3.5 mm and work the next round as follows: * Knit 2, purl 2, knit 1, 1 yarn over (= 1 stitch increased), purl 2, knit 2, 1 yarn over (= 1 stitch increased), purl 1 *, work from *-* until there are 8-0-4-4-8-0 stitches left, work rib (= knit 2 / purl 2) over the remaining stitches = 116-120-124-136-140-144 stitches. The yarn overs are worked twisted in rib (i.e. knit 2 / purl 2) on the next round to avoid holes. Cast off with knit over knit and purl over purl when the rib measures 3 cm. ASSEMBLY: Sew the openings under the sleeves in the outermost loop of the outermost stitch. |
||||||||||||||||
Diagram explanations |
||||||||||||||||
|
||||||||||||||||
 |
||||||||||||||||
 |
||||||||||||||||
 |
||||||||||||||||
 |
||||||||||||||||
 |
||||||||||||||||
Have you finished this pattern?Tag your pictures with #dropspattern #valdressweater or submit them to the #dropsfan gallery. Do you need help with this pattern?You'll find 30 tutorial videos, a Comments/Questions area and more by visiting the pattern on garnstudio.com. © 1982-2026 DROPS Design A/S. We reserve all rights. This document, including all its sub-sections, has copyrights. Read more about what you can do with our patterns at the bottom of each pattern on our site. |
||||||||||||||||


With over 40 years in knitting and crochet design, DROPS Design offers one of the most extensive collections of free patterns on the internet - translated to 17 languages. As of today we count 324 catalogues and 12245 patterns translated into English (UK/cm). 12245
We work hard to bring you the best knitting and crochet have to offer, inspiration and advice as well as great quality yarns at incredible prices! Would you like to use our patterns for other than personal use? You can read what you are allowed to do in the Copyright text at the bottom of all our patterns. Happy crafting!
Post a comment to pattern DROPS 197-1
We would love to hear what you have to say about this pattern!
If you want to leave a question, please make sure you select the correct category in the form below, to speed up the answering process. Required fields are marked *.