
Popular categories
Looking for a yarn?


Comments / Questions (23)
![]() Unni wrote:
Unni wrote:
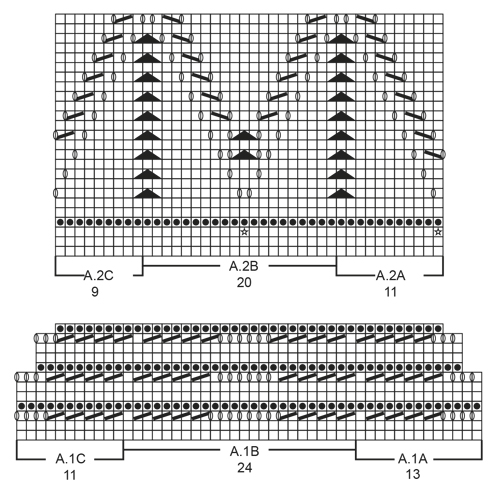
Jeg mente den 11. runden, og da gjelder det selvfølgelig også runde nr.12. Det er for mange masker i A1B.
11.06.2021 - 16:00
![]() Unni wrote:
Unni wrote:
Jeg har spurt om hjelp til den 12. runden i dette mønsteret A1. Dere har sagt til en annen at det skal være 12m. i A1A, 22m. i A1B og 10m. i A1C i runde 7 i mønsteret. Det stemmer, og dere sier videre at det skal være 11m. i A1A, 20m. i A1B og 9 m. i A1C, men det stemmer overhodet ikke ikke. Kan dere være så snille å sjekke dette? Jeg har ventet en stund på mitt første spørsmål angående runde 12, så nå håper jeg på et raskt svar. Unni.
11.06.2021 - 15:57DROPS Design answered:
Hei Unni. Husk å hake av for spørsmål når du sender inn et spørsmål du venter svar på. Ser at du har sendt inn 2 Kommentarer og disse blir ikke besvart. Når du sender inn et spørsmål er det fint om du oppgir hvilken størrelse du strikker, så kan vi dobbeltsjekke om det er noe feil med den størrelsen du strikker. Uten å vite hvilken str. du strikker, kan det være at du ikke strikker siste maske i A.1B sammen med første maske i A.1B når rapporten av A.1B skal gjentas? mvh DROPS design
14.06.2021 - 13:29
![]() Unni wrote:
Unni wrote:
Hei, jeg får ikke mønsteret til å stemme på rad nr.11. Slutten av A.1B er vanskelig å forstå. Jeg trenger å bli forklart hvordan jeg skal strikke hele den raden. Vennlig hilsen Unni.
07.06.2021 - 14:35
![]() Anna wrote:
Anna wrote:
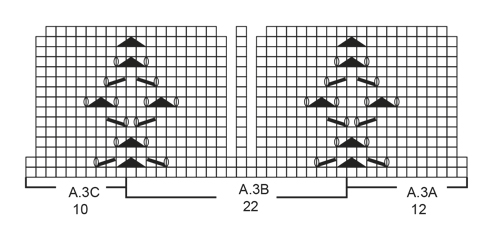
Buon giorno, io ho iniziato il 3 diagramma, non capisco cosa devo fare dalla terza riga in poi alla metà di A.3B dove non ci sono caselle. Grazie
01.09.2020 - 22:10DROPS Design answered:
Buonasera Anna, deve lavorare il motivo come si presenta, nella riga 2 le maglie vengono diminuite, quindi deve semplicemente lavorare i quadratini. Buon lavoro!
01.09.2020 - 22:53
![]() Petra Meyer wrote:
Petra Meyer wrote:
Hallo ich komme mit der Runde 12 von A1 nicht klar bei mir verschiebt sich das Muster immer nach links. Ich weiß auch nicht welches die letzte Masche von A1B ist. Wäre schön wenn ich Hilfe bekommen könnte
27.08.2019 - 18:00DROPS Design answered:
Liebe Frau Meyer, nach 7. Reihe sind es nur noch 12 M in A.1A, 22 M in jedem A.1B und 10 M in A.1C - nach 11. Reihen sind es nur noch 11 M in A.1A, 20 M in jedem A.1B und 9 M in A.1C. Viel Spaß beim stricken!
28.08.2019 - 08:32
![]() Giovanna wrote:
Giovanna wrote:
Ciao, ho iniziato a lavorare questa maglia e al momento ho finito i diagrammi A1, A2 e A3... mi viene però adesso un dubbio (guardando la foto del modello)... ho lavorato fino alla fine del diagramma A3 a punto legaccio, adesso mi dice di proseguire a maglia rasata, ma dalla foto non si nota uno stacco di lavorazione. È corretto così? Grazie
17.06.2019 - 12:11DROPS Design answered:
Buongiorno Giovanna. Nei diagrammi, i quadrati bianchi diventano maglie rasate, lavorate a diritto sul diritto del lavoro e a rovescio sul rovescio del lavoro. Il lavoro quindi prosegue a maglia rasata senza stacchi nella lavorazione. Buon lavoro!
17.06.2019 - 12:23
![]() Ann Litchfield wrote:
Ann Litchfield wrote:
On pattern A.3B what stich are the blank line in the middle of the 22 sts?
19.03.2019 - 21:31DROPS Design answered:
Dear Mrs Litchfield, there are no stitches on each side of the middle stitch in A.3B, when working the 2nd row in diagrams you will decrease the number of sts, so that you then just have to work the squares (= 17 sts on row 4 between the first YO in A.3B and the last YO in A.3B). Happy knitting!
20.03.2019 - 08:51
![]() Mimi wrote:
Mimi wrote:
Hi,I started this top in XL & I have a question about A1.Written instructions say "next round work A1A, A1B 16 times & end with A1C. Continue with pattern. At the end of round, there should be 340 stitches." Now A1 is made of 12 rounds, not 1. After the first row with yarn overs, I did a row purl, followed by 2 rows knit, then started the row with the yarn overs & diagram matches where the k2tog & yarn overs were in previous row but not on the knitted piece. It's confusing. please help
07.09.2018 - 04:13DROPS Design answered:
Hi Mimi, The pattern says that when A.1 has been completed (after the 12 rounds) you will have 340 stitches. You start A.1 from bottom right and work upwards, so begin with 2 knitted rows, then row 3 which has knitted together stitches and yarn overs. Row 4 is purled; the yarn overs are purled as well to leave holes. Continue working the diagram like this until A.1 has been completed. I hope this helps and happy knitting!
07.09.2018 - 07:49
![]() Eva Ohlsson wrote:
Eva Ohlsson wrote:
Som også en anden spørger om ? : Er det ikke en fejl i diagrammet hvor der står samme forklaring til 2 forskellige rækker ( de første 2 , ret på retsiden og vrang på vrangsiden og næste række står der det samme )
07.08.2018 - 22:02DROPS Design answered:
Hej Eva, den anden skulle være vrang og det er nu rettet :)
14.08.2018 - 14:03
![]() Gale wrote:
Gale wrote:
The measurements in the graph where we choose the size cannot be in cm or it is HUGE. I have started it and it is way too big. Please put the unit of measure in each graphic so that I don't waste my time and yarn
04.07.2018 - 20:51DROPS Design answered:
Dear Mrs Gale, the measurements in the chart are in cm and taken flat from side to side, this top has a A-line so that the bottom edge will be larger than the bust measurements. Make sure to check your gauge and adjust needle size if necessary. The bottom edge is worked with a wage edge, which requires more sts for 10 cm than standard stocking stitch. Happy knitting!
05.07.2018 - 07:36
|
||||||||||||||||||||||
Istanbul#istanbultop |
||||||||||||||||||||||
 |
 |
|||||||||||||||||||||
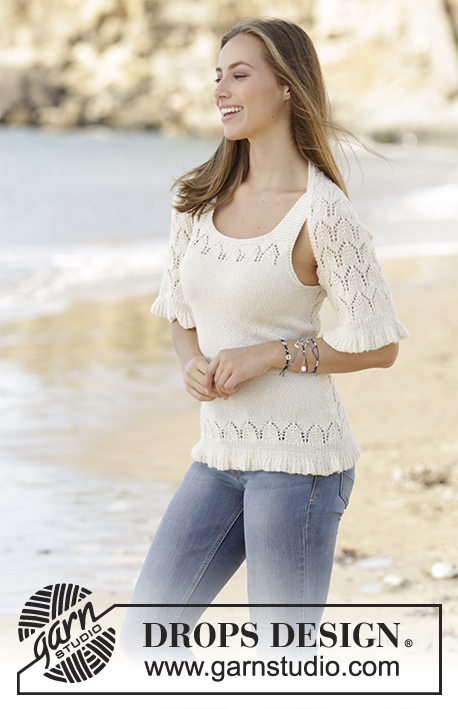
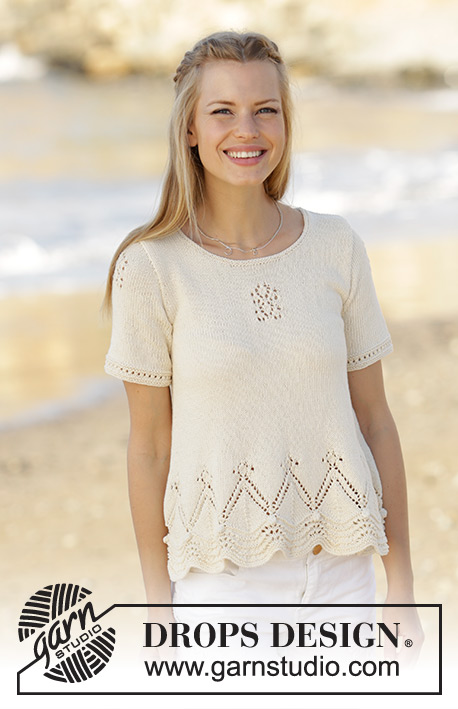
Top with wave pattern and lace pattern, worked bottom up in DROPS Safran. Sizes S - XXXL.
DROPS 178-63 |
||||||||||||||||||||||
|
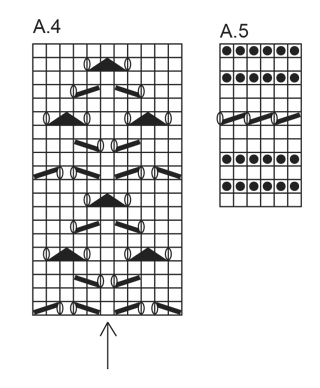
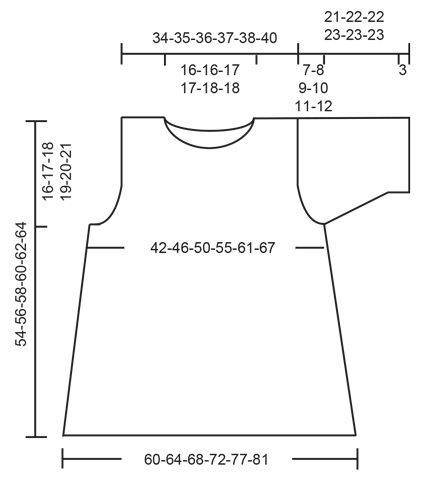
RIDGE/GARTER STITCH (worked in the round): 1 ridge = 2 rounds. Knit 1 round and purl 1 round. PATTERN: See diagrams A.1 to A.5. The diagrams show all the rows in the pattern seen from the right side. DECREASE TIP (for the sides on the body): Start 4 stitches before the marker thread, knit 2 together, knit 4 (the marker thread sits in the middle of these stitches), slip 1 stitch as if to knit, knit 1, pass the slipped stitch over (= 2 stitches decreased). ---------------------------------------------------------- TOP: The piece is worked in the round with circular needle up to the armhole, then the front and back pieces are worked back and forth separately. The sleeves are worked in the round with double pointed needles and the sleeve cap is worked back and forth. BODY: Loosely cast on 336-360-384-408-432-456 stitches with circular needle size 3 mm and Safran. Work 2 RIDGES – see description above. The next round is worked as follows: A.1A (= 13 stitches), work A.1B (= 24 stitches) 13-14-15-16-17-18 times in width, A.1C (= 11 stitches). Continue the pattern in this way. When A.1 has been completed, there are 280-300-320-340-360-380 stitches on the round. The next round is worked as follows: A.2A (= 11 stitches), work A.2B (= 20 stitches) 13-14-15-16-17-18 times in width, A.2C (= 9 stitches). Continue the pattern in this way. REMEMBER THE KNITTING TENSION! When A.2 has been completed there are 308-330-352-374-396-418 stitches on the round. The next round is worked as follows: A.3A (= 12 stitches), work A.3B (= 22 stitches) 13-14-15-16-17-18 times in width, A.3C (= 10 stitches). Continue the pattern in this way. When the diagrams have been completed in height there are 252-270-288-306-324-342 stitches. The piece measures approx. 17 cm in all sizes. Insert a marker thread at the beginning of the round and after 126-135-144-153-162-171 stitches (= in the sides) – allow the marker threads to follow in the piece upwards. Continue by working stocking stitch and on the first round decrease 2 stitches in each side – READ DECREASE TIP (= 4 stitches decreased). Decrease in this way approx. every 3rd-3rd-3rd-4th-6th-9th round a total of 12-12-11-10-7-5 times in each side. After all the decreases, there are 204-222-244-266-296-322 stitches. Knit one round where you decrease 2-0-2-0-2-0 stitches evenly on the round = 202-222-242-266-294-322 stitches. Continue with stocking stitch until the piece measures 35-37-38-40-41-43 cm. Now work A.4 over the middle 11 stitches on the front piece (arrow in the diagram shows the middle stitch on the front piece), AT THE SAME TIME, when the piece measures 38-39-40-41-42-43 cm cast off the middle 8-8-10-10-12-12 stitches in each side (= 4-4-5-5-6-6 stitches on each side of the marker threads) for the armholes. Place the 93-103-111-123-135-149 stitches for the back piece on a thread. The front and back pieces are now worked back and forth and worked separately. FRONT PIECE: = 93-103-111-123-135-149 stitches. Continue with stocking stitch, A.4 and work 1 edge stitch in garter stitch in each side. AT THE SAME TIME cast off stitches in each side of the piece for the armholes. Cast off stitches at the beginning of each row in each side as follows: Cast off 3 stitches 0-1-1-1-1-2 times, 2 stitches 2-2-3-5-7-7 times and 1 stitch 1-1-2-3-4-6 times = 83-87-89-91-93-97 stitches remaining. When A.4 has been completed in height, work stocking stitch over these stitches. When the piece measures 44-46-47-49-50-52 cm place the middle 19-19-21-21-23-23 stitches on 1 thread for the neck and each shoulder is finished separately. Continue to cast off for the neck at the beginning of each row from the neck as follows: Cast off 2 stitches 3 times and 1 stitch 4 times = 22-24-24-25-25-27 stitches left on the shoulder. Continue working until the piece measures 54-56-58-60-62-64 cm, knit 1 row from the wrong side and loosely cast off in knit from the right side. Repeat on the other shoulder. BACK PIECE: = 93-103-111-123-135-149 stitches. Continue with stocking stitch and work 1 edge stitch in garter stitch in each side. AT THE SAME TIME cast off stitches in each side for the armholes as for the front piece = 83-87-89-91-93-97 stitches. AT THE SAME TIME when the piece measures 44-46-48-50-52-54 cm work pattern according to diagram A.4 over the middle 11 stitches (arrow in the diagram shows the middle stitch on the back piece – the remaining stitches are worked in stocking stitch with 1 edge stitch in garter stitch in each side). When A.4 has been completed work stocking stitch over these stitches to finished length. When the piece measures 52-54-56-58-60-62 cm cast off the middle 35-35-37-37-39-39 stitches for the neck and each shoulder is finished separately. Continue to cast off for the neck at the beginning of each row from the neck as follows: Cast off 1 stitch 2 times = 22-24-24-25-25-27 stitches left on the shoulder. Continue working until the piece measures approx. 54-56-58-60-62-64 cm, knit 1 row from the wrong side and loosely cast off while knitting from the right side. Repeat on the other shoulder. SLEEVE: Cast on 67-73-81-87-95-101 stitches with double pointed needles size 2.5 mm and work pattern in the round according to diagram A.5 (On the 7th round in the diagram, knit the last stitch on the round). After A.5 change to double pointed needles size 3 mm. Work stocking stitch in the round. Now work pattern and cast off for the armholes and sleeve cap as follows: NOTE: In sizes S and M start pattern A.4 before casting off for the sleeve cap. In sizes L, XL, XXL and XXXL start pattern A.4 after you have started casting off for the sleeve cap! When the piece measures 12-13-14-15-15-16 cm work pattern according to diagram A.4 over the middle 11 stitches (arrow in the diagram shows the middle stitch on the round) – the remaining stitches are worked in stocking stitch. AT THE SAME TIME when the piece measures 14-14-13-13-12-11 cm cast off the middle 8-8-10-10-12-12 stitches mid under the sleeve and the sleeve cap is worked back and forth with circular needle size 3 mm. Continue with stocking stitch and A.4 over the middle 11 stitches and cast off for the sleeve cap in each side as follows (NOTE: When A.4 has been completed work stocking stitch over these stitches): Cast off 3 stitches 1 time in all sizes, 2 stitches 3-3-3-4-4-5 times and 1 stitch 3-3-3-5-6-6 times in each side, continue by casting off 2 stitches in each side until the piece measures 20-21-21-22-22-22 cm, then cast off 3 stitches 1 time in each side. Cast off the remaining stitches, the sleeve measures approx. 21-22-22-23-23-23 cm. Work the other sleeve in the same way. ASSEMBLY: Sew the shoulder seams. Sew the sleeves to the body. Sew inside the 1 edge stitch in garter stitch on the front and back pieces and inside the cast-off edge on the sleeves. NECK: Knit up from the right side approx. 110 to 120 stitches around the neck with short circular needle size 2.5 mm. Purl 1 round, knit 1 round and purl 1 round. Then cast off in knit (make sure the casting off is not tight). |
||||||||||||||||||||||
Diagram explanations |
||||||||||||||||||||||
|
||||||||||||||||||||||
 |
||||||||||||||||||||||
 |
||||||||||||||||||||||
 |
||||||||||||||||||||||
 |
||||||||||||||||||||||
Have you finished this pattern?Tag your pictures with #dropspattern #istanbultop or submit them to the #dropsfan gallery. Do you need help with this pattern?You'll find 27 tutorial videos, a Comments/Questions area and more by visiting the pattern on garnstudio.com. © 1982-2026 DROPS Design A/S. We reserve all rights. This document, including all its sub-sections, has copyrights. Read more about what you can do with our patterns at the bottom of each pattern on our site. |
||||||||||||||||||||||


With over 40 years in knitting and crochet design, DROPS Design offers one of the most extensive collections of free patterns on the internet - translated to 17 languages. As of today we count 325 catalogues and 12298 patterns translated into English (UK/cm). 12298
We work hard to bring you the best knitting and crochet have to offer, inspiration and advice as well as great quality yarns at incredible prices! Would you like to use our patterns for other than personal use? You can read what you are allowed to do in the Copyright text at the bottom of all our patterns. Happy crafting!
Post a comment to pattern DROPS 178-63
We would love to hear what you have to say about this pattern!
If you want to leave a question, please make sure you select the correct category in the form below, to speed up the answering process. Required fields are marked *.