
Popular categories
Looking for a yarn?


Comments / Questions (33)
![]() Donata wrote:
Donata wrote:
Was very interested in purchasing this garment.I could never make this poncho and wanted to know where to buy one. Thanks
29.11.2017 - 04:08DROPS Design answered:
Dear Donata, we are offering only free pattern not finished project. You can contact any DROPS store in your country to ask them if they have any possibility to make it for you. Happy knitting!
29.11.2017 - 09:28Paula wrote:
Thank you for the help. If this pattern is doing the moss stitch shouldn't we cast on an odd number of stitches? It says to cast on 32,40, etc.
06.11.2017 - 16:13DROPS Design answered:
Dear Paula, you will work moss stitch over an odd number of sts: ie 7-9-9-11 sts in moss st with K1 in between (where you add markers). Happy knitting!
07.11.2017 - 08:23Paula wrote:
I am very confused. On row 5, it says to inc 1 stitch on each side of EVERY K st with a marker. Then it refers to the Increase Tip, where it says to increase only on the shoulder/side seams! Not the front and back sts.? And then inc 4sts. on the round - where do you inc these 4 sts? At the end of the round? Pleas help so I can continue! Thank you.
24.10.2017 - 19:45DROPS Design answered:
Dear Paula, you increase first 8 sts (1 on each side of each marker) every other round a total of 6 times, then inc only 4 sts (= 1 st on each side of the marker on mid front and on mid back, ie on each side of 2nd and 4th marker) a total of 16-17 times (see size) every other round. Happy knitting!
25.10.2017 - 08:42
![]() Jardin wrote:
Jardin wrote:
Bonjour je vais commencer le poncho mais je ne comprends pas le début avec les cotes mousse (pour moi un rang a l endroit et un rang a l envers c'est du jersey) et pourquoi on en fait en rond et d 'autre en aller retour du coup on démarre par lequel ?? merci beaucoup de votre aide christelle
13.05.2017 - 19:16DROPS Design answered:
Bonjour Mme Jardin, le poncho se tricote en rond de haut en bas, c'est-à-dire de l'encolure jusqu'aux ouvertures des manches puis on va terminer le devant et le dos séparément en allers et retours. Pour tricoter du point mousse en rond, on doit alterner 1 tour end, 1 tour env - cf vidéo. Bon tricot!
15.05.2017 - 09:13
![]() Jardin wrote:
Jardin wrote:
Bonjour J ai commande de la laine drop eskimo pour faire ce poncho comme vous aviez inscrit dans un commentaire précédent . Vous dites qu il faut un fil mais dans les explications vous notez tricoter avec deux fils cloud alors je suis un peu perdu et du coup est ce que je vais avoir assez de laine comme j ai commander 900 gr..désolé pour ses questions mais je débute en tricot. Merci Christelle
10.05.2017 - 12:50DROPS Design answered:
Bonjour Mme Jardin, 1 fil Eskimo remplace 1 fil Cloud, mais comme le poncho se tricote avec 2 fils Cloud, il faudra également 2 fils Eskimo. Regardez ici comment calculer la quantité nécessaire avec une alternative. Bon tricot!
10.05.2017 - 13:53
![]() Yurena wrote:
Yurena wrote:
Hola! Soy principiante y me gusta este poncho, pero me gustaría hacerlo en lana Eskimo pero no sé si para calcular la cantidad de lana tengo que fijarme en el peso o en la longitud de la madeja ya que en lana Clouds pone que necesito 900 gr para la talla L y no sé si tengo que comprar 900 gr en lana Eskimo o tengo que calcular el equivalente según la longitud que trae la madeja de una y otra. Espero haberme explicado bien. Gracias y saludos.
18.12.2016 - 16:17DROPS Design answered:
Hola Yurena. Aquí puedes consultar cómo calcular el material necesario: https://www.garnstudio.com/faq.php?cid=23
31.12.2016 - 19:27
![]() Tina Johnson wrote:
Tina Johnson wrote:
Hvor meget garn benyttes til de forskellige str det kan jeg ikke se noget sted. Vil gerne strikke en medium
13.12.2016 - 23:21DROPS Design answered:
Hej Tina. Det staar överst i opskriften: Materialer: DROPS CLOUD fra Garnstudio 800-900-950-1050 g f.nr 08, lilla tåge
14.12.2016 - 11:30Lucie Pedneault wrote:
Je voudrais faire ce poncho. Clouds est discontinué. Pouvez vous me donner une alternative de fil? Merci
18.11.2016 - 21:53
![]() Madelon wrote:
Madelon wrote:
Ik vind deze poncho prachtig, maar ik vroeg me af of jullie deze ook in een patroon kunnen opstellen met een draad, en dus dunnere naalden. Ik vind maat 15 wel heel erg dik, net als met dubbele draden breien. Ik zou de poncho graag in de enkele versie willen maken. Ik snap dat hij dan dunner en opener wordt, wat ik prima vind, maar ik vind het lastig om dat helemaal om te rekenen. Het is nogal een verschil, naald 9 of 15! Hoor het graag of dat kan.
18.09.2016 - 16:00DROPS Design answered:
Beste Madelon, al onze patronen zijn gratis beschikbaar, maar we passen ze niet aan op individueel verzoek. Het staat iedereen vrij om zelf aanpassingen te maken, maar het is voor ons niet te doen om daar ondersteuning bij te leveren. Kijk anders eens in onze ruim 6000 gratis patronen of er een poncho voor dunner garen bij is die je aanspreekt.
19.09.2016 - 09:37
![]() Hana Matysová wrote:
Hana Matysová wrote:
Lila Provence....je můj tip na název tohoto modelu je hřejivý už na pohled,už ted se těším na návod...
24.07.2016 - 18:32
|
|
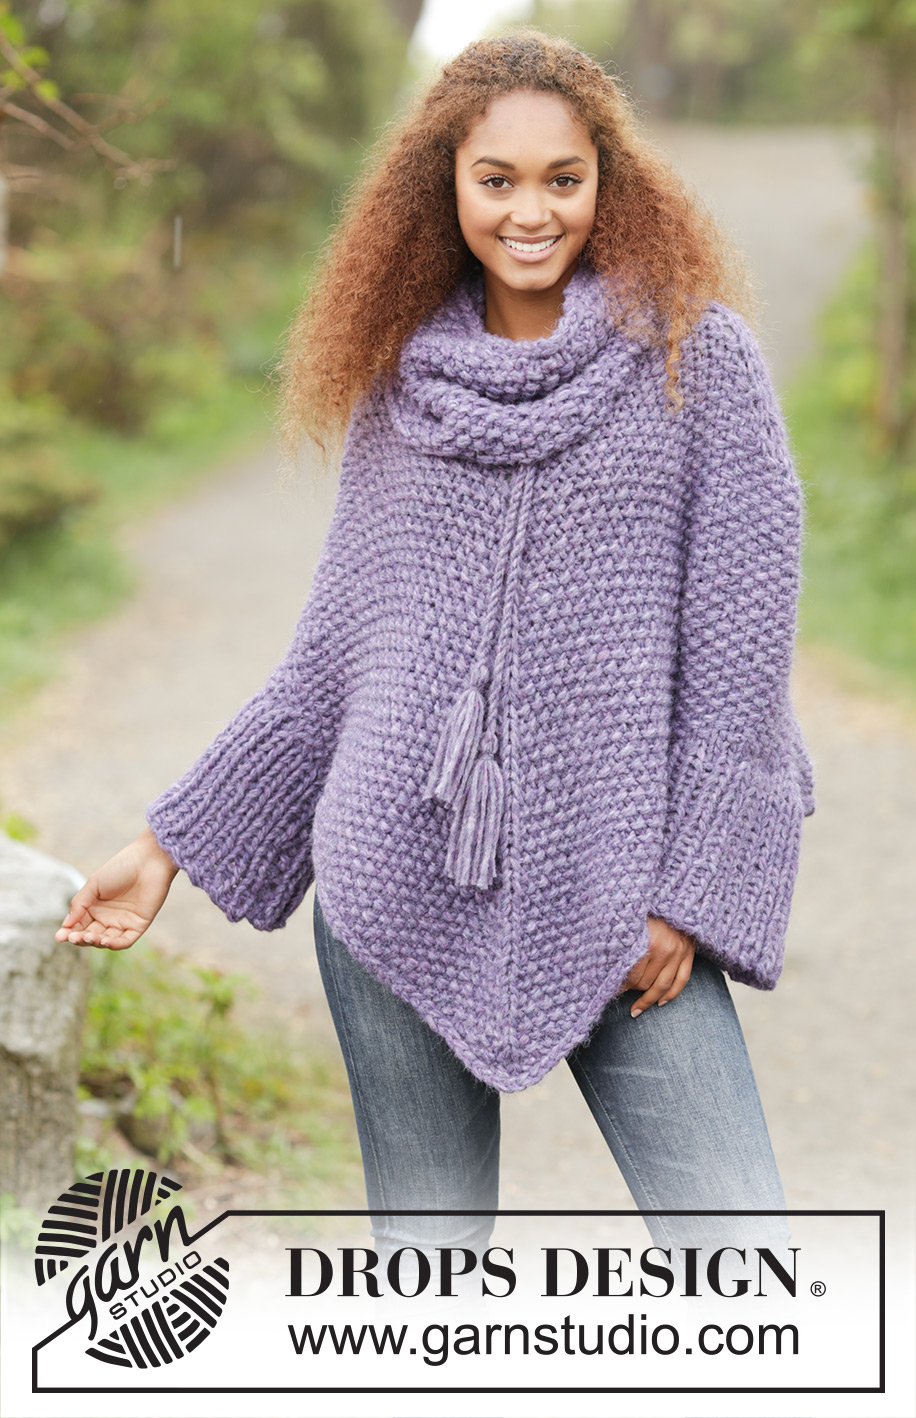
Lavender Grove#lavendergroveponcho |
|
|
|
|
Knitted DROPS poncho in moss st, detachable collar, worked top down in 2 strands Cloud or 4 strands Air. Size S-XXXL.
DROPS 172-25 |
|
|
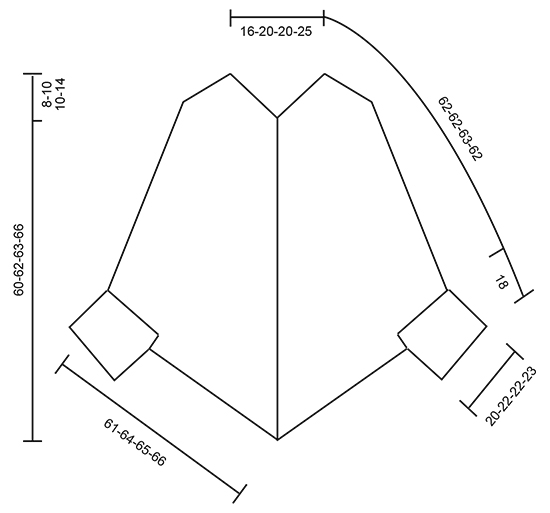
GARTER ST (worked in the round): 1 ridge = 2 rounds. * K 1 round and P 1 round *, repeat from *-*. GARTER ST (back and forth): K all rows. 1 ridge = 2 rows K. MOSS ST: Round/row 1: * K 1, P 1 *, repeat from *-* and finish with K 1. Round/row 2: K over P and P over K. Repeat 2nd round/row. INCREASE TIP: First inc 8 sts on round. When inc on each shoulder/side are done, inc 4 sts on round. Inc 1 st by making a YO. On next round work YO twisted to avoid holes. Work YO twisted K or twisted P so that new sts fit in moss st. ---------------------------------------------------------- PONCHO: Worked in the round on circular needle, top down. Cast on 32-40-40-48 sts with 2 strands Cloud or 4 strands Air on circular needle size 15 mm. Work 1 ridge in GARTER ST - see explanation above. Work next round as follows * K 2 tog, 1 YO *, repeat from *-* the rest of round. On next round K all sts and YOs to make holes. Now insert 4 markers in the piece and work pattern as follows: K 1, insert 1st marker in this st (= right shoulder/side), work MOSS ST - see explanation above, over the next 7-9-9-11 sts, K 1, insert 2nd marker in this st (= mid front), moss st over the next 7-9-9-11 sts, K 1, insert 3rd marker in this st (= left shoulder/side), moss st over the next 7-9-9-11 sts, K 1, insert 4th marker in this st (= mid back), work moss st over the remaining 7-9-9-11 sts. Continue like this in the round. On next round inc 1 st on each side of every K st with marker - Read INCREASE TIP! Inc like this every other round 6 times in total = 80-88-88-96 sts. REMEMBER THE KNITTING TENSION Then work inc mid front and mid back every other round 16-16-17-16 more times, AT THE SAME TIME inc on each shoulder/side every 4th round 2 more times = 152-160-164-168 sts. Piece now measures approx. 44-44-45-44 cm measured along K sts mid front. Now continue inc on each side of K sts mid front and mid back and divide piece in front piece, back piece and sleeve as follows: Work the first 10-11-11-12 sts and slip them on a stitch holder (= half sleeve), work the next 57-59-61-61 sts and slip these sts on a stitch holder (= front piece), then work the next 19-21-21-23 sts before slipping them on a stitch holder (= sleeve), work the next 57-59-61-61 sts (= back piece) and keep them on the needle, work the remaining 9-10-10-11 sts (= half sleeve) and slip the on the same stitch holder as the first 10-11-11-12 sts on round (= sleeve). Cut the yarn. BACK PIECE: = 59-61-63-63 sts. Continue back and forth over sts on back piece as follows: Beg from WS and work moss st back and forth, continue inc on each side of the K sts with marker on every row from RS 3 more times = 65-67-69-69 sts. P 1 row from WS, and cast off with K from RS. FRONT PIECE: Slip the 59-61-63-63 sts from stitch holder back on circular needle size 15 mm. Beg from WS and work as back piece. CUFF: Worked back and forth on circular needle. Now measure the piece from here. Cast on 8 sts with 2 strands Cloud or 4 strands Air on circular needle size 15 mm. Work the 19-21-21-23 sts in moss st from one of the stitch holders for sleeve on to needle, cast on 8 new sts at the end of row = 35-37-37-39 sts. Work next row from WS as follows: 1 edge st in garter st, * P 1, K 1 *, repeat from *-* until 2 sts remain, P 1, 1 edge st in garter st. Continue rib with K over K and P over P with 1 edge st in garter st in each side until piece measures 18 cm. Cast off sts with K over K and P over P. Work the other cuff the same way. ASSEMBLY: Sew cuff tog inside 1 edge st in garter st in each side, then sew the new sts that where cast on under sleeve to each side of front/back piece of the poncho. Repeat in the other side. TWINED STRING WITH TASSELS: Cut 2 lengths of Cloud or 4 lengths of Air of 3 metres each. Twine the strands tog until they resist, fold the string double so that they twines again. Make a knot at each end. Beg mid front on poncho and thread tie up and down through eyelet row. Cut 10 lengths of Cloud or 20 lengths of Air of yarn of 30 cm. Thread them through end on the twined string and distribute so that they are even. Place a strand around the tassel, tighten and make a knot. Repeat in the other end of string. DETACHABLE COLLAR: Worked in the round on circular needle. Cast on 49 sts with 2 strands Cloud or 4 strands Air on circular needle size 15 mm. K 1 round. Now work MOSS ST - see explanation above! When piece measures 30 cm, K 1 round. Cast off while working K. |
|
 |
|
Have you finished this pattern?Tag your pictures with #dropspattern #lavendergroveponcho or submit them to the #dropsfan gallery. Do you need help with this pattern?You'll find 30 tutorial videos, a Comments/Questions area and more by visiting the pattern on garnstudio.com. © 1982-2026 DROPS Design A/S. We reserve all rights. This document, including all its sub-sections, has copyrights. Read more about what you can do with our patterns at the bottom of each pattern on our site. |


With over 40 years in knitting and crochet design, DROPS Design offers one of the most extensive collections of free patterns on the internet - translated to 17 languages. As of today we count 324 catalogues and 12267 patterns translated into English (UK/cm). 12267
We work hard to bring you the best knitting and crochet have to offer, inspiration and advice as well as great quality yarns at incredible prices! Would you like to use our patterns for other than personal use? You can read what you are allowed to do in the Copyright text at the bottom of all our patterns. Happy crafting!
Post a comment to pattern DROPS 172-25
We would love to hear what you have to say about this pattern!
If you want to leave a question, please make sure you select the correct category in the form below, to speed up the answering process. Required fields are marked *.