
Popular categories
Looking for a yarn?


Comments / Questions (91)
![]() LESSIRARD wrote:
LESSIRARD wrote:
Bonjour je n'ai pas très bien compris les explication pour le devant existe t'il un schéma qui puisse me le rendre plus compréhensible s'il vous plait ?
11.05.2016 - 23:17DROPS Design answered:
Bonjour Mme Lessirard, il n'y a pas de schéma pour les devants, vous crochetez simplement les rangs raccourcis comme indiqué, et en même temps, augmentez dans l'arceau du milieu devant tous les rangs (1B,3ml,1B dans l'arceau du milieu). Bon crochet!
12.05.2016 - 09:01Claudia Rodriguez La Rosa wrote:
Hola! Soy principiante y no entiendo bien el frente, Al hacerlo,me queda demasiado apretado,y se ondea pero no entiendo qué estoy haciendo mal. Estoy en el primer tamaño
06.04.2016 - 01:53DROPS Design answered:
Hola Claudia. Con el ganchillo hay que controlar mucho la tensión. Tienes que trabajar un poco más flojo para que no quede prieto y tenga caída.
13.04.2016 - 09:06
![]() Michaela wrote:
Michaela wrote:
Ich hab jetzt "geraten" wie das gemeint sein könnte, so viele Möglichkeiten gibt es ja nicht. Und ich scheine es richtig zu machen. Ein kleiner Tip vielleicht, den man evtl. in die Anleitung aufnehmen könnte - der eine Bogen, den man in jeder Reihe in der Mitte zunimmt, endet unten an der Jacke als Ecke. Ich war nämlich auch mit dieser Zunahme verwirrt und dachte, das wird nie so wie auf dem Foto mit dieser "Ecke" mitten im Vorderteil. Aber es wird. :)
03.04.2016 - 03:30
![]() Michaela wrote:
Michaela wrote:
Wollte gerade mit den Vorderteilen anfangen, verstehe aber nur Bahnhof. Kann man das auch verständlicher ausdrücken? Über welche 2 Bögen wird nicht mehr gehäkelt und wann? Und auch der Rest ist für mich unverständlich. Vielleicht stehe ich auch nur auf der Leitung.
02.04.2016 - 10:39DROPS Design answered:
Liebe Michalea, schön, dass die Anleitung nach genauer Lektüre doch noch verständlich war.
04.04.2016 - 09:46
![]() Mariët wrote:
Mariët wrote:
Beschrijving van de voorpanden begrijp ik niet goed. Worden er aan weerszijden steeds 2 lussen geminderd? Waarom moet je dan aan het begin van de eerste toer de lussen eerst wel haken en aan het eind niet. Zo wordt het toch a symetrisch? Dan werk je toch niet over 49 st./lussen?
21.03.2016 - 17:12
![]() Lois wrote:
Lois wrote:
When adding the arm holes for size L/XL what pattern do you follow as the description is unclear. THANKS for your help!
13.03.2016 - 17:05DROPS Design answered:
Dear Loïs, in 2nd size you work the armholes as follows: work over the first 36 sts as before, then work 40 ch and skip the next 40 sts (= 1st armhole), continue in the next sts as before until 76 sts remain before end of round and repeat armhole =work 40 ch and skip the next 40 sts, and finish the last 36 sts as before. On next round, continue in pattern as before, crocheting in both ch for armholes as before too to keep pattern as if you wouldn't have worked the chains (= work in the chain as you are working around). Happy crocheting!
14.03.2016 - 09:46
![]() Marianne wrote:
Marianne wrote:
Bonjour, Je lis dans les explications : "Quand A.2 et A.3 ont été crochetés, on a 312 B." Il s'agit, je pense de la taille S/M. Qu'en est-il pour les autres tailles ? Merci !
13.03.2016 - 12:26DROPS Design answered:
Bonjour Marianne, on a le même nombre de brides pour toutes les tailles car on crochète dans toutes les tailles (6x (A.2, A.3) ) - les emmanchures se font sur un nbe différent car sur un rang différent selon la taille. Bon crochet!
14.03.2016 - 09:30
![]() Paola wrote:
Paola wrote:
Ho iniziato oggi questo maglioncino e mi trovo a non capire un passaggio : dopo aver fatto M1 una volta in verticale dovrei avere 132 maglie ma io ne ho solo 60. Dove ho sbagliato?
09.03.2016 - 20:08DROPS Design answered:
Buonasera Paola. Provi a verificare di aver ripetuto il diagramma A1 sei volte nell’anello di cat: quindi, dopo il primo giro deve avere 12 m.a; dopo il 2° giro ha 24 m.a, dopo il terzo 36 m.a e così via. Buon lavoro!
09.03.2016 - 20:47
![]() Birthe Nyström wrote:
Birthe Nyström wrote:
Är på mönster 168-12 Ska nu börja på framstycke Hur räknar jag ut var jag ska börja räkna? Hoppas på snabbt svar
01.03.2016 - 14:57DROPS Design answered:
Hej Birthe, du fortsätter där du har tråden. Klipp tråden, hoppa över de första 13-16-19 st och virka enligt beskrivningen. Lycka till!
02.03.2016 - 14:24
![]() Birthe Nyström wrote:
Birthe Nyström wrote:
Jag har bekymmer med 168-12 Vad är det för skillnad på a 5 och A6 ??? Förstår inte
23.02.2016 - 20:39DROPS Design answered:
Hej Birthe, jo du ökar i det ena diagrammet, dvs att när du följer diagrammen, ökar du automatiskt över varannan spets. Lycka till!
29.02.2016 - 11:03
|
||||||||||||||||||||||||||||
Endless Love#endlesslovecardigan |
||||||||||||||||||||||||||||
 |
 |
|||||||||||||||||||||||||||
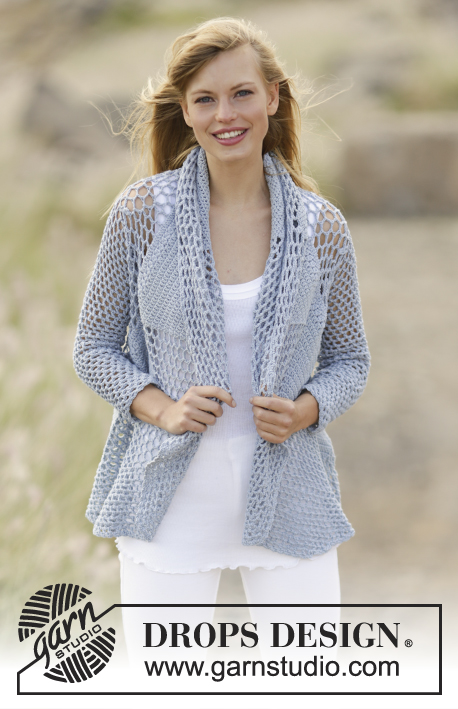
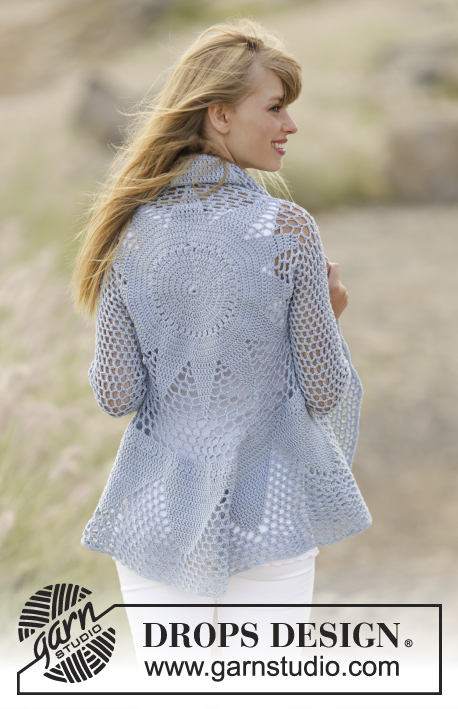
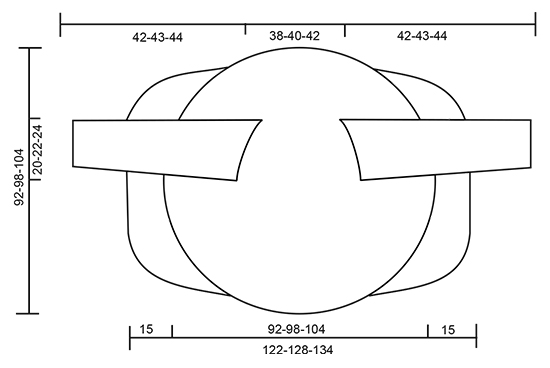
Crochet DROPS jacket worked in a circle with trebles and lace pattern in ”Cotton Merino”. Size S - XXXL.
DROPS 168-12 |
||||||||||||||||||||||||||||
|
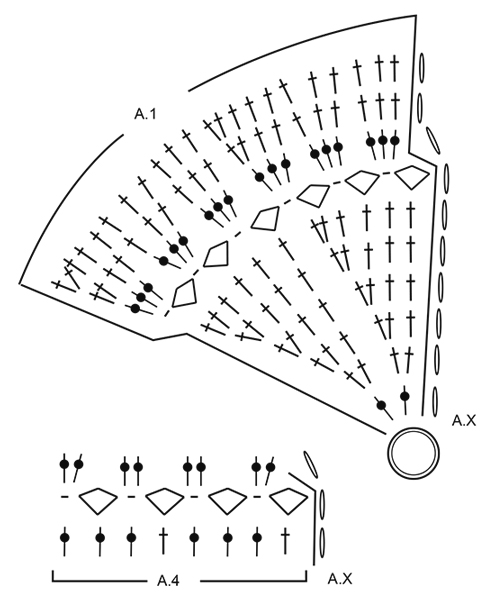
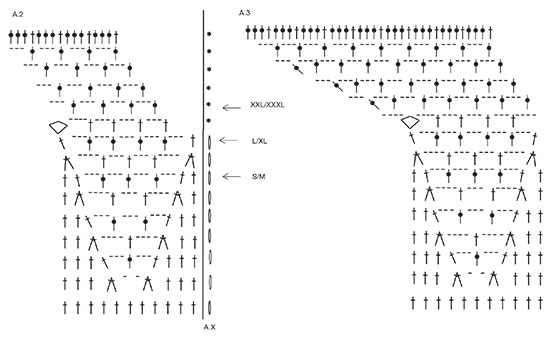
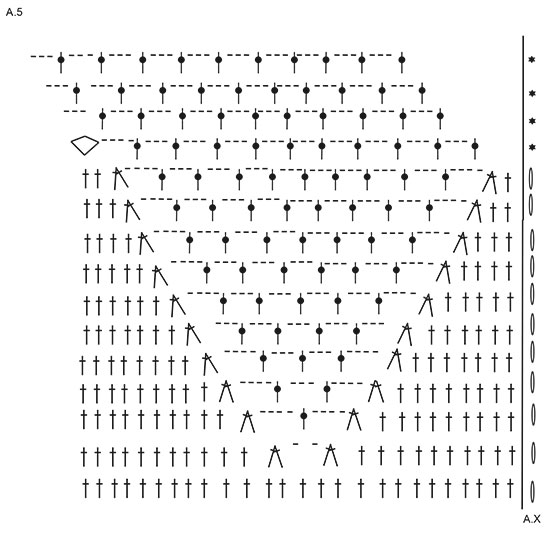
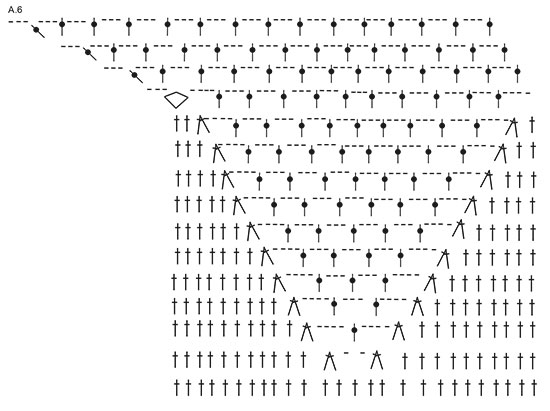
PATTERN: See diagrams A.1 to A.6. DECREASE TIP: Work 1 tr around next ch-space but wait with last pull through, work next tr around next ch-space (do not work 3 ch between tr), on last pull through, pull yarn through all 3 loops on hook. CROCHET TIP (applies to sleeve): After last tr on the round, continue to next round with 1 tr in next ch-space (= first ch-space on next round). NOTE: Insert 1 marker at the beg of round between last ch and first tr on the next round, move the marker upwards. NOTE: MAKE SURE NOT TO DISPLACE THE MARKER. ---------------------------------------------------------- JACKET WORKED IN A CIRCLE: Worked in the round from the centre and outwards. Work 4 ch with Cotton Merino on hook size 4 mm and form a ring with 1 sl st. Then work pattern according to diagram A.1 (= 6 repetitions in width) NOTE: A.x shows how every round beg and end, and is in addition to pattern. REMEMBER THE CROCHET TENSION! When entire A.1 has been worked vertically (= 132 tr), continue as follows: Work * A.2 (= 11 tr), A.3 (= 11 tr) *, repeat from *-* 6 times in total. Work up to and with arrow in diagram - see arrow for your size, there are now 228-252-264 sts on round. Work next round as follows: Continue to work over the first 34-36-38 sts, work 36-40-44 ch, and skip the next 36-40-44 sts (= armhole), work until 70-76-82 sts remain, work 36-40-44 ch and skip the next 36-40-44 sts (= armhole), continue to work over the last 34-36-38 sts. On next round continue according to pattern, work pattern as in diagram around ch-spaces in each side. When A.2 and A.3 have been worked, there are 312 tr on round. Continue with A.4 (= 39 repetitions on round). First round in A.4 shows last round in A.2/A.3, do not work this round. Continue to work as follows: Work * A.5 (= 26 tr), A.6 (= 26 tr) *, repeat from *-* 6 times in total. When A.5/A.6 have been worked, there are 600 sts on round (150 tr with 3 ch between each). Finish size S/M here. Size M/L -XXL/XXXL: Work 2-4 more rounds as last round in A.5/A.6 = 162-174 tr with 3 ch between. ALL SIZES: Piece measures approx. 46-49-52 cm from centre (92-98-104 cm in total). FRONT PIECES: Work back and forth in the one side with short rows. Cut the yarn, skip the first 13-16-19 tr on round, then work over the next 49 tr + ch-spaces as follows (insert a marker here): Work 3 ch, skip 1 ch-space, 1 dc around next ch-space, 3 ch (these 2 ch-spaces are no longer worked), 1 tr around next ch-space, work pattern as before until 2 ch-spaces remain (i.e. ch-spaces between tr, do not work around these 2 ch-spaces anymore), turn piece. Continue the short rows like this, AT THE SAME TIME inc 1 tr + 3 sts in the middle ch-space on every row (work 1 tr + 3 ch + 1 tr in this space). Continue with inc and dec on every row until piece measures 15 cm from marker. Skip 26-32-38 tr, then work short rows over the next 49 tr (13-16-19 tr remain on round). Work the same way as in the other side. CROCHET EDGE: Work an edge around the entire circle as follows: 1 dc around first ch-space, * 3 ch, 1 dc around next ch-space *, repeat from *-* and finish with 1 sl st in first dc. Fasten off. SLEEVES: Worked in the round, top down. Beg mid under one armhole, work 1 dc around first ch-space, 6 ch (= 1 tr + 3 ch), skip first tr and work 1 tr around next ch-space, * 3 ch, 1 tr around next ch-space *, repeat from *-* the entire round (work 1 tr + 3 ch around tr in corners), finish round with 1 tr around first 6 ch, then continue to work in the round without finishing it – READ CROCHET TIP = 21-23-25 tr + 21-23-25 ch-spaces. Continue with 1 tr + 3 ch around every space. When piece measures 4 cm, dec 1 ch-space before marker - READ DECREASE TIP! Repeat dec every 4½ cm 7 more times, dec alternately before and after marker = 13-15-17 tr + 13-15-17 ch-spaces. Continue until piece measures 42-43-44 cm. CROCHET EDGE SLEEVES: Crochet an edge around the sleeves as follows: 1 dc around first ch-space, * 3 ch, 1 dc around next ch-space *, repeat from *-* and finish with 1 sl st in first dc. Fasten off. Work the other sleeve the same way. |
||||||||||||||||||||||||||||
Diagram explanations |
||||||||||||||||||||||||||||
|
||||||||||||||||||||||||||||
 |
||||||||||||||||||||||||||||
 |
||||||||||||||||||||||||||||
 |
||||||||||||||||||||||||||||
 |
||||||||||||||||||||||||||||
 |
||||||||||||||||||||||||||||
Have you finished this pattern?Tag your pictures with #dropspattern #endlesslovecardigan or submit them to the #dropsfan gallery. Do you need help with this pattern?You'll find 7 tutorial videos, a Comments/Questions area and more by visiting the pattern on garnstudio.com. © 1982-2026 DROPS Design A/S. We reserve all rights. This document, including all its sub-sections, has copyrights. Read more about what you can do with our patterns at the bottom of each pattern on our site. |
||||||||||||||||||||||||||||


With over 40 years in knitting and crochet design, DROPS Design offers one of the most extensive collections of free patterns on the internet - translated to 17 languages. As of today we count 324 catalogues and 12267 patterns translated into English (UK/cm). 12267
We work hard to bring you the best knitting and crochet have to offer, inspiration and advice as well as great quality yarns at incredible prices! Would you like to use our patterns for other than personal use? You can read what you are allowed to do in the Copyright text at the bottom of all our patterns. Happy crafting!
Post a comment to pattern DROPS 168-12
We would love to hear what you have to say about this pattern!
If you want to leave a question, please make sure you select the correct category in the form below, to speed up the answering process. Required fields are marked *.