
Popular categories
Looking for a yarn?


Comments / Questions (91)
![]() Ingrid Wiederhold wrote:
Ingrid Wiederhold wrote:
Ich finde leider diese Anleitung nicht
22.03.2023 - 15:20DROPS Design answered:
Liebe Frau Wiederhold, klicken Sie hier, um die deutsche Anleitung zu finden. Viel Spaß beim häkeln!
22.03.2023 - 16:15
![]() Ulla Eilersen wrote:
Ulla Eilersen wrote:
I opskriften under “HÆKLETIPS (gælder ærme)“ står der at der efter sidste sm i en omgang skal fortsættes med en sm i næste omgang (der skal gøre det ud for en luftmaskebue). Når jeg gør det så bliver første sm i næste omgang om en sm (der gør det ud for lm-buen). Altså to sm i træk. Samtidig skal der sættes en markering mellem sidste lm og første sm! Det giver ikke mening når der samtidig skal afsluttes og startes med sm? Kan ikke få det til at hænge sammen. Bh Ulla
17.03.2023 - 14:58DROPS Design answered:
Hej Ulla, jeg kan ikke finde hvor i opskriften vi skriver sm, så jeg forstår ikke dit spørgsmål. Skriv hvor du er i opskriften, så kan vi hjælpe til med teksten eller få den rettet hvis noget er galt :)
11.04.2023 - 15:43
![]() Sabine Naumann wrote:
Sabine Naumann wrote:
Hallo, die Zunahme(n) bei A3, werden die nur 1 mal am Reihenende gemacht oder noch jedem 3er St.? In einem kommentar heisst es bei A3,Reihe 11, nach dem 3er St: 3Lm-1St-1St-3lm in den Lm Bogen. Im Diagramm steht: 3Lm-1St-3Lm-1St,also noch 3 Lm zwischen den St.was stimmt? Lg,Sabine
02.05.2022 - 11:56DROPS Design answered:
Liebe Sabine, häkeln Sie wie im Diagram A.3 gezeigt, dh bei der 11. Reihe (= 1 Stb um den nächsten Luftmaschenbogen, 3 Lm) x 7 Mal, 1 Stb um den gleichen Luftmaschenbogen (= 2 Stb in selben Luftmaschenbogen), 3 Lm. So häkeln Sie jedes A.3. Viel Spaß beim häkeln!
02.05.2022 - 13:24
![]() Conny wrote:
Conny wrote:
Hallo, bisher sieht die Jacke sehr schön aus aber nun komme ich nicht weiter . Habe Probleme mit der Anleitung für das Vorderteil. Nach welchem Muster häkle ich nach dem Anfang weiter und wo nehme ich ab und zu?
09.02.2022 - 14:34DROPS Design answered:
Liebe Conny, setzen Sie 2 Markierungen, um die 49 Stb/Lmbogen zu markieren + 1 Markierung in das Stäbchen in der Mitte diese 49 Stb; dann fangen Sie mit 1 fm in das erste Stb (von dem 49 Stb/Lmbogen), *3 Lm, 1 fm in das nächste Lmbogen, 3 Lm und dann wie zuvor häkeln (und in das mittlere Stb zunehmen) bis 2 Lmbogen bleiben, wenden, und ab * bei der nächsten Reihe häkeln aber die 2 letzten Lmbogen (oben unterstrichen) nicht häkeln, sonder nach dem letzten Stb, wenden und ab * weiterhäkeln. Viel Spaß beim häkeln!
09.02.2022 - 16:17
![]() Conny wrote:
Conny wrote:
Wieviel Bögen bzw. Maschen muss ich in die beiden Luftmaschenbögen häkeln?
17.01.2022 - 18:53DROPS Design answered:
Liebe Conny, bei der nächsten Runde häkeln Sie genauso wie zuvor, als ob diese Maschen nicht übersrungen/durch Luftmaschen ersetzt wurden. dh Sie hatten 36-40-44 Maschen übersprungen und 36-40-44 Luftmaschen gehäkelt, jetzt häkeln Sie wie im Diagram über diese 36-40-44 Maschen. Viel Spaß beim häkeln!
18.01.2022 - 08:47
![]() Federica wrote:
Federica wrote:
Non capisco la lavorazione sul davanti a righe accorciate. Potete specificare meglio?
18.08.2021 - 09:24DROPS Design answered:
Buonasera Federica, le righe accorciate sono righe in cui non si lavora su tutte le maglie sulla riga, ma solo su una parte: deve procedere come indicato. Buon lavoro!
19.08.2021 - 13:22
![]() Monika wrote:
Monika wrote:
Dobrý den, v návodu označený "předním díl" se háčkuje kam, když se jedná o kruhový kabátek? A před průramky se po celém kruhovém obvodu vzoru dělají krátké sloupky, pevná oka nebo dlouhé sloupky? Nebo jen navážu na předchozí řadu před průramky? Předem děkuji za odpověď , Monika
11.01.2021 - 12:41DROPS Design answered:
Dobrý den, Moniko! Ano, kabátek má kruový základ, ale je dotvarovaný naháčkováním předních dílů - viz nákres modelu pod návodem. Průramky vzniknou tak, že vynecháme potřebný počet ok a místo nich uháčkujeme stejný počet řetízkových ok, která vedou nad nimi, pak pokračujeme v háčkovaní původní kruhové řady (= mezi vynechanými oky a velikým obloučkem z řo je díra = průramek). V další kruhové řadě pak kolem tohoto velkého obloučku z řo háčkujeme vzor podle popisu v návodu a ve schématu. Hodně zdaru! Hana
20.01.2021 - 05:54
![]() Sándor Veronika wrote:
Sándor Veronika wrote:
Üdv! Az S/M-es méretet készítem, és a karöltő kialakítás előtt 228 szemem van a körben. Elkezdem a kört, 34 szemen horgolom a mintát a 8. körben, majd 36 lszt horgolok, és kihagyom a 36 lszt, majd leszúrok, és folytatom a horgolást tovább 70 szemen. Utána ismét 36 lszt horgolok, kihagyok 36 szemet, majd leszúrok, és a leírás szerint a maradék 34 szemen folytatom a horgolást. Viszont nekem nem 34, hanem 51 szemem maradt a kör végéig. Hol ronthattam el?
24.11.2020 - 20:41
![]() Sylvia wrote:
Sylvia wrote:
En el frente dice que debo continuar con aumentos y disminuciones en cada hilera hasta que la pieza mida 15 cm a partir del marcapuntos. Eso significa que en cada hilera, al dejar de trabajar 2 arcos de cad (disminución), y aumentar 1 p.a. + 3 pts en el arco de cad central en cada hilera, tendré un arco menos? De ser asi no llegaré a los 15 cm porque la pieza en lugar de quedar como en el dibujo está quedando con punta en el centro y mas plana en al inicio y final ... ¿es correcto?
24.10.2020 - 13:00DROPS Design answered:
Hola Sylvia. El patrón es correcto. En cada fila disminuimos 4 arcos, pero dos arcos están compensados con los aumentos en el centro ( 1 p.a + 3 cadenetas + 1 p.a.), por lo que realmente hay 2 arcos menos en cada fila. En este caso la labor tiene que tener una forma como la del diagrama bajo el patrón. Es importante mantener la misma tensión del tejido durante toda la labor.
13.12.2020 - 12:35
![]() Lorena wrote:
Lorena wrote:
No entiendo las instrucciones del FRENTE. Ayúdenme por favor, cuáles son 13 p.a. (talla s) que debo saltar? Y cuáles son los 49 p.a. que debo trabajar .... desde donde se cuentan? Que tramo del frente es el que se debe tejer?
18.10.2020 - 04:40DROPS Design answered:
Hola Lorena, al trabajar la espalda en redondo, has colocado 1 MP al inicio de la vuelta. Este marcapuntos lo tienes que ir subiendo cada vuelta según se avanza la labor. Para trabajar el delantero, tienes que saltar los 13 primeros p.a desde el MP y trabajar los siguientes 49.
20.11.2020 - 23:58
|
||||||||||||||||||||||||||||
Endless Love#endlesslovecardigan |
||||||||||||||||||||||||||||
 |
 |
|||||||||||||||||||||||||||
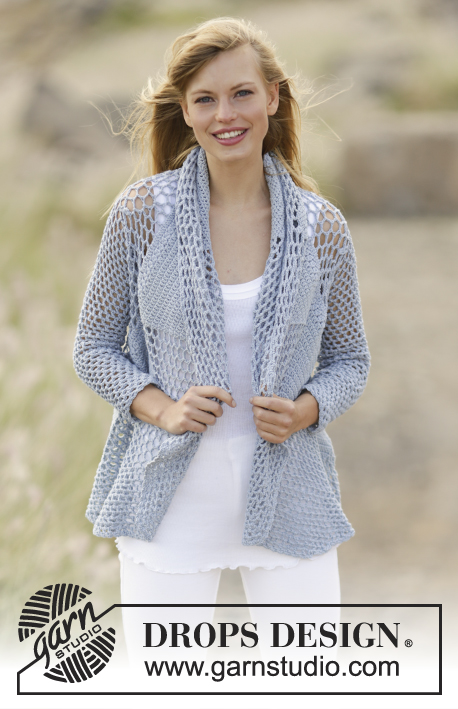
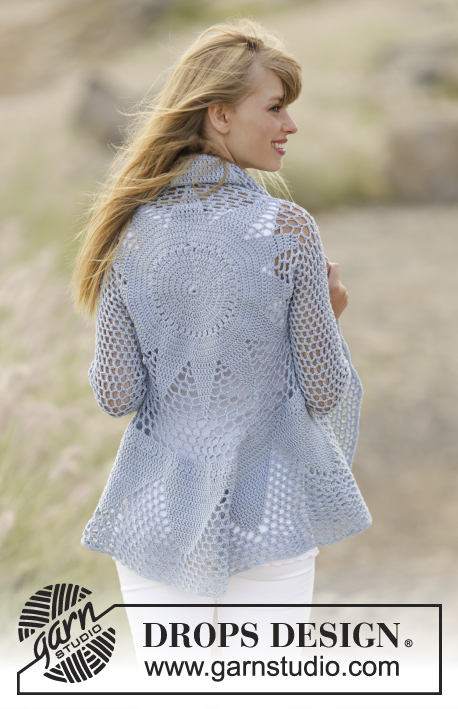
Crochet DROPS jacket worked in a circle with trebles and lace pattern in ”Cotton Merino”. Size S - XXXL.
DROPS 168-12 |
||||||||||||||||||||||||||||
|
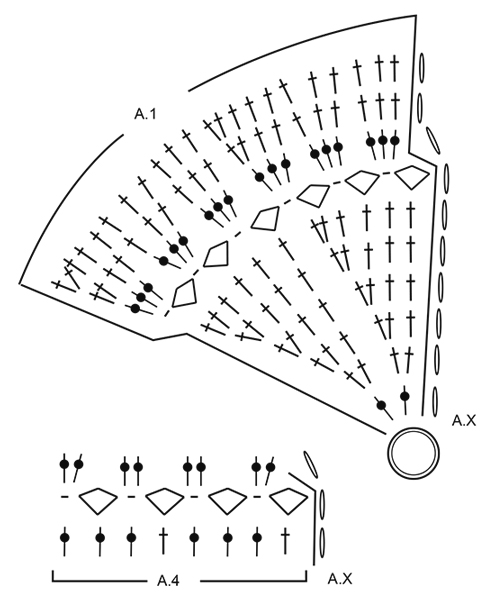
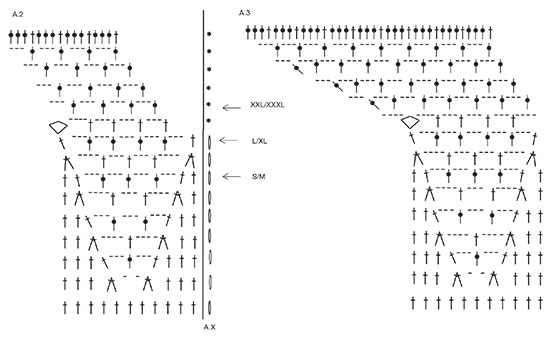
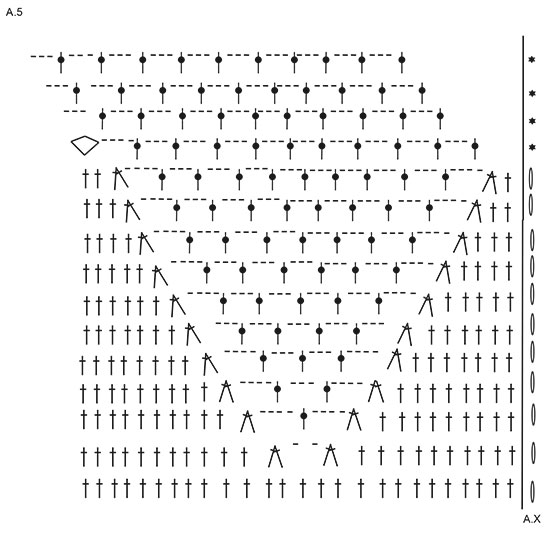
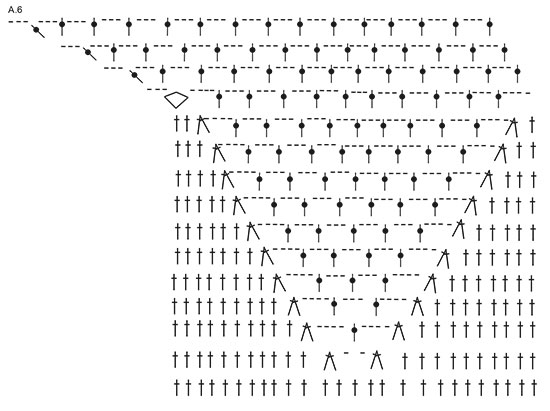
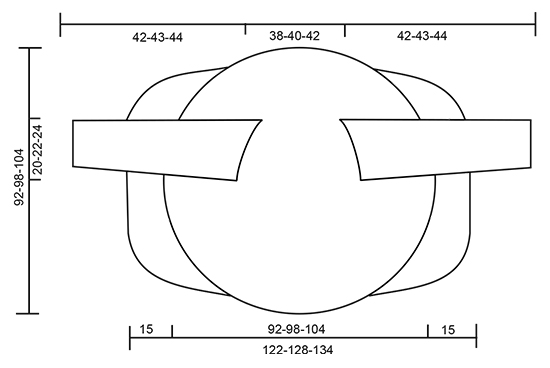
PATTERN: See diagrams A.1 to A.6. DECREASE TIP: Work 1 tr around next ch-space but wait with last pull through, work next tr around next ch-space (do not work 3 ch between tr), on last pull through, pull yarn through all 3 loops on hook. CROCHET TIP (applies to sleeve): After last tr on the round, continue to next round with 1 tr in next ch-space (= first ch-space on next round). NOTE: Insert 1 marker at the beg of round between last ch and first tr on the next round, move the marker upwards. NOTE: MAKE SURE NOT TO DISPLACE THE MARKER. ---------------------------------------------------------- JACKET WORKED IN A CIRCLE: Worked in the round from the centre and outwards. Work 4 ch with Cotton Merino on hook size 4 mm and form a ring with 1 sl st. Then work pattern according to diagram A.1 (= 6 repetitions in width) NOTE: A.x shows how every round beg and end, and is in addition to pattern. REMEMBER THE CROCHET TENSION! When entire A.1 has been worked vertically (= 132 tr), continue as follows: Work * A.2 (= 11 tr), A.3 (= 11 tr) *, repeat from *-* 6 times in total. Work up to and with arrow in diagram - see arrow for your size, there are now 228-252-264 sts on round. Work next round as follows: Continue to work over the first 34-36-38 sts, work 36-40-44 ch, and skip the next 36-40-44 sts (= armhole), work until 70-76-82 sts remain, work 36-40-44 ch and skip the next 36-40-44 sts (= armhole), continue to work over the last 34-36-38 sts. On next round continue according to pattern, work pattern as in diagram around ch-spaces in each side. When A.2 and A.3 have been worked, there are 312 tr on round. Continue with A.4 (= 39 repetitions on round). First round in A.4 shows last round in A.2/A.3, do not work this round. Continue to work as follows: Work * A.5 (= 26 tr), A.6 (= 26 tr) *, repeat from *-* 6 times in total. When A.5/A.6 have been worked, there are 600 sts on round (150 tr with 3 ch between each). Finish size S/M here. Size M/L -XXL/XXXL: Work 2-4 more rounds as last round in A.5/A.6 = 162-174 tr with 3 ch between. ALL SIZES: Piece measures approx. 46-49-52 cm from centre (92-98-104 cm in total). FRONT PIECES: Work back and forth in the one side with short rows. Cut the yarn, skip the first 13-16-19 tr on round, then work over the next 49 tr + ch-spaces as follows (insert a marker here): Work 3 ch, skip 1 ch-space, 1 dc around next ch-space, 3 ch (these 2 ch-spaces are no longer worked), 1 tr around next ch-space, work pattern as before until 2 ch-spaces remain (i.e. ch-spaces between tr, do not work around these 2 ch-spaces anymore), turn piece. Continue the short rows like this, AT THE SAME TIME inc 1 tr + 3 sts in the middle ch-space on every row (work 1 tr + 3 ch + 1 tr in this space). Continue with inc and dec on every row until piece measures 15 cm from marker. Skip 26-32-38 tr, then work short rows over the next 49 tr (13-16-19 tr remain on round). Work the same way as in the other side. CROCHET EDGE: Work an edge around the entire circle as follows: 1 dc around first ch-space, * 3 ch, 1 dc around next ch-space *, repeat from *-* and finish with 1 sl st in first dc. Fasten off. SLEEVES: Worked in the round, top down. Beg mid under one armhole, work 1 dc around first ch-space, 6 ch (= 1 tr + 3 ch), skip first tr and work 1 tr around next ch-space, * 3 ch, 1 tr around next ch-space *, repeat from *-* the entire round (work 1 tr + 3 ch around tr in corners), finish round with 1 tr around first 6 ch, then continue to work in the round without finishing it – READ CROCHET TIP = 21-23-25 tr + 21-23-25 ch-spaces. Continue with 1 tr + 3 ch around every space. When piece measures 4 cm, dec 1 ch-space before marker - READ DECREASE TIP! Repeat dec every 4½ cm 7 more times, dec alternately before and after marker = 13-15-17 tr + 13-15-17 ch-spaces. Continue until piece measures 42-43-44 cm. CROCHET EDGE SLEEVES: Crochet an edge around the sleeves as follows: 1 dc around first ch-space, * 3 ch, 1 dc around next ch-space *, repeat from *-* and finish with 1 sl st in first dc. Fasten off. Work the other sleeve the same way. |
||||||||||||||||||||||||||||
Diagram explanations |
||||||||||||||||||||||||||||
|
||||||||||||||||||||||||||||
 |
||||||||||||||||||||||||||||
 |
||||||||||||||||||||||||||||
 |
||||||||||||||||||||||||||||
 |
||||||||||||||||||||||||||||
 |
||||||||||||||||||||||||||||
Have you finished this pattern?Tag your pictures with #dropspattern #endlesslovecardigan or submit them to the #dropsfan gallery. Do you need help with this pattern?You'll find 7 tutorial videos, a Comments/Questions area and more by visiting the pattern on garnstudio.com. © 1982-2026 DROPS Design A/S. We reserve all rights. This document, including all its sub-sections, has copyrights. Read more about what you can do with our patterns at the bottom of each pattern on our site. |
||||||||||||||||||||||||||||


With over 40 years in knitting and crochet design, DROPS Design offers one of the most extensive collections of free patterns on the internet - translated to 17 languages. As of today we count 324 catalogues and 12267 patterns translated into English (UK/cm). 12267
We work hard to bring you the best knitting and crochet have to offer, inspiration and advice as well as great quality yarns at incredible prices! Would you like to use our patterns for other than personal use? You can read what you are allowed to do in the Copyright text at the bottom of all our patterns. Happy crafting!
Post a comment to pattern DROPS 168-12
We would love to hear what you have to say about this pattern!
If you want to leave a question, please make sure you select the correct category in the form below, to speed up the answering process. Required fields are marked *.