
Popular categories
Looking for a yarn?


Comments / Questions (53)
![]() Myriam wrote:
Myriam wrote:
Bonjour, Pour la réhausse au dos, lorsque l'on commence les 7 mailles après le marqueur, on les commence juste après le marqueur ou bien faut-il commencer le rang depuis le bord du tricot (début du rang). Merci pour votre réponse, Cordialement
01.02.2018 - 14:23DROPS Design answered:
Bonjour Myriam, on tricote d'abord sur l'endroit jusqu'au marqueur, puis les 7 m après le marqueur, on tourne, on fait les rangs raccourcis et, au dernier rang sur l'endroit, on tricote jusqu'à la fin du rang (= toutes les mailles ont été tricotées). Bon tricot!
01.02.2018 - 14:31
![]() Virginie wrote:
Virginie wrote:
Bonjour, Je suis débutante. Pour mon échantillon, j'obtiens une rectangle de 11,5 x 9,5 cm... que dois-je faire svp pour adapter le modèle ? Merci de votre aide
21.11.2017 - 22:01DROPS Design answered:
Bonjour Virginie, essayez un nouvel échantillon avec des aiguilles plus fines/grosses puis lavez votre échantillon et faites le sécher à plat (dans les mêmes conditions que votre gilet terminé). Vous trouverez ici des astuces sur l'échantillon, votre magasin saura également vous aider et vous conseiller. Bon tricot!
22.11.2017 - 09:03
![]() Ludmilla wrote:
Ludmilla wrote:
På ett ställe i beskrivningen (minskningstips) står det att minskningen ska ske 4 maskor före markören. I själva beskrivningstexten står det att det ska minskas före och efter markören. Vilket gäller?
09.09.2017 - 14:20DROPS Design answered:
Hej Ludmilla, Jo det stämmer, du minsker enligt minskningstipset. Lycka till!
13.09.2017 - 13:23
![]() Alice wrote:
Alice wrote:
Please can you tell me what size buttons I need for this. I can find no mention of them anywhere. Thanks
04.03.2017 - 20:44DROPS Design answered:
Dear Alice, you need 7 buttons in all size reference no 522 (=Mother of pearl, Arched, white, size 20 mm) - see them here. Happy knitting!
06.03.2017 - 09:10
![]() Myriam wrote:
Myriam wrote:
Bonjour, j'aime beaucoup ce modèle mais étant débutante en tricot je souahiterais le faire en jersey jusqu'en haut, comment adapter les explications concernant la partie de l'empiècement du haut ? merci pour vos réponses !
22.12.2016 - 20:45DROPS Design answered:
Bonjour Myriam, vous pouvez diminuer comme indiqué dans les diagrammes pour conserver la forme de l'empiècement, tout en tricotant les diagrammes en jersey. Ou bien regarder parmi nos autre modèles si vous en trouvez un qui vous convient sans le modifier. Pour toute assistance individuelle, merci de bien vouloir vous adresser à votre magasin DROPS. Bon tricot!
29.12.2016 - 13:15
![]() Trine wrote:
Trine wrote:
Hej, jeg strikker den i str M, men efter at have strikket mønsteret og burde have 146 masker tilbage har jeg 166, jeg talte mine masker da jeg startede mønsteret og der passede det. Jeg kan ikke se hvor der er sket fejl, har I en ide? Vh Trine
07.12.2016 - 15:43DROPS Design answered:
Hej Trine. Du begynder med 246 m og strikker A.1 og A.2. Du har A.2 10 gange paa p og du tager 10 m ind per gentagelse i höjden: 100 m i alt. Saa jeg tror du enten har glemt at tage ind et sted (husk det er 4 m i alt i sidste p af A.2) og at du tager ind igen til sidst i A.1
07.12.2016 - 16:19
![]() Paula Arenas wrote:
Paula Arenas wrote:
Jeg er i gang med Model nr ne-179. og skal begynder nu på bærestykke. Ønsker at lave den uden mønstre. Hvordan gør jeg. Er ny begynder.
26.09.2016 - 17:45DROPS Design answered:
Hej Paula. Umiddelbart ville jeg sige at du skal strikke videre i glatstrik og saa tage ind/ud som der vises i diagrammet. Men hold öje med at dit arbejde passer i str - pröv den paa undervejs - fordi mönstret nok vil traekke sig lidt mere sammen end ren glatstrik. Ellers er det vist bare lige ud af landevejen :)
27.09.2016 - 15:53
![]() Christel Fritz-Jensen wrote:
Christel Fritz-Jensen wrote:
Jeg strikker str. L og har strikket første snoning. Sådan som jeg læser diagr. A1 skal jeg, når jeg strikker vrang tilbage have 8 m. Det forstår jeg ikke, men betyder det at jeg skal tage 2 m ud?
11.06.2016 - 20:12DROPS Design answered:
Hej Christel. Naar du strikker den förste snoning over 6 masker tager du to masker ud. Se beskrivelsen af symbolet: sæt 3 m på hj.p bag arb, 2 ret, strik 2 m i næste m, strik 2 m ret i første m fra hj.p, strik 2 ret fra hj.p = 8 m
13.06.2016 - 13:59Janette Box wrote:
Dear Drops thank you for your previous help with pattern. I am stuck yet again! This time I cannot work out the decreasing after the first cable. I now have 268 stitches how and where do I decrease to get 146 stitches left at the end of working whole of chart? Many thanks Janette
27.04.2016 - 11:35DROPS Design answered:
Dear Mrs Box, after the first cable in A.1 you have 268 sts for size M; if you continue working A.1 and A.2 in heigh, at the end of a full repetitions you'll have 146 sts (for A.2 10 decs x 10 repetitions = 100 sts, and for A.1 2 decs x 11 repetitions = 22 sts, so 268 - 122 = 146 sts). Hope this helps. Happy knitting!
27.04.2016 - 13:32
![]() Janette Box wrote:
Janette Box wrote:
Dear Drops Thank you for your previous reply. I'm afraid it is not the first row of chart that I am having problems with, it is row 2. I have 226 stitches left on needles, after first row is completed. I am reading the pattern from left to right for 2nd row. At end of second row, the pattern does not work out to being the same as the beginning of the start of row. Many thanks
01.04.2016 - 08:56DROPS Design answered:
Dear Mrs Box, remember to start at the bottom corner on the right side (from RS) - on 1st row in each A.1 (size XL-XXL-XXL) you should have inc 2 sts - these inc are done on row 3 in the first 3 sizes. Inserting a marker after each repeat in width may help to check your number of sts on each row. Happy knitting!
01.04.2016 - 10:14
|
||||||||||||||||||||||||||||
Early Autumn Cardigan#earlyautumncardigan |
||||||||||||||||||||||||||||
 |
 |
|||||||||||||||||||||||||||
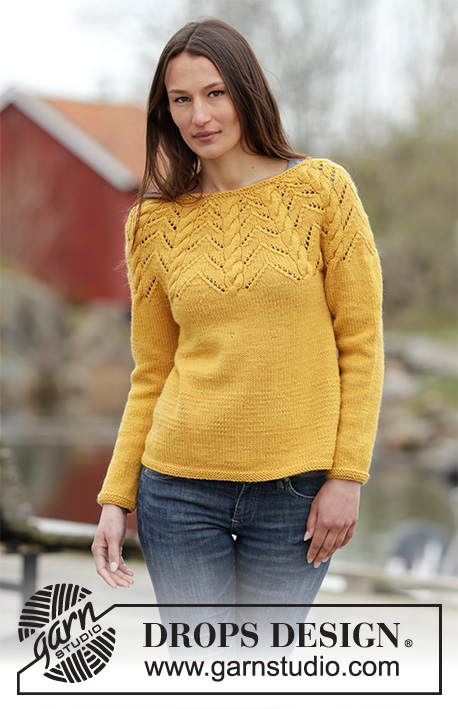
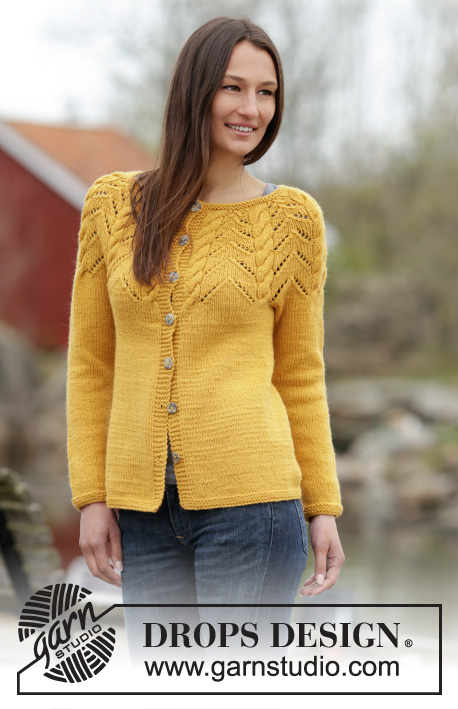
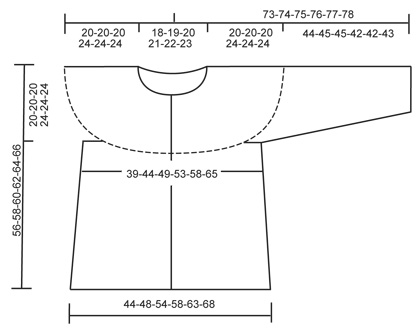
Knitted DROPS jacket with A-shape, round yoke, cables and lace pattern in ”Nepal”. Size: S - XXXL.
DROPS 166-8 |
||||||||||||||||||||||||||||
|
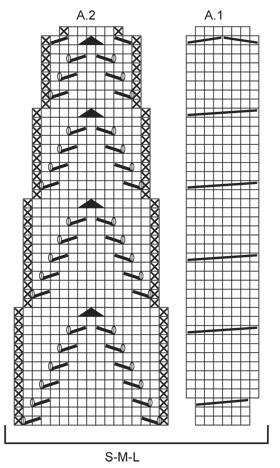
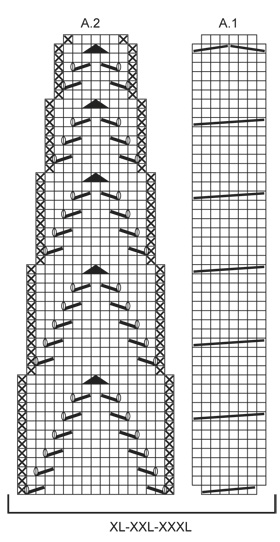
GARTER ST (back and forth on needle): K all rows. 1 ridge = 2 rows K GARTER ST (in the round on double pointed needles): * K 1 round and P 1 round *, repeat from *-*. 1 ridge = 2 rounds. DECREASE TIP (applies to body): Dec as follows before marker (beg 4 sts before marker): K 2 tog, 2 sts in stocking st. Dec as follows after marker: 2 sts in stocking st, slip 1 st as if to K, K 1, psso. PATTERN: See diagram A.1-A.2 - see diagram for your size. BUTTONHOLES: Dec for buttonholes on right band. 1 buttonhole = K tog third and fourth st from edge and make 1 YO. Dec for buttonholes when piece measures: SIZE S: 11, 17, 23, 30, 37, 44 and 51 cm SIZE M: 11, 18, 25, 32, 39, 46 and 53 cm SIZE L: 11, 18, 25, 32, 39, 47 and 55 cm SIZE XL: 11, 18, 26, 34, 42, 50 and 57 cm SIZE XXL: 11, 19, 27, 35, 43, 51 and 59 cm SIZE XXXL: 11, 20, 29, 37, 45, 53 and 61 cm --------------------------------------------------------- BODY: Worked back and forth on circular needle. Cast on 159-174-193-208-223-242 sts on circular needle size 4 mm with Nepal. Insert 2 markers in the piece; 42-46-51-55-58-63 sts in from each side (back piece = 75-82-91-98-107-116 sts). Work 3 ridges in GARTER ST - see explanation above. Switch to circular needle size 5 mm and continue in stocking st with 5 sts in garter st in each side (= bands). REMEMBER THE KNITTING TENSION When piece measures 8 cm, dec 1 st on each side of both markers - READ DECREASE TIP! Repeat dec every 8-9-10-9-10-10 cm 3 more times (= 4 times in total) = 143-158-177-192-207-226 sts. When piece measures 36-38-40-38-40-42 cm, cast off 8 sts in each side for armholes (i.e. 4 sts on each side of every marker) = 59-66-75-82-91-100 sts on back piece and 34-38-43-47-50-55 sts remain on each front piece. Put piece aside and knit the sleeves. SLEEVE: Worked in the round on double pointed needles. Cast on 36-38-40-42-44-46 sts on double pointed needles size 4 mm with Nepal. Work 3 ridges in GARTER ST - see explanation above. Switch to double pointed needles size 5 mm. Insert 1 marker at beg of round (= mid under sleeve). Continue in stocking st. AT THE SAME TIME when piece measures 8 cm, inc 1 st on each side of marker by K 2 sts in the st before and after the marker. Repeat inc every 3½-3-3-2½-2½-2½ cm 9-10-10-11-12-12 more times (= 10-11-11-12-13-13 times in total) = 56-60-62-66-70-72 sts. When piece measures 44-45-45-42-42-43 cm, cast off 8 sts mid under sleeve (i.e. cast off 4 sts on each side of marker) = 48-52-54-58-62-64 sts remain on needle. Put piece aside and knit another sleeve. YOKE: Slip sleeves on to same circular needle size 5 mm as body = 223-246-269-292-315-338 sts. Then work as follows from RS: 5 sts in garter st, * A.1, A.2 *, repeat from *-* 9-10-11-12-13-14 times, finish with A.1 and 5 sts in garter st. See diagram for size! After first cable in A.1, there are 243-268-293-318-343-368 sts on needle. Continue pattern and dec in A.2, when A.1/A.2 have been worked 1 time vertically, there are 133-146-159-172-185-198 sts on needle. K 1 row while dec 33-40-47-54-61-68 sts evenly = 100-106-112-118-124-130 sts. P 1 row. Then work an elevation at the back of neck as follows in stocking st, insert 1 marker mid back. K 7 sts past marker mid back, turn, tighten yarn and P 14 sts back, turn, tighten yarn and K 21 sts, turn, continue to work 7 sts more for every turn until a total of 56-56-56-70-70-70 sts have been worked, turn and K 1 row to mid front again. P 1 row from WS. Switch to circular needle size 4 mm. Work 2 ridges. Cast off with K from RS. ASSEMBLY: Sew the openings under the sleeves tog. Sew the buttons on to the left band. |
||||||||||||||||||||||||||||
Diagram explanations |
||||||||||||||||||||||||||||
|
||||||||||||||||||||||||||||
 |
||||||||||||||||||||||||||||
 |
||||||||||||||||||||||||||||
 |
||||||||||||||||||||||||||||
Have you finished this pattern?Tag your pictures with #dropspattern #earlyautumncardigan or submit them to the #dropsfan gallery. Do you need help with this pattern?You'll find 29 tutorial videos, a Comments/Questions area and more by visiting the pattern on garnstudio.com. © 1982-2026 DROPS Design A/S. We reserve all rights. This document, including all its sub-sections, has copyrights. Read more about what you can do with our patterns at the bottom of each pattern on our site. |
||||||||||||||||||||||||||||


With over 40 years in knitting and crochet design, DROPS Design offers one of the most extensive collections of free patterns on the internet - translated to 17 languages. As of today we count 324 catalogues and 12267 patterns translated into English (UK/cm). 12267
We work hard to bring you the best knitting and crochet have to offer, inspiration and advice as well as great quality yarns at incredible prices! Would you like to use our patterns for other than personal use? You can read what you are allowed to do in the Copyright text at the bottom of all our patterns. Happy crafting!
Post a comment to pattern DROPS 166-8
We would love to hear what you have to say about this pattern!
If you want to leave a question, please make sure you select the correct category in the form below, to speed up the answering process. Required fields are marked *.