Early Autumn Cardigan by DROPS Design

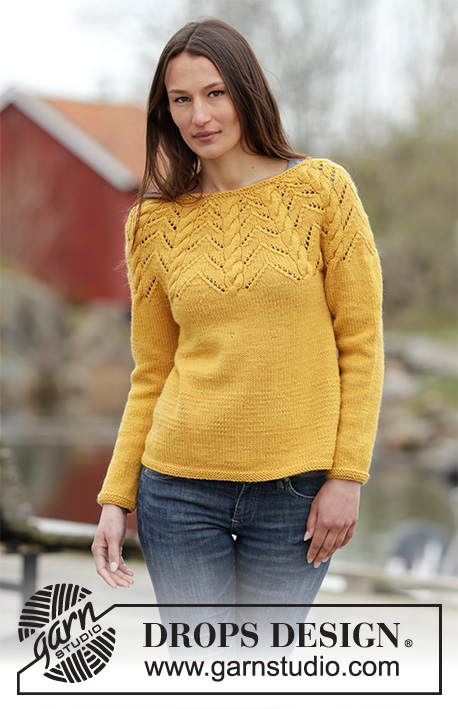
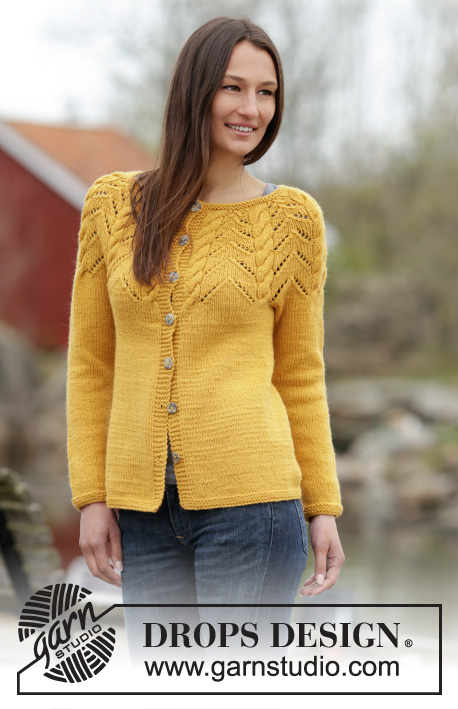
DROPS propínací svetr - kabátek do A s kruhovým sedlem, copánky a ažurovým vzorem pletený z příze "Nepal". Velikost: S-XXXL.

DROPS 166-8
DROPS design: model č. ne-179
Skupina přízí: C nebo A + A
-----------------------------------------------------------

Velikost: S – M – L – XL – XXL – XXXL

Materiál: DROPS NEPAL firmy Garnstudio
550-650-700-750-850-900 g, barva č.2923, žlutá

DROPS PONOŽKOVÉ JEHLICE a KRUHOVÁ JEHLICE (80 cm) č. 5 – nebo velikosti potřebné k upletení zkušebního vzorku o rozměrech 17 ok x 22 řad lícovým žerzejem = 10 x 10 cm.
DROPS PONOŽKOVÉ JEHLICE a KRUHOVÁ JEHLICE (80 cm) č. 4 – na lemy.

DROPS PERLEŤOVÝ KNOFLÍK Vypouklý (bílý) č. 522 (průměr 20 mm): 7 ks pro všechny velikosti.

-------------------------------------------------------

Zkušební vzorek – Podívejte se, jak ho měřit a proč
Náhradní příze – Podívejte se, jak změnit přízi
Skupina přízí A až F – Neměňte návod, změňte přízi
Spotřeba příze při použití náhradní příze – Využijte náš převodník

-------------------------------------------------------


65% vlna, 35% alpaka
od 72.00 Kč /50g
DROPS Nepal uni colour DROPS Nepal uni colour 72.00 Kč /50g
Ganella
Objednat
DROPS Nepal mix DROPS Nepal mix 77.00 Kč /50g
Ganella
Objednat
needles Jehlice a háčky Objednat
Přízi na tento model můžete mít už za 792Kč. Více zde.

Návod

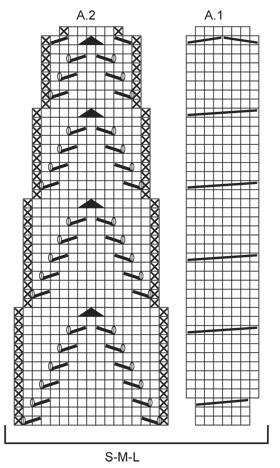
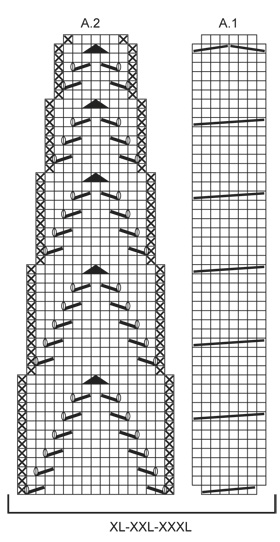
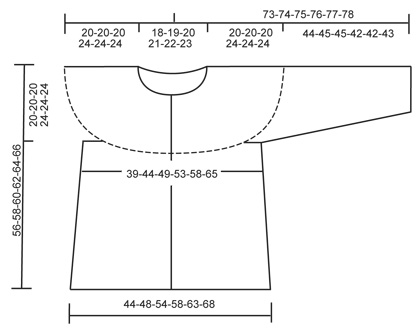
VROUBKOVÝ VZOR:
V řadách: pleteme stále hladce, lícové i rubové řady. 1 vroubek = 2 řady hladce.
V kruhových řadách: pleteme střídavě 1 kruhovou řadu hladce, 1 obrace. 1 vroubek = 2 kruhové řady.

TIP – UJÍMÁNÍ (trup):
PŘED značkou (začínáme 4 oka před značkou): 2 oka spleteme hladce, 2 oka upleteme lícovým žerzejem.
ZA značkou: 2 oka upleteme lícovým žerzejem, 1 oko sejmeme hladce, 1 upleteme hladce a sejmuté přes ně přetáhneme.

VZOR:
Viz schémata A.1-A.2; zvolte si schéma pro požadovanou velikost.

KNOFLÍKOVÉ DÍRKY:
Knoflíkové dírky vyplétáme v léze pravého předního dílu. 1 dírka = 3. a 4. oko od předního okraje légy a 1x nahodíme.
Knoflíkové dírky vyplétáme v těchto rozestupech:
Velikost S: 11, 17, 23, 30, 37, 44 a 51 cm.
Velikost M: 11, 18, 25, 32, 39, 46 a 53 cm.
Velikost L: 11, 18, 25, 32, 39, 47 a 55 cm.
Velikost XL: 11, 18, 26, 34, 42, 50 a 57 cm.
Velikost XXL: 11, 19, 27, 35, 43, 51 a 59 cm.
Velikost XXXL: 11, 20, 29, 37, 45, 53 a 61 cm.
---------------------------------------------------------

PROPÍNACÍ SVETR

TRUP:
Pleteme v řadách na kruhové jehlici od okraje jedné légy k okraji druhé.
Na kruhovou jehlici č.4 nahodíme přízí Nepal 159-174-193-208-223-242 ok. Označíme si boky – do pleteniny vložíme 2 značky, vždy za 42.-46.-51.-55.-58.-63. oko od každého předního okraje (= mezi značkami leží 75-82-91-98-107-116 ok zadního dílu). Upleteme 3 vroubky vroubkovým vzorem – viz výše. Pak pleteninu převedeme na kruhovou jehlici č.5 a pleteme lícovým žerzejem, jen krajních 5 ok na každé straně pleteme vroubkovým vzorem (= légy). Ve výši 8 cm ujmeme na obou stranách obou značek 1 oko - viz TIP - UJÍMÁNÍ! Toto ujímání opakujeme vždy po 8-9-10-9-10-10 cm výšky ještě 3x (= ujmeme celkem 4x) = 143-158-177-192-207-226 ok. Ve výši 36-38-40-38-40-42 cm uzavřeme na každém boku 8 ok pro průramky (tj. 4 oka na každé straně každé značky) = 59-66-75-82-91-100 ok zadního dílu a 34-38-43-47-50-55 ok každého předního dílu. Díl odložíme a upleteme rukávy.

RUKÁV:
Pleteme v kruhových řadách na ponožkových jehlicích.
Na ponožkové jehlice č.4 nahodíme přízí Nepal 36-38-40-42-44-46 a upleteme 3 vroubky vroubkovým vzorem – viz výše. Pak převedeme pleteninu na ponožkové jehlice č.5. Označíme si začátek kruhové řady (= střed vnitřní strany rukávu). Pokračujeme lícovým žerzejem. SOUČASNĚ ve výši 8 cm přidáme na každé straně značky 1 oko (přidáváme rozpletením 1 oka na dvě). Toto přidávání opakujeme vždy po 3,5-3-3-2,5-2,5-2,5 cm výšky ještě 9-10-10-11-12-12x (= přidáme celkem 10-11-11-12-13-13x) = 56-60-62-66-70-72 ok. Ve výši 44-45-45-42-42-43 cm uzavřeme uprostřed vnitřní strany rukávu 8 ok (tj. 4 oka na každé straně značky) = na jehlici zbývá 48-52-54-58-62-64 ok. Díl odložíme a upleteme stejným způsobem i druhý rukáv.

SEDLO:
Rukávy a trup převedeme na jednu a tutéž kruhovou jehlici č.5 (rukávy přiložíme k trupu v místech uzavřených pro průramky) = 223-246-269-292-315-338 ok. Pokračujeme lícovou řadou, takto: 5 ok vroubkovým vzorem, *vzor A.1, vzor A.2*, *-* opakujeme 9-10-11-12-13-14x, končíme vzorem A.1 a 5 oky vroubkovým vzorem. Zvolte si schéma pro požadovanou velikost! Po dokončení prvního copánku ve vzoru A.1 máme na jehlici 243-268-293-318-343-368 ok. Pokračujeme v pletení vzoru a ujímáme dle schématu A.2. Po dokončení 1 celé sekvence vzoru A.1/A.2 (na výšku) máme na jehlici 133-146-159-172-185-198 ok. Upleteme 1 řadu a SOUČASNĚ ujmeme rovnoměrně 33-40-47-54-61-68 ok = 100-106-112-118-124-130 ok. Upleteme 1 řadu obrace. Nyní tvarujeme pomocí zkrácených řad zvýšený zadní průkrčník – pleteme lícovým žerzejem a označíme si střed zadního průkrčníku; upleteme 7 ok hladce za značkou uprostřed zadního průkrčníku, práci otočíme, přízi utáhneme a pleteme zpět 14 ok obrace, práci otočíme, přízi utáhneme a upleteme 21 ok hladce, práci otočíme a takto pokračujeme – po každém otočení upleteme o 7 ok více, až do chvíle, kdy upleteme celkem 56-56-56-70-70-70 ok, práci otočíme a upleteme 1 řadu hladce zpět k přednímu okraji. Nyní upleteme 1 rubovou řadu obrace. Pak pleteninu převedeme na kruhovou jehlici č.4 a upleteme 2 vroubky. Poté všechna oka v lícové řadě hladce uzavřeme.

DOKONČENÍ:
Sešijeme otvory v podpaží. Přišijeme knoflíky.

Schéma

symbols = lícový žerzej (líc hladce, rub obrace)
symbols = rubový žerzej (líc obrace, rub hladce)
symbols = 1 oko sejmeme hladce, 1 upleteme hladce a sejmuté přes ně přetáhneme
symbols = 2 oka spleteme hladce
symbols = 1 oko sejmeme hladce, 2 oka spleteme hladce a sejmuté přes ně přetáhneme
symbols = 1x nahodíme mezi 2 oky
symbols = 3 oka odložíme na pomocnou jehlici ZA práci, 2 oka hladce, následující oko rozpleteme na 2, první oko z pom.jehlice rozpleteme na 2, 2 oka z pom.jehlice hladce = 8 ok
symbols = 4 oka odložíme na pomocnou jehlici ZA práci, 4 oka hladce, 4 oka z pom.jehlice hladce
symbols = 4 oka odložíme na pomocnou jehlici ZA práci, 2 oka hladce, 2 oka spleteme hladce, 2 oka z pom.jehlice spleteme hladce, 2 oka z pom.jehlice hladce = 6 ok
diagram
diagram
diagram

Potřebujete poradit s tímto návodem?

Děkujeme, že jste si vybrali návod DROPS Design. Zakládáme si na tom, že dáváme k dispozici návody ověřené a snadno srozumitelné. Všechny návody jsou přeložené z norského originálu a tak si můžete kdykoli srovnat rozměry a počty s původním návodem (DROPS 166-8) .

Máte s návodem potíže? Níže najdete seznam odkazů, které vám pomohou dokončit vaše dílo co nejdříve - nebo se třeba přiučit něco nového.

signature-image signature

Máte s návodem potíže? Níže najdete seznam odkazů, které vám pomohou dokončit vaše dílo co nejdříve - nebo se třeba přiučit něco nového.

Každý náš návod je doprovázen speciálními video-ukázkami, které vás navedou.

Máme takopodrobné rozpisy různých technik a postupů krok za krokem - najdete je zde.

1) Why is the knitting/crochet tension so important?

Knitting tension is what determines the final measurements of your work, and is usually measured per 10 x 10 cm. It is provided like so: number of stitches in width x number of rows in height - eg: 19 stitches x 26 rows = 10 x 10 cm.

The knitting tension is very individual; some people knit/crochet loosely while others work tightly. You adjust the knitting tension with the needle size, which is why the suggested needle size only serve as a guide! You need to adjust this (up or down) to ensure that YOUR knitting tension matches the knitting tension provided in the pattern. If you work with a different knitting tension than provided you will have a different yarn consumption, and your work will have different measurements than what the pattern suggests.

The knitting tension also determines which yarns can replace each other. As long as you achieve the same knitting tension you can replace one yarn with another.

See DROPS lesson: How to measure your tension/gauge

See DROPS video: How to make a gauge tension swatch

nahoru

2) What are the yarn groups?

All our yarns are categorised into yarn groups (from A to F) according to thickness and knitting tension – group A contains the thinnest yarns and group F the thickest. This makes it easier for you to find alternative yarns to our patterns, should you wish to switch yarn. All yarns within the same group have a similar knitting tension and can easily replace each other. However, different yarn qualities have different structures and properties which will give the finished work a unique look and feel.

Click here for an overview of the yarns in each yarn group

nahoru

3) Can I use a different yarn than what the pattern suggests?

The important thing when changing from one yarn to another is that the knitting/crochet tension remains the same. This is so that the measurements of the finished piece will be the same as on the sketch provided. It is easier to achieve the same knitting tension using yarns from the same yarn group. It is also possible to work with multiple strands of a thinner yarn to achieve the knitting tension of a thicker one. Please try our yarn converter. We recommend you to always work a test swatch.

Please NOTE: when changing yarn the garment might have a different look and feel to the garment in the photo, due to individual properties and qualities of each yarn.

See DROPS lesson: Can I use a different yarn than the one mentioned in the pattern?

nahoru

4) How do I use the yarn converter?

At the top of all our patterns you’ll find a link to our yarn converter, which is a helpful tool should you wish to use a different yarn than suggested. By filling in the yarn quality you wish to replace, the amount (in your size) and number of strands, the converter will present good alternative yarns with the same knitting tension. Additionally it will tell you how much you’ll require in the new qualities and whether you’ll need to work with multiple strands. Most skeins are 50g (some are 25g or 100g).

If the pattern is worked with multiple colours, every colour will have to be converted separately. Similarly, if the pattern is worked with several strands of different yarns (for example 1 strand Alpaca and 1 strand Kid-Silk) you will have to find alternatives for each, individually.

Click here to see our yarn converter

nahoru

5) Why do I get the wrong knitting tension with the suggested needle size?

The needle size provided in the pattern serves only as a guide, the important thing is to follow the knitting tension. And since knitting tension is very individual, you will have to adjust the needle size to ensure that YOUR tension is the same as in the pattern – maybe you’ll have to adjust 1, or even 2 needle sizes, up or down to achieve the correct tension. For this, we recommend that you work test swatches.

Should you work with a different knitting tension than the one provided, the measurements of the finished garment might deviate from the measurement sketch.

See DROPS lesson: How to measure your tension/gauge

See DROPS video: How to make a gauge tension swatch

nahoru

6) Why is the pattern worked top-down?

Working a garment top-down provides more flexibility and room for personal adjustment. For example it is easier to try the garment on while working, as well as making adjustments to length of yoke and shoulder caps.

The instructions are carefully explaining every step, in the correct order. Diagrams are adjusted to the knitting direction and are worked as usual.

nahoru

7) Why are the sleeves shorter in larger sizes?

The total width of the garment (from wrist-to-wrist) will be larger in the larger sizes, despite the actual sleeves being shorter. The larger sizes have longer sleeve caps and wider shoulders, so there will be a good fit in all sizes.

nahoru

8) What is a repeat?

Diagrams are often repeated on the round or in height. 1 repeat is the diagram the way it appears in the pattern. If it says to work 5 repeats of A.1 in the round, then you work A.1 a total of 5 times after/next to each other in the round. If it says to work 2 repeats of A.1 vertically/in height you work the entire diagram once, then begin again at the start and work the entire diagram one more time.

nahoru

9) How do I work according to a knitting diagram?

The diagram depicts all rows/rounds, and every stitch seen from the right side. It is read from bottom to top, from right to left. 1 square = 1 stitch.

When working back and forth, every other row is worked from the right side and every other row is worked from the wrong side. When working from the wrong side, the diagram will have to be worked reversed: from left to right, knit stitches are purled, purl stitches are knit etc.

When working in the round every round is worked from the right side and the diagram are worked from right to left on all rounds.

See DROPS lesson: How to read knitting diagrams

nahoru

10) How do I work according to a crochet diagram?

The diagram depicts all rows/rounds, and every stitch seen from the right side. It is worked from bottom to top, from right to left.

When working back and forth every other row is worked from the right side: from right to left and every other row is worked from the wrong side: from left to right.

When working in the round, every row in the diagram are worked from the right side, from right to left.

When working a circular diagram you start in the middle and work your way outwards, counter clockwise, row by row.

The rows usually start with a given number of chain stitches (equivalent to the height of the following stitch), this will either be depicted in the diagram or explained in the pattern.

See DROPS lesson: How to read crochet diagrams

nahoru

11) How do I work several diagrams simultaneously on the same row/round?

Instructions for working several diagrams after each other on the same row/round, will often be written like so: “work A.1, A.2, A.3 a total of 0-0-2-3-4 times". This means you work A.1 once, then A.2 is worked once, and A.3 is repeated (in width) the number of times provided for your size – in this case like so: S = 0 times, M = 0 times, L=2 times, XL= 3 times and XXL = 4 times.

The diagrams are worked as usual: begin with the first row in A.1, then work the first row in A.2 etc.

See DROPS lesson: How to read knitting diagrams

See DROPS lesson: How to read crochet diagrams

nahoru

12) Why does the piece start with more chain stitches than it’s worked with?

Chain stitches are slightly narrower than other stitches and to avoid working the cast-on edge too tight, we simply chain more stitches to begin with. The stitch count will be adjusted on the following row to fit the pattern and measurement sketch.

nahoru

13) Why increase before the rib edge when the piece is worked top-down?

The rib edge is more elastic and will contract slightly compared to, for example, stocking stitch. By increasing before the rib edge, you avoid a visible difference in width between the rib edge and the rest of the body.

nahoru

14) Why increase in the cast-off edge?

It’s very easy to cast off too tightly, and by making yarn overs while casting off (and simultaneously casting these off) you avoid a too tight cast off edge.

See DROPS video: How to bind off with yarn overs (yo)

nahoru

15) How do I increase/decrease on every 3rd and 4th row/round alternately?

To achieve an even increase (or decrease) you can increase on, for example: every 3rd and 4th row alternately, like so: work 2 rows and increase on the 3rd row, work 3 rows and increase on the 4th. Repeat this until the increase is complete.

See DROPS lesson: Increase or decrease 1 st on every 3rd and 4th row alternately

nahoru

16) Why is the pattern slightly different than what I see in the photo?

Pattern repeats can vary slightly in the different sizes, in order to get the correct proportions. If you’re not working the exact same size as the garment in the photo, yours might deviate slightly. This has been carefully developed and adjusted so that the complete impression of the garment is the same in all sizes.

Make sure to follow instructions and diagrams for your size!

nahoru

17) How can I work a jacket in the round instead of back and forth?

Should you prefer to work in the round instead of back and forth, you may of course adjust the pattern. You’ll need to add steeks mid-front (usually 5 stitches), and follow the instructions. When you would normally turn and work from the wrong side, simply work across the steek and continue in the round. At the end you’ll cut the piece open, pick up stitches to work bands, and cover the cut edges.

See DROPS video: How to knit steeks and cut open

nahoru

18) Can I work a jumper back and forth instead of in the round?

Should you prefer to work back and forth instead of in the round, you may of course adjust the pattern so you work the pieces separately and then assemble them at the end. Divide the stitches for the body in 2, add 1 edge stitch in each side (for sewing) and work the front and back pieces separately.

See DROPS lesson: Can I adapt a pattern for circular needles into straight needles?

nahoru

19) Why do you show discontinued yarns in the patterns?

Since different yarns have different qualities and textures we have chosen to keep the original yarn in our patterns. However, you can easily find options among our available qualities by using our yarn converter, or simply pick a yarn from the same yarn group.

It is possible that some retailers still have discontinued yarns in stock, or that someone has a few skeins at home that they would like to find patterns for.

The yarn converter will provide both alternative yarn as well as required amount in the new quality.

nahoru

20) How do I make a women’s size garment into a men’s size one?

If you have found a pattern you like which is available in women’s size it’s not very difficult to convert it to men’s size. The biggest difference will be the length of sleeves and body. Start working on the women size that you think would fit across the chest. The additional length will be worked right before you cast off for the armhole/sleeve cap. If the pattern is worked top-down you can add the length right after the armhole or before the first decrease on sleeve.

Regarding additional yarn amount, this will depend on how much length you add, but it is better with a skein too many than too few.

nahoru

21) How do I prevent a hairy garment from shedding?

All yarns will have excess fibres (from production) that might come off as lint or shedding. Brushed yarns (ie hairier yarns) have more of these loose, excess fibres, causing more shedding.

Shedding also depends on what is worn under or over the garment, and whether this pulls at the yarn fibres. It’s therefore not possible to guarantee that there will be no shedding

Below are some tips on how to get the best result when working with hairier yarns:

1. When the garment is finished (before you wash it) shake it vigorously so the looser hairs come off. NOTE: do NOT use a lint roller, brush or any method that pulls at the yarn.

2. Place the garment in a plastic bag and put it in your freezer - the temperature will cause the fibres to become less attached to each other, and excess fibres will come off easier.

3. Leave in the freezer for a few hours before taking it out and shaking it again.

4. Wash the garment according to the instructions on the yarn label.

nahoru

22) Where on the garment is the length measured?

The measurement sketch/schematic drawing provides information regarding the full length of the garment. If it’s a jumper or a jacket the length is measured from the highest point on the shoulder closest to the neckline, and straight down to the bottom of the garment. It is NOT measured from the tip of shoulder. Similarly, the length of yoke is measured from the highest point on the shoulder and down to where yoke is split into body and sleeves.

On a jacket measures are never taken along bands, unless specifically stated. Always measure inside band stitches when measuring the length.

See DROPS lesson: How to read a schematic drawing

nahoru

23) How do I know how many balls of yarn I need?

The required amount of yarn is provided in grams, eg: 450 g. To calculate how many balls you’ll need you first need to know how many grams are in 1 ball (25g, 50g or 100g). This information is available if you click on the individual yarn quality on our pages. Divide the amount required with the amount of each ball. For example, if each ball is 50g (the most common amount), the calculation will be as follows: 450 / 50 = 9 balls.

nahoru

Pořídili jste si přízi DROPS na tento model? Pak máte taky právo žádat po svém prodejci, u něhož jste nakoupili, pomoc a rady. Seznam DROPS obchodů najdete tady!
Pořád se nemůžete dobrat odpovědi, kterou hledáte? Pak posuňte stránku dolů a napište nám svůj dotaz, naši specialisté se vám pokusí poradit. Obvykle to zvládneme během 5 až 10 pracovních dnů.. Mezitím si můžete pročíst otázky a odpovědi, které k tomuto modelu položili ostatní, nebo navštívit skupinu DROPS Workshop na Facebooku, kde vám může poradit některá spřízněná duše!

Komentáře / Otázky (52)

country flag Vlasta Saková wrote:

Dobrý den, prosím poradíte, jak zmenšit návod DROPS 166-8 na dívčí velikost 152??? moc se mi líbí, jen si nevím rady...díky předem. Vlasta

18.11.2021 - 15:51

country flag Nel wrote:

Bij het lijf staat er niets aan gegeven wanneer er met het patroon gestart wordt. Dit is wel bij andere patronen van drops. Nu kan ik mijn werk gaan uit halen. Is niet fijn.

13.04.2021 - 14:03

country flag Madeleine Bergh wrote:

Hej, (fråga 1) Om jag har 246m i storlek M när jag påbörjar oket, hur kan det bli 268 efter första flätan i A1, och (fråga2) jag får det till 166m (storlek M, efter att ha minskat 80m) i stället för 146m efter rapporten stickats 1 gång på höjden, är det fel i mönstret? "Efter första flätan i A.1 är det 243-268-293-318-343-368 m på st. Fortsätt med mönstret och minskn i A.2, när A.1/ A.2 har stickats 1 gång på höjden är det 133-146-159-172-185-198 m på st. "

22.10.2020 - 15:29

DROPS Design answered:

Hej Madeleine. När vi skriver att det ska vara 268 m efter första flätan menar vi efter första vridningen på flätan, dvs efter varv 3 i diagrammen är stickade. Du stickar A.1 totalt 11 gånger på 1 varv (först 10 gånger tillsammans med A.2 och sedan 1 gång innan de 5 sista rätstickade m). Det ökas 2 m i varje A.2. 246+ (2x11)=268 m. Sedan minskar du 100 m i A.2 och 22 m i A.1. 268-100-22= 146 m. Observera att sista minskningen i A.2 är på 4 maskor, inte 2 som de tidigare. Mvh DROPS Design

23.10.2020 kl. 09:02

country flag Sarah Paule Dalle wrote:

In the photo it looks like the cables are knit right up to the two ridges at the neckline, but in following the instructions I end up with several cm of stockinette between the end of the cable pattern and the neckline. Have I misunderstood something?

13.10.2020 - 22:14

DROPS Design answered:

Dear Mrs Dalle, if you work the elevation on back piece, there might be some more stocking stitch after pattern and before neck edge. You might like to work these short rows in garter stitch or just leave them (neck on front piece and back piece will be the same). Happy knitting!

14.10.2020 kl. 07:57

country flag Siobhan Sargent wrote:

I have completed the chart and followed the instructions and my stitch count is not correct it's less for the size l, THe neck is very wide unlike the photo do you suggest ripping and redoing the yoke

20.05.2020 - 13:19

DROPS Design answered:

Dear Mrs Sargent, do you have the correct number of sts in each diagram as described in previous answer? When 159 sts remain, knit 1 row while dec 47 sts evenly = 112 sts remain, purl 1 row and work now elevation. You are welcome to bring your work to your store to show them what you did till now (or send them a picture), it would be much easier for them to check. Happy knitting!

20.05.2020 kl. 13:36

country flag Siobhan Sargent wrote:

Dear drops, I am knitting this cardigan in the size l, I have worked my way through the chart and have not got the correct amount of stitches after I have done the decreases, can you please Advise? Also in the back it says to do the short rows, is this continues in the pattern or stocking stitch ? Thank you

20.05.2020 - 00:37

DROPS Design answered:

Dear Mrs Sargent, in size L you start yoke with 269 sts and work: 5 front band sts, 11 x (A.1, A.2), A.1, 5 front band sts. When diagrams are finished, there are 6 sts in each A1 and 7 sts in each A.2, this means: 5 + 11x (6+7) + 6 + 5 = 159 sts. Short rows for the elevation on back piece are worked in stocking stitch. Happy knitting!

20.05.2020 kl. 07:17

country flag SPD wrote:

There is a mistake in the instructions for the buttonhole: the k2tog should be on the 2nd and 3rd stitches from the edge (not 3rd &4th)

03.05.2020 - 01:07

country flag Cath wrote:

Je viens de tricoter ce modèle (en taille S) et je ne comprends pas le nombre de mailles indiqué une fois que les diagrammes A1 et A2 ont été tricotés. Si j'ai 243 m après la première torsade et que je diminue de 2 m à chaque surjet double donc 9 fois dans la largeur (répétition du motif) et 4 fois dans la hauteur, je diminue au total de 72 m. 243 mailles - 72 = 171 mailles (et pas 133)

01.05.2020 - 08:49

DROPS Design answered:

Bonjour Cath, vous diminuez non pas 8 mailles mais 10 mailles dans chaque A.2 + 2 mailles dans la dernière torsade de chaque A.1 soit: 10 diminutions x 9 A.2 = 90 diminutions et 2 diminutions x 10 A.1 = 20 diminutions. Vous aviez 243 m - 90 m - 20= 133 m. Bon tricot!

04.05.2020 kl. 10:05

country flag Lesley Dutch wrote:

Please ignore my earlier question, I have found where the increases are to be made and can get on with finishing things off. Thank you Lesley Lesl

22.01.2020 - 17:22

country flag Lesley Dutch wrote:

I have joined the sleeves to the yoke and had the correct number of stitches once I had done this for the size (315 for xxl) . The instructions say that there should be 343 after the 1st cable. I cannot see how this can be correct when the chart tells you to decrease and there are no obvious increases. Is this a misprint in the number of stitches after the 1st cable or am I missing something in the chart? Thank you for your help. Lesley aPDutch

22.01.2020 - 16:58

DROPS Design answered:

Dear Mrs Dutch, when you work the first cable in A.1 (first row in size XXL), you work over 6 sts - see 7th symbol: slip 3 sts on cable needle behind piece, K 2, K 2 sts in next st (= you increase 1 stitch), K 2 sts in first st from cable needle (you increase 1 stitch), K 2 from cable needle = 8 sts = 2sts increased in each A.1, so that you increase 2 sts at total of 14 times (14 repeats of A.1 on the row) = 28 +315= 343 sts. Happy knitting!

23.01.2020 kl. 09:19

Přidejte komentář k návodu DROPS 166-8

Rádi bychom věděli, co si o tomto modelu myslíte!

Pokud se chcete na něco zeptat, dbejte prosím na to, abyste ve formuláři níže vybrali správnou kategorii - díky tomu se dříve dozvíte, co potřebujete vědět. Povinná pole jsou označena *.