
Popular categories
Looking for a yarn?


Comments / Questions (16)
![]() Diana Blunier wrote:
Diana Blunier wrote:
Guten Tag Ich habe den Boden gestrickt gem. Anleitung jedoch nur mit einem drittel der maschenangabe, da ich den schnemann nich so gross haben will. Nun hat mein boden die form eines dreiecks und ich weiss nicht, wie ich diesen zusammennähen soll, dass es einen schönen runden boden gibt. Danke für ihre hilfe. Lg
09.05.2016 - 11:27DROPS Design answered:
Liebe Diana, das ist von hier aus schwierig zu sagen, wir können nur weiterhelfen, wenn Sie genau nach unseren Anleitungen arbeiten. Grundsätzlich sollten Sie eher ein dünneres Garn nehmen, wenn Sie Figur verkleinern möchten, dann bleiben die Proportionen besser erhalten.
10.05.2016 - 09:11
![]() DROPS Design wrote:
DROPS Design wrote:
Het patroon is nu aangepast.
01.03.2016 - 12:05
![]() José wrote:
José wrote:
Een vraag: bij het breien van het lijf worden er steeds 8 st. gemeerderd. Bij 14 x meerderen kom ik uit op een stekenaantal van 121 st. ipv 119 st.. Heb ik ergens iets over het hoofd gezien? Bij het verder breien zou ik dan 2 st. extra moeten rekenen. Lijkt me voor het eindresultaat niet veel uitmaken, maar kunt u mij antwoord geven op bovenstaande vraag?
07.02.2016 - 18:08DROPS Design answered:
Hoi José. Ik ben met je eens. Met 8 keer meerderen per keer kom ik ook uit op 121 ipv 119. Ik heb het doorgegeven aan ons Design Team, maar ik kan helaas niet zeggen hoelang een correctie zal duren op dit moment. Ik zou doen als voorgesteld en 2 extra berekenen, het gaat volgens mij ook niet veel verschillen (of dan gewoon 2 extra st minderen naar 90 st).
10.02.2016 - 15:54
![]() Bente Hallager Askholm wrote:
Bente Hallager Askholm wrote:
Snemandens krop: Det passer ikke med de 119 m. Der bliver jo unægtelig (8 x X) + 1 maske. dvs. 121 masker (eller 113 m), og så skal der tages 31(alternativt 32) m ind til de 90
01.11.2015 - 15:56DROPS Design answered:
Hej Bente, Jo opskriften stemmer, bare følg opskriften, det gør ikke noget hvis du har en udtagning mere eller mindre på sidste omg, men sørg for at få det antal m som står i opskriften. God fornøjelse!
02.11.2015 - 11:05
![]() GobertBernadette wrote:
GobertBernadette wrote:
Il semble qu'il y a une erreur au niveau du corps à 30cm vous dites faire 18 augmentations alors qu'il faut faire 18 diminutions pour arriver de 90 mailles à 72 mailles.
09.10.2015 - 22:47DROPS Design answered:
Bonjour Mme Gobert et merci, c'est exact, la correction a été faite. Bon tricot!
12.10.2015 - 11:01
![]() Jytte wrote:
Jytte wrote:
Jeg kan ikke få antallet af udtagninger i bunden til at passe med 119 masker. Der skal tages 8 masker ud på hver retpind. Det kan jeg enten få det til at blive 13 pinde med udtagning (113 m i alt), 14 pinde (121 m) eller 15 pinde (129 m). Er det mig, der ikke kan regne, eller er der en skrivefejl? På forhånd tak for hjælpen.
31.08.2015 - 14:27DROPS Design answered:
Hej Jytte, ja men så tager du bare 6 m ud sidste gang så du får 119 m som der står i opskriften. God fornöjelse!
03.09.2015 - 20:12
|
|
Frank |
|
|
|
|
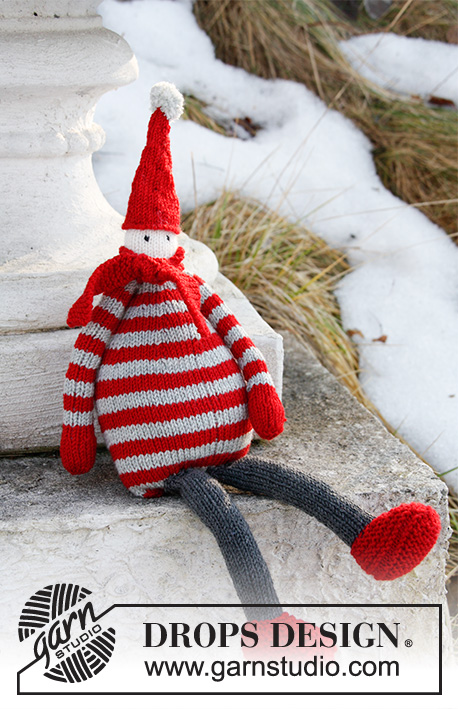
DROPS Christmas: Knitted DROPS snowman with scarf and hat in "Snow".
DROPS Extra 0-1056 |
|
|
GARTER ST (back and forth): K all rows. 1 ridge = 2 rows K. ---------------------------------------------------------- SNOWMAN: Work back and forth in GARTER ST - see explanation above - on circular needle. First work the bottom then work the body and head. Cast on 9 sts on circular needle size 8 mm with off white. ROW 1: K all sts. ROW 2 (= RS): * K 1, 1 YO *, repeat from *-* until 1 st remains, finish with K 1. ROW 3: K all sts - K the YOs twisted (i.e. work in the back loop of sts instead of front) to avoid holes (= 17 sts). ROW 4: * K 2, 1 YO *, repeat from *-* until 1 st remains, finish with K 1. ROW 5: As 3rd row (= 25 sts). REMEMBER THE KNITTING TENSION! ROW 6: * K 3, 1 YO *, repeat from *-* until 1 st remains, finish with K 1. Repeat 5th and 6th row upwards but on every inc, there is 1 st more between inc. When there are 121 sts on row, stop inc. The bottom is done. Insert 1 marker. NOW MEASURE PIECE FROM HERE! Then continue on garter st over all sts until piece measures 20 cm (adjust so that next row is from RS). On next row, dec 31 sts evenly (i.e. approx. every 4th st) = 90 sts. Work in garter st until piece measures 30 cm (adjust so that next row is from RS). On next row, dec 18 sts evenly (i.e. approx. every 5th st) = 72 sts. Work in garter st until piece measures 34 cm (adjust so that next row is from RS). Work as follows: * K 2, K 2 tog *, repeat from *-* = 54 sts. On next row from RS, dec 12 sts evenly = 42 sts. The body is finished. Insert 1 marker here. NOW MEASURE PIECE FROM HERE! On next row from RS, inc 24 sts evenly for head = 66 sts. When piece measures 15 cm from marker (adjust so that next row is from RS), dec 8 sts evenly = 58 sts. Repeat dec on every row from RS 6 more times = 10 sts. Cut the yarn and pull it through the remaining sts, tighten tog and fasten. ARMS: Worked back and forth on needle. Cast on 12 sts on needle size 5 mm with black. Work in stocking st until piece measures 13 cm. Switch to light blue. Work 1 ridge in garter st AT THE SAME TIME inc 6 sts evenly = 18 sts. Work in garter st until piece measures 18 cm. Work all sts K 2 tog = 9 sts. Work 1 row. On next row K 2 and 2 tog until 1 st remains, 1 st in garter st = 5 sts. Cut the yarn and pull it through the remaining sts (NOTE: Adjust so that yarn is long enough for assembly). Sew sleeve tog in outer loops of edge sts with light blue, then black. Make another arm. EYES: Cast on 1 st on needle size 5 mm with black. In same st work * K 1, 1 YO *, repeat from *-* 3 times in total, finish with K 1 in same st = 7 sts. On next row, P all sts tog. Cut the yarn. Pull yarn through the last st. Tie the 2 strands tog. Make another eye. BUTTONS: Cast on 1 st on needle size 5 mm with black. In same st work * K 1, 1 YO *, repeat from *-* 4 times in total, finish with K 1 in same st = 9 sts. On next row, P all sts. Then K 2 and 2 tog until 1 st remains, K 1 = 5 sts. P all sts tog. Cut the yarn. Pull yarn through the last st. Tie the 2 strands tog. Make 2 buttons more. NOSE: Worked back and forth in stocking st. Cast on 2 sts on needle size 5 mm with orange. P 1 row (= WS). On next row from RS work 2 sts in each of the 2 sts = 4 sts. Then inc on every row from RS by working 2 sts in the outermost st in each side of piece (= 2 sts inc). Continue inc until there are 12 sts on the needle. Cast off with K from WS. SCARF: Worked back and forth on needle. Cast on 16 sts on circular needle size 8 mm with light blue. Work in garter st. Cast off when piece measures approx. 90 cm. Fringes: 1 fringe = 1 thread orange of approx. 18 cm. Place yarn double, thread loop at the edge through st along cast-on edge and pull ends through loop. Insert loops in every other st along cast-on and cast-off edge. HAT: Worked back and forth in garter st on needle. Cast on 9 sts on needle size 8 mm with black. ROW 1: K all sts. ROW 2 (= RS): * K 1, 1 YO *, repeat from *-* until 1 st remains, finish with K 1. ROW 3: K all sts - K the YOs twisted (i.e. work in the back loop of sts instead of front) to avoid holes (= 17 sts). ROW 4: * K 2, 1 YO *, repeat from *-* until 1 st remains, finish with K 1. ROW 5: As 3rd row (= 25 sts). ROW 6: * K 3, 1 YO *, repeat from *-* until 1 st remains, finish with K 1. Repeat 5th and 6th row upwards but on every inc, there is 1 st more between inc. When there are 57 sts on row, stop inc. Insert 1 marker in piece. NOW MEASURE PIECE FROM HERE! Then work in stocking st over all sts until piece measures 10 cm. Now continue piece in garter st AT THE SAME TIME on 1st row inc 4 sts evenly = 61 sts. Repeat inc when piece measures 14 cm = 65 sts. Work in garter st until piece measures 18 cm. Loosely cast off. ASSEMBLY: Sew body tog in outer loops of edge sts. Before sewing it entirely tog place a regular plastic plate in the bottom so that the snowman has something to stand on. Fill the body and head with cotton wool (or use an old pillow) before sewing it tog. Tighten snowman tog in the bottom. Sew hat tog in outer loops of edge sts. Tighten tog the top of hat. Sew on eyes and buttons. Sew nose tog in outer loops of edge sts. Fill nose with some cotton wool and fasten on face. Fill arms with some cotton wool and fasten on body. Tie scarf around the neck and put the hat on the head. |
|
Have you finished this pattern?Tag your pictures with #dropspattern or submit them to the #dropsfan gallery. Do you need help with this pattern?You'll find 19 tutorial videos, a Comments/Questions area and more by visiting the pattern on garnstudio.com. © 1982-2026 DROPS Design A/S. We reserve all rights. This document, including all its sub-sections, has copyrights. Read more about what you can do with our patterns at the bottom of each pattern on our site. |


With over 40 years in knitting and crochet design, DROPS Design offers one of the most extensive collections of free patterns on the internet - translated to 17 languages. As of today we count 324 catalogues and 12267 patterns translated into English (UK/cm). 12267
We work hard to bring you the best knitting and crochet have to offer, inspiration and advice as well as great quality yarns at incredible prices! Would you like to use our patterns for other than personal use? You can read what you are allowed to do in the Copyright text at the bottom of all our patterns. Happy crafting!
Post a comment to pattern DROPS Extra 0-1056
We would love to hear what you have to say about this pattern!
If you want to leave a question, please make sure you select the correct category in the form below, to speed up the answering process. Required fields are marked *.