
Popular categories
Looking for a yarn?


Comments / Questions (68)
![]() Jean Brickey wrote:
Jean Brickey wrote:
First I agree with Ann Marie Marshall, I wish the pattern was written simpler. I am not sure if you are doing the foot in the round or in pieces. If in the round then why can't you use circular needles? Second it says to work 4 ridges. What is a ridge? and what is A.1? Not sure where you are going with this.
08.10.2014 - 19:46DROPS Design answered:
Dear Mrs Brickey, start with the cuff (around ankle), then work the instep back & forth over the first 10 sts (+ 2 sts inc), then pick up sts each side of instep + knit back sts from st holder and work foot in the round, dec then for heel and toe (seam is under foot). Finish then with the loose edge to sew around the slipper. 1 ridge = K2 rows or K1 round, P1 round. A.1= diagram for the pattern. You may use circular needle for foot but maybe then with magic loop technic. Happy knitting!
09.10.2014 - 09:54
![]() Maggie Marshall wrote:
Maggie Marshall wrote:
Would live these knitted slipper boot patterns but they wouldn't print
07.10.2014 - 04:52DROPS Design answered:
Dear Mrs Marshall, when you click on the button "Print:pattern", make sure your browser allows popup windows, a new window with an add will open, click on "continue to print the pattern" in this new window to launch printing. Happy knitting!
07.10.2014 - 09:24
![]() Ann Marie Marshall wrote:
Ann Marie Marshall wrote:
Please I need help on the pattern slippers 158-47 I do not understand the pattern I wish it was written out better that that
03.10.2014 - 19:53DROPS Design answered:
Dear Mrs Marshall, you first work some rounds around ankle, then work the upper foot over the first 10 sts (inc 1 st each side), then work around picking up sts along both side of upper foot to finish with sole. A video will comme soon, please stay tuned. Happy knitting!
04.10.2014 - 17:20
![]() Nadine Lowden wrote:
Nadine Lowden wrote:
Pattern says all slippers require 300g. but when you go to order it is only 200g. I am confused. will 200g do a pair.
03.10.2014 - 16:42DROPS Design answered:
Dear Mrs Lowden, you need 300 g Andes to work these slippers, ie 3 balls Andes, check stock of your Drops store and contact them if necessary to know when they will have more if they don't have 3 balls right now. Happy knitting!
03.10.2014 - 16:49
![]() Marie Hall wrote:
Marie Hall wrote:
What is the tension for the slipers
01.10.2014 - 18:14DROPS Design answered:
Dear Mrs Hall, tension to this pattern is 13 sts x 17 rows in stockinette st = 10 x 10 cm ( 4'' x 4''). Happy knitting!
02.10.2014 - 08:58
![]() Amanda wrote:
Amanda wrote:
I'm trying to make the foot i just want to know where it says K2 tog on each side of marker 4 a round is it with each marker as it says to put 2 markers. I've knitted patterns before but I'm so confused with this one
30.09.2014 - 17:34DROPS Design answered:
Dear Amanda, you insert 2 markers, one at the mid top of toe and the 2nd one at the mid heel, then work K2 tog each side of these both markers = 4 dec sts per dec round (= every other round). You dec then 2 sts on top of toe and 2 sts on mid back. Happy knitting!
01.10.2014 - 09:18
![]() Rose MAcPherson wrote:
Rose MAcPherson wrote:
Is there a video that I can watch for this pattern,. I do not understand it at all. I have started them but have no idea how or what to do. Thank you for any help at all.
22.09.2014 - 17:57DROPS Design answered:
Dear Mrs MacPherson, a video showing how to work this pattern be uploaded as soon as possible. Stay tuned ! Happy knitting!
02.10.2014 - 14:08
![]() Cindy wrote:
Cindy wrote:
I am not used to a pattern explained this way. I am used to row 1... row 2... row 3.. etc. But these patterns are so beautiful! I have to try. Will let you know how it goes :)
19.09.2014 - 05:39
![]() Knut wrote:
Knut wrote:
27-27-29 refers to different sizes, 37-37-37 also
18.09.2014 - 08:29
![]() Terry wrote:
Terry wrote:
I am stuck at the foot. I have done the leg, 37-37-39. Next I am to keep first 10 stiches on the needle, then put remaining 27-27-29 on a stich holder. 37-37-39 = 113. 10 + 27-27-29 = 93. where are the remaining 20 stiches?
18.09.2014 - 02:45DROPS Design answered:
Dear Terry, when leg part is done, you work foot over the first 10 sts, the remaining 27 sts (1st and 2nd size) or 29 sts (3rd size) go onto a st holder. You then work over the first 10 sts the lenght stated for your size, then pick up sts (either 12, 14 or 16 sts - see size) each side of the middle piece + knit back sts from st holder = 61 sts in 1st size, 65 sts in 2nd size, 71 sts in larger size). Happy knitting!
18.09.2014 - 09:00
|
|||||||
One Step Ahead#onestepaheadslippers |
|||||||
 |
 |
||||||
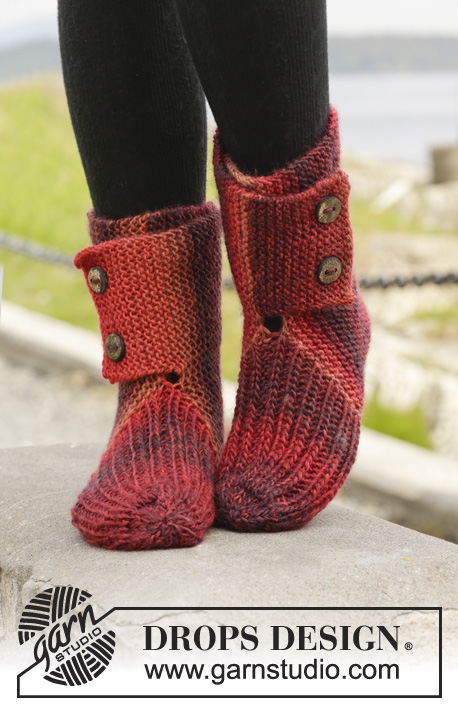
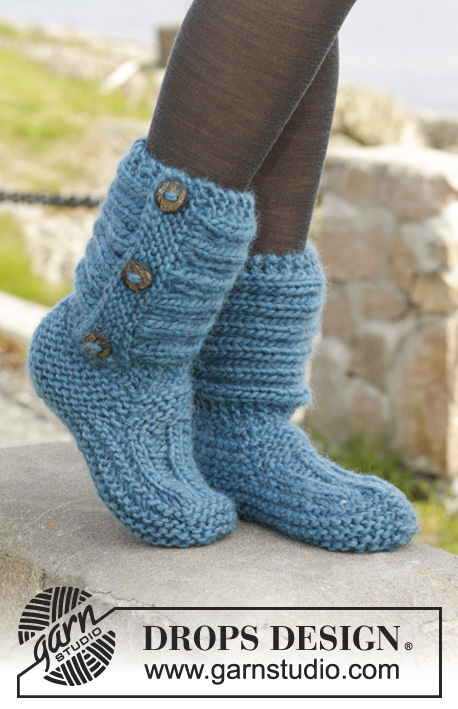
Knitted DROPS slippers in garter st with rib in "Andes".
DROPS 158-47 |
|||||||
|
GARTER ST (in the round on double pointed needles): * K 1 round and P 1 round *, repeat from *-*. 1 ridge = 2 rounds. GARTER ST (back and forth on needle): K all rows. 1 ridge = 2 rows K. PATTERN: See diagram A.1. PATTERN 2: Row 1 (= RS): * K 2, P 2 *, repeat from *-* until 2 sts remain, K 2. Row 2 (= WS): K over K and P over P. Repeat 2nd row ---------------------------------------------------------- SLIPPER: First work an edge at the bottom of leg, then work the foot. Then work a loose leg across. LEG: Cast on 37-37-39 sts on double pointed needles size 6 mm with Andes. Work in GARTER ST in the round - see explanation above - until piece measures approx. 4 cm, finish after 1 round P. REMEMBER THE KNITTING TENSION! FOOT: Now work piece back and forth. Now keep the first 10 sts on the needle, slip the remaining 27-27-29 sts on 1 stitch holder. Now work a middle part according to PATTERN 2 – see explanation above, over the 10 sts – AT THE SAME TIME at the end of the next 2 rows cast on 1 new edge st (work edge st in GARTER ST - see explanation above) = 12 sts. When middle part measures 7-8½-10 cm, dec 1 edge st in each side = 10 sts. Then slip the sts from stitch holder back on needle and pick up 12-14-16 sts on each side of middle part (inside 1 edge st) = 61-65-71 sts on needle. NOW MEASURE PIECE FROM HERE! Insert 1 marker in the middle of the 10 sts on middle part (= mid front on toe) and 1 marker in st at the back of heel, there are 30-32-35 sts between markers in each side. Now continue piece in the round in garter st. When piece measures 2 cm, K 2 sts tog on each side of every marker on every other round (= 4 sts less per round). Continue dec until piece measures 5-5-6 cm. Cast off the remaining sts. Sew seams under foot in outer loops of edge sts to avoid a chunky seam. LOOSE LEG WORKED ACROSS: Worked back and forth on needle. Cast on 22 sts on needle size 6 mm with Andes. Work 4 ridges AT THE SAME TIME on last row inc 6 sts evenly = 28 sts. Work according to A.1 (= 28 sts) until piece measures approx. 35-36-38 cm. Work 4 ridges AT THE SAME TIME on 1st row dec 6 sts evenly = 22 sts. Cast off. Place cast-off edge over cast-on edge and sew on 3 buttons for decoration through ridges on the leg. ASSEMBLY: Sew the loose leg worked across to cast-on edge on leg (i.e. cast-on edge for leg at beg of pattern). Sew the loose leg so that buttons are placed on the outside of slipper with opening faced backwards towards the heel – sew from WS so that seam is invisible. Knit another slipper the same way, make sure that the leg opening is in the opposite side. |
|||||||
Diagram explanations |
|||||||
|
|||||||
 |
|||||||
Have you finished this pattern?Tag your pictures with #dropspattern #onestepaheadslippers or submit them to the #dropsfan gallery. Do you need help with this pattern?You'll find 18 tutorial videos, a Comments/Questions area and more by visiting the pattern on garnstudio.com. © 1982-2026 DROPS Design A/S. We reserve all rights. This document, including all its sub-sections, has copyrights. Read more about what you can do with our patterns at the bottom of each pattern on our site. |
|||||||


With over 40 years in knitting and crochet design, DROPS Design offers one of the most extensive collections of free patterns on the internet - translated to 17 languages. As of today we count 324 catalogues and 12267 patterns translated into English (UK/cm). 12267
We work hard to bring you the best knitting and crochet have to offer, inspiration and advice as well as great quality yarns at incredible prices! Would you like to use our patterns for other than personal use? You can read what you are allowed to do in the Copyright text at the bottom of all our patterns. Happy crafting!
Post a comment to pattern DROPS 158-47
We would love to hear what you have to say about this pattern!
If you want to leave a question, please make sure you select the correct category in the form below, to speed up the answering process. Required fields are marked *.