
Popular categories
Looking for a yarn?


Comments / Questions (49)
![]() Huguenet wrote:
Huguenet wrote:
Je voudrais tricoter le pull drops design modele n fa -228 skagen mais impossible de comprendre le rang n 2 et 3 concernant comment faire les augmentations et à quel endroit du rang Dans l'attente de votre réponse . Salutations
26.07.2015 - 21:31DROPS Design answered:
Bonjour Mme Huguenet, tricotez le rang 2 ainsi (sur l'endroit): 2 m end, *1 jeté (= 1 augm.), tricotez à l'endroit jusqu'à ce qu'il reste 2 m avant le marqueur suivant, 1 jeté, 2 m end, marqueur, 2 m end, 1 jeté, continuez à l'endroit jusqu'à ce qu'il reste 2 m avant le marqueur suivant, 1 jeté, 2 m end, marqueur, 2 m end, 1 jeté* tricotez à l'end jusqu'à ce qu'il reste 2 m, 1 jeté, 2 m end = 6 augm. Montez 4 m. Au rang 3, tricotez toutes les mailles à l'env (les jetés torse à l'env) et montez 4 m à la fin du rang). Bon tricot!
27.07.2015 - 17:52
![]() Ester Moreira wrote:
Ester Moreira wrote:
Hello I m doing this sweater, which is looking great, but I got to the part where I ve to do the "shorter front/half moon style", a few cms before the ribbing at the end, where I work rigth and wrong sides, I noticed that there ares holes in the stitches I putback on the sticth holder, once I restarted working in rounds.... how can I avoid this??? I ve tried everything but it doesn t work...... Kind regards Ester
06.07.2015 - 15:15DROPS Design answered:
Dear Ester, at the transitions between short rows (to shape the "half moon style"), you can pick up strand between sts and work it twisted with next st tog to avoid holes. Happy knitting!
06.07.2015 - 16:25
![]() Birgith Pedersen wrote:
Birgith Pedersen wrote:
Den må jeg eje tror den bliver fin i æblegrøn
03.07.2014 - 17:03
![]() Ina wrote:
Ina wrote:
Hallo, ich ich bin beim letzten Schritt bevor der Rumpfteil gestrickt wird. Ich habe 20x 8 Maschen zugenommen nun kommt der Schritt indem alle 4 Runden zugenommen wird. Aber in der Anleitung steht für meine Grosse eine Zunahme von 0, wie komme ich nun auf die vorgebene Maschenanzahl, wenn ich nicht mehr zunehmen soll? Vielen Dank schon jetzt für die Antwort. Viele Grüsse Ina PS: Dies ist mein erster Pulli den ich stricke
16.02.2014 - 17:33DROPS Design answered:
Liebe Ina, ich vermute, Sie stricken Größe XXL und es fehlen Ihnen nun noch 8 M bis zur angegebenen M-Zahl (d.h. Sie haben 276 M statt 284 M)? Sie müssen beachten, dass Sie insgesamt 21x in jeder 2. Rd zunehmen, nicht nur 20x. Wenn Sie nun also in der nächsten 2. Rd noch 1x 8 M zunehmen, dann haben Sie die benötigte M-Zahl, in Ihrer Größe wird dann nicht weiter zugenommen und Sie können mit dem Rumpfteil weitermachen. Viel Spaß beim Stricken!
16.02.2014 - 17:55
![]() Jutta wrote:
Jutta wrote:
Hallo, wenn ich das Glittergarn weglasse, reichen dann fuer gr.m trotzdem 200g Fabel und 100g Kid silk? Kommt mir so wenig vor.
27.01.2014 - 22:07DROPS Design answered:
Liebe Jutta, Sie können sicherheitshalber je 1 Knäuel mehr kaufen, also je 5 Knäuel.
28.01.2014 - 07:59
![]() Inga Hansen wrote:
Inga Hansen wrote:
Skal hver enkelt maske strikkes med alle 3 tråde på èn gang? for mig at se på billedet er der striber i hhv. grå og blå!
09.01.2014 - 18:00DROPS Design answered:
Hej Inga. Ja, der strikkes med 3 traade. Det er printen in Fabel garnet som automatisk sörger for striberne.
09.01.2014 - 18:09
![]() Simke wrote:
Simke wrote:
Kan deze trui ook met rechte breinaalden gemaakt worden? En zo ja hebben jullie hier dan ook een patroontje van?
13.05.2013 - 15:06DROPS Design answered:
Hoi Simke. Ik denk dat het beste is om dit model in de rondte te breien vanwege de vorm en pas. Ik kan u niet helpen met een apart patroontje voor heen en weer breien.
13.05.2013 - 20:29
![]() Andrea wrote:
Andrea wrote:
Jeg får også huller i arbeidet, og videoen dere har linket til viser jo et avfelt arbeid, mens dette er jo satt på maskoholder/tråd?
05.05.2013 - 16:46DROPS Design answered:
Hej Andrea. Du kan fjerne eventuele huller ved at samle en ekstra maske op hvor hullet er og strik denne sammen med den naeste maske.
08.05.2013 - 12:10
![]() Ulla Ovesen wrote:
Ulla Ovesen wrote:
Jeg har læst denne opskrift igennem og jeg er stadig ikke sikker på at jeg har forstået den ret, det er især det stykke der strikkes frem og tilbage i starten der volder mig problemer,er det fordi det er omvendt halsindtagninger at der skal slås masker op og at det så bliver samlet når maskeantal er opnået?
15.04.2013 - 21:58DROPS Design answered:
Det er simpelthen fordi at halsen på ryggen skal sidde højere en halsen på forstykket. Du starter med at strikke frem og tilbage over rygstygget, tager ud til raglan som beskrevet og sætter løbende masker op til forstykket. Når alle masker er slået op, samler du dem og strikker rundt. Jeg kan godt forstå det virker forvirrende, men følg opskriften og du skal se hvad der menes :-)
30.04.2013 - 15:54Trötter wrote:
Vid diagrammet - som alltid!
28.02.2013 - 19:45
|
||||
Skagen#skagensweater |
||||
 |
 |
|||
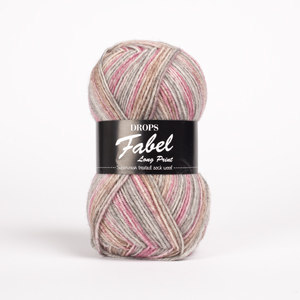
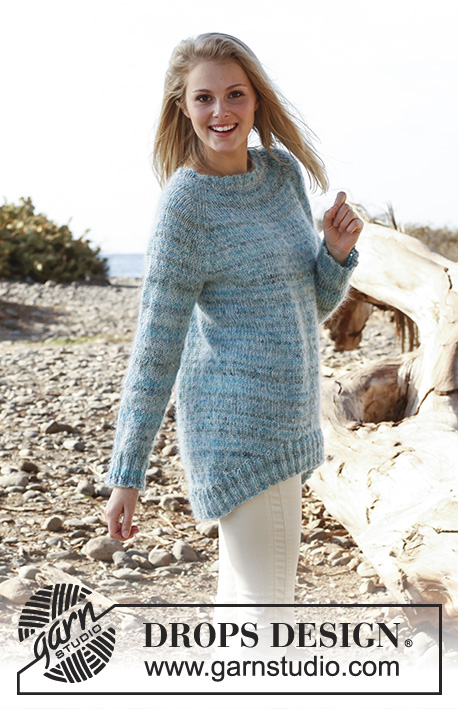
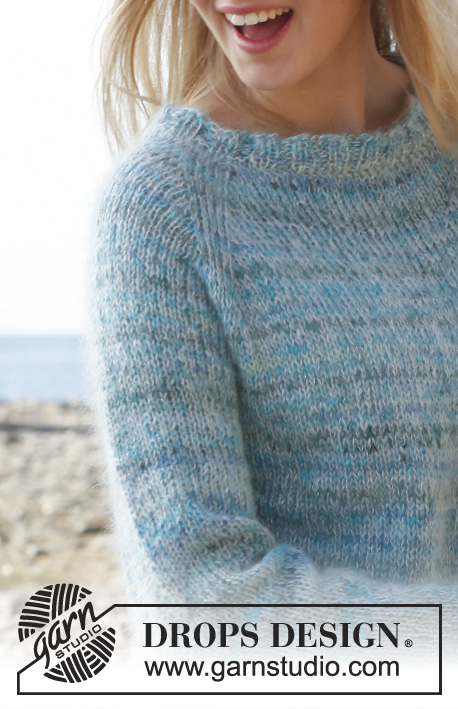
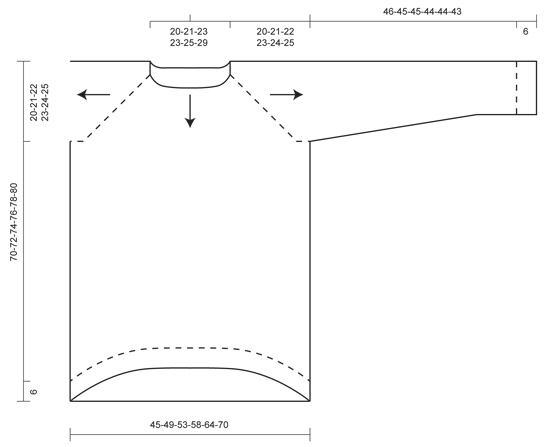
Knitted DROPS top down jumper with raglan in “Fabel”, “Kid Silk” and “Glitter”. Size: S - XXXL
DROPS 148-17 |
||||
|
INCREASE TIP: Back and forth on needle: Inc 1 st from RS by making 1 YO, on next row P YO twisted. In the round on needle: Inc 1 st by making 1 YO, on next round K YO twisted. DECREASE TIP: Dec 1 st on each side of marker as follows: Work until 3 sts remain before marker, slip 1 st as if to K, K 1, psso, K 2 (marker is between these sts), K the next 2 tog. --------------------------------------------------------- RAGLAN: The piece is worked from the neck and down. First work back and forth until front piece has been cast on, then work in the round. Cast on 48-50-52-52-52-58 sts on circular needle size 5.5 mm with 1 thread of each yarn. Row 1 (= WS): P all sts. Insert 1 marker 8-8-8-8-6-6 sts in from each side (= 8-8-8-8-6-6 sts on sleeve in each side, 32-34-36-36-40-46 sts on back piece between markers). Move the markers upwards when working. Row 2 (= RS): K 2, * inc 1 st - READ INCREASE TIP, K until 2 sts remain before next marker, inc 1 st, K 4 (marker is between these sts), inc 1 st, K until 2 sts remain before next marker, inc 1 st, K 4 (marker is between these sts), inc 1 st *, K until 2 sts remain, inc 1 st, K 2 = 6 inc sts. Now cast on 4 sts on needle for front piece = 58-60-62-62-62-68 sts on needle. Row 3: P all sts, at the end of row cast on 4 sts = 62-64-66-66-66-72 sts. Insert 1 new marker 4 sts in from each side (= 4 sts on front piece in each side, 4 markers in total in piece). Row 4: K 6, (1st marker is after the first 4 sts), repeat from *-* on 2nd row, K until 2 sts remain before last marker, inc 1 st, K 6 (last marker is before the last 4 sts) = 6 inc sts. Cast on 4 sts = 72-74-76-76-76-82 sts on needle. Row 5: P all sts, at the end of row cast on 4 sts = 76-78-80-80-80-86 sts (= 8 sts on front piece in each side). Row 6: K 10, (1st marker is after the first 8 sts), repeat from *-* on 2nd row, K until 2 sts remain before last marker, inc 1 st, K 10 = 6 inc sts (last marker is before the last 8 sts). Cast on 11-12-13-13-15-18 sts = 93-96-99-99-101-110 sts on needle. Row 7: P all sts, at the end of row cast on 11-12-13-13-15-18 sts = 104-108-112-112-116-128 sts on needle (= 19-20-21-21-23-26 sts on front piece in each side, 38-40-42-42-46-52 sts on back piece and 14-14-14-14-12-12 sts on each sleeve). REMEMBER THE KNITTING TENSION! Then work the piece in the round on needle as follows: ROUND 1: * K until 2 sts remain before next marker, inc 1 st, K 4 (marker is between these sts), inc 1 st *, repeat from *-* 3 more times (= 4 times in total), K the remaining sts = 8 inc sts. ROUND 2: K all sts. Then inc 8 sts on round the same way - i.e. inc 1 st on each side of every marker - every other round 10-11-12-17-20-21 more times (11-12-13-18-21-22 inc in total on front piece), then every 4th round 3-3-3-1-0-0 times in total. When all inc are done, there are 216-228-240-264-284-304 sts on needle (= 66-70-74-80-88-96 sts on front and back piece, 42-44-46-52-54-56 sts on each sleeve). NOTE! Insert 1 marker in the middle of front piece (marks front piece which has shorter raglan). BODY: Worked in the round. Work next round as follows: Work 66-70-74-80-88-96 sts on front piece, * slip the next 42-44-46-52-54-56 sts (= sleeve) on 1 stitch holder, cast on 6-8-10-12-14-16 sts for armhole *, work the next 66-70-74-80-88-96 sts on back piece, repeat from *-* 1 more time = 144-156-168-184-204-224 sts on needle. Then work in stocking st over all sts. NOTE: Insert 1 new marker mid under left armhole, i.e. between the 6-8-10-12-14-16 new sts for armhole (= beg of round), insert 1 new marker mid under right armhole, i.e. between the 6-8-10-12-14-16 new sts for armhole (= the side) = 72-78-84-92-102-112 sts between markers. Move the markers upwards when working. Continue in the round in stocking st. When piece measures 52-54-55-57-58-60 cm in total vertically (measured on back piece), insert 1 marker on each side of the middle 22-28-28-36-38-46 sts on front piece. Then work back and forth as follows: Row 1 (= RS): Work until 1st marker before the middle sts on front piece, slip the next 22-28-28-36-38-46 sts on 1 stitch holder, turn piece. Row 2 (= WS): P all sts on needle. Row 3: K until 3 sts remain on needle, slip the last 3 sts on stitch holder, turn piece. Row 4: P until 3 sts remain on needle, slip the last 3 sts on stitch holder, turn piece. Then slip sts at the end of every row on stitch holder the same way as follows: 3 sts 0-0-1-1-3-4 more times (1-1-2-2-4-5 times in total), 2 sts 10-10-10-10-9-8 times in total = 2 sts remain before each marker in the side. Now slip all sts on stitch holder on to same circular needle = 144-156-168-184-204-224 sts on needle as before. Then work in the round until finished measurements. On next round switch to circular needle size 5 mm and K while AT THE SAME TIME inc 36-40-44-48-52-56 sts evenly on round = 180-196-212-232-256-280 sts. Then work rib as follows: * K 2, P 2 *, repeat from *-* the entire round. When rib measures 6 cm, loosely cast off with K over K and P over P, piece measures approx. 70-72-74-76-78-80 cm in total. SLEEVE: Worked in the round on double pointed needles size 5.5 mm. Cast on 3-4-5-6-7-8 sts on double pointed needles with 1 thread of each yarn, knit up 42-44-46-52-54-56 sts on stitch holder from one sleeve, cast on 3-4-5-6-7-8 sts on double pointed needles = 48-52-56-64-68-72 sts in total (= 6-8-10-12-14-16 sts for armhole). Insert 1 marker at beg of round (= mid under sleeve). NOTE: Now measure the piece from here. Then work in stocking st in the round for 3 cm. On next round dec 1 st - READ DECREASE TIP - on each side of marker. Repeat dec every 5½-5-4-2½-2½-2 cm 6-7-8-12-13-14 more times (7-8-9-13-14-15 times in total) = 34-36-38-38-40-42 sts. Continue in stocking st until piece measures 40-39-39-38-38-37 cm. On next round switch to double pointed needles size 5 mm and K while AT THE SAME TIME inc 10-8-10-10-12-10 sts evenly on round = 44-44-48-48-52-52 sts. Continue to work rib as follows: * K 2, P 2 *, repeat from *-* the entire round. When rib measures 6 cm, loosely cast off with K over K and P over P, piece measures approx. 46-45-45-44-44-43 cm (shorter measurements in the larger sizes because of broader shoulder width). ASSEMBLY: Sew the openings under the sleeves. NECK EDGE: Worked in the round on double pointed needles size 5 mm. Beg at transition between back piece and left sleeve, knit up from RS approx. 90 to 110 sts around the entire neck edge with 1 thread of each yarn. K next round - while AT THE SAME TIME adjusting no of sts to 80-88-92-96-100-108. Continue to work rib as follows: * K 2, P 2 *, repeat from *-* the entire round. When rib measures 2 cm, loosely cast off all sts with K over K and P over P. |
||||
Diagram explanations |
||||
|
||||
 |
||||
Have you finished this pattern?Tag your pictures with #dropspattern #skagensweater or submit them to the #dropsfan gallery. Do you need help with this pattern?You'll find 17 tutorial videos, a Comments/Questions area and more by visiting the pattern on garnstudio.com. © 1982-2026 DROPS Design A/S. We reserve all rights. This document, including all its sub-sections, has copyrights. Read more about what you can do with our patterns at the bottom of each pattern on our site. |
||||


With over 40 years in knitting and crochet design, DROPS Design offers one of the most extensive collections of free patterns on the internet - translated to 17 languages. As of today we count 324 catalogues and 12267 patterns translated into English (UK/cm). 12267
We work hard to bring you the best knitting and crochet have to offer, inspiration and advice as well as great quality yarns at incredible prices! Would you like to use our patterns for other than personal use? You can read what you are allowed to do in the Copyright text at the bottom of all our patterns. Happy crafting!
Post a comment to pattern DROPS 148-17
We would love to hear what you have to say about this pattern!
If you want to leave a question, please make sure you select the correct category in the form below, to speed up the answering process. Required fields are marked *.