
Popular categories
Looking for a yarn?


Comments / Questions (81)
![]() Mary wrote:
Mary wrote:
These patterns are so hard to understand. Even when I try to look at the patterns
10.07.2024 - 07:14
![]() Mary wrote:
Mary wrote:
I have looked at so many of your patterns for so long, this maybe the only one I maybe able to challenge. The patterns are so difficult to read. Thanks for sharing and putting larder sizses
09.07.2024 - 00:58
![]() Marika wrote:
Marika wrote:
Vorrei provare a realizzare questo cardigan con il filato brushed alpaca silk. Non so se è una buona idea! Per calcolare quanto filato devo acquistare, sommo i 3 tipi di filato nella descrizione e poi uso il convertitore?
26.07.2021 - 22:44DROPS Design answered:
Buonasera Marika, può usare 3 capi di Brushed Alpaca Silk. Per calcolare la quantità deve trovare il metraggio totale utilizzato con i filati indicati nel modello per la sua taglia, poi calcolare il numero di gomitoli di Brushed Alpaca silk necessari. Buon lavoro!
29.07.2021 - 09:56
![]() Fabiana Luchete wrote:
Fabiana Luchete wrote:
Não tem gráfico da parte das costas???
12.02.2021 - 20:12
![]() Barb Alber wrote:
Barb Alber wrote:
Is it possible to crochet this without the sleeves?
17.04.2018 - 01:50DROPS Design answered:
Dear Mrs Albert, it's probably possible, you may like then to just crochet a small finishing edge around both armholes. Happy crocheting!
17.04.2018 - 09:19Gen Hart wrote:
Hello, I’m working on my first sleeve and not sure if I’m on the right track... This section here... “repeat inc every 6-5-5-4-4-3½ cm / 2 3/8"-2"-2"-1½"-1½"-1 1/4" 6-8-8-9-10-11 more times = 50-54-56-58-62-64 dc.” I’m making the second size so in need to increase every 5cm. My question is, do I crochet 5cm then increase the next row or increase on the row which makes 5cm? I hope I’m making sense! Thank you!
16.03.2018 - 22:05DROPS Design answered:
Dear Gen, I would crochet 5 cm and increase in the next row. The next time start measuring from the row in which the increase was done. I hope this helps. Happy crocheting!
17.03.2018 - 12:15
![]() Karen wrote:
Karen wrote:
Jullie hebben ooit gezegd dat het haken tussen eerste en tweede hoek moest zijn in plaats van haken tussen tweede en derde hoek. Maar er is volgens mij nog iets blijven hangen van deze zin in het patroon : ==> Knip de draad af, haak nu heen en weer tussen de eerste en tweede hoek. Haak vanaf de eerste hoek als volgt: 2 stk in de l-lus in de hoek, 1 stk in elk stk/l tot de derde hoek Het voorlaatste woord moet tweede hoek zijn ipv derde hoek. Klopt ?
29.04.2016 - 15:00Adriana wrote:
I understand the sizes are S - M - L - XL - XXL - XXXL. But with knowing that, what size in inches would each size be?
25.04.2016 - 07:40DROPS Design answered:
Dear Adriana, scrolling down the page, you can find a measurement chart, compare it with a similar garment you have, and you'll find the right size. Happy crocheting!
25.04.2016 - 10:32Ximena Gomez wrote:
Buenas tardes, estoy feliz por haberlos encontrado, estoy en el proceso del segundo proyecto y estoy encantada, pero ya tengo una pregunta: no me es muy clara la forma de hacer la manga, no entiendo esto de "hasta que resten 5-5-0-0-3-3 cadenetas...", me podrian ayudar con esto? Muchas gracias.
09.04.2016 - 03:44DROPS Design answered:
Hola Ximena. Aquí quiere decir: " hasta que queden por trabajar 5-5-0-0-3-3 cadenetas en la fila". Cada número corresponde a una talla (S – M – L – XL – XXL – XXXL). Para que el trabajo sea más fácil marca los números que corresponden a la talla elegida antes de empezar la labor.
10.04.2016 - 21:04
![]() Hannelore wrote:
Hannelore wrote:
Und gibt es vielleicht ein Foto von diesem Abschnitt?
24.04.2015 - 20:46DROPS Design answered:
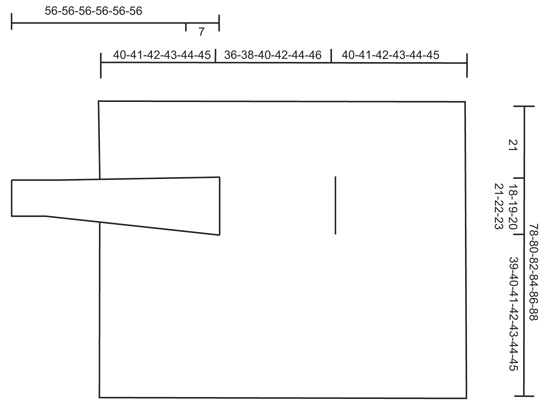
Leider nein. In der Maßskizze ist der senkrechte Strich die Stelle, an der Sie statt des Musters die Lm häkeln (= Armausschnitt) und danach mit dem Muster wie zuvor weiterhäkeln.
03.05.2015 - 12:55
|
|
Jennifer#jennifervest |
|
 |
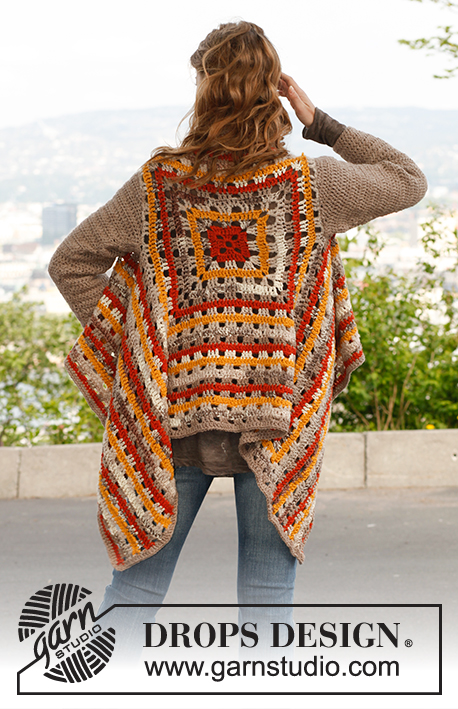 |
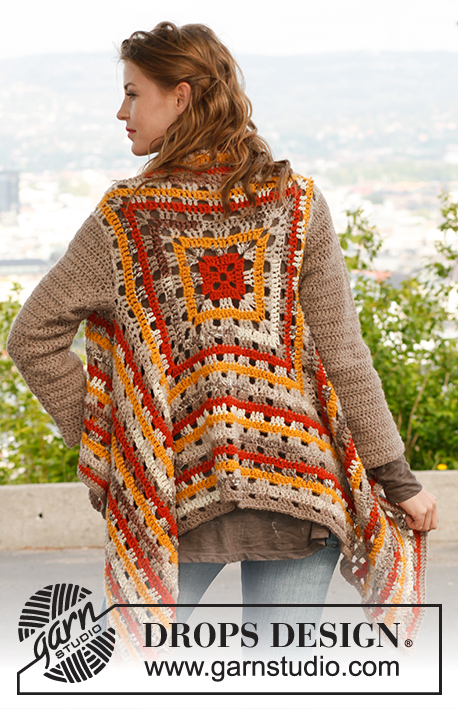
Crochet DROPS jacket in ”Nepal”, ”Big Fabel” and ”Alpaca Bouclé”. Size: S - XXXL.
DROPS 143-38 |
|
|
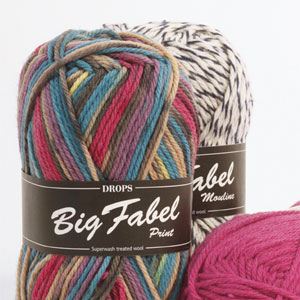
STRIPES: Work stripes as follows: * 1 round orange Nepal, 1 round Big Fabel, 1 round goldenrod Nepal, 1 round Alpaca Bouclé, 1 round Big Fabel, 1 round camel Nepal *, repeat from *-* until garment is finished. CROCHET INFO (applies to sleeve): Replace first tr on every row with 3 ch. DECREASE TIP (applies to sleeve): Dec at beg of row by working sl sts over the no of tr to be dec. Dec at end of row by working until same no of tr to be dec remains, turn piece. ---------------------------------------------------------- BODY: Work in the round from mid back. Crochet 8 ch with orange Nepal on hook size 5 mm and form a ring with 1 sl st in first ch. ROUND 1: Work with orange Nepal. Work 3 ch (= 1 tr), 2 tr in ch-ring, * 4 ch, 3 tr in ch-ring *, repeat from *-* a total of 3 times and finish with 4 ch and 1 sl st in 3rd ch from beg of round. ROUND 2: READ STRIPES. 3 ch (= 1 tr), 1 tr in each of the next 2 tr, * 2 tr in next ch-loop, 4 ch, 2 tr in same ch-loop, 1 tr in each of the next 3 tr *, repeat from *-* a total of 3 times, 2 tr in next ch-loop, 4 ch, 2 tr in same ch-loop, finish with 1 sl st in 3rd ch from beg of round. ROUND 3: 3 ch (= 1 tr), 1 tr in each of the next 2 tr, * 2 ch, skip 2 tr, 2 tr in next ch-loop, 4 ch, 2 tr in same ch-loop, 2 ch, skip 2 tr, 1 tr in each of the next 3 tr *, repeat from *-* a total of 3 times, 2 ch, skip 2 tr, 2 tr in next ch-loop, 4 ch, 2 tr in same ch-loop, 2 ch, skip 2 tr, finish with 1 sl st in 3rd ch from beg of round. ROUND 4: 3 ch (= 1 tr), 1 tr in each of the next 2 tr, * 2 tr in next ch-loop, 1 tr in each of the next 2 tr, 2 tr in next ch-loop, 4 ch, 2 tr in same ch-loop, 1 tr in each of the next 2 tr, 2 tr in next ch-loop, 1 tr in each of the next 3 tr *, repeat from *-* a total of 3 times, 2 tr in next ch-loop, 1 tr in each of the next 2 tr, 2 tr in next ch-loop, 4 ch, 2 tr in same ch-loop, 1 tr in each of the next 2 tr, 2 tr in next ch-loop, finish with 1 sl st in 3rd ch from beg of round. ROUND 5: 3 ch (= 1 tr), 1 tr in each of the next 2 tr, * 2 ch, skip 2 tr, 1 tr in each of the next 3 tr, 2 ch, skip 1 tr, 2 tr in next ch-loop, 4 ch, 2 tr in same ch-loop, 2 ch, skip 1 tr, 1 tr in each of the next 3 tr, 2 ch, skip 2 tr, 1 tr in each of the next 3 tr *, repeat from *-* a total of 3 times, 2 ch, skip 2 tr, 1 tr in each of the next 3 tr, 2 ch, skip 1 tr, 2 tr in next ch-loop, 4 ch, 2 tr in same ch-loop, 2 ch, skip 1 tr, 1 tr in each of the next 3 tr, 2 ch, skip 2 tr, finish with 1 sl st in 3rd ch from beg of round. ROUND 6: 3 ch (= 1 tr), 1 tr in each of the next 2 tr, * 2 tr in next ch-loop, 1 tr in each of the next 3 tr, 2 tr in next ch-loop, 1 tr in each of the next 2 tr, 2 tr in next ch-loop, 4 ch, 2 tr in same ch-loop, 1 tr in each of the next 2 tr, 2 tr in next ch-loop, 1 tr in each of the next 3 tr, 2 tr in next ch-loop, 1 tr in each of the next 3 tr *, repeat from *-* a total of 3 times, 2 tr in next ch-loop, 1 tr in each of the next 3 tr, 2 tr in next ch-loop, 1 tr in each of the next 2 tr, 2 tr in next ch-loop, 4 ch, 2 tr in same ch-loop, 1 tr in each of the next 2 tr, 2 tr in next ch-loop, 1 tr in each of the next 3 tr, 2 tr in next ch-loop, finish with 1 sl st in 3rd ch from beg of round. Repeat 5th and 6th round, with inc, there are 2 tr-groups more between every corner every other round. ARMHOLE: When square measures 36-38-40-42-44-46 cm x 36-38-40-42-44-46 cm, work as follows – adjust so that this is a round worked as 5th round: Work as before until first corner, work 2 tr, 4 ch, 2 tr in the corner. Then work ch until the middle of next side – work 1 ch over every tr/ch until the middle tr, work 1 tr in the middle tr and work until the third corner as before, work until the middle of next side, then work 1 ch over every tr/ch until the fourth corner, work 2 tr, 4 ch, 2 tr in the corner and work until beg of round as before. On next round work as before, in ch-loops for armholes work 1 tr in every ch. Continue as before until square measures 78-80-82-84-86-88 cm x 78-80-82-84-86-88 cm (i.e. 21 cm in all sizes from armhole), adjust so that last row is worked as 5th round. Cut the thread, now work back and forth between first and second corner. Work from the first corner as follows: 2 tr in ch-loop in the corner, 1 tr in every tr/ch until second corner, 2 tr in ch-loop in the corner. Turn and work back, continue pattern as on 5th and 6th round. Continue like this until 19-20-21-22-23-24 cm have been worked back and forth (without inc), cut the thread. Repeat on the other side, now work back and forth from third to fourth corner. Finally work a round with camel around the entire square, work 1 tr in every tr, in ch-loop in every corner work 4 tr. SLEEVE: The entire sleeve is worked back and forth with camel. Read crochet info! Work 44-44-46-46-49-49 loose ch (incl 4 ch to turn with) on hook size 5 mm with Nepal. ROW 1: 1 tr in 4th ch from hook (= 2 tr), * skip 1 ch, 1 tr in each of the next 6 ch *, repeat from *-* until 5-5-0-0-3-3 ch remain, skip 1 ch and work 1 tr in each of the last 4-4-0-0-2-2 ch = 36-36-38-38-40-40 tr. Then work 1 tr in every tr. When piece measures 7 cm, inc 1 tr in each side, repeat inc every 6-5-5-4-4-3½ cm 6-8-8-9-10-11 more times = 50-54-56-58-62-64 tr. Work until piece measures 49 cm (same in all sizes because of broader shoulder width on body in the larger sizes). Now dec at beg and end of every row for sleeve cap – SEE DECREASE TIP: 3 tr 1 time, 2 tr 2 times and 3 tr 1 time = 30-34-36-38-42-44 tr remain. Cut and fasten the thread, sleeve measures approx. 56 cm in all sizes. Work another sleeve. ASSEMBLY: Sew underarm seams. Sew in sleeves. |
|
 |
|
Have you finished this pattern?Tag your pictures with #dropspattern #jennifervest or submit them to the #dropsfan gallery. Do you need help with this pattern?You'll find 5 tutorial videos, a Comments/Questions area and more by visiting the pattern on garnstudio.com. © 1982-2026 DROPS Design A/S. We reserve all rights. This document, including all its sub-sections, has copyrights. Read more about what you can do with our patterns at the bottom of each pattern on our site. |
|


With over 40 years in knitting and crochet design, DROPS Design offers one of the most extensive collections of free patterns on the internet - translated to 17 languages. As of today we count 324 catalogues and 12267 patterns translated into English (UK/cm). 12267
We work hard to bring you the best knitting and crochet have to offer, inspiration and advice as well as great quality yarns at incredible prices! Would you like to use our patterns for other than personal use? You can read what you are allowed to do in the Copyright text at the bottom of all our patterns. Happy crafting!
Post a comment to pattern DROPS 143-38
We would love to hear what you have to say about this pattern!
If you want to leave a question, please make sure you select the correct category in the form below, to speed up the answering process. Required fields are marked *.