
Popular categories
Looking for a yarn?


Comments / Questions (182)
Lorena wrote:
Esta super elmodelo lo he hechoy me esta quedando muy bonito en lo unico que tengo problemas es en la hecha de las mangas ya queempiezan delgadas y llega un momento en que aumenta un punto y queda ancha. si me pueden ayudar gracias.
28.09.2012 - 20:33Zitouni wrote:
Bonjour, auriez vous s'il vous plais les explications avec des shemas, je ne sais pas lire le crochet
23.09.2012 - 13:13DROPS Design answered:
Bonjour Zitouni, il n'existe pas de schéma pour ce modèle. Je vous recommande de suivre tour après tour les indications, à l'aide des vidéos si nécessaire. Pour toute aide personnalisée, je vous remercie de bien vouloir prendre contact avec votre magasin DROPS. Bon crochet !
24.09.2012 - 08:56
![]() Dawn wrote:
Dawn wrote:
I'm having the same trouble understanding round 10. Please help!
21.09.2012 - 01:43DROPS Design answered:
Dear Dawn, could you indicate which size you are working ? Thank you.
13.11.2012 - 10:38Fabiola Gaete Gaete wrote:
Hola como están, saben me gustaría ver si me pueden enviar el diagrama de este modelo ya que estoy un poquito confundida con los puntos y también me gustaría ver algún diagrama de faldas a crochet que no fuera muy difícil de ante mano muchas gracias.
26.08.2012 - 02:30DROPS Design answered:
Fabiola, este modelo no tiene un diagrama. Para ver otros modelos de faldas en ganchillo, utiliza la "Búsqueda de patrones" en el margen izquierdo de la página principal. Saludos!
26.08.2012 - 06:39Ana María wrote:
Sería posible que me enviarán el diagrama de este modelo. De antemano, muchas gracias
21.08.2012 - 20:36
![]() Waldu wrote:
Waldu wrote:
Os felicito por el modelo, es precioso. Lo he realizado sin mangas y queda un chaleco divino. Vuestros modelos y explicaciones son geniales. Muchas felicidades!
21.08.2012 - 15:40
![]() Jannecke wrote:
Jannecke wrote:
Nå har jeg heklet selve jakken to ganger, og ermene 11 ganger. Ermene blir ikke som på bildet. Det blir flaggermusermer. Nå gir jeg straks opp og lager den til en vest istedet. Heklet først i størrelse xxxl, men den ble jo altfor stor! (og jeg er en plus size altså!!) Nå har jeg heklet den i størrelse L og den sitter perfekt. Men den ligner ikke bildet. Jakken blir under rumpa! Så om noen har noen tips til åssen jeg IKKE skal få flaggermusermer så blir jeg glad!!
21.08.2012 - 10:26
![]() Jannecke wrote:
Jannecke wrote:
Nå har jeg heklet selve jakken to ganger, og ermene 11 ganger. Ermene blir ikke som på bildet. Det blir flaggermusermer. Nå gir jeg straks opp og lager den til en vest istedet. Heklet først i størrelse xxxl, men den ble jo altfor stor! (og jeg er en plus size altså!!) Nå har jeg heklet den i størrelse L og den sitter perfekt. Men den ligner ikke bildet. Jakken blir under rumpa! Så om noen har noen tips til åssen jeg IKKE skal få flaggermusermer så blir jeg glad!!
21.08.2012 - 10:26DROPS Design answered:
Heisann. Plagget modellen har på seg er i str. xs/s og for å få ermhullet til å passe med de største størrelsene, blir ermene større. For ikke å få for vide ermer må sirkelen være mindre, men da vil ikke sirkelen/plagget passe de største størrelsene.
01.10.2012 - 13:37
![]() Anne Holm wrote:
Anne Holm wrote:
Kommer ikke lenger en til omg 10, får ikke mønsteret til stemme.Må være noe feil i oppskifta.Hekler M/L.Er det noen som har heklet den og fått den til?
14.08.2012 - 14:18DROPS Design answered:
Mønsteret skulle stemme. Hvis du kan fortaelle hvad der praecis gaar galt eller du kan tage forbi din butik for mere personlig hjaelp kan du nok komme videre
19.12.2012 - 14:44Claudia wrote:
Hermoso y muy femenino
13.08.2012 - 17:12
|
|
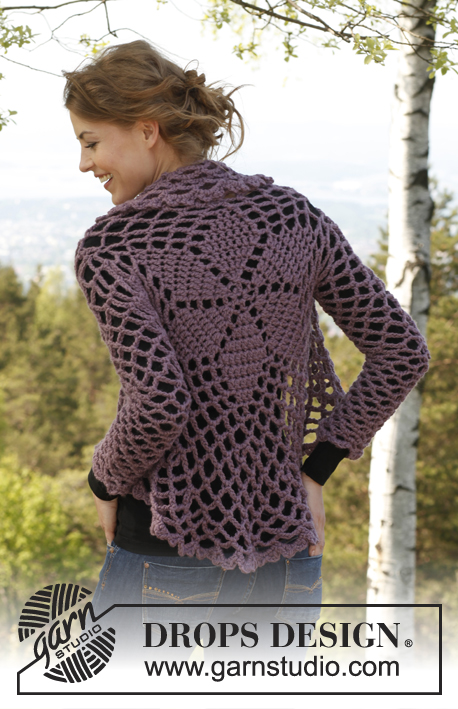
Dalie Delight#daliedelightjacket |
|
 |
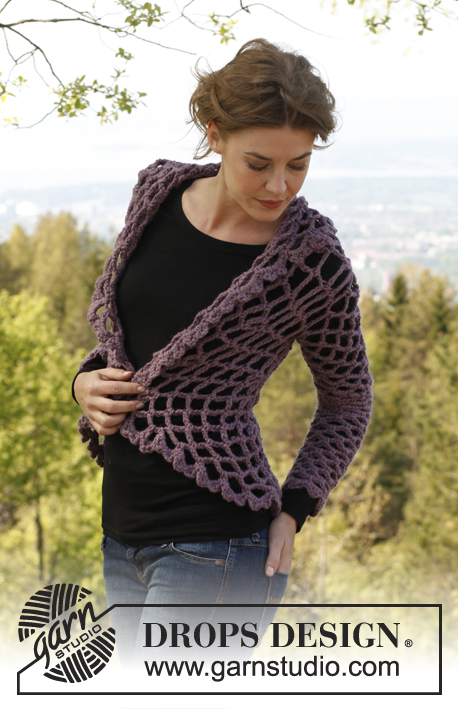 |
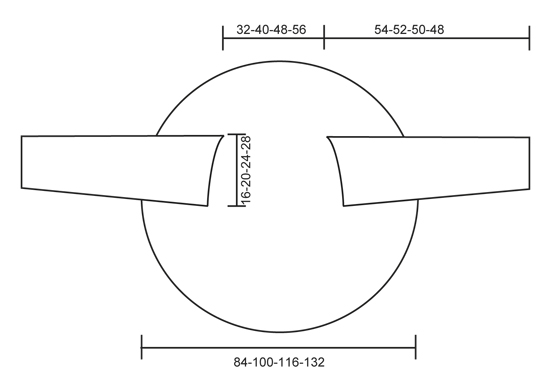
Crochet DROPS jacket worked in a circle in ”Andes”. Size: XS - XXXL.
DROPS 141-1 |
|
|
CROCHET TIP: Replace first tr on every tr round with 3 ch. Finish every tr round with 1 sl st in 3rd ch from beg of round. Finish every round starting with 3 ch and a 1 dc in first ch-loop with 1 sl st in 1st dc from beg of round. ---------------------------------------------------------- BODY: Worked in the round in a circle from mid back. Work 4 ch with Andes on hook size 9 mm. Form a ring with 1 sl st in first ch. READ CROCHET TIP! ALL SIZES: ROUND 1: * 1 tr in ch-ring, 2 ch *, repeat from *-* 5 more times (= 6 tr in total with 2 ch between each). ROUND 2: 3 tr in first tr, 2 ch, * 3 tr in next tr, 2 ch *, repeat from *-* the entire round (= 18 tr in total with 2 ch between every 3rd tr). ROUND 3: * 2 tr in first tr, 1 tr in next tr, 2 tr in next tr, 2 ch *, repeat from *-* the entire round (= 30 tr in total with 2 ch between every 5th tr). ROUND 4: * 2 tr in first tr, 1 tr in each of the next 3 tr, 2 tr in next tr, 2 ch *, repeat from *-* the entire round (= 42 tr in total with 2 ch between every 7th tr). ROUND 5: * 2 tr in first tr, 1 tr in each of the next 5 tr, 2 tr in next tr, 2 ch *, repeat from *-* the entire round (= 54 tr in total with 2 ch between every 9th tr). SIZE XS/S and M/L: ROUND 6: 1 sl st in first tr, * 1 tr in each of the next 7 tr, 4 ch, 1 dc in ch-loop from previous round, 4 ch, skip 1 tr *, repeat from *-* the entire round. ROUND 7: 1 sl st in first tr, * 1 tr in each of the next 5 tr, 4 ch, 1 dc in first ch-loop, 5 ch, 1 dc in next ch-loop, 4 ch, skip 1 tr *, repeat from *-* the entire round. ROUND 8: 1 sl st in first tr, * 1 tr in each of the next 3 tr, 4 ch, 1 dc in first ch-loop, 5 ch, 1 dc in next ch-loop, 5 ch, 1 dc in next ch-loop, 4 ch, skip 1 tr *, repeat from *-* the entire round. ROUND 9: 1 sl st in first tr, * 1 tr in next tr, 4 ch, 1 dc in first ch-loop, 5 ch, 1 dc in next ch-loop, 5 ch, 1 dc in next ch-loop, 5 ch, 1 dc in next ch-loop, 4 ch, skip 1 tr *, repeat from *-* the entire round = 30 ch-loops. Piece measures approx. 18 cm from centre and outwards. SIZE XL/XXL and XXXL: ROUND 6: * 2 tr in first tr, 1 tr in each of the next 7 tr, 2 tr in next tr, 2 ch *, repeat from *-* the entire round (= 66 tr in total with 2 ch between every 11th tr). ROUND 7: 1 sl st in first tr, * 1 tr in each of the next 9 tr, 4 ch, 1 dc in ch-loop from previous round, 4 ch, skip 1 tr *, repeat from *-* the entire round. ROUND 8: 1 sl st in first tr, * 1 tr in each of the next 7 tr, 4 ch, 1 dc in first ch-loop, 5 ch, 1 dc in next ch-loop, 4 ch, skip 1 tr *, repeat from *-* the entire round. ROUND 9: 1 sl st in first tr, * 1 tr in each of the next 5 tr, 4 ch, 1 dc in first ch-loop, 5 ch, 1 dc in next ch-loop, 5 ch, 1 dc in next ch-loop, 4 ch, skip 1 tr *, repeat from *-* the entire round. ROUND 10: 1 sl st in first tr, * 1 tr in each of the next 3 tr, 4 ch, 1 dc in first ch-loop, 5 ch, 1 dc in next ch-loop, 5 ch, 1 dc in next ch-loop, 5 ch, 1 dc in next ch-loop, 4 ch, skip 1 tr *, repeat from *-* the entire round. ROUND 11: 1 sl st in first tr, * 1 tr in next tr, 4 ch, 1 dc in first ch-loop, 5 ch, 1 dc in next ch-loop, 5 ch, 1 dc in next ch-loop, 5 ch, 1 dc in next ch-loop, 5 ch, 1 dc in next ch-loop, 4 ch, skip 1 tr *, repeat from *-* the entire round = 36 ch-loops. Piece measures approx. 22 cm from centre and outwards. SIZE XS/S: ROUND 10: 3 ch, 1 dc in first ch-loop, * 6 ch, 1 dc in next ch-loop *, repeat from *-* 3 more times (= 4 ch-loops), 25 ch, skip 3 ch-loops (= armhole), 1 dc in next ch-loop, repeat from *-* 14 times, 25 ch, skip 3 ch-loops (= armhole), 1 dc in next ch-loop, repeat from *-* 4 times but finish with 1 sl st in first dc from beg of round. ROUND 11: 3 ch, 1 dc in first ch-loop, * 6 ch, 1 dc in next ch-loop *, repeat from *-* the entire round but over the 25 ch worked over each armhole, work as follows: 6 ch, 1 dc in 4th ch, 6 ch, skip 5 ch, 1 dc in next ch, 6 ch, skip 5 ch, 1 dc in next ch, 6 ch, skip 5 ch, 1 dc in next ch, 6 ch, 1 dc in next ch-loop (= 30 ch-loops in total on round). ROUND 12: 3 ch, 1 dc in first ch-loop, * 6 ch, 1 dc in next ch-loop *, repeat from *-* the entire round – NOTE: But in every 5th ch-loop work 1 extra loop (= 6 ch + 1 dc) = 36 ch-loops in total. ROUND 13: 3 ch, 1 dc in first ch-loop, *6 ch, 1 dc in next ch-loop*, repeat from *-* the entire round. ROUND 14: Work as 12th round but work 1 extra ch-loop in every 6th ch-loop = 42 ch-loops in total. ROUND 15 and every uneven numbered round: Work as 13th round. ROUND 16 and every even numbered round: Work as 12th round but with 1 ch-loop more between inc every time. Work until there are 60 ch-loops in total on round. SIZE M/L: ROUND 10: 3 ch, 1 dc in first ch-loop, * 6 ch, 1 dc in next ch-loop *, repeat from *-* the entire round. NOTE: But in every 5th ch-loop work 1 extra loop (= 6 ch + 1 dc) = 36 ch-loops in total. ROUND 11: 3 ch, 1 dc in first ch-loop, *6 ch, 1 dc in next ch-loop*, repeat from *-* the entire round. ROUND 12: 3 ch, 1 dc in first ch-loop, * 6 ch, 1 dc in next ch-loop *, repeat from *-* 4 more times (= 5 ch-loops), work 31 ch, skip 4 ch-loops (= armhole), 1 dc in next ch-loop, repeat from *-* 16 times, 31 ch, skip 4 ch-loops (= armhole), 1 dc in next ch-loop, repeat from *-* 5 times but finish with 1 sl st in first dc from beg of round. ROUND 13: 3 ch, 1 dc in first ch-loop, * 6 ch, 1 dc in next ch-loop *, repeat from *-* the entire round but over the 31 ch worked over each armhole, work as follows: 6 ch, 1 dc in 4th ch, * 6 ch, skip 5 ch, 1 dc in next ch *, repeat from *-* 3 more times, 6 ch, 1 dc in next ch-loop (= 36 ch-loops in total on round). ROUND 14: 3 ch, 1 dc in first ch-loop, * 6 ch, 1 dc in next ch-loop *, repeat from *-* the entire round – NOTE: But in every 6th ch-loop work 1 extra loop (= 6 ch + 1 dc) = 42 ch-loops in total. ROUND 15: 3 ch, 1 dc in first ch-loop, *6 ch, 1 dc in next ch-loop*, repeat from *-* the entire round. ROUND 16: Work as 14th round but work 1 extra ch-loop in every 7th ch-loop = 48 ch-loops in total. ROUND 17 and every uneven numbered round: Work as 15th round. ROUND 18 and every even numbered round: Work as 14th round but with 1 ch-loop more between inc every time. Work until there are 72 ch-loops in total on round. SIZE XL/XXL and XXXL: ROUND 12: 3 ch, 1 dc in first ch-loop, * 6 ch, 1 dc in next ch-loop *, repeat from *-* the entire round. NOTE: But in every 6th ch-loop work 1 extra loop (= 6 ch + 1 dc) = 42 ch-loops in total. ROUND 13: 3 ch, 1 dc in first ch-loop, *6 ch, 1 dc in next ch-loop*, repeat from *-* the entire round. SIZE XL/XXL: ROUND 14: 3 ch, 1 dc in first ch-loop, * 6 ch, 1 dc in next ch-loop *, repeat from *-* 5 more times (= 6 ch-loops), work 37 ch, skip 5 ch-loops (= armhole), 1 dc in next ch-loop, repeat from *-* 18 times, 37 ch, skip 5 ch-loops (= armhole), 1 dc in next ch-loop, repeat from *-* 6 times but finish with 1 sl st in first dc from beg of round. ROUND 15: 3 ch, 1 dc in first ch-loop, * 6 ch, 1 dc in next ch-loop *, repeat from *-* the entire round but over the 37 ch worked over each armhole, work as follows: 6 ch, 1 dc in 4th ch, * 6 ch, skip 5 ch, 1 dc in next ch *, repeat from *-* 4 more times, 6 ch, 1 dc in next ch-loop (= 42 ch-loops in total on round). ROUND 16: 3 ch, 1 dc in first ch-loop, * 6 ch, 1 dc in next ch-loop *, repeat from *-* the entire round – NOTE: But in every 7th ch-loop work 1 extra loop (= 6 ch + 1 dc) = 48 ch-loops in total. ROUND 17: 3 ch, 1 dc in first ch-loop, *6 ch, 1 dc in next ch-loop*, repeat from *-* the entire round. ROUND 18: Work as 16th round but work 1 extra ch-loop in every 8th ch-loop = 54 ch-loops in total. ROUND 19 and every uneven numbered round: Work as 17th round. ROUND 20 and every even numbered round: Work as 16th round but with 1 ch-loop more between inc every time. Work until there are 84 ch-loops in total on round. SIZE XXXL: ROUND 14: 3 ch, 1 dc in first ch-loop, * 6 ch, 1 dc in next ch-loop *, repeat from *-* the entire round. NOTE: But in every 7th ch-loop work 1 extra loop (= 6 ch + 1 dc) = 48 ch-loops in total. ROUND 15: 3 ch, 1 dc in first ch-loop, *6 ch, 1 dc in next ch-loop*, repeat from *-* the entire round. ROUND 16: 3 ch, 1 dc in first ch-loop, * 6 ch, 1 dc in next ch-loop *, repeat from *-* 6 more times (= 7 ch-loops), work 43 ch, skip 6 ch-loops (= armhole), 1 dc in next ch-loop, repeat from *-* 20 times, 43 ch, skip 6 ch-loops (= armhole), 1 dc in next ch-loop, repeat from *-* 7 times but finish with 1 sl st in first dc from beg of round. ROUND 17: 3 ch, 1 dc in first ch-loop, * 6 ch, 1 dc in next ch-loop *, repeat from *-* the entire round but over the 43 ch worked over each armhole, work as follows: 6 ch, 1 dc in 4th ch, * 6 ch, skip 5 ch, 1 dc in next ch *, repeat from *-* 5 more times, 6 ch, 1 dc in next ch-loop (= 48 ch-loops in total on round). ROUND 18: 3 ch, 1 dc in first ch-loop, * 6 ch, 1 dc in next ch-loop *, repeat from *-* the entire round – NOTE: But in every 8th ch-loop work 1 extra loop (= 6 ch + 1 dc) = 54 ch-loops in total. ROUND 19: 3 ch, 1 dc in first ch-loop, 6 ch, 1 dc in next ch-loop, repeat from *-* the entire round. ROUND 20: Work as 18th round but work 1 extra ch-loop in every 9th ch-loop = 60 ch-loops in total. ROUND 21 and every uneven numbered round: Work as 19th round. ROUND 22 and every even numbered round: Work as 20th round but with 1 ch-loop more between inc every time. Work until there are 96 ch-loops in total on round. ALL SIZES: Work last round as follows: 3 ch, 1 dc in first ch-loop, * 1 picot (= 3 ch, 1 tr in first ch), 1 dc in same ch-loop, 1 picot, 1 dc in next ch-loop *, repeat from *-* the entire round. Cut and fasten the thread. Piece measures approx. 42-50-58-66 cm from centre and outwards. SLEEVE: The sleeves are worked from armholes and down. Work as follows around one armhole: 1 dc in dc at the bottom of armhole (i.e. in the side with the longest distance between armholes), 6 ch, skip the half ch-loop and work 1 dc in next whole ch-loop, * 6 ch, 1 dc in next ch-loop *, repeat from *-* 1-2-3-4 more times, 6 ch, 1 dc in dc in the other end of armhole, 6 ch, skip the half ch-loop and work 1 dc in next whole ch-loop, repeat from *-* 2-3-4-5 times, finish with 6 ch and 1 sl st in first dc on round = 8-10-12-14 ch-loops. Work 4 more rounds with 6 ch in every loop and 1 dc in every ch-loop – every round beg with 3 ch and 1 dc at the top of first ch-loop. Then work 6 rounds with 5 ch in every loop. Then work 4 ch in every loop (now every round beg with only 2 ch) until sleeve measures 53-51-49-47 cm (shorter measurements in the larger sizes because of broader shoulder width, hold piece up when measuring so that it stretches to correct measurements). Work last round as follows: 2 ch, 1 sl st at the top of first ch-loop, * 3 ch, 1 tr in first ch (= 1 picot), 1 dc in next ch-loop *, repeat from *-* the entire round. Work another sleeve the same way in the other side. |
|
 |
|
Have you finished this pattern?Tag your pictures with #dropspattern #daliedelightjacket or submit them to the #dropsfan gallery. Do you need help with this pattern?You'll find 5 tutorial videos, a Comments/Questions area and more by visiting the pattern on garnstudio.com. © 1982-2026 DROPS Design A/S. We reserve all rights. This document, including all its sub-sections, has copyrights. Read more about what you can do with our patterns at the bottom of each pattern on our site. |
|


With over 40 years in knitting and crochet design, DROPS Design offers one of the most extensive collections of free patterns on the internet - translated to 17 languages. As of today we count 324 catalogues and 12267 patterns translated into English (UK/cm). 12267
We work hard to bring you the best knitting and crochet have to offer, inspiration and advice as well as great quality yarns at incredible prices! Would you like to use our patterns for other than personal use? You can read what you are allowed to do in the Copyright text at the bottom of all our patterns. Happy crafting!
Post a comment to pattern DROPS 141-1
We would love to hear what you have to say about this pattern!
If you want to leave a question, please make sure you select the correct category in the form below, to speed up the answering process. Required fields are marked *.