
Popular categories
Looking for a yarn?


Comments / Questions (53)
![]() Michelle Guillette wrote:
Michelle Guillette wrote:
The instructions say insert a marker "in" the first stitch on each needle to mark the corner stitches, but if the marker is within the stitch, how can it follow as ypu are working outwards? Thank you, Michelle
12.02.2016 - 18:07DROPS Design answered:
Dear Mrs Guillette, you can move the marker in the new st worked on next round - with our markers it will be easier, your DROPS store will for sure help you. Happy knitting!
12.02.2016 - 18:18
![]() Stefania wrote:
Stefania wrote:
Vorrei sapere come posso eseguire lo stesso modello con i ferri tradizionali e non circolari grazie infinite
04.11.2015 - 12:13DROPS Design answered:
Buonasera Stefania, questo modello inizia con il quadrato al centro dietro, che è lavorato in tondo, per cui non è possibile lavorarlo con i ferri dritti: in alternativa ai ferri circolari può utilizzare i ferri a doppia punta fino a quando il n° di m lo permette o la tecnica del magic loop. Buon lavoro!
04.11.2015 - 19:49Arina wrote:
Bij het opzetten van het rugpand met die 8 steken krijg ik het niet voor elkaar om rond te breien. Ik zie gewoon niet welke naald de volgende is. Zijn hier tips voor.
06.03.2015 - 01:57DROPS Design answered:
Hoi Arina. Plaats een markeerder om aan te geven waar het begin van de nld is. Een goede tip is ook om de eerste paar naalden heen en weer te breien, dan wordt het werk wat steviger en makkelijker om in de rondte te breien.
06.03.2015 - 16:25
![]() Chrissi wrote:
Chrissi wrote:
Wo beginnt die verkürzte Reihe - am Armloch oder am unteren Rand?
05.01.2015 - 17:09DROPS Design answered:
Sie beginnen die verkürzten R am rechten Vorderteil mit einer Hin-R, diese beginnt am unteren Rand. Am linken Vorderteil beginnen die verkürzten R somit auch am unteren Rand, aber mit einer Rück-R.
08.01.2015 - 00:01
![]() Sara wrote:
Sara wrote:
Danke für die rasche Antwort! Verstehe ich es also richtig, dass man IMMER mit zwei Fäden strickt, immer mit einem Faden DELIGHT und einem Faden VIVALDI? Was ist dann hiermit in der Anleitung gemeint? "FARBWECHSEL: Damit der Knäuelwechsel schön wird muss man mit der gleichen Farbsequenz wechseln." Wo muss ich welche Farbe wechseln? Welche Sequenz? Danke nochmal für eine Antwort!
04.02.2014 - 12:45DROPS Design answered:
Liebe Sara, irgendwann ist der Knäuel aufgebraucht und Sie brauchen einen neuen. Delight ist ein Farbveralufsgarn und de Knäuel beginnen nicht immer mit exakt der Farbe, mit der der alte Knäuel aufhört. Sie sollten also ein wenig darauf achten, dass die Farben harmonisch verlaufen und den nächsten Knäuel so wählen dass es passt.
05.02.2014 - 10:31
![]() Sara wrote:
Sara wrote:
Liebes Drops-Team, sind Sie sicher, dass die DELIGHT-Farbe für dieses Modell wirklich "rosa/lila" lautet? Für mich sieht die Farbe mehr nach BIG DELIGHT "rosengarten" aus. Denn diese Farbe sieht der auf dem Bild sehr ähnlich - ähnlicher als "rosa/lila" von DELIGHT. Eine kurze Antwort wäre nett, danke!
03.02.2014 - 17:19DROPS Design answered:
Liebe Sara, die Farben und Materialien sind genau wie angegeben. Der Effekt entsteht durch das Zusammenstricken mit Vivaldi.
04.02.2014 - 08:48
![]() Lee wrote:
Lee wrote:
I finished the back of the sweater and don't understand the directions for the front. It needs to be knitted bottom to top but the directions call for side to side. I think there are directions missing at "NOW MEASURE PIECE FROM HERE"
25.12.2013 - 17:59DROPS Design answered:
Dear Lee, after back piece, you continue with right front piece: first pick up sts on the bottom part of back piece (the one worked back and forth for bottom back), then knit up sts from st holder 1 - see chart at the end of pattern with arrow to show knitting direction. Happy knitting!
27.12.2013 - 13:35
![]() Rudolf wrote:
Rudolf wrote:
Ärmmudden!
01.08.2012 - 14:40
![]() Litet Nystan wrote:
Litet Nystan wrote:
Jag kan inte hitta någonstans i själva beskrivningen att man ska använda strumpstickor nr 6, men det står med i listan över material man behöver. Har det blivit fel?
01.08.2012 - 14:14DROPS Design answered:
Jeg tror du har rett. Der skal ikke användas strumpstickor nr 6 her. Jeg har givet det videre så det kan fjernes.
01.05.2013 - 16:54Eunice wrote:
Gracias por compartir los modelos tan lindos, mis felicitaciones para las chicas que lo tejen como a las traductoras
04.03.2012 - 04:01
|
|||||||
Crossroads#crossroadscardigan |
|||||||
 |
 |
||||||
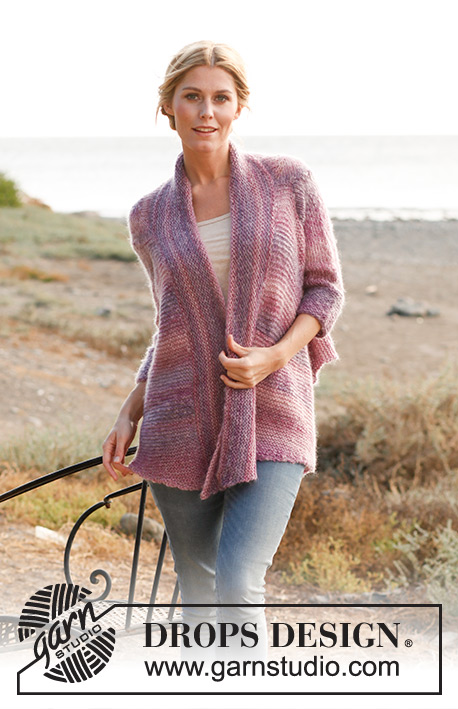
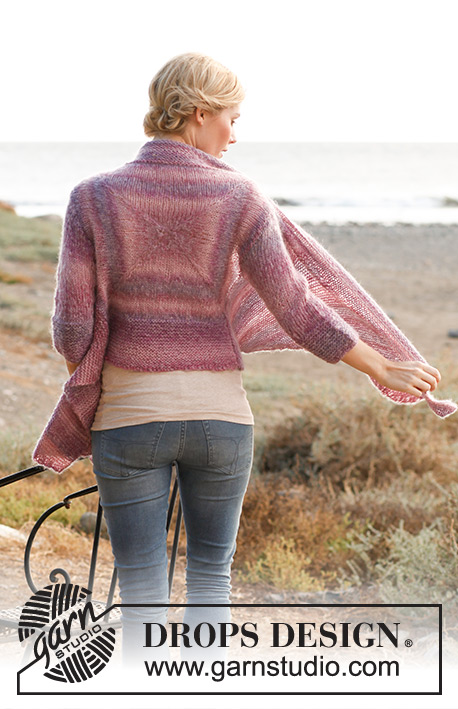
DROPS square knitted jacket with ¾ sleeves in ”Delight” and ”Vivaldi”. Size: S - XXXL
DROPS 137-27 |
|||||||
|
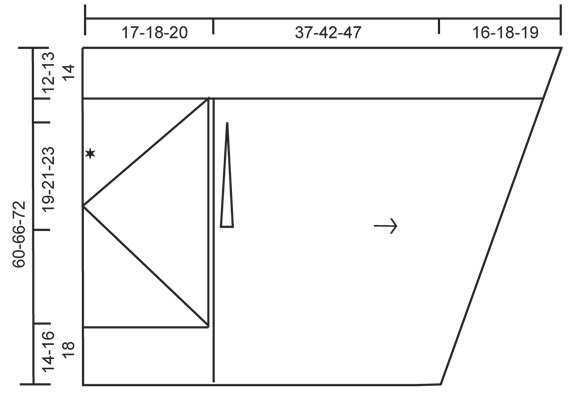
TIP FOR SWITCHING THREADS: To make the colour transitions in Delight pretty when switching ball, it is important to find a ball that starts with the same colour last ball ended with. INCREASE TIP: Inc 1 st by making 1 YO on each side of all 4 corner sts, on next round K YOs twisted (i.e. in back loop of st instead of front) to avoid holes. GARTER ST (back and forth): K all rows. 1 ridge = 2 rows K. -------------------------------------------------------- JACKET: Worked from mid back in a square, then worked down the back piece and outwards in each side for front piece. Finish by working the sleeves. READ TIP FOR SWITCHING THREADS! BACK PIECE: Cast on 8 sts with 1 thread Delight and 1 thread Vivaldi and divide them on 4 double pointed needles size 7 mm (= 2 sts on every needle). Insert a marker in the first st on every needle (= 4 markers). Work in stocking st in the round - AT THE SAME TIME on 1st round, inc 1 st on each side of all sts with markers (= 8 inc) - SEE INCREASE TIP! * Work 2 rounds with inc, then 1 round without inc *, repeat from *-*. REMEMBER THE KNITTING TENSION! Sts with markers are corner sts, let the markers follow when working outwards. Switch to circular needle when there are enough sts. Work and inc until there are total of 192-208-224 sts on needle (= 47-51-55 sts between all corner sts). Piece now measures approx. 34-37-40 cm along each side. Work next round as follows: Work 49-53-57 sts (= from and with 1st corner st to and with 2nd corner st) and slip them on stitch holder 1 (= right front piece), cast off the next 47-51-55 sts (= up towards neck), work the next 49-53-57 sts (= from and with 3rd corner st to and with 4th corner st) and slip them on stitch holder 2 (= left front piece), work in GARTER ST over the remaining sts on needle size 6 mm – see explanation above – for 14-16-18 cm (= down the back piece). Then LOOSELY cast off. RIGHT FRONT PIECE: Knit up on circular needle size 6 mm with 1 thread Delight and 1 thread Vivaldi: 20-22-25 sts along the right side of ridges worked down the back piece, then work sts from stitch holder 1 on to needle = a total of 69-75-82 sts. K 2 rows back and forth. Work next row as follows (= WS): K 7, cast off 27-29-32 sts for armhole and K the rest of row (= 35-39-43 sts). Then work short rows under armhole as follows: K 7-8-9, turn and K back, K 14-16-18, turn and K back, K 21-24-27, turn and K back, K 28-32-36, turn and K back, K all 35-39-43 sts, turn and K back, K 28-32-36, turn and K back, K 21-24-27, turn and K back, K 14-16-18, turn and K back, K 7-8-9, turn and K back. Work next row as follows: K 35-39-43, cast on 27-29-32 new sts over armhole and K the last 7 sts = 69-75-82 sts. NOW MEASURE PIECE FROM HERE! Continue in garter st back and forth over all sts. When piece measures 37-42-47 cm, slip sts on a stitch holder in the right side (seen from RS) as follows, beg from RS: Work 3-3-4 sts, then slip them on a stitch holder, work the rest of row, turn and work back, turn, work 3 sts and then slip them on the same stitch holder, work the rest of row, * turn and work back, turn, work 3 sts, then slip them on the same stitch holder, work the rest of row *, repeat from *-* until all sts are on the stitch holder. Then slip all sts back on needle (without working them), cast off – AT THE SAME TIME pick up thread between every time sts were slipped on stitch holder (to avoid holes), cast off the picked up sts the same way as the other sts. LEFT FRONT PIECE: Work as right front piece - beg as follows from RS: Work sts from stitch holder 2 on to needle and then knit up 20-22-25 sts along the left side of ridges at the bottom of back piece = 69-75-82 sts. K 1 row from WS, work next row as follows from RS: K 7, cast off 27-29-32 sts, K the rest of row (= 35-39-43 sts). Then finish as right front piece. NOTE: When slipping sts on stitch holder, this is done in the left side seen from RS, beg on every row from WS. NECK EDGE AND BANDS: Knit up with 1 thread Delight and 1 thread Vivaldi on circular needle size 6 mm along the entire upper edge: Approx. 200-220-240 sts - knit up 1 st in every ridge and 1 st in every st. Work in garter st back and forth - AT THE SAME TIME on 2nd row, inc 1 st in each side by making 1 YO inside outermost st, on next row K YOs twisted to avoid holes. Repeat inc every 6th row until finished measurements. When edge measures approx. 12-13-14 cm, LOOSELY cast off – use circular needle size 7 mm when casting off to avoid a tight cast off edge. SLEEVE: Worked back and forth on circular needle. Cast on 40-42-44 sts (incl 1 edge st in each side) on circular needle size 6 mm with 1 thread Delight and 1 thread Vivaldi. Work 10 cm in garter st. Switch to circular needle size 7 mm and work in stocking st. AT THE SAME TIME when piece measures 13 cm, inc 1 st in each side. Repeat inc every 3-2½-2 cm a total of 5-6-7 times = 50-54-58 sts. When piece measures 28 cm in all sizes, cast off for sleeve cap at beg of every row in each side: 3 sts 1 time, 2 sts 2 times and 1 st 3 times, then cast off 2 sts in each side until piece measures 36 cm in all sizes, then cast off 3 sts 1 time in each side. Cast off the remaining sts, the piece measures approx. 37 cm. ASSEMBLY: Sew sleeve seams inside 1 edge st and sew in the sleeves. |
|||||||
Diagram explanations |
|||||||
|
|||||||
 |
|||||||
Have you finished this pattern?Tag your pictures with #dropspattern #crossroadscardigan or submit them to the #dropsfan gallery. Do you need help with this pattern?You'll find 16 tutorial videos, a Comments/Questions area and more by visiting the pattern on garnstudio.com. © 1982-2026 DROPS Design A/S. We reserve all rights. This document, including all its sub-sections, has copyrights. Read more about what you can do with our patterns at the bottom of each pattern on our site. |
|||||||


With over 40 years in knitting and crochet design, DROPS Design offers one of the most extensive collections of free patterns on the internet - translated to 17 languages. As of today we count 324 catalogues and 12267 patterns translated into English (UK/cm). 12267
We work hard to bring you the best knitting and crochet have to offer, inspiration and advice as well as great quality yarns at incredible prices! Would you like to use our patterns for other than personal use? You can read what you are allowed to do in the Copyright text at the bottom of all our patterns. Happy crafting!
Post a comment to pattern DROPS 137-27
We would love to hear what you have to say about this pattern!
If you want to leave a question, please make sure you select the correct category in the form below, to speed up the answering process. Required fields are marked *.