
Popular categories
Looking for a yarn?


Comments / Questions (235)
![]() Marie wrote:
Marie wrote:
Merci beaucoup pour votre réponse très claire. Vous êtes très efficace...comme toujours. Oui effectivement, je m'étais mal exprimée, je voulais dire en début et 6 rgs (end) + haut en fin de cette section.
07.12.2015 - 12:25
![]() Marie wrote:
Marie wrote:
Bonjour, diminuer 1 m dans chaque section envers tous les 6 rgs, alternativement, veut dire 2 m ens au début des 15 m envers, puis continuer le diagramme et 6 rgs plus haut 2 m ens en fin de rgs? merci
07.12.2015 - 08:06DROPS Design answered:
Bonjour Marie, vous diminuez d'abord en tricotant ens les 2 premières m env de chaque section env, lors du 2ème rang de diminution, diminuez en tricotant ens à l'env les 2 dernières m de chaque section envers, et continuez ainsi en tricotant ens à l'env les 2 premières m puis les 2 dernières m dans chaque section env (pas en fin de rang). Bon tricot!
07.12.2015 - 11:47
![]() Karin wrote:
Karin wrote:
6+9(17+14)+17+6=308. Klantigt formulerat: man ska inte upprepa 9 ggr utan sticka 9 ggr totalt.
05.07.2015 - 11:42
![]() Kristina Bagge wrote:
Kristina Bagge wrote:
Vad gör jag för fel? jag inte framsidorna lika. har lagt upp 308 m och stickat 6 kantm, mönster (17M), men när jag kommer till slutet finns inte plats för mönster utan det slutar med 14 am. Hjälp innan jag blir tokig.
05.07.2015 - 09:40DROPS Design answered:
Hej Kristina, Du gör så här: 6 + (17+14=31)x9 = 279 + 17(M.1 igen) + 6 = 308 m - Lycka till!
08.07.2015 - 15:25
![]() Päivi wrote:
Päivi wrote:
In my opinion You need to add cotton garn 150-200 g more to l/xl - this is worth knitting.
19.12.2014 - 12:08
![]() Sus Vang wrote:
Sus Vang wrote:
Utrolig smukt mønster. Jeg spekulerer på, om man kan strikke den på rundpind, altså som en sweater ikke en cardigan? på forhånd tak :) mvh Sus
13.08.2014 - 23:34DROPS Design answered:
Hej Sus. Ja, det tror jeg da godt du kan. Undlad de 6 stolpemasker i midten og strik rundt. God fornöjelse med den.
14.08.2014 - 16:14
![]() Veronika wrote:
Veronika wrote:
Hallo, ich würde die jacke gerne mit langen ärmeln in s stricken habt ihr einen tip für mich was ich da machen kann?
31.07.2014 - 11:43DROPS Design answered:
Liebe Veronika, Sie können beginnen wie beschrieben und den Abstand zwischen den Zunahmen etwas erhöhen. Wenn Sie den Ärmel unten enger möchten, beginnen Sie mit weniger Maschen und machen mehr Zunahmen.
15.08.2014 - 08:07
![]() Frugie wrote:
Frugie wrote:
Bonjour, Erreur dès le début car le nombre de mailles à monter est faux : M1 17 m + 15 m env (pour la taille L/XL) = 31 m x 9 fois = 310 + le dernier M1 (17 m) + les 12 m des bordures ce qui fait 339 et non 320.
29.07.2014 - 08:57DROPS Design answered:
Bonjour Mme Frugie, en taille L/XL, on tricote 14 m env entre chaque M1, on a : 6 m de bordure devant + [(17 m de M1 + 14 m env) x 9], 17 m de M1 et 6 m de bordure devant, soit 6 + 279 + 17 + 6 = 308 m. Et dans la dernière taille: 6 + [(17 + 13)x11] +17 +6 = 359m. Bon tricot!
29.07.2014 - 09:55
![]() Daniela Clösges wrote:
Daniela Clösges wrote:
Kann ich die Ärmel auch rundstricken? Ich möchte mir eine Naht sparen.
26.05.2014 - 12:59DROPS Design answered:
Ja, Sie können die Ärmel auch rundstricken, bis zum Armausschnitt, mit diesen Änderungen: Sie schlagen 2 M weniger an, da Sie die kraus re gestrickten Rand-M nicht benötigen. Die M, die immer beidseitig zugenommen werden, nehmen Sie an der unteren Ärmelmitte zu, d.h. dort nehmen Sie pro Zunahme-Rd 2 M zu. Das Abketten beginnt so: statt der beids. 1x je 4 M ketten Sie 6 M an der unteren Ärmelmitte ab (da ja 2 Rand-M weniger da sind), dann weiter wie beschrieben abketten.
26.05.2014 - 20:48
![]() Cathleen Calagna wrote:
Cathleen Calagna wrote:
I am not sure what to do on the even # rows. After knitting the first 3 rows,I am to do row 1 of M-1,then purl the stitches in between M-1 repeats. Pattern doesn't say what to do with the stitches between M-1 repeats on Row #2 & the following even # rows.Are these stitches knitted?I want to make sure this is right. Please let me know asap!
05.05.2014 - 02:40DROPS Design answered:
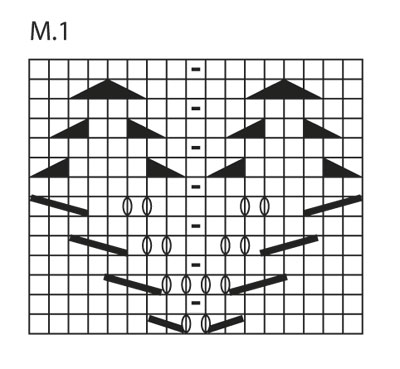
Dear Mrs Calagna, the sts between M.1 are P from RS (and K from WS), in M.1, 1 square = 1 st x 1 row (= RS & WS rows are included in the diagram). Start reading diagram at the bottom corner on the right side towards the left (from RS). From WS, read from the left towards theh right. Happy knitting!
05.05.2014 - 09:10
|
||||||||||||||||||||||||||||
Grace#gracecardigan |
||||||||||||||||||||||||||||
 |
 |
|||||||||||||||||||||||||||
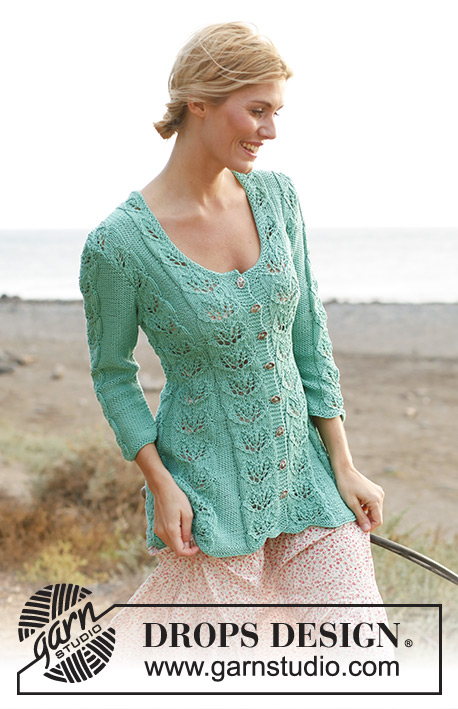
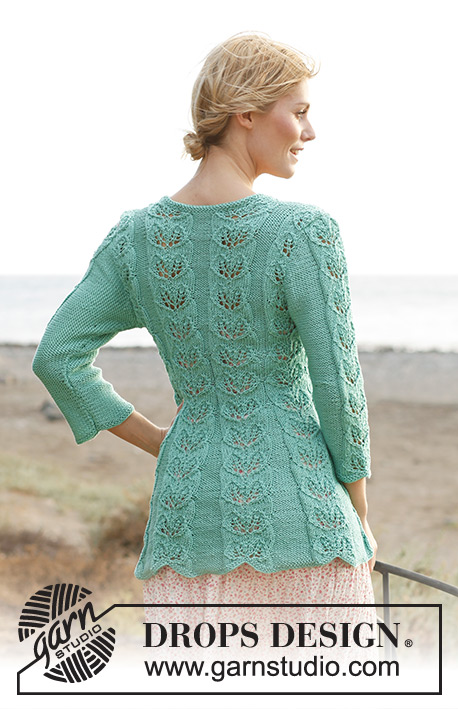
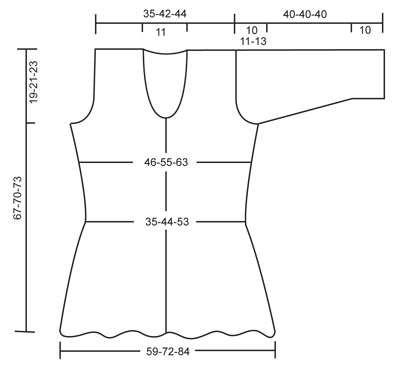
Knitted DROPS waisted jacket with lace pattern and ¾ sleeves in ”Muskat” or ”Cotton Light”. Size: S - XXXL.
DROPS 138-5 |
||||||||||||||||||||||||||||
|
GARTER ST (back and forth on needle): K all rows. PATTERN: See diagram M.1, diagram shows pattern from RS. BUTTON HOLES: Cast off for button holes on right band. 1 button hole = K 3rd and 4th st from mid front tog and make 1 YO. Cast off for button holes when piece measures: SIZE S/M: 8, 14, 20, 26, 32, 38, 44 and 50 cm SIZE L/XL: 8, 14, 21, 27, 33, 40, 46 and 52 cm SIZE XXL/XXXL: 8, 15, 21, 28, 34, 41, 48 and 54 cm NOTE: Cast off for last button hole when only 2 rows remain before neck dec. -------------------------------------------------------- BODY: Worked back and forth on circular needle from mid front. Cast on 253-308-359 sts (incl 6 band sts in each side towards mid front) on circular needle size 4 mm with Muskat. K 3 rows (1st row = WS). Then work as follows (seen from RS): 6 band sts in GARTER ST - see explanation above - * diagram M.1 (= 17 sts), P 15-14-13 *, repeat from *-* a total of 7-9-11 times, diagram M.1 and 6 band sts in garter st. Continue like this. REMEMBER THE KNITTING TENSION! When piece measures approx. 3-5-7 cm (adjust so that next row is worked from RS), dec 1 st in every P-section by P the first 2 sts tog. Repeat dec every 6th row a total of 14-13-12 times – NOTE: Dec alternately at the end and beg of every P-section. AT THE SAME TIME when piece measures 8 cm, beg to cast off for BUTTON HOLES – see explanation above! After all dec in P-sections, 155-191-227 sts remain on needle and only 1 P st between every M.1-section (piece now measures approx. 31 cm). Continue until piece measures approx. 34-35-36 cm (adjust so that next row is worked from RS), now inc 1 st in every P-section by making 1 YO after all P sts, on next row (from WS) K YOs twisted (i.e. work in back loop of st instead of front) to avoid holes. Repeat inc every 6th row a total of 6-5-4 times – NOTE: Inc alternately before and after all P sts by making 1 YO. When all inc are done, there are 7-6-5 P sts in every P-section and 197-236-271 sts in total on needle. When piece measures approx. 48-49-50 cm (adjust so that next row is worked from RS), work next row as follows: Work 47-56-64 sts as before (= right front piece), cast off 7-9-11 sts for armhole, work 89-106-121 sts as before (= back piece), cast off 7-9-11 sts for armhole, work the last 47-56-64 sts as before (= left front piece). Finish each part separately. LEFT FRONT PIECE: = 47-56-64 sts. Then cast off for armhole at beg of every row from the side: 2 sts 2-2-4 times and 1 st 4-5-6 times. AT THE SAME TIME when piece measures 51-53-55 cm, slip the outermost 10 sts towards mid front on a stitch holder for neck. Then cast off at beg of every row from neck: 2 sts 1 time and 1 st 2 times. After all cast offs for armhole and neck, 25-33-36 sts remain on shoulder. There is now ½ repetition of diagram M.1 towards the neck in all sizes, there is also ½ repetition towards the armhole in the smallest size. Continue pattern as before with 1 st in garter st in each side. When piece measures approx. 67-70-73 cm - adjust after 1 whole repetition of diagram M.1 - cast off. RIGHT FRONT PIECE: Slip sts from stitch holder back on needle and work as left front piece but reversed. BACK PIECE: = 89-106-121 sts. Continue to cast off for armholes at beg of every row in each side as on front piece = 73-88-93 sts. When piece measures approx. 65-68-72 cm (finish after 1 row from WS when 4 rows remain in diagram M.1), cast off the middle 23-22-21 sts for neck and finish each shoulder (= 25-33-36 sts) separately. Cast off when the last repetition has been worked. SLEEVE: Worked back and forth on circular needle. Cast on 53-57-61 sts (incl 1 edge st in each side) on circular needle size 4 mm with Muskat. K 3 rows (1st row = WS). Work next row as follows (from RS): 1 edge st in garter st, P 17-19-21 sts, diagram M.1, P 17-19-21 sts and 1 edge st in garter st. When piece measures 10 cm, inc 1 st in each side. Repeat inc every 2-1½-1 cm a total of 10-12-15 times = 73-81-91 sts (P the inc sts seen from RS). READ ALL OF THE FOLLOWING SECTION BEFORE CONTINUING! When piece measures 30-29-27 cm (shorter measurements in the larger sizes because of longer sleeve cap and broader shoulder width), cast off for sleeve cap at beg of every row in each side: 4 sts 1 time, 2 sts 3 times and 1 st 6-7-10 times, then cast off 2 sts in each side until piece measures approx. 40 cm – adjust after 1 whole repetition of diagram M.1. Cast off the remaining sts. ASSEMBLY: Sew the shoulder seams. NECK EDGE: Knit up approx. 100 to 110 sts around the neck (incl sts on stitch holders at the front) on circular needle size 4 mm. K 3 rows and cast off. Sew sleeve seams inside 1 edge st and sew in the sleeves. Sew on buttons. Steam the garment to make it hang nicely. |
||||||||||||||||||||||||||||
Diagram explanations |
||||||||||||||||||||||||||||
|
||||||||||||||||||||||||||||
 |
||||||||||||||||||||||||||||
 |
||||||||||||||||||||||||||||
Have you finished this pattern?Tag your pictures with #dropspattern #gracecardigan or submit them to the #dropsfan gallery. Do you need help with this pattern?You'll find 23 tutorial videos, a Comments/Questions area and more by visiting the pattern on garnstudio.com. © 1982-2026 DROPS Design A/S. We reserve all rights. This document, including all its sub-sections, has copyrights. Read more about what you can do with our patterns at the bottom of each pattern on our site. |
||||||||||||||||||||||||||||


With over 40 years in knitting and crochet design, DROPS Design offers one of the most extensive collections of free patterns on the internet - translated to 17 languages. As of today we count 324 catalogues and 12260 patterns translated into English (UK/cm). 12260
We work hard to bring you the best knitting and crochet have to offer, inspiration and advice as well as great quality yarns at incredible prices! Would you like to use our patterns for other than personal use? You can read what you are allowed to do in the Copyright text at the bottom of all our patterns. Happy crafting!
Post a comment to pattern DROPS 138-5
We would love to hear what you have to say about this pattern!
If you want to leave a question, please make sure you select the correct category in the form below, to speed up the answering process. Required fields are marked *.