
Popular categories
Looking for a yarn?


Comments / Questions (235)
![]() Cristina Becker wrote:
Cristina Becker wrote:
Ich habe die Jacke in Gr. S/M Nadelst. 4 " Muskat" begonnen. Umfang viel zu gross. Nun habe ich Nadelst.3 (stricke sehr fest) immer noch zu gross. Wenn ich weniger Maschen nehme stimmt es mit dem Muster nicht. Bin eine erfahrene Strickerin. Hat jemand das schon kommentiert? Waere dankbar fuer Hilfe.
17.07.2020 - 12:12DROPS Design answered:
Liebe Frau Becker, stimmt Ihre Maschenprobe? Wenn Sie 21 M x 28 Reihen glatt rechts = 10 x 10 cm bekommen, dann stimmen die Anleitung und damit bekommen Sie die Maßen, die in der Maßskizze gezeigt sind. Viel Spaß beim stricken!
17.07.2020 - 14:15
![]() Jayne Vanleer wrote:
Jayne Vanleer wrote:
So the stitches on left front stitch holder are put back on needle on right front, this is not making any sense to me sorry, i have already worked the left front and cannot see how putting the stitch holder stitches back on the needle for right front works, are you not meant to slip 10 stitches from right front onto a stitch holder as well the same as for left front.
02.09.2019 - 13:01DROPS Design answered:
Dear Mrs Vanleer, when you work right front piece, you will cast off at the beginning of the row from WS for the armhole, and work the first 10 stitches at the beg of the row from RS before slipping them on a thread (to avoid cutting the yarn), then continue to cast off for neck as on left front piece. Happy knitting!
02.09.2019 - 13:47
![]() Jayne Vanleer wrote:
Jayne Vanleer wrote:
I am a bit confused as to right front, its says to slip st on stitch holder back onto needle and work as left front but in reverse, i have stitches on stitch holder for left front but not for right front, am i not supposed to slip 10 st from right front the same as left front.
01.09.2019 - 19:54DROPS Design answered:
Dear Mrs Vanleer, the cast off row for armholes is worked from the right side, so that the next row from WS will start with stitches on left front piece. When working the right front piece, put stitches back on needle and work next row from WS and continue as explained under left front piece = cast off towards armhole and then towards neckline. Happy knitting!
02.09.2019 - 10:56
![]() Karina wrote:
Karina wrote:
Wie kann ich ads Muster mehr prominent / sichtbar machen. Ich mache offensichtlich ein Fehler, kann aber nicht rausfinden wo... Ich vermute es liegt daran, wie man die Maschen rechts strickt. Gibt es vielleicht ein Anleitungsvideo zu dem Muster?
26.03.2018 - 23:35
![]() MarieP wrote:
MarieP wrote:
Merci de votre aide. Les 10 mailles, ce n'est pas EN MÊME TEMPS mais APRES les diminutions de l'emmanchure, si j'ai bien compris. On ne peut plus être à 55 cm de hauteur, non ? RABATTRE pour l'encolure les 1 fois 2 m et 2 fois 1 m, c'est entre les 10 mailles de côté et le reste du tricot ? Ou tu rabats ET APRES tu laisses 10 mailles ?
20.03.2018 - 18:33DROPS Design answered:
Bonjour MarieP, tout dépend de la taille, vous commencez les diminutions de l'encolure à 55 cm, si celles de l'emmanchure ne sont pas terminées, vous les continuez comme avant jusqu'à la fin. À 55 cm, tricotez les 10 premières m sur l'envers (devant gauche) et glissez-les en attente, tricotez le rang jusqu'à la fin et le rang suivant sur l'endroit. Au rang suivant sur l'envers commencez à rabattre pour l'encolure: 1x2 m et 2 x 1m tous les rangs (= au début de chaque rang sur l'envers). - soit pour l'encolure: 10 m en attente et 4 m rabattues. Bon tricot!
21.03.2018 - 09:05
![]() MarieP wrote:
MarieP wrote:
J'ai glissé les 10 mailles côté boutonnières. vous dites "Rabattre ensuite au début de chaque rang à partir de l'encolure : 1 fois 2 m et 2 fois 1 m." mais ça ne fait que 4 mailles rabattues côté encolure. Que fait -on des 10 mailles ? Si vous pouvez m'expliquer de façon lisible, ... Tout abandonner, quelle pitié ... Tout défaire, quelle horreur ...
20.03.2018 - 12:34DROPS Design answered:
Bonjour MarieP, quand vous ferez le col, vous reprendrez ces 10 m, relèverez des mailles le long des 4 m rabattues pour l'encolure, puis tout autour de l'encolure jusqu'aux 10 m du devant gauche qui seront reprises, soit environ 110 m pour le col en taille XL/XXXL - cf COL. Bon tricot!
20.03.2018 - 13:25
![]() MarieP wrote:
MarieP wrote:
Bonjour. Je ne comprends pas. Concernant le devant gauche en XXL/XXXL (et il y aura la même question avec le devant droite), c'est incompréhensible. Je me retrouve avec 52 mailles. L'emmanchure ressemble à une encolure. ET il n'y a pas d'encolure. Au secours !
20.03.2018 - 12:33DROPS Design answered:
Bonjour MarieP, il doit vous rester 50 m après les diminutions de l'emmanchure soit 64 -( 4x2 m et 6x1m)=52 m. On met ensuite en attente 10 m pour l'encolure et on rabat 1 x 2 m et 2x1 m pour l'encolure = il reste 36 m pour l'épaule. Bon tricot!
20.03.2018 - 13:23
![]() Suzan wrote:
Suzan wrote:
Hello! I don't understand how can I do the right front piece. Because I have 10 sts more. So what can I do with the 10 sts which remain the left front piece?
15.06.2016 - 08:59DROPS Design answered:
Dear Suzan, you should have same number of sts on each front piece = 47-56-64 and 89-101-121 sts for back piece - have you checked number of sts cast off for armholes at the end of body? Happy kniting!
15.06.2016 - 09:18
![]() Rigmor Rehnström wrote:
Rigmor Rehnström wrote:
Hej! Håller på att sticka största storleken och jag ser att garnet kommer inte att räcka. Jag har rätt stickfasthet så det beror inte på det. Har ni räknat rätt på åtgången av garn? Har använt 6 nystan och har inte minskat färdigt ännu. Rigmor
13.01.2016 - 09:31DROPS Design answered:
Hej Rigmor, Om du stickar i DROPS Muskat så bör 14 nystan räcka. Vi har inte fått andra kommentarer om at det inte skulle räcka. Har du kollat så du har 21 m x 28 varv i slätst på 10 x 10 cm ?
26.01.2016 - 16:06
![]() Marie wrote:
Marie wrote:
Bonjour, je suis arrivée au devant gauche et ne comprends pas comment diminuer l'encolure avec les 10 m en attente. Pouvez-vous m'expliquer plus en détail? merci
21.12.2015 - 08:10DROPS Design answered:
Bonjour Marie, en début de rang sur l'envers, tricotez ces 10 m et mettez-les en attente sur un fil ou un arrêt de mailles. Tricotez les mailles restantes du rang, tournez et tricotez le rang suivant sur l'endroit. Commencez à rabattre/diminuez les mailles pour l'encolure au rang suivant sur l'envers, soit: 1x2 m et 2x1m. Les mailles en attente sont ensuite reprises à la fin quand on tricote le col. Bon tricot!
21.12.2015 - 11:28
|
||||||||||||||||||||||||||||
Grace#gracecardigan |
||||||||||||||||||||||||||||
 |
 |
|||||||||||||||||||||||||||
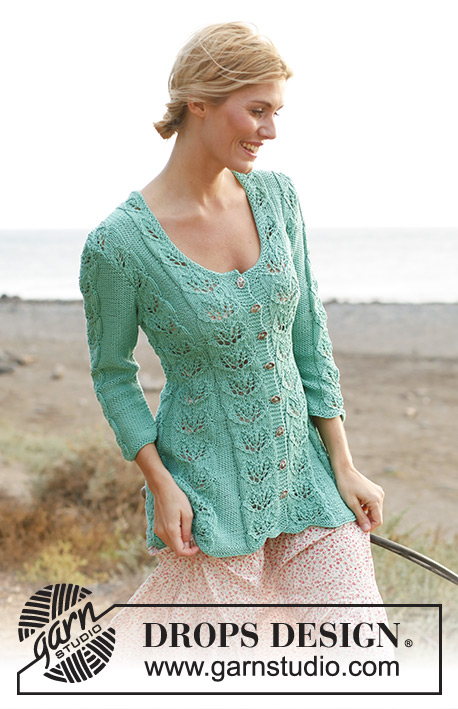
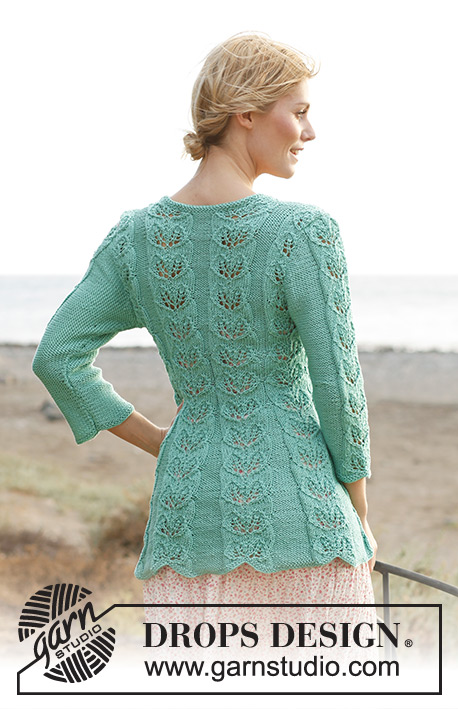
Knitted DROPS waisted jacket with lace pattern and ¾ sleeves in ”Muskat” or ”Cotton Light”. Size: S - XXXL.
DROPS 138-5 |
||||||||||||||||||||||||||||
|
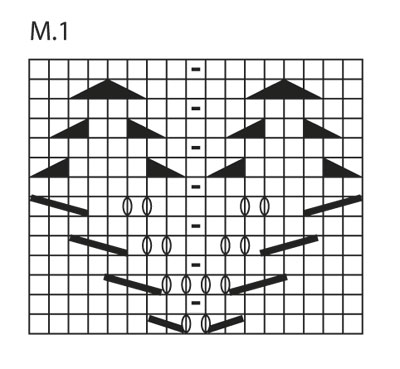
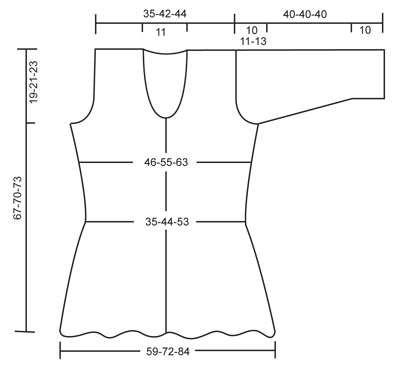
GARTER ST (back and forth on needle): K all rows. PATTERN: See diagram M.1, diagram shows pattern from RS. BUTTON HOLES: Cast off for button holes on right band. 1 button hole = K 3rd and 4th st from mid front tog and make 1 YO. Cast off for button holes when piece measures: SIZE S/M: 8, 14, 20, 26, 32, 38, 44 and 50 cm SIZE L/XL: 8, 14, 21, 27, 33, 40, 46 and 52 cm SIZE XXL/XXXL: 8, 15, 21, 28, 34, 41, 48 and 54 cm NOTE: Cast off for last button hole when only 2 rows remain before neck dec. -------------------------------------------------------- BODY: Worked back and forth on circular needle from mid front. Cast on 253-308-359 sts (incl 6 band sts in each side towards mid front) on circular needle size 4 mm with Muskat. K 3 rows (1st row = WS). Then work as follows (seen from RS): 6 band sts in GARTER ST - see explanation above - * diagram M.1 (= 17 sts), P 15-14-13 *, repeat from *-* a total of 7-9-11 times, diagram M.1 and 6 band sts in garter st. Continue like this. REMEMBER THE KNITTING TENSION! When piece measures approx. 3-5-7 cm (adjust so that next row is worked from RS), dec 1 st in every P-section by P the first 2 sts tog. Repeat dec every 6th row a total of 14-13-12 times – NOTE: Dec alternately at the end and beg of every P-section. AT THE SAME TIME when piece measures 8 cm, beg to cast off for BUTTON HOLES – see explanation above! After all dec in P-sections, 155-191-227 sts remain on needle and only 1 P st between every M.1-section (piece now measures approx. 31 cm). Continue until piece measures approx. 34-35-36 cm (adjust so that next row is worked from RS), now inc 1 st in every P-section by making 1 YO after all P sts, on next row (from WS) K YOs twisted (i.e. work in back loop of st instead of front) to avoid holes. Repeat inc every 6th row a total of 6-5-4 times – NOTE: Inc alternately before and after all P sts by making 1 YO. When all inc are done, there are 7-6-5 P sts in every P-section and 197-236-271 sts in total on needle. When piece measures approx. 48-49-50 cm (adjust so that next row is worked from RS), work next row as follows: Work 47-56-64 sts as before (= right front piece), cast off 7-9-11 sts for armhole, work 89-106-121 sts as before (= back piece), cast off 7-9-11 sts for armhole, work the last 47-56-64 sts as before (= left front piece). Finish each part separately. LEFT FRONT PIECE: = 47-56-64 sts. Then cast off for armhole at beg of every row from the side: 2 sts 2-2-4 times and 1 st 4-5-6 times. AT THE SAME TIME when piece measures 51-53-55 cm, slip the outermost 10 sts towards mid front on a stitch holder for neck. Then cast off at beg of every row from neck: 2 sts 1 time and 1 st 2 times. After all cast offs for armhole and neck, 25-33-36 sts remain on shoulder. There is now ½ repetition of diagram M.1 towards the neck in all sizes, there is also ½ repetition towards the armhole in the smallest size. Continue pattern as before with 1 st in garter st in each side. When piece measures approx. 67-70-73 cm - adjust after 1 whole repetition of diagram M.1 - cast off. RIGHT FRONT PIECE: Slip sts from stitch holder back on needle and work as left front piece but reversed. BACK PIECE: = 89-106-121 sts. Continue to cast off for armholes at beg of every row in each side as on front piece = 73-88-93 sts. When piece measures approx. 65-68-72 cm (finish after 1 row from WS when 4 rows remain in diagram M.1), cast off the middle 23-22-21 sts for neck and finish each shoulder (= 25-33-36 sts) separately. Cast off when the last repetition has been worked. SLEEVE: Worked back and forth on circular needle. Cast on 53-57-61 sts (incl 1 edge st in each side) on circular needle size 4 mm with Muskat. K 3 rows (1st row = WS). Work next row as follows (from RS): 1 edge st in garter st, P 17-19-21 sts, diagram M.1, P 17-19-21 sts and 1 edge st in garter st. When piece measures 10 cm, inc 1 st in each side. Repeat inc every 2-1½-1 cm a total of 10-12-15 times = 73-81-91 sts (P the inc sts seen from RS). READ ALL OF THE FOLLOWING SECTION BEFORE CONTINUING! When piece measures 30-29-27 cm (shorter measurements in the larger sizes because of longer sleeve cap and broader shoulder width), cast off for sleeve cap at beg of every row in each side: 4 sts 1 time, 2 sts 3 times and 1 st 6-7-10 times, then cast off 2 sts in each side until piece measures approx. 40 cm – adjust after 1 whole repetition of diagram M.1. Cast off the remaining sts. ASSEMBLY: Sew the shoulder seams. NECK EDGE: Knit up approx. 100 to 110 sts around the neck (incl sts on stitch holders at the front) on circular needle size 4 mm. K 3 rows and cast off. Sew sleeve seams inside 1 edge st and sew in the sleeves. Sew on buttons. Steam the garment to make it hang nicely. |
||||||||||||||||||||||||||||
Diagram explanations |
||||||||||||||||||||||||||||
|
||||||||||||||||||||||||||||
 |
||||||||||||||||||||||||||||
 |
||||||||||||||||||||||||||||
Have you finished this pattern?Tag your pictures with #dropspattern #gracecardigan or submit them to the #dropsfan gallery. Do you need help with this pattern?You'll find 23 tutorial videos, a Comments/Questions area and more by visiting the pattern on garnstudio.com. © 1982-2026 DROPS Design A/S. We reserve all rights. This document, including all its sub-sections, has copyrights. Read more about what you can do with our patterns at the bottom of each pattern on our site. |
||||||||||||||||||||||||||||


With over 40 years in knitting and crochet design, DROPS Design offers one of the most extensive collections of free patterns on the internet - translated to 17 languages. As of today we count 324 catalogues and 12260 patterns translated into English (UK/cm). 12260
We work hard to bring you the best knitting and crochet have to offer, inspiration and advice as well as great quality yarns at incredible prices! Would you like to use our patterns for other than personal use? You can read what you are allowed to do in the Copyright text at the bottom of all our patterns. Happy crafting!
Post a comment to pattern DROPS 138-5
We would love to hear what you have to say about this pattern!
If you want to leave a question, please make sure you select the correct category in the form below, to speed up the answering process. Required fields are marked *.