
Popular categories
Looking for a yarn?


Comments / Questions (135)
![]() Inez Persson wrote:
Inez Persson wrote:
I beskrivningen. Över de första 15 m stickas det räta samtidigt som det ökas 8 m jämt fördelat. detta är ju mönstrets 23 maskor. På mönsstret visas det räta maskor före M1 stämmer detta med vändningarna som skall göras efter 38 , 57 , 80 och 86 ?
19.08.2013 - 09:08DROPS Design answered:
Ja det stämmer, du börjar först M1 efter att du har ökat de 8 m. Lycka till!
22.08.2013 - 09:38
![]() Rita wrote:
Rita wrote:
Hei, jeg har strikket vesten som er veldig lik denne jakken (Vest: BabyDROPS 20-14) og ser at målene er helt annerledes for de tilsvarende størrelsene. På jakken er f.eks. str 3/4 år like stor som str 5/6 år på vesten? Tenker da på målene som står på illustrasjonen av plagget - er det riktige mål i forhold til størrelse? Vanskelig forklart, men skal jakken være en del større enn vesten? Veldig flotte modeller!
21.07.2013 - 19:32DROPS Design answered:
Hej Rita. Jeg forstaar ikke helt hvad du mener. Begge mönstre skulle vaere korrekte og sammenligner jeg 20-12 og 20-14, saa er maalene paa höjden og bredden paa maaltegningen de samme for baade 3/4 og 5/6 - undtagen for aermerne paa jakken, da den jo har lange aermer.
15.08.2013 - 16:00
![]() Mai wrote:
Mai wrote:
Sehr schöne Jacke, leider mit ein paar Macken. Die Skizze für Maße stimmt nicht: der Saumumfang muss größer sein damit Brustumfang stimmt - Skizze von Anleitung 16-3 passt besser. Daraus folgt Garnverbrauch evtl. zu wenig in Angabe.
22.06.2013 - 22:54
![]() Annie wrote:
Annie wrote:
Avant de commencer le diagramme il me semble par la photo qu'il faut quelques points mousse! merci pour la réponse
23.03.2013 - 11:38DROPS Design answered:
Tout à fait Annie, il faut tricoter 8 rangs endroit, puis 1 rang avec des augmentations, 1 rang sur l'envers et enfin on commence le diagramme et les rangs raccourcis. Bon tricot!
25.03.2013 - 11:22
![]() Hortens wrote:
Hortens wrote:
Merci pour la réponse.
15.03.2013 - 17:09
![]() Hortens wrote:
Hortens wrote:
Bonjour, je suis rendue à mesurer à partir de 40cm et là je bloque je ne vois pas où mesurer, c'est certainement clair mais j'ai un problème là je mesure juste au dessus du point fantaisie et en repérant le rang où j'ai raccroché la manche c'est ça?? merci de votre gentillesse à me répondre, bonne journée.
15.03.2013 - 11:28DROPS Design answered:
Bonjour Madame Hortens, vous mesurez à partir du marqueur que vous avez placez en reprenant la manche, juste avant le 1er des rangs raccourcis, au-dessus de M.1. Bon tricot !
15.03.2013 - 13:45
![]() J De Boer wrote:
J De Boer wrote:
Ik heb maat 6-9 maanden gebreid maar 150 gram was niet genoeg bij mij. Koop een bolletje extra! I knitted size 6-9 months, but 150 grams of yarn was not enough. Buy some extra!
11.03.2013 - 15:57DROPS Design answered:
Hartelijk dank voor uw reactie. Wij geven het door aan de designafdeling. Het is altijd aan te raden om een extra bol te kopen, aangezien iedereen een andere hand van breien heeft.
15.03.2013 - 09:12
![]() Hortens wrote:
Hortens wrote:
Bonjour, pour la correction que vous apportez sur le diagramme je retrouve la même explication que le modèle je ne comprends pas, y a t'il vraiment une correction?? Merci pour la réponse.
02.02.2013 - 07:48DROPS Design answered:
Bonjour Madame Hortens, les corrections sont systématiquement ajoutées dans les modèles en ligne, vous pouvez les imprimer tranquillement. Les corrections concernent principalement les catalogues imprimés et/ou si vous avez imprimé les explications avant la date de la correction. Bon tricot !
02.02.2013 - 09:48
![]() Susanne Strøyberg wrote:
Susanne Strøyberg wrote:
I opskriften starter man med diagrammet, som strikkes af de første 23 masker? Hvis man kigger på billedet, med babyen, ser det ud som, at man starter med ca. 2 cm retstrik - inden diagrammet - men det står ikke i opskriften?
29.01.2013 - 19:29DROPS Design answered:
Jo du starter med 8 p retstrik (til forkant) ifølge opskriften. God fornøjelse!
01.02.2013 - 10:32
![]() Fatima Guerreiro wrote:
Fatima Guerreiro wrote:
Boa noite, Creio que no vosso esquema e explicação não referem quantas malhas são necessárias para fazer a orla inferior tal como se vê n fotografia. E se se devem acrescentar e como fica então a distribuição das malhas. Se isso altera o nº de malhas total. Obrigada
21.01.2013 - 04:31DROPS Design answered:
Boa tarde, Este casaco é tricotado transversalmente, de um lado para o outro, ou seja, começa-se por uma das frentes. A orla inferior a que se refere é tricotada desde o princípio. Depois, tricota-se uma manga, depois, as costas, depois, a outra manga e, por fim, a outra frente. Esperamos tê-la ajudado. Não hesite em contactar-nos para quaisquer dúvidas. Bom tricô!
22.01.2013 - 16:28
|
||||||||||||||||||||||
DROPS Baby 20-12 |
||||||||||||||||||||||
 |
 |
|||||||||||||||||||||
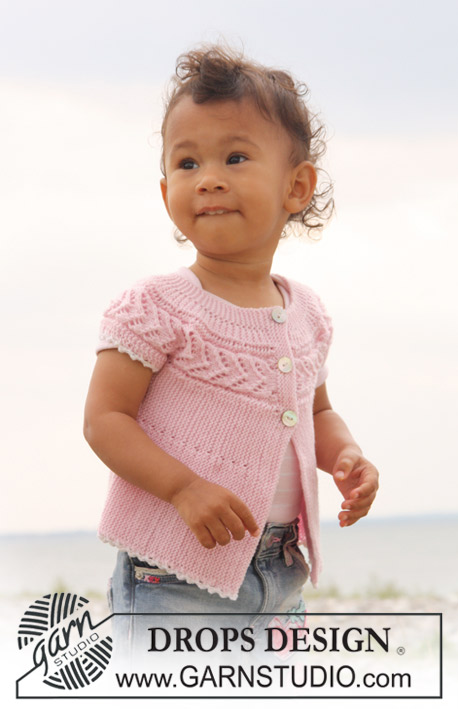
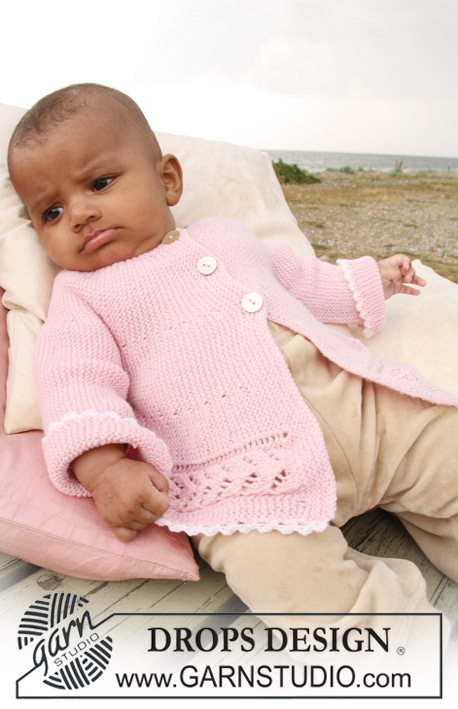
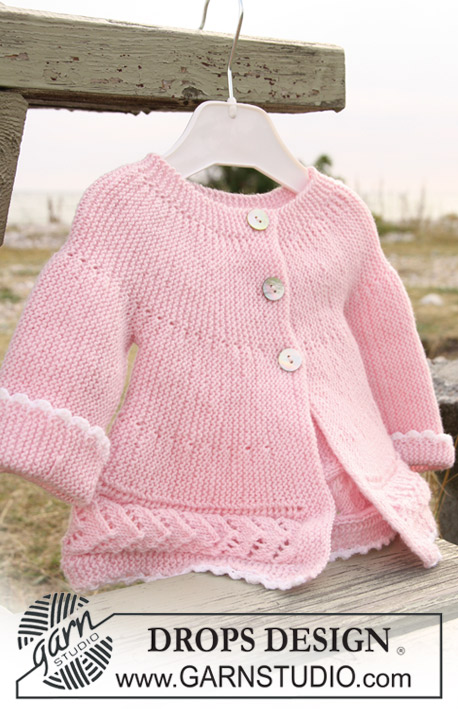
Jacket knitted from side to side in garter st and lace pattern for baby and children in DROPS BabyMerino
DROPS Baby 20-12 |
||||||||||||||||||||||
|
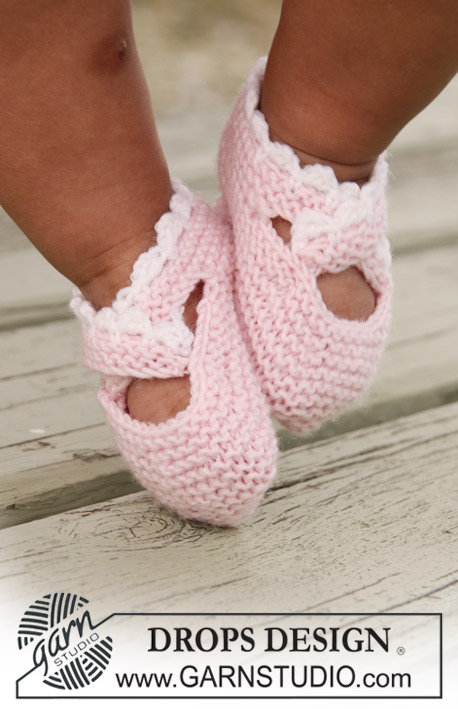
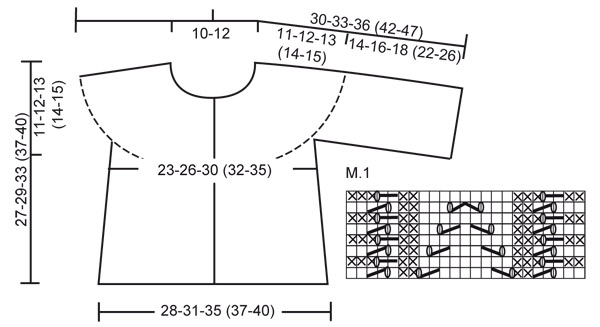
JACKET: PATTERN: See diagram M.1. Diagram shows the pattern from RS. KNITTING TIP: When turning mid piece, slip the first st as if to K, tighten thread and continue as before, do this to avoid a hole in transition. -------------------------------------------------------- -------------------------------------------------------- JACKET: Beg on left front piece, work towards the sleeve, back piece, the other sleeve and finish with right front piece. Loosely cast on 62-68-78 (88-96) sts on needle size 2.5 mm with Baby Merino and K 8 rows for front band (first row = RS). Work next row as follows from RS: K the first 15 sts, AT THE SAME TIME inc 8 sts evenly (inc1 st by making 1 YO), K remaining sts on needle = 70-76-86 (96-104) sts. K 1 row from WS on all sts, work YO into back of loop to avoid a hole. Continue as follows: work the first 23 sts on needle in M.1, and K remaining sts on every row. AT THE SAME TIME work shortened rows as follows – see KNITTING TIP: * work the first 30-32-38 (42-47) sts, turn piece and work return row, work the first 46-50-57 (65-70) sts, turn piece and work return row, work the first 64-70-80 (90-98) sts, turn piece and work return row, work all 70-76-86 (96-104) sts, turn and work return row *, repeat from *-* until piece measures approx 16-17.5-19.5 (20.5-22) cm from cast on row (measured just before the first turn, i.e. over M.1). Cut the thread. Now slip the first 41-45-52 (60-65) sts towards bottom edge on a stitch holder (= the side). Cast on 36-42-46 (60-70) new sts over sts on stitch holder (i.e. before the 29-31-34 (36-39) sts left on needle) for sleeve and now continue as follows (first row = from RS): * work the first 41-47-51 (65-75) sts, turn piece and work return row, work the first 59-67-74 (90-103) sts, turn piece and work return row, work all 65-73-80 (96-109) sts, turn and work return row *. Repeat from *-*. When piece measures 16-17-18 (18-20) cm from where sts for sleeve were cast on (measured where widest, i.e. along bottom edge) cast off 36-42-46 (60-70) sts from sleeve edge towards body piece. Cut the thread. Slip the 41-45-52 (60-65) sts from stitch holder at the side back on needle and insert a marker in piece. Continue from bottom of body piece as before from *-* as described for front piece (first row = from RS). When piece measures 28-31-35 (37-40) cm from marker (measured just before the first turn, i.e. over M.1) cut the thread. Slip the first 41-45-52 (60-65) sts towards bottom edge on a stitch holder (= the side). Cast on 36-42-46 (60-70) new sts over sts on stitch holder (i.e. before the 29-31-34 (36-39) sts left on needle) for sleeve and continue as before from *-* as described for the other sleeve. When sleeve measures the same as the left sleeve cast off 36-42-46 (60-70) sts from sleeve edge towards body piece. Cut the thread. Slip the 41-45-52 (60-65) sts from stitch holder at the side back on needle and continue from bottom of body piece as before from *-* as described for front piece (first row = RS). When right front piece measures the same as left front piece (less front band) work next row from RS as follows: K the first 23 sts, AT THE SAME TIME dec 8 sts evenly (dec 1 st by K2 tog) and K remaining 47-53-63 (73-81) sts on row = 62-68-78 (88-96) sts. Now work front band as follows (first row = from WS): K 3 rows on all sts, on next row from RS make 3 buttonholes as follows (i.e. from bottom edge towards neckline): K 41-45-53 (61-65) sts, 1 YO, K2 tog, K 7-8-9 (10-12) sts, 1 YO, K2 tog, K 7-8-9 (10-12) sts, 1 YO, K2 tog and finish with K1. Turn and K all sts on return row. Now K 5 rows on all sts and cast off loosely from RS. ASSEMBLY: Sew under arm seams, edge to edge. Sew on buttons. CROCHET BORDER: Crochet a border along bottom edge with crochet hook size 3 mm and white as follows: 1 dc, * 3 ch, 1 tr in the first of the 3 ch, skip approx 1 cm, 1 dc *, repeat from *-*. Crochet a similar border round both sleeves. |
||||||||||||||||||||||
Diagram explanations |
||||||||||||||||||||||
|
||||||||||||||||||||||
 |
||||||||||||||||||||||
Have you finished this pattern?Tag your pictures with #dropspattern or submit them to the #dropsfan gallery. Do you need help with this pattern?You'll find 16 tutorial videos, a Comments/Questions area and more by visiting the pattern on garnstudio.com. © 1982-2026 DROPS Design A/S. We reserve all rights. This document, including all its sub-sections, has copyrights. Read more about what you can do with our patterns at the bottom of each pattern on our site. |
||||||||||||||||||||||


With over 40 years in knitting and crochet design, DROPS Design offers one of the most extensive collections of free patterns on the internet - translated to 17 languages. As of today we count 325 catalogues and 12298 patterns translated into English (UK/cm). 12298
We work hard to bring you the best knitting and crochet have to offer, inspiration and advice as well as great quality yarns at incredible prices! Would you like to use our patterns for other than personal use? You can read what you are allowed to do in the Copyright text at the bottom of all our patterns. Happy crafting!
Post a comment to pattern DROPS Baby 20-12
We would love to hear what you have to say about this pattern!
If you want to leave a question, please make sure you select the correct category in the form below, to speed up the answering process. Required fields are marked *.