
Popular categories
Looking for a yarn?


Comments / Questions (27)
![]() Isabelle wrote:
Isabelle wrote:
Bonjour, comment se font les diminutions pour l'emmanchure du devant ?? Ça dit seulement de rabattre 4 mailles après la première diminution de l'encolure ... Merci !!
08.11.2019 - 04:16DROPS Design answered:
Bonjour Isabelle, après avoir rabattu les 4 mailles de l'emmanchure sur le 1er côté du devant, vous mettez les mailles en attente, vous tricotez le 2ème côté du devant et mettez en attente; vous tricotez le dos et les manches en les mettant en attente puis vous reprendrez toutes les mailles pour tricoter l'empiècement comme on le montre dans cette vidéo. Bon tricot!
08.11.2019 - 09:18Oksana wrote:
Where the front and back pieces are joint with sleeves for yoke it says: Work 1 round on front and back pieces before starting the decreases. Question: so sts of sleeves are not knitted in this round? Thanks!
17.07.2018 - 15:00DROPS Design answered:
Dear Oksana, all sts will be worked on this round, but you will decrease for raglan only on sleeves and not on front/back pieces, you decrease for sleeves first every 2 rows while you decrease for body first every 4th row. Happy knitting!
17.07.2018 - 15:06
![]() Garcia-Brazzalotto wrote:
Garcia-Brazzalotto wrote:
Bonjour Je ne comprends absolument pas l’empiecement. Par exemple sur le devant en V ça fait mousse puis jersey puis mousse? Est-il indispensable ?
02.07.2018 - 05:00DROPS Design answered:
Bonjour Mme Garcia-Brazzlotto, diverses petites corrections ont été apportées: l'empiècement se tricote en jersey envers (= comme le reste du pull) avec 2 m end (= jersey endroit) à la transition entre les manches et le dos/le devant. On continue les 2 m point mousse au début et à la fin de chaque rang (= bordure d'encolure). Bon tricot!
02.07.2018 - 10:05
![]() Marie-France Dionne wrote:
Marie-France Dionne wrote:
Bonjour Est ce possible de remplacer le point mousse par le point de riz. Merci
23.05.2017 - 18:18DROPS Design answered:
Bonjour Mme Dionne, si vous préférez ainsi, vous pouvez tout à fait. Bon tricot!
24.05.2017 - 08:36
![]() MARIE-FRANCE wrote:
MARIE-FRANCE wrote:
Bonjour première question Est-ce que ce patron se tricote en rond sur des aiguilles circulaire je ne ferais pas les fentes. Je ne comprend pas le paragraphe empiècement . merci bonne journée
19.05.2017 - 17:38DROPS Design answered:
Bonjour Marie-France, on tricote ici en allers et retours sur aiguille circulaire. L'empiècement se tricote également en allers et retours à partir de l'encolure devant. On diminue pour le raglan à un rythme différent sur le dos/les côtés du devant et sur les manches en fonction de la taille. Bon tricot!
22.05.2017 - 08:39
![]() Hayley Thomas wrote:
Hayley Thomas wrote:
I am struggling with the instructions on this pattern from the point that I start the v neck. I am making it in the largest size. I worked one side doing the 11 decreases and have done 147 rows, also I cast off 8 sts at the beginning of row 108, is this right? When reading further it says to work the other side of the front and also the back to armhole decreases, I am very confused, please help
07.05.2017 - 04:15DROPS Design answered:
Dear Hayley, when you knit the V neck you separate the front piece at the middle, and do the two part separately, that is why you have to cast off the 8 stitches on both side. After you done the front, you do the back at the same way you did the front, except, do not separate at the middle, but continue to knit back and forth, and cast off for the armhole on both side of teh back. I hope this helps. Happy Knitting!
07.05.2017 - 12:24
![]() Karine wrote:
Karine wrote:
Parfait. Merci beaucoup pour votre aide. Karine
16.04.2015 - 15:39
![]() Planche wrote:
Planche wrote:
Bonjour, Est il possible de réaliser ce modèle avec des aiguilles droites et non circulaires et dans ce cas comment dois je procéder ? Merci pour votre aide. Cordialement Karine
15.04.2015 - 18:52DROPS Design answered:
Bonjour Karine, on utilise ici une aiguille circulaire pour avoir suffisamment de place pour y loger toutes les mailles. Vous pouvez utiliser des aiguilles droites mais les mailles seront plus serrées, pensez à bien vérifier et conserver la bonne tension. Bon tricot!
16.04.2015 - 09:34
![]() Katia wrote:
Katia wrote:
Bonjour, 1°je ne comprends pas comment se font les emmanchures sur le devant (combien de diminutions et comment??); 2° les deux premières mailles cotés encolures sont en point mousse? merci
28.07.2012 - 18:09DROPS Design answered:
Bonjour Katia, les explications ont été légèrement reformulées. Les mailles de l'emmanchures sont rabattues après la 1ère diminution de l'encolure V (devant). On continue ensuite avec 2 m point mousse côté encolure. Bon tricot !
31.07.2012 - 08:47Elin wrote:
Åh vilken härlig tröja! =)
07.02.2006 - 14:33
|
|
DROPS 95-7 |
|
|
|
|
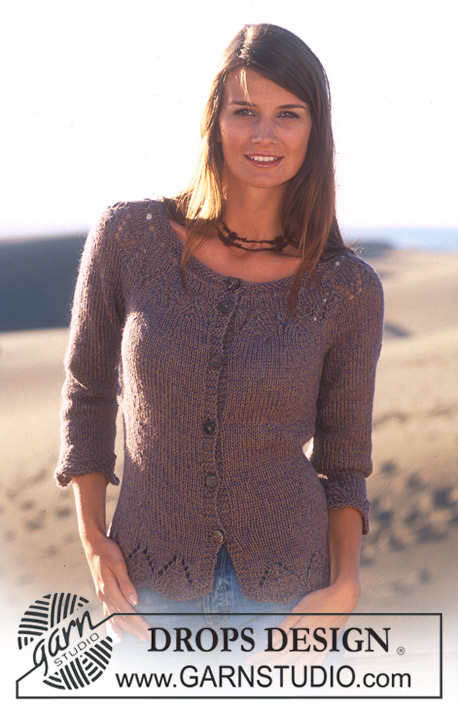
DROPS Jumper with V-neck in Paris
DROPS 95-7 |
|
|
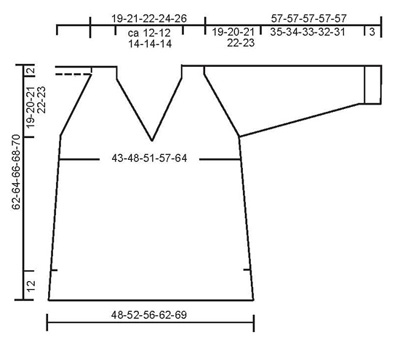
Knitting tension: 17 sts x 22 rows on needles size 5 mm in stocking sts. = 10 x 10 cm. Rib: *K3, P3*, repeat from *-* Decreasing tip 1 (applies to V-neck): All dec are done from the right side and within 2 edge sts that are K on every row. Dec as follows after 2 edge sts: P2 tog into back of st. Dec as follows before 2 edge sts: P2 tog. Decreasing tip 2 (applies to yoke): On the rows where no decreases are made, Kthe 2 sts on both sides of all marking thread from the right side and P them from the wrong side. Dec as follows from the right side: Before marking thread: work until there are 3 sts left before the marking thread, K2 tog, K1. After marking thread: K1, slip 1 st as if to knit, K1, psso. Dec as follows from the wrong side: Before the marking thread: Work until there are 3 sts left before the marking thread, P2 tog into back of st, P1. After marking thread: P1, P2 tog. Knitting tip: If your knitting tension doesn’t fit the measurement chart (too tight), the sleeve cap will be too short. You may adjust this by knitting extra random rows without dec between decreases. ________________________________________________________________ FRONT PIECE: Work back and forth on circular needle. Cast on 81-89-95-105-117 sts on circular needles size 5mm. K2 rows in garter st and continue in reverse stocking stitch with 3 sts each side in garter st (= slit). When piece measures 12 cm, cast on 1 new st each side (seam st) = 83-91-97-107-119 sts. Continue in reverse stocking stitch with 4 sts each side in garter st until there are 4 rows above the slit, now work reverse stocking stitch over all sts. When piece measures 14 cm, dec 1 st each side on every 7 cm a total of 4 times = 75-83-89-99-111 sts. When piece measures 38-39-41-42-43 cm, K4 rows in garter over the middle 5 sts (work other sts as before). Then cast off the middle st and put half the sts on a holder = 37-41-44-49-55 sts each side. Now dec for V-neck inside 2 sts worked in garter st – see Decreasing tips above – dec 1 st on every 4th row a total of 10-10-11-11-11 times. At the same time when piece measures 41-42-43-44-45 cm (after 1 dec for V-neck) cast off 4-4-4-6-8 sts at the side for armhole. Put sts on a holder and repeat the dec on the other side up till the armhole dec. Note! Work 1st row from mid front and start by picking up a st in the st which was cast off and knit this tog with the first st on row (do this to avoid a “hole” at the bottom of the V-neck). Put the piece aside and work back piece. Back piece: Cast on and work as front piece up to the armhole, but do not decrease for V-neck, and cast off for armhole as on the front piece = 67-75-81-87-95 sts. Put piece aside and work the sleeves. Sleeves: Work back and forth on circular needle. Loosely cast on 44-44-44-50-50 sts (includes 1 edge st each side) on circular needles size 5mm and purl 1 row from the wrong side. Continue in Rib with 1 edge st each side in garter st. When sleeve measures 3 cm, continue in reverse stocking stitch. When piece measures 12-12-10-10-11 cm inc 1 st each side on every 2.5-2-2-2-1.5 cm a total of 10-12-13-12-14 times = 64-68-70-74-78 cm. When piece measures 38-37-36-35-34 cm cast off for sleeve cap 4-4-4-6-8 sts each side (i.e cast off in beg of next 2 rows) = 56-60-62-62-62 sts. Put sts on a holder and work the other sleeve. Yoke: Read the whole of this section before continuing! Put the sleeves in on the same circular needle as front and back pieces where you bound off for armholes = 243-267-283-295-311 sts. Insert a marking thread where sleeve meets body pieces (= 4 marking threads). Decreases: See Knitting and Decreasing tip 2 above! Work 1 round on front and back pieces before starting the decreases. Remember dec for V-neck on front pieces! Dec each side of front and back pieces as follows: 1 st on every 4th row a total of 5-3-2-1-0 times and 1 st on every other row a total of 12-17-20-22-25 times. Dec each side of both sleeves as follows: 1 st on every other row a total of 18-18-19-21-23 times and thereafter on every row 1 st a a total of 7-9-9-7-5 times. At the same time, when piece measures 59-61-63-65-67 cm K4 rows in garter over the middle 19-19-21-21-21 sts on back piece, work the other sts as before. Then cast off the middle 19-19-21-21-21 sts and dec 1 st at neck edge on next row – see Decreasing tips 1 above. When all dec have been made, there are 36-40-40-48-56 sts remaining. When piece measures 61-63-65-67-69 cm, K2 rows in garter (1st row = right side) over all sts and cast off – piece measures approx 62-64-66-68-70 cm. Assembly: Sew side seams, sleeve seams and the openings under the arms. Pocket: Cast on 35-35-35-41-41 sts on needle size 5mm and work Rib with 1 edge st and 3 purled sts each side (seen from the right side) – Note: K the edge st each side in garter until finished measurements. When the Rib measures 3 cm continue in reverse stocking stitch. When piece measures 23-23-23-27-27 cm, work Rib again with 1 edge st and 3 purled sts each side (seen from the right side). Cast off when the Rib measures 3 cm. Sew the pocket on the front piece approx 12-13-14-14-15 cm from the bottom edge. |
|
 |
|
Have you finished this pattern?Tag your pictures with #dropspattern or submit them to the #dropsfan gallery. Do you need help with this pattern?You'll find 26 tutorial videos, a Comments/Questions area and more by visiting the pattern on garnstudio.com. © 1982-2026 DROPS Design A/S. We reserve all rights. This document, including all its sub-sections, has copyrights. Read more about what you can do with our patterns at the bottom of each pattern on our site. |


With over 40 years in knitting and crochet design, DROPS Design offers one of the most extensive collections of free patterns on the internet - translated to 17 languages. As of today we count 324 catalogues and 12252 patterns translated into English (UK/cm). 12252
We work hard to bring you the best knitting and crochet have to offer, inspiration and advice as well as great quality yarns at incredible prices! Would you like to use our patterns for other than personal use? You can read what you are allowed to do in the Copyright text at the bottom of all our patterns. Happy crafting!
Post a comment to pattern DROPS 95-7
We would love to hear what you have to say about this pattern!
If you want to leave a question, please make sure you select the correct category in the form below, to speed up the answering process. Required fields are marked *.