
Popular categories
Looking for a yarn?


Comments / Questions (25)
![]() Benedetta wrote:
Benedetta wrote:
Buongiorno, vorrei chiedere un aiuto . Non capisco come andare avanti sull'aumento dello sprone e cioè: "Spostare i 4 segnapunti in modo che ognuno sia nella maglia più esterna a ogni lato del davanti e dietro,con .......maglie tra le maglie con il segnapunti sulle maniche" Grazie per l'aiuto!
17.05.2024 - 11:28DROPS Design answered:
Buonasera Benedetta, deve spostare i segnapunti nelle ultime maglie del davanti e del dietro. Buon lavoro!
16.06.2024 - 22:14
![]() Jenni wrote:
Jenni wrote:
Onko ohjeessa virhe... tein lisäykset ohjeen mukaan koossa 1/3 ja silmukoita on yhteensä 210, vaikka niitä piti olla 218. Ohje jatkuu osioden jakamiseen 32+42+54+42+32 =202 ... eli lisäyksiä on ohjeessa joko liikaa tai loppuohjeen jako menee väärin.
02.03.2024 - 22:30DROPS Design answered:
Tarkistin ohjeen lisäykset ja en löytänyt virheitä. Kaarrokkeen alkaessa työssä on 94 silmukkaa. Satulaolkapäitä varten lisätään yhteensä 40 silmukkaa, hihoja varten lisätään 44 silmukkaa ja kaarroketta varten lisätään 24 silmukkaa. Tämän jälkeen työssä on 202 silmukkaa (koossa 1/3).
06.03.2024 - 17:12
![]() Yard wrote:
Yard wrote:
Je ne sais pas tricoter avec des aiguilles circulaires. Puis je tricoter avec des aiguilles double pointe. et comment dois-je m'y prendre (voir les instructions) Merci
02.03.2024 - 13:07DROPS Design answered:
Bonjour Mme Yard, vous pouvez tricoter le col et l'empiècement sur aiguilles droites, puis après la division, tricotez le bas du gilet sur aiguilles droites, et tricotez ensuite les manches en rond sur les aiguilles doubles pointes. Bon tricot!
04.03.2024 - 07:53
![]() Marianne Beck wrote:
Marianne Beck wrote:
Die 4 Markierer der Ärmelzunahmen so versetzen, dass jeder dieser Markierer in der äußersten Masche an beiden Seiten von Vorderteil und Rückenteil sitzt. Es sind 34-32-32-32 (34) Maschen pro Ärmel zwischen den markierten Maschen vorhanden. Das verstehe ich nicht.
17.02.2024 - 16:18DROPS Design answered:
Liebe Frau Beck, die Markierer waren zuerst zwischen 2 Maschen, jetzt soll jeder Markierer in einer Masche eingesetzt werden und zwar in die letzte Masche vom linken Vorderteil + in die 1. Masche + in die lezte Masche vom Rückenteil + in die erste Masche vom rechten Vorderteil. Viel Spaß beim stricken!
19.02.2024 - 09:01
![]() Duverger wrote:
Duverger wrote:
Dans dos/devants je tricote pendant 12 cm ensuite un rang endroit et j'augmente 14 mailles après les 12 cm ce qui fait que mon gilet est plus large en bas ....... ou j'augmente avant de tricoter les 12 cm j'ai un doute car sur le diagramme le gilet ne semble pas plus large en bas j'attends votre réponse merci
20.01.2024 - 19:18DROPS Design answered:
Bonjour Mme Duverger, vous tricotez jusqu'à ce que le dos et les devants mesurent 12 cm après la division (4ème taille), puis vous tricotez 1 rang sur l'endroit en répartissant 18 augmentations et continuez avec les aiguilles 2,5 en côtes comme indiqué; comme il faut davantage de mailles en côtes avec les aiguilles 2,5 qu'en jersey avec les aiguilles 3, on doit augmenter avant les côtes pour éviter que la bordure ne resserre le bas du gilet. Bon tricot!
22.01.2024 - 08:40
![]() Christine Weir wrote:
Christine Weir wrote:
Hi ...I'm knitting the 6-9 mnths i have done the increases as each section said ...got the correct number of sts each time but now i have 186 sts ... my problem is the 32sts between marker .... i have 28i watched the video but dont know where my problem is ...can you help?
21.11.2023 - 22:50Christine Weir answered:
Hi....thank you ... I found my mistake !🙂
21.11.2023 - 23:26
![]() Lina wrote:
Lina wrote:
Buongiorno, nel momento in cui si devono fare gli aumenti per lo sprone e le maniche contemporaneamente, quali suggerimenti bisogna seguire? Le istruzioni indicano il suggerimento 2, che fa riferimento agli aumenti dal rovescio del lavoro, ma per lo sprone devo aumentare dal diritto...non capisco
05.04.2023 - 13:03DROPS Design answered:
Buonasera Lina, nel testo è riportato il riferimento ai suggerimenti per il lavoro -1 e -2 a seconda se si lavori dal diritto o dal rovescio del lavoro: vanno utilizzati entrambi. Buon lavoro!
05.04.2023 - 16:48
![]() Juliette wrote:
Juliette wrote:
Bonjour. Je tricoté ce modèle en taille 0/1 mois. Au paragraphe DIVISION POUR LE DOS/ LES DEVANTS ET LES MANCHES, je ne tombe pas sur le même nombre de maille, mais sur : Manches = 48 et dos = 40 mailles. (Manches : 10 mailles + 10 augmentations + 24 augmentations + 4 augmentations) Pouvez-vous me dire à quelle étape j’ai raté quelque chose ? Merci
22.03.2023 - 19:35DROPS Design answered:
Bonjour Juliette, en fait, vous ne devez pas avoir 48 mailles pour les manches, avant d'augmenter pour l'empiècement, vous avez 34 mailles pour les manches (10 m + 12 augm de chaque côté), puis vous mettez un marqueur dans la 1ère et dans la dernière de ces mailles (= 34 m pour les manches) et les marqueurs sont pour les augmentations de l'empiècement. Vous augmentez ensuite 1 fois 8 m au -total, soit 2 m pour chaque manche = 36 m entre les marqueurs. Vous glisserez ensuite 40 m (soit les 36 m entre les marqueurs + les 2 m avec un marqueur + 1 m de chaque côté) en attente pour les manches. Bon tricot!
23.03.2023 - 09:57
![]() Anaïs wrote:
Anaïs wrote:
Bonjour, Je ne suis pas sure de comprendre l augmentation pour les manches “monter (4) 4-6-6-8 (8) mailles (côté sous la manche),” je dois tricoter ces 4 mailles avec le dos devant ou les laisser en attente? Merci
29.11.2022 - 21:11DROPS Design answered:
Bonjour Anaïs, ces mailles doivent être montées = ajoutées (pas augmentées au sens d'augmentation traditionnelle) car elles vont remplacer les mailles de la manche que l'on met en attente - cette leçon montre, à partir de la photo 11 comment on monte ces nouvelles mailles (montez-en bien 4 comme pour la taille tricotée, la leçon n'est qu'une illustration). Bon tricot!
30.11.2022 - 08:43
![]() Neli wrote:
Neli wrote:
Ist die erste Masche eine Randmasche? Denn sonst geht das alles nicht auf.
30.10.2022 - 16:46DROPS Design answered:
Liebe Neli, es gibt hier keine Randmasche, die erste sowie die letzte Maschen gehören zu den 5 ersten /letzen Blende-Maschen. Viel Spaß beim stricken!
31.10.2022 - 09:07
|
|||||||||||||
Blue Pebbles Cardigan#bluepebblescardigan |
|||||||||||||
 |
 |
||||||||||||
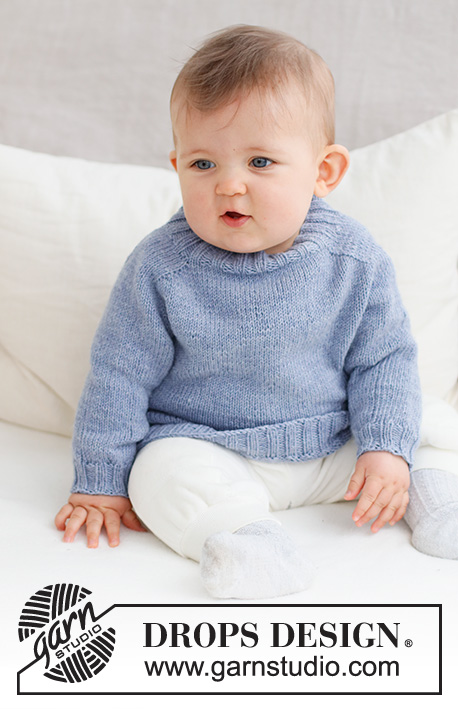
Knitted jacket for baby in DROPS BabyMerino. The piece is worked top down with saddle-shoulders. Sizes: Premature to 2 years.
DROPS Baby 43-3 |
|||||||||||||
|
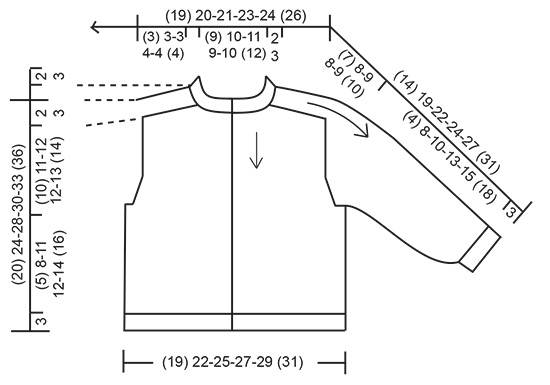
------------------------------------------------------- EXPLANATIONS FOR THE PATTERN: ------------------------------------------------------- RIDGE/GARTER STITCH (worked back and forth): Knit all rows. 1 ridge = knit 2 rows. INCREASE TIP-1 (saddle-shoulders, sleeves and yoke from the right side): BEFORE MARKER: The new stitch twists to the right. Use left needle to pick up thread between 2 stitches from row below, pick up thread from behind and knit stitch in front loop. AFTER MARKER: The new stitch twists to the left. Use left needle to pick up thread between 2 stitches from row below, pick up thread from front and knit stitch in back loop. INCREASE TIP-2 (for saddle-shoulders from the wrong side): BEFORE MARKER: The new stitch twists to the (seen from the right side). Use left needle to pick up thread between 2 stitches from row below, pick up thread from front and purl stitch in back loop. AFTER MARKER: The new stitch twists to the left (seen from the right side). Use left needle to pick up thread between 2 stitches from row below, pick up thread from behind and purl stitch in front loop. DECREASE TIP (for sleeves): Start 3 stitches left before the marker, knit 2 together, knit 2 (marker sits between these 2 stitches), slip 1 stitch as if to knit, knit 1 and pass the slipped stitch over the knitted stitch (= 2 stitches decreased). BUTTONHOLES: Work the buttonholes on the right band (when the garment is worn). Work from the right side when there are 3 stitches left: Make 1 yarn over, knit 2 together and knit 1. On the next row (wrong side) knit the yarn over to leave a hole. The first buttonhole is worked when the neck measures 1½-2 cm, the other (3) 4-5-5-5 (5) buttonholes are worked with (5) 5-5-5-5½ (6) cm between each one. ------------------------------------------------------- START THE PIECE HERE: ------------------------------------------------------- JACKET – SHORT OVERVIEW OF THE PIECE. The neck and yoke are worked back and forth with circular needle, from mid front and top down. Stitches are increased for the saddle-shoulders, sleeves and yoke. The yoke is divided for body and sleeves and the body continued back and forth. The sleeves are worked in the round with double pointed needles. NECK: Cast on (72) 76-80-84-88 (96) stitches with circular needle size 2.5 mm and DROPS Baby Merino. Purl 1 row from the wrong side. The next row is worked as follows from the right side: 5 band stitches in GARTER STITCH – read description above, * knit 2, purl 2 *, work from *-* until there are 7 stitches left, knit 2 and 5 band stitches in garter stitch. Work this rib for (2) 2-2-3-3 (3) cm – remember the BUTTONHOLES on the right band – read description above. When the rib is finished, knit 1 row from the right side where you increase (10) 14-14-18-18 (18) stitches evenly spaced (do not increase over the bands) = (82) 90-94-102-106 (114) stitches. Purl 1 row from the wrong side (the bands are knitted). YOKE: Change to circular needle size 3 mm. Insert 1 marker after the band; the yoke is measured from this marker! In addition, insert 4 other markers without working the stitches and each marker is inserted between 2 stitches; these markers are used when increasing for the shoulders and should have a different colour to the marker on the neck. Marker 1: Start mid-front and count (18) 20-21-21-22-24 stitches (front piece), insert the marker before the next stitch. Marker 2: Count (10) 10-10-14-14 (14) stitches from marker 1 (shoulder), insert the marker before the next stitch. Marker 3: Count (26) 30-32-32-34 (38) stitches from marker 2 (back piece), insert the marker before the next stitch. Marker 4: Count (10) 10-10-14-14 (14) stitches from marker 3 (shoulder), insert the marker before the next stitch. There are (18) 20-21-21-22 (24) stitches left after marker 4 (front piece). Allow these markers to follow your work onwards. INCREASES FOR SADDLE SHOULDERS: Read the next section before continuing – on the first row from the right side, increase 4 stitches for the saddle-shoulders as follows: Work stocking stitch and 5 band stitches in garter stitch on each side. Increase BEFORE markers 1 and 3 and AFTER markers 2 and 4 – read INCREASE TIP-1. You are only increasing on the front and back pieces. The number of shoulder stitches remains the same. On the next row (wrong side), increase 4 stitches as follows: Increase BEFORE markers 4 and 2 and AFTER markers 3 and 1– read INCREASE TIP-2. You are, therefore, increasing on EACH row but differently from the right and wrong side so the stitches lie neatly. Continue like this, increasing a total of (10) 10-10-12-12 (12) times = (122) 130-134-150-154 (162) stitches. REMEMBER THE KNITTING TENSION! After the last increase, the piece measures approx. (3) 3-3-4-4 (4) cm from the marker on the neck. Now increase for the sleeves as follows: INCREASES TO SLEEVES: Continue with stocking stitch and 5 band stitches in garter stitch on each side. AT THE SAME TIME, on the next row from the right side increase 4 stitches for the sleeves as follows: Increase AFTER markers 1 and 3 and BEFORE markers 2 and 4 – remember INCREASE TIP-1. You are only increasing on the sleeves and the number of stitches on the front and back pieces remains the same. Increase like this every 2nd row (each row from the right side) a total of (10) 12-11-9-9 (10) times = (162) 178-178-186-190 (202) stitches. The piece measures approx. (9) 11-10-10-10 (10) cm from the marker on the neck. Now increase for the yoke as follows. INCREASES TO YOKE: SIZE (prematur): = (162) stitches. Continue with stocking stitch but without increasing until the piece measures 10 cm from the marker on the neck. Go to ‘Divide for the body and sleeves’ below. SIZES 0/1 - 1/3 - 6/9 - 12/18 months (2 years): Move the 4 markers so each marker sits in the outermost stitch on each side of the back and front pieces, with 34-32-32-32 (34) stitches between the marker-stitches on the sleeves. On the next row from the right side increase 8 stitches by increasing both before and after each marker-stitch – remember INCREASE TIP-1. You are now increasing on the front and back pieces as well as the sleeves. Increase like this every 2nd row (each row from the right side) a total of 1-3-4-5 (5) times = 186-202-218-230 (242) stitches. After the last increase, the piece measures approx. 11-12-12-13 (13) cm from the marker on the neck. Continue working until the piece measures 11-12-12-13 (14) cm from the marker. DIVIDE FOR THE BODY AND SLEEVES: Work the first (26) 29-32-34-36 (38) stitches, place the next (34) 40-42-46-48 (50) stitches on a thread for the sleeve, cast on (4) 4-6-6-8 (8) stitches (in side under sleeve), work (42) 48-54-58-62 (66) stitches, place the next (34) 40-42-46-48 (50) stitches on a thread for the sleeve, cast on (4) 4-6-6-8 (8) stitches (in side under sleeve), work the last (26) 29-32-34-36 (38) stitches. The body and sleeves are finished separately. The piece is now measured from here! BODY: = (102) 114-130-138-150 (158) stitches. Continue with stocking stitch and 5 band stitches in garter stitch on each side for a further (5) 8-11-12-14 (16) cm. Knit 1 row from the right side where you increase (14) 14-18-18-22 (22) stitches evenly spaced (do not increase over the bands) = (116) 128-148-156-172 (180) stitches. Change to circular needle size 2.5 mm and work as follows from the wrong side: 5 band stitches in garter stitch, * purl 2, knit 2 *, work from *-* until there are 7 stitches left, purl 2 and 5 band stitches in garter stitch. Continue this rib for 3 cm. Cast off a little loosely. The jacket measures approx. (20) 24-28-30-33 (36) cm from the shoulder down. SLEEVES: Place the (34) 40-42-46-48 (50) stitches from the thread on the one side of the piece on double pointed needles size 3 mm and knit up 1 stitch in each of the (4) 4-6-6-8 (8) stitches cast on under the sleeve = (38) 44-48-52-56 (58) stitches. Insert a marker in the middle of the (4) 4-6-6-8 (8) stitches under the sleeve. Start at the marker and work stocking stitch in the round for 1 cm. Now decrease 2 stitches under the sleeve (does not apply to sizes prematur and 0/1 month) – read DECREASE TIP. Decrease like this every 3rd round a total of (0) 2-2-3-4 (4) times = (38) 40-44-46-48 (50) stitches. Continue working until the sleeve measures (4) 8-10-13-15 (18) cm from the division. There is approx. 3 cm to finished length; try the jacket on and work to desired length. Knit 1 round where you decrease (2) 0-0-2-0 (2) stitches evenly spaced = (36) 40-44-44-48 (48) stitches. Change to double pointed needles size 2.5 mm and work rib (knit 2, purl 2) for 3 cm. Cast off a little loosely The sleeve measures approx. (7) 11-13-16-18 (21) cm from the division. Work the other sleeve in the same way. ASSEMBLY: Sew the buttons onto the left band. |
|||||||||||||
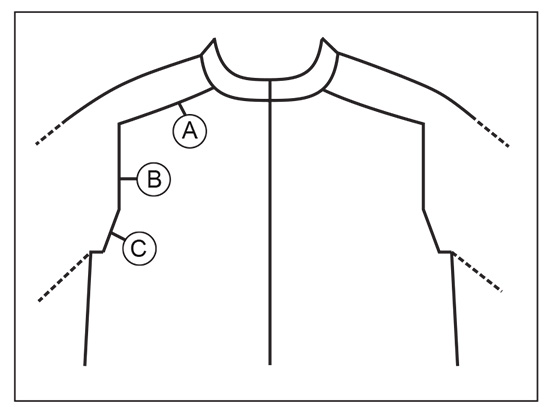
Diagram explanations |
|||||||||||||
|
|||||||||||||
|
|||||||||||||
|
|||||||||||||
Have you finished this pattern?Tag your pictures with #dropspattern #bluepebblescardigan or submit them to the #dropsfan gallery. Do you need help with this pattern?You'll find 31 tutorial videos, a Comments/Questions area and more by visiting the pattern on garnstudio.com. © 1982-2025 DROPS Design A/S. We reserve all rights. This document, including all its sub-sections, has copyrights. Read more about what you can do with our patterns at the bottom of each pattern on our site. |
|||||||||||||


With over 40 years in knitting and crochet design, DROPS Design offers one of the most extensive collections of free patterns on the internet - translated to 17 languages. As of today we count 314 catalogues and 11820 patterns translated into English (UK/cm). 11820
We work hard to bring you the best knitting and crochet have to offer, inspiration and advice as well as great quality yarns at incredible prices! Would you like to use our patterns for other than personal use? You can read what you are allowed to do in the Copyright text at the bottom of all our patterns. Happy crafting!
Post a comment to pattern DROPS Baby 43-3
We would love to hear what you have to say about this pattern!
If you want to leave a question, please make sure you select the correct category in the form below, to speed up the answering process. Required fields are marked *.