
Popular categories
Looking for a yarn?


Comments / Questions (28)
![]() Annet Meijer wrote:
Annet Meijer wrote:
Kan dit patroon ook op 2 pennen gebreid worden?
19.12.2021 - 18:11
![]() Annette Hoffmann wrote:
Annette Hoffmann wrote:
Ich bin der Meinung, dass in dieser Anleitung die Maschenzahl zu wenig ist. Ich habe Größe M gestrickt. Nach der Passe habe ich festgestellt, dass es vielleicht einem Kind mit Gr. 152 passt. 158 Maschen für 2 Ärmel, Rückenteil und Vorderteil ist viel zu wenig. Ich stricke sehr viel Islandpullis, und weis von was ich spreche. Gruß
19.12.2021 - 09:23DROPS Design answered:
Liebe Frau Hoffmann, stimmt Ihre Maschenprobe? Mit 11 Maschen = 10 cm, sollen die 106 Maschen beim Rumpfteil ca 96 cm sein dh minus die Randmaschen ca 47 cm breit von der Seite bis auf der anderen Seite, genauso wie bei der Skizze. Hoffentlich kann das Ihnen helfen. Viel Spaß beim stricken!
20.12.2021 - 08:31
![]() Annette Hoffmann wrote:
Annette Hoffmann wrote:
Ich habe festgestellt, dass die Maschenzahl nicht korrekt ist. Nach der Rundpasse hat man 158 Maschen für Vorderteile, Rückenteil und Ärmel auf den Nadeln . Jetzt werden die Maschen verteilt. Je Ärmel legt man 32 Maschen still. Dann verbleiben für das Rückenteil und Vorderteile 94 Maschen. Diese Maschenzahl ist für Größe M viel zu wenig. Bitte um Überprüfung!!!!!
15.12.2021 - 15:32DROPS Design answered:
Liebe Frau Hoffmann, ich habe die Maschenanzahl richtig so: 24 M + 32 M + 46 M + 32 M + 24 M = 158 Maschen - misverstehe ich Ihre Frage?
15.12.2021 - 16:27
![]() Inge Soree wrote:
Inge Soree wrote:
Ik ben met het vest in DROPS Wish 228-13 bezig, maar zie niet goed hoe ik na de boord kan vinden wat ik waar moet meerderen voor de pas. Er staat in de tekst "LET OP! Meerder niet volgens het telpatroon voor deze steek" dus waar kan ik dan wel vinden hoeveel ik waar moet meerderen? Alvast bedankt voor de hulp!
12.12.2021 - 15:03DROPS Design answered:
Dag Inge,
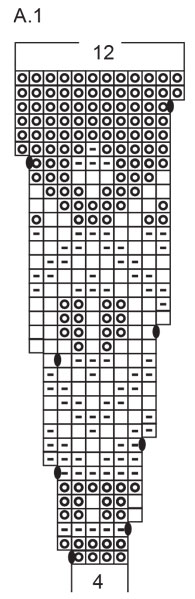
De meerderingen voor de pas zijn in het telpatroon opgenomen, dus als je het telpatroon gewoon volgt, meerder je automatisch voor de pas. De laatste steek op de naald brei je in A.1 en alleen voor deze ene steek in A.1 geldt dat je niet meerdert, dus niet de omslagen maakt zoals aangegeven in A.1
14.12.2021 - 10:46
![]() Sjan wrote:
Sjan wrote:
Het patroon, is iedere toer 1 keer of moet de terug gaande toer het zelfde gebreid worden? Ik lees daar niks over en kan het niet goed zien
03.12.2021 - 00:25DROPS Design answered:
Dag Sjan,
In het telpatroon zijn alle naalden weergegeven, dus zowel de heengaande als de teruggaande naald. Als je naald 1 gebreid hebt, ga je op de volgende toer dus verder met naald 2, enzovoort. Bij de vaak gestelde vragen kun je ook meer informatie vinden over het lezen van telpatronen.
09.12.2021 - 11:09
![]() Lina wrote:
Lina wrote:
Buongiorno, ho realizzato il modello e, secondo le indicazioni, ho utilizzato il blu denim ma l'effetto è più scuro rispetto alla foto. Potrei sapere il colore del modello in foto? Forse il blu navy?
15.11.2021 - 08:14DROPS Design answered:
Buonasera Lina, il modello è realizzato con blu denim, ma la colorazione può variare a seconda della luce e anche dallo schermo. Buon lavoro!
16.11.2021 - 22:16
![]() Sjan Baardemans wrote:
Sjan Baardemans wrote:
Lekker dik vest denk ik. Hoop dat hij snel online is
10.08.2021 - 11:28
![]() Susanne wrote:
Susanne wrote:
So schön!!
10.08.2021 - 10:10
|
|||||||||||||
North Gate#northgatejacket |
|||||||||||||
 |
 |
||||||||||||
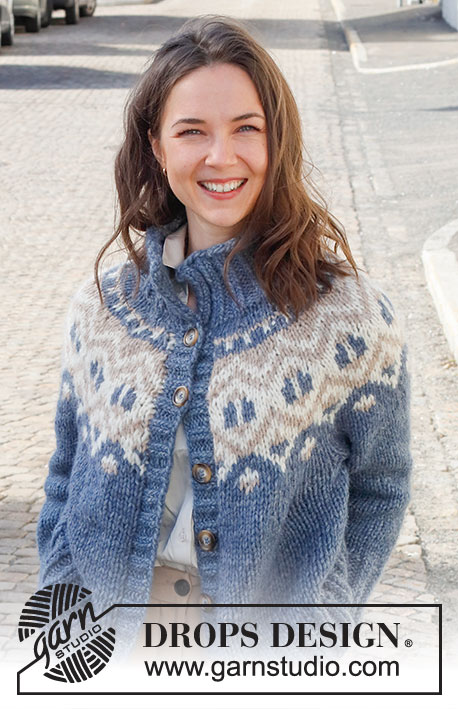
Knitted jacket in DROPS Wish. Piece is knitted top down with round yoke, multi-coloured pattern and high collar. Size: S - XXXL
DROPS 228-13 |
|||||||||||||
|
---------------------------------------------------------- EXPLANATION FOR THE PATTERN: ---------------------------------------------------------- GARTER STITCH (back and forth): Knit all rows. 1 ridge vertically = knit 2 rows. INCREASE/DECREASE TIP (evenly): To calculate how to increase/decrease evenly, use the total number of stitches increases/decreases are done over (e.g. 54 stitches) and divide by number of increases/decreases to be done (e.g. 5) = 10.8. In this example increase by making 1 yarn over after approx. every 11th stitch. Do not increase over edge stitches. On next row work yarn overs twisted to avoid holes. To decrease in this example knit every 10th and 11th stitch together. PATTERN: See diagram A.1. Work the entire pattern in stocking stitch. KNITTING TIP: To avoid the garment losing elasticity when working pattern, it is important not to tighten the strands on back side of piece. Switch to a higher needle number when working pattern if the pattern is somewhat tight. DECREASE TIP (applies to sleeves): Decrease 1 stitch on each side of marker thread as follows: Work until 3 stitches remain before marker thread, knit 2 together, knit 2 stitches (marker thread is between these 2 stitches), slip 1 stitch knitwise, knit 1, pass slipped stitch over stitch worked (= 2 stitches decreased). BUTTONHOLES: Decrease for 6-7-7-7-7-7 button holes on right front band. 1 buttonhole = work 2 stitches together, make 1 yarn over – NOTE: Decrease for buttonholes will look better by purling 2 together in a section with 2 purl stitches (seen from right side). On next row knit yarn over to make holes. Bottom buttonhole should be placed approx. 4-6 cm from bottom edge and top buttonhole approx. 1 cm from neck edge. Place the remaining 4-5-5-5-5-5 evenly between top and bottom hole. CAST-OFF TIP: To avoid a tight cast-off edge when casting off, you may use a larger needle. If this still is too tight make 1 yarn over after approx. every 6th stitch while casting off (cast off yarn overs as stitches). ---------------------------------------------------------- START THE PIECE HERE: ---------------------------------------------------------- JACKET - SHORT OVERVIEW OF THE PIECE: Work neck edge and yoke back and forth on circular needle from mid front, work top down. Cast off stitches for band and work the rest of yoke back and forth with 1 edge stitch in each side towards mid front. Now divide yoke for body and sleeves. Work body back and forth on circular needle from mid front, work top down. Work sleeves in the round on double pointed needles/short circular needle, top down. Then pick up band on front pieces. NECK EDGE: Cast on 60-64-64-68-68-72 stitches (including 5 band stitches in each side towards mid front) on circular needle size 7 mm with colour denim blue in DROPS Wish. Purl 1 row (= wrong side). Work next row as follows from right side: 1 edge stitch in GARTER STITCH – read explanation above - * knit 2 twisted, purl 2 *, work from *-* until 3 stitches remain, knit 2 twisted, and finish with 1 edge stitch in garter stitch. Work from wrong side as follows: 1 edge stitch in garter stitch, * purl 2 twisted, knit 2 *, repeat from *-* until 3 stitches remain on needle, purl 2 twisted, and finish with 1 edge stitch in garter stitch. Continue rib like this for 10 cm. When rib has been worked, work next row as follows from right side: Cast off the first 5 stitches (fasten band here later), knit the next 50-54-54-58-58-62 stitches, AT THE SAME TIME increase 1-1-5-5-13-13 stitches evenly - read INCREASE/DECREASE TIP, work rib as before over the next 4 stitches and finish with 1 edge stitch in garter stitch. Switch to circular needle size 8 mm. Turn piece, cast off the first 5 stitches, purl until 1 stitch remains on row (purl yarn overs twisted), and finish with 1 edge stitch in garter stitch = 51-55-59-63-71-75 stitches on needle. Insert 1 marker after edge stitch at beginning of row mid front, measure yoke from this marker! YOKE: Read KNITTING TIP and then work next row as follows from right side: 1 edge stitch in garter stitch, work A.1 until 2 stitches remain (= 12-13-14-15-17-18 repetitions of 4 stitches), work first stitch in A.1 (so that pattern begins and ends the same in each side towards mid front - NOTE! Do not increase as shown in diagrams before this stitch), and finish with 1 edge stitch in garter stitch. Continue pattern like this. Work edge stitches in same colour as first/last stitch in pattern. When A.1 has been worked one time vertically, there are 147-159-171-183-207-219 stitches on round. Then work piece in stocking stitch with colour denim blue. On next row adjust number of stitches to 146-158-178-186-206-222. When piece measures 25-25-25-27-29-31 cm, divide yoke for body and sleeves, i.e. work next row as follows: Work 22-24-27-28-32-35 stitches as before (= front piece), slip the next 30-32-36-38-40-42 stitches on 1 thread for sleeve, cast on 6-6-6-8-8-8 new stitches on row (= in the side under sleeve), work 42-46-52-54-62-68 stitches as before (= back piece), slip the next 30-32-36-38-40-42 stitches on 1 thread for sleeve, cast on 6-6-6-8-8-8 new stitches on row (= in the side under sleeve) and work the 22-24-27-28-32-35 stitches as before (= front piece). Finish body and sleeves separately. NOW MEASURE PIECE FROM HERE! BODY: = 98-106-118-126-142-154 stitches. Continue with colour denim blue, work in stocking stitch with 1 edge stitch in garter stitch in each side. Work until piece measures 15-17-19-19-19-19 cm. Knit 1 row from right side and increase AT THE SAME TIME 10-10-10-10-14-14 stitches evenly = 108-116-128-136-156-168 stitches. Increase stitches to avoid the rib from contracting. Switch to circular needle size 7 mm. Work first row as follows from wrong side: 1 edge stitch in garter stitch, * purl 2 twisted, knit 2 *, repeat from *-* until 3 stitches remain on needle, purl 2 twisted, and finish with 1 edge stitch in garter stitch. Work as follows from right side: 1 edge stitch in garter stitch, * knit 2 twisted, purl 2 *, repeat from *-* until 3 stitches remain on needle, knit 2 twisted, and finish with 1 edge stitch in garter stitch. Continue rib like this for 10 cm, cast off with garter stitch over garter stitch, knit over twisted knit and purl over purl - read CAST-OFF TIP. Jacket measures approx. 54-56-58-60-62-64 cm from shoulder. SLEEVES: Slip the 30-32-36-38-40-42 stitches from thread in one side on a short circular needle/double pointed needles size 8 mm and pick in addition up 1 stitch in each of the 6-6-6-8-8-8 stitches cast on in the side under sleeve stitch with colour denim blue = 36-38-42-46-48-50 stitches. Insert a marker thread in the middle of the new stitches (= 3-3-3-4-4-4 new stitches on each side of marker thread). Move the marker thread upwards when working; it should be used for decrease mid under sleeve. Begin at the marker thread, and work stocking stitch in the round. When sleeve measures 4 cm from division, decrease 1 stitch on each side of marker thread - read DECREASE TIP. Decrease like this approx. every 11-10-7-6-4-4 cm 3-3-4-4-5-5 times in total = 30-32-34-38-38-40 stitches. Work until sleeve measures 27-26-28-26-25-23 cm from division – or desired length (approx. 10 cm remain until finished measurements). Now increase 10-8-10-8-10-8 stitches evenly = 40-40-44-44-48-48 stitches. Switch to double pointed needles size 7 mm. Work rib (= knit 2 twisted/purl 2) for 10 cm. Cast off with knit over twisted knit and purl over purl – remember CAST-OFF TIP. Sleeve measures approx. 37-36-38-36-35-33 cm from division. Work the other sleeve the same way. RIGHT BAND: Pick up from right side along front piece inside 1 edge stitch in garter stitch approx. 68-80 stitches on circular needle size 7 mm with denim blue (number of stitches should be divisible by 4). Work first row as follows from wrong side: 1 edge stitch in garter stitch, * purl 2 twisted, knit 2 *, repeat from *-* until 3 stitches remain on needle, purl 2 twisted, and finish with 1 edge stitch in garter stitch. Work as follows from right side: 1 edge stitch in garter stitch, * knit 2 twisted, purl 2 *, repeat from *-* until 3 stitches remain on needle, knit 2 twisted, and finish with 1 edge stitch in garter stitch When piece measures approx. 2 cm, decrease for BUTTONHOLES - see explanation above. Continue until rib measures 4 cm, adjust so that band is the same width as the 5 stitches cast off on neck edge. Cast off with knit over knit and purl over purl - remember CAST-OFF TIP. LEFT BAND: Work the same way as right band but do not decrease for buttonholes. ASSEMBLY: Sew neck edge neatly to edge on bands with seam in towards wrong side. Sew the buttons on to the left band. |
|||||||||||||
Diagram explanations |
|||||||||||||
|
|||||||||||||
|
|||||||||||||

|
|||||||||||||
Have you finished this pattern?Tag your pictures with #dropspattern #northgatejacket or submit them to the #dropsfan gallery. Do you need help with this pattern?You'll find 36 tutorial videos, a Comments/Questions area and more by visiting the pattern on garnstudio.com. © 1982-2025 DROPS Design A/S. We reserve all rights. This document, including all its sub-sections, has copyrights. Read more about what you can do with our patterns at the bottom of each pattern on our site. |
|||||||||||||


With over 40 years in knitting and crochet design, DROPS Design offers one of the most extensive collections of free patterns on the internet - translated to 17 languages. As of today we count 314 catalogues and 11820 patterns translated into English (UK/cm). 11820
We work hard to bring you the best knitting and crochet have to offer, inspiration and advice as well as great quality yarns at incredible prices! Would you like to use our patterns for other than personal use? You can read what you are allowed to do in the Copyright text at the bottom of all our patterns. Happy crafting!
Post a comment to pattern DROPS 228-13
We would love to hear what you have to say about this pattern!
If you want to leave a question, please make sure you select the correct category in the form below, to speed up the answering process. Required fields are marked *.