
Popular categories
Looking for a yarn?


Comments / Questions (28)
![]() Sian Iles wrote:
Sian Iles wrote:
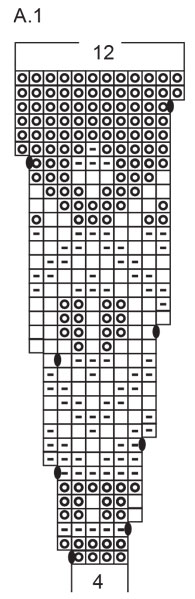
Is the extra stitch worked as the first or last stitch of A1 maintained throughout the pattern ?
30.12.2024 - 23:45DROPS Design answered:
Dear Sian, yes, as long as the same pattern of A.1 is worked, at the start of the yoke, you have to keep the first stitch of A.1 once again, at the end of the row, so that the pattern will be symmetrical. You will work over this stitch on the next rows as if it were a new repeat of A.1, but only consisting of this stitch. Happy knitting!
31.12.2024 - 01:14
![]() Bente Kyrkjebø wrote:
Bente Kyrkjebø wrote:
Hvor kan jeg bestille garn til denne jakka?
12.10.2024 - 11:44DROPS Design answered:
Hej Bente. Detta garn har dessvärre utgått ur sortimentet, men du kan sticka den i 2 trådar av ett garn i garngrupp C som t.ex. DROPS Air istället. Mvh DROPS Design
14.10.2024 - 09:29
![]() Bente Kyrkjebø wrote:
Bente Kyrkjebø wrote:
Hvor kan jeg bestille garn?
12.10.2024 - 11:43
![]() Fabienne wrote:
Fabienne wrote:
Bonjour, j'ai oublié de vous demander si je devais tricoter tout le diagramme de gauche à droite ? Je pense d'après les explications de drops que c'est de droite à gauche pair et l'inverse rang envers . Je préfère avoir votre avis. Merci encore . Bonne journée.
17.04.2024 - 15:39DROPS Design answered:
Bonjour Fabienne, les diagrammes se lisent de bas en haut, de droite à gauche sur l'endroit et de gauche à droite sur l'envers. Bon tricot!
18.04.2024 - 07:50
![]() Fabienne wrote:
Fabienne wrote:
Bonjour, je reviens vers vous car je ne comprends pas comment se font les mailles lisières, j'ai regardé différentes vidéo mais je ne comprends pas comment terminer un rang en tricotant une maille lisière , je pense que la maille lisière ne se tricote pas mais se glisse ? depuis les 63 mailles du début je me retrouve avec des mailles supplémentaires ( 3 ) dont je ne sais quoi faire. j'attends vos instructions pour pouvoir continuer. Merci encore. Bonne journée fabienne
12.04.2024 - 10:15DROPS Design answered:
Bonjour Fabienne, il existe différentes façons de tricoter les mailles lisières, ici, elles sont tricotées au point mousse, autrement dit, tricotez la 1ère maille et la dernière maille à l'endroit sur l'endroit et à l'endroit sur l'envers. Vous allez augmenter dans A.1 comme indiqué dans le diagramme pour l'empiècement, autrement dit, au 1er rang, vous tricotez A.1 sur 4 mailles ainsi: (4 m end, 1 jeté), et vous avez donc augmenté 15 mailles au 1er rang de A.1. N'hésitez pas à mettre un marqueur entre chaque diagramme pour mieux vous aider à repérer/vérifier votre nombre de mailles. Bon tricot!
12.04.2024 - 12:51
![]() Fabienne wrote:
Fabienne wrote:
Bonne journee
12.04.2024 - 10:03
![]() Fabienne wrote:
Fabienne wrote:
Bonjour, je suis ennuyée au niveau du nombre de mailles après les côtes, il me reste 63 mailles comme indiqué dans le modèle, puis ensuite pour l'empiècement il est dit tricoter A.1 jusqu'à ce qu'il reste 2 mailles (= 12-13-14-15-17-18 motifs de 4 mailles. Si je fais 15 motifs de 4 mailles il me reste 1 maille en trop puisque 15X4=60 plus deux qui sont les mailles lisières. Il me reste donc 1 maille puisque j'en ai 63. que puis je faire ? merci pour votre aide . bonne journée
10.04.2024 - 11:10DROPS Design answered:
Bonjour Fabienne, tricotez ainsi: 1 m lisière, répétez 15 fois les 4 mailles de A.1 (= 15 x 4 = 60 mailles), tricotez la 1ère maille de A.1 (pour que le motif soit symétrique) et terminez par 1 m lisière, soit: 1+60+1+1= 63. Sur l'envers, tricotez 1 m lisière, tricotez la dernière maille du diagramme (en lisant de gauche à droite), répétez A.1 en lisant de gauche à droite et terminez par 1 m lisière. Bon tricot!
10.04.2024 - 13:47
![]() Rike wrote:
Rike wrote:
Vielen Dank für die Antwort, meine Maschenprobe ist tatsächlich 13x15 Maschen. Ich stricken sehr fest. Habe dickere Nadel versucht, aber trotzdem gleiche Maschenprobe. Kann ich einfach die Jacke in m oder L stricken um sie tragen zu können. Vielen Dank, für die schnelle Antwort
27.02.2024 - 11:54DROPS Design answered:
Liebe Rike, am besten bentuzen Sie grösseren Nadeln, um die richtige Maschenprobe bzw die richtigen Maßnahmen zu haben; sonnst sollen Sie die ganze Anleitung mit Ihrer eigenen Maschenprobe umrechnen. Viel Spaß beim stricken!
27.02.2024 - 13:35
![]() Rike wrote:
Rike wrote:
Hallo habe jetzt voller Stolz zum ersten Mal das Muster gestrickt und festgestellt, dass die Jacke einem Kind passt. Wo liegt der Fehler? Größe war s , meine normale Größe und die Maschenprobe stimmt auch. Fallen die Muster so klein aus und welche Größe soll ich jetzt stricken? Vielen Dank
26.02.2024 - 18:14DROPS Design answered:
Liebe Rike, stimmt Ihre Maschenprobe in der Breite sowie in der Höhe? dh 11 M x 15 Reihen glatt rechts sowie beim Musterstricken = 10 x 10 cm, auch beim stricken? So sollten Sie die selben Maßnahmen wie in der Skizze haben. Viel Spaß beim Stricken!
27.02.2024 - 08:06
![]() Paola wrote:
Paola wrote:
Scusate ,lo schema si ripete considerando l'ultima maglia ,sommandola alle prime?,per esempio al ferro 10: devo fare 3 beige e 2 bianche 1 beige ,2 bianche ,3 beige? Invece devo fare 2 beige ,2 bianche ,1 beige 2 bianche? Non riesco a far combaciare lo schema.grazie
05.02.2024 - 13:42DROPS Design answered:
Buonasera Paola, deve considerare la legenda, quindi partire con 2 maglie beige. Buon lavoro!
25.02.2024 - 22:08
|
|||||||||||||
North Gate#northgatejacket |
|||||||||||||
 |
 |
||||||||||||
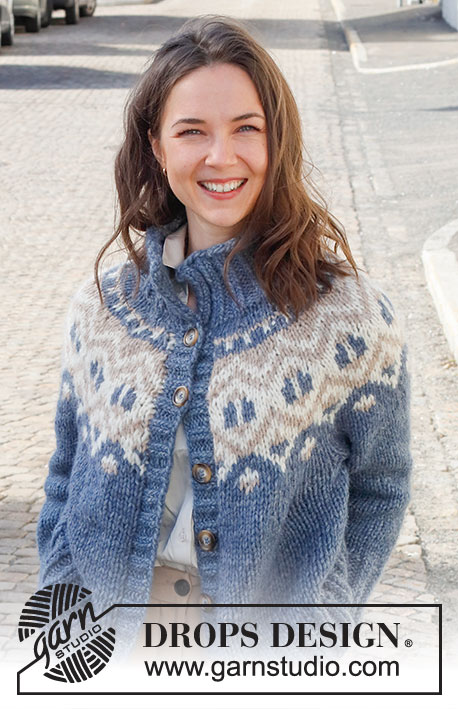
Knitted jacket in DROPS Wish. Piece is knitted top down with round yoke, multi-coloured pattern and high collar. Size: S - XXXL
DROPS 228-13 |
|||||||||||||
|
---------------------------------------------------------- EXPLANATION FOR THE PATTERN: ---------------------------------------------------------- GARTER STITCH (back and forth): Knit all rows. 1 ridge vertically = knit 2 rows. INCREASE/DECREASE TIP (evenly): To calculate how to increase/decrease evenly, use the total number of stitches increases/decreases are done over (e.g. 54 stitches) and divide by number of increases/decreases to be done (e.g. 5) = 10.8. In this example increase by making 1 yarn over after approx. every 11th stitch. Do not increase over edge stitches. On next row work yarn overs twisted to avoid holes. To decrease in this example knit every 10th and 11th stitch together. PATTERN: See diagram A.1. Work the entire pattern in stocking stitch. KNITTING TIP: To avoid the garment losing elasticity when working pattern, it is important not to tighten the strands on back side of piece. Switch to a higher needle number when working pattern if the pattern is somewhat tight. DECREASE TIP (applies to sleeves): Decrease 1 stitch on each side of marker thread as follows: Work until 3 stitches remain before marker thread, knit 2 together, knit 2 stitches (marker thread is between these 2 stitches), slip 1 stitch knitwise, knit 1, pass slipped stitch over stitch worked (= 2 stitches decreased). BUTTONHOLES: Decrease for 6-7-7-7-7-7 button holes on right front band. 1 buttonhole = work 2 stitches together, make 1 yarn over – NOTE: Decrease for buttonholes will look better by purling 2 together in a section with 2 purl stitches (seen from right side). On next row knit yarn over to make holes. Bottom buttonhole should be placed approx. 4-6 cm from bottom edge and top buttonhole approx. 1 cm from neck edge. Place the remaining 4-5-5-5-5-5 evenly between top and bottom hole. CAST-OFF TIP: To avoid a tight cast-off edge when casting off, you may use a larger needle. If this still is too tight make 1 yarn over after approx. every 6th stitch while casting off (cast off yarn overs as stitches). ---------------------------------------------------------- START THE PIECE HERE: ---------------------------------------------------------- JACKET - SHORT OVERVIEW OF THE PIECE: Work neck edge and yoke back and forth on circular needle from mid front, work top down. Cast off stitches for band and work the rest of yoke back and forth with 1 edge stitch in each side towards mid front. Now divide yoke for body and sleeves. Work body back and forth on circular needle from mid front, work top down. Work sleeves in the round on double pointed needles/short circular needle, top down. Then pick up band on front pieces. NECK EDGE: Cast on 60-64-64-68-68-72 stitches (including 5 band stitches in each side towards mid front) on circular needle size 7 mm with colour denim blue in DROPS Wish. Purl 1 row (= wrong side). Work next row as follows from right side: 1 edge stitch in GARTER STITCH – read explanation above - * knit 2 twisted, purl 2 *, work from *-* until 3 stitches remain, knit 2 twisted, and finish with 1 edge stitch in garter stitch. Work from wrong side as follows: 1 edge stitch in garter stitch, * purl 2 twisted, knit 2 *, repeat from *-* until 3 stitches remain on needle, purl 2 twisted, and finish with 1 edge stitch in garter stitch. Continue rib like this for 10 cm. When rib has been worked, work next row as follows from right side: Cast off the first 5 stitches (fasten band here later), knit the next 50-54-54-58-58-62 stitches, AT THE SAME TIME increase 1-1-5-5-13-13 stitches evenly - read INCREASE/DECREASE TIP, work rib as before over the next 4 stitches and finish with 1 edge stitch in garter stitch. Switch to circular needle size 8 mm. Turn piece, cast off the first 5 stitches, purl until 1 stitch remains on row (purl yarn overs twisted), and finish with 1 edge stitch in garter stitch = 51-55-59-63-71-75 stitches on needle. Insert 1 marker after edge stitch at beginning of row mid front, measure yoke from this marker! YOKE: Read KNITTING TIP and then work next row as follows from right side: 1 edge stitch in garter stitch, work A.1 until 2 stitches remain (= 12-13-14-15-17-18 repetitions of 4 stitches), work first stitch in A.1 (so that pattern begins and ends the same in each side towards mid front - NOTE! Do not increase as shown in diagrams before this stitch), and finish with 1 edge stitch in garter stitch. Continue pattern like this. Work edge stitches in same colour as first/last stitch in pattern. When A.1 has been worked one time vertically, there are 147-159-171-183-207-219 stitches on round. Then work piece in stocking stitch with colour denim blue. On next row adjust number of stitches to 146-158-178-186-206-222. When piece measures 25-25-25-27-29-31 cm, divide yoke for body and sleeves, i.e. work next row as follows: Work 22-24-27-28-32-35 stitches as before (= front piece), slip the next 30-32-36-38-40-42 stitches on 1 thread for sleeve, cast on 6-6-6-8-8-8 new stitches on row (= in the side under sleeve), work 42-46-52-54-62-68 stitches as before (= back piece), slip the next 30-32-36-38-40-42 stitches on 1 thread for sleeve, cast on 6-6-6-8-8-8 new stitches on row (= in the side under sleeve) and work the 22-24-27-28-32-35 stitches as before (= front piece). Finish body and sleeves separately. NOW MEASURE PIECE FROM HERE! BODY: = 98-106-118-126-142-154 stitches. Continue with colour denim blue, work in stocking stitch with 1 edge stitch in garter stitch in each side. Work until piece measures 15-17-19-19-19-19 cm. Knit 1 row from right side and increase AT THE SAME TIME 10-10-10-10-14-14 stitches evenly = 108-116-128-136-156-168 stitches. Increase stitches to avoid the rib from contracting. Switch to circular needle size 7 mm. Work first row as follows from wrong side: 1 edge stitch in garter stitch, * purl 2 twisted, knit 2 *, repeat from *-* until 3 stitches remain on needle, purl 2 twisted, and finish with 1 edge stitch in garter stitch. Work as follows from right side: 1 edge stitch in garter stitch, * knit 2 twisted, purl 2 *, repeat from *-* until 3 stitches remain on needle, knit 2 twisted, and finish with 1 edge stitch in garter stitch. Continue rib like this for 10 cm, cast off with garter stitch over garter stitch, knit over twisted knit and purl over purl - read CAST-OFF TIP. Jacket measures approx. 54-56-58-60-62-64 cm from shoulder. SLEEVES: Slip the 30-32-36-38-40-42 stitches from thread in one side on a short circular needle/double pointed needles size 8 mm and pick in addition up 1 stitch in each of the 6-6-6-8-8-8 stitches cast on in the side under sleeve stitch with colour denim blue = 36-38-42-46-48-50 stitches. Insert a marker thread in the middle of the new stitches (= 3-3-3-4-4-4 new stitches on each side of marker thread). Move the marker thread upwards when working; it should be used for decrease mid under sleeve. Begin at the marker thread, and work stocking stitch in the round. When sleeve measures 4 cm from division, decrease 1 stitch on each side of marker thread - read DECREASE TIP. Decrease like this approx. every 11-10-7-6-4-4 cm 3-3-4-4-5-5 times in total = 30-32-34-38-38-40 stitches. Work until sleeve measures 27-26-28-26-25-23 cm from division – or desired length (approx. 10 cm remain until finished measurements). Now increase 10-8-10-8-10-8 stitches evenly = 40-40-44-44-48-48 stitches. Switch to double pointed needles size 7 mm. Work rib (= knit 2 twisted/purl 2) for 10 cm. Cast off with knit over twisted knit and purl over purl – remember CAST-OFF TIP. Sleeve measures approx. 37-36-38-36-35-33 cm from division. Work the other sleeve the same way. RIGHT BAND: Pick up from right side along front piece inside 1 edge stitch in garter stitch approx. 68-80 stitches on circular needle size 7 mm with denim blue (number of stitches should be divisible by 4). Work first row as follows from wrong side: 1 edge stitch in garter stitch, * purl 2 twisted, knit 2 *, repeat from *-* until 3 stitches remain on needle, purl 2 twisted, and finish with 1 edge stitch in garter stitch. Work as follows from right side: 1 edge stitch in garter stitch, * knit 2 twisted, purl 2 *, repeat from *-* until 3 stitches remain on needle, knit 2 twisted, and finish with 1 edge stitch in garter stitch When piece measures approx. 2 cm, decrease for BUTTONHOLES - see explanation above. Continue until rib measures 4 cm, adjust so that band is the same width as the 5 stitches cast off on neck edge. Cast off with knit over knit and purl over purl - remember CAST-OFF TIP. LEFT BAND: Work the same way as right band but do not decrease for buttonholes. ASSEMBLY: Sew neck edge neatly to edge on bands with seam in towards wrong side. Sew the buttons on to the left band. |
|||||||||||||
Diagram explanations |
|||||||||||||
|
|||||||||||||
|
|||||||||||||

|
|||||||||||||
Have you finished this pattern?Tag your pictures with #dropspattern #northgatejacket or submit them to the #dropsfan gallery. Do you need help with this pattern?You'll find 36 tutorial videos, a Comments/Questions area and more by visiting the pattern on garnstudio.com. © 1982-2025 DROPS Design A/S. We reserve all rights. This document, including all its sub-sections, has copyrights. Read more about what you can do with our patterns at the bottom of each pattern on our site. |
|||||||||||||


With over 40 years in knitting and crochet design, DROPS Design offers one of the most extensive collections of free patterns on the internet - translated to 17 languages. As of today we count 314 catalogues and 11820 patterns translated into English (UK/cm). 11820
We work hard to bring you the best knitting and crochet have to offer, inspiration and advice as well as great quality yarns at incredible prices! Would you like to use our patterns for other than personal use? You can read what you are allowed to do in the Copyright text at the bottom of all our patterns. Happy crafting!
Post a comment to pattern DROPS 228-13
We would love to hear what you have to say about this pattern!
If you want to leave a question, please make sure you select the correct category in the form below, to speed up the answering process. Required fields are marked *.