
Looking for a yarn?


Comments / Questions (15)
![]() Annette Schwarz wrote:
Annette Schwarz wrote:
Hallo liebes Team. Ich habe Probleme bei der Zunahme der Ärmel. Ich verstehe einfach nicht wie man das Muster bei den Zunahmen weiterführt . Und fange ich in der Reihen mit den rechtes gestrickten Maschen an zuzunehmen oder in der Reihe 1 links 3 rechts … ? Den Makierer setzte ich vor einer links gestrickten Masche !? Vielen Dank erstmal LG Annette
25.01.2025 - 20:18DROPS Design answered:
Liebe Frau Schwarz, die neue Masche am Ende der Runde soll wie die nächste Masche gestrickt werden, und die neue Masche am Anfang der Runde soll wie die vorige Masche gestrickt werden, so wird sich das Muster erbreitern, aber und sich nicht verschieben. Viel Spaß beim Stricken!
27.01.2025 - 10:03
![]() Claudia wrote:
Claudia wrote:
Kann man den Pullover statt in Runden auch einzeln Rückenteil und Vorderteil stricken? Stricke ich Diagramm A2 dann wie folgt: 1. Reihe auf rechte Seite: 1 links, 3 rechts, 1 links, 3 rechts usw 2. Reihe: alle Maschen links Diese 2 Reihen wiederholen?
13.12.2024 - 09:20DROPS Design answered:
Liebe Claudia, über eine Maschenanzahl teilbar durch 3 wird man A.1 so stricken, dh die letzte Maschen der Hinreihe wird wie die 1. Masche A.1 gestrickt; bei A.2 sollen Sie dann eine Maschenanzahl teilbar durch 4+1 - dazu kommen noch 2 Randmaschen (1 beidseitig). Bei den Rückreihen lesen Sie die Diagramme links nach rechts und wie unter" in Rückreihen" in der Zeichungbeschreibung erkärt = die 1. Masche A.1/A.2 wird rechts bei den Rückreihen gestrickt, die 2. Masche A.1/die 3 letzten Maschen A.3 sind Glattrechts gestrickt.. Viel Spaß beim Stricken!
16.12.2024 - 09:26
![]() Claudia wrote:
Claudia wrote:
In den Diagrammen sind die Hinreihen angezeigt?
13.12.2024 - 01:16DROPS Design answered:
Liebe Claudia, alle Reihen sind im Diagram gezeichnet; in Runden lesen Sie jede Reihe rechts nach links, in Hin und Rückreihen lesen Sie die Rückreihen links nach rechts. Viel Spaß beim Stricken!
13.12.2024 - 07:49
![]() Sławomira wrote:
Sławomira wrote:
Gdzie znajdę schemat A1 i A2?
29.05.2024 - 15:42DROPS Design answered:
Witaj Sławomiro, schematy A.1 i A.2 znajdują się po prawej stronie schematycznego rysunku miar, na dole strony. Pozdrawiamy!
29.05.2024 - 15:59
![]() Nadezhda wrote:
Nadezhda wrote:
Hello, are we supposed to work several repeats of diagram A1 and A2 in width?
09.11.2023 - 23:16DROPS Design answered:
Dear Nadezhda, repeat the diagrams all the round/row, this means when working A.1 repeat the 2 sts in diagram (= alternately 1 stitch in garter stitch, 1 stitch in stocking stitch), and when working A.2 repeat the 4 sts all the row (= 1 stitch in garter stitch, 3 sts in stocking stitch). Happy knitting!
10.11.2023 - 09:34
![]() Les wrote:
Les wrote:
Hello - I’m working on the sleeves now & having trouble with the sleeve ribbing increase. I can’t seem to make it blend well. After the yarn over, do I turn them into knits or purls or does it change after every increase?how can I join the ribbing pattern seamlessly? Thanks!
13.05.2023 - 22:18DROPS Design answered:
Dear Les, the yarn overs are worked inside A.2. Every time you increase a stitch, you need to check in the pattern if the corresponding stitch should be knitted or purled. The sleeve is worked in the round, so it has no seams; the increases will always be visible, but they have been placed in a not too visible place of the sleeve. Happy knitting!
14.05.2023 - 19:27
![]() Les wrote:
Les wrote:
Hello! For the back piece - the instructions after the neck cast off is confusing for me! Can someone help clarify? "Work in stocking stitch and cast off 1 stitch on next row from the neck = 21-24-24-24-25-28 stitches remain on row." Do I cast off one stitch EVERY row on the neck edge until I reach 21sts? Then the shoulder is worked until the piece measures 46cm? Thanks!
03.02.2023 - 04:52DROPS Design answered:
Hi Les, You had 69 stitches before casting off 25 stitches for the neck, leaving you with 22 stitches on each shoulder. The instructions are to cast off 1 stitch on the next row from the neck (which leaves you with 21 stitches). Continue working to correct length. Happy knitting!
03.02.2023 - 06:53
![]() Blownsoto wrote:
Blownsoto wrote:
Obliva Blownsoto Albully
22.05.2022 - 11:42
![]() Mona wrote:
Mona wrote:
When is Kid silk shade 34 going to come back in stock? I really need to know because I have an unfinished project that needs it.
07.03.2022 - 18:50DROPS Design answered:
Dear Mona, we are expecting Kid-Silk 34 back in stock week 11, ie from next week (14/03), please contact your DROPS store, they will then let you know - even per mail or telephone- when they will get some back in stock. Happy knitting!
08.03.2022 - 10:59
![]() Marie-Andrée Gratton wrote:
Marie-Andrée Gratton wrote:
Bonjour, Est-il possible d'avoir une correspondance grandeur ( S, M etc.) avec les mensurations de poitrine en cm. ou en po. Ex: je mesure 88 cm. + 10cm (pour de l'ampleur) = 98cm. quelle grandeur choisir? Merci pour votre aide Marie-Andrée
03.01.2022 - 15:06DROPS Design answered:
Bonjour Mme Gratton, vous retrouverez toutes les mesures finales des vêtements dans les schémas du bas de page; mesurez un vêtement similaire dont vous aimez la forme pour trouver votre taille. Plus d'infos sur les tailles ici. Bon tricot!
04.01.2022 - 06:54
|
||||||||||
Wild Mint Tea#wildmintteasweater |
||||||||||
 |
 |
|||||||||
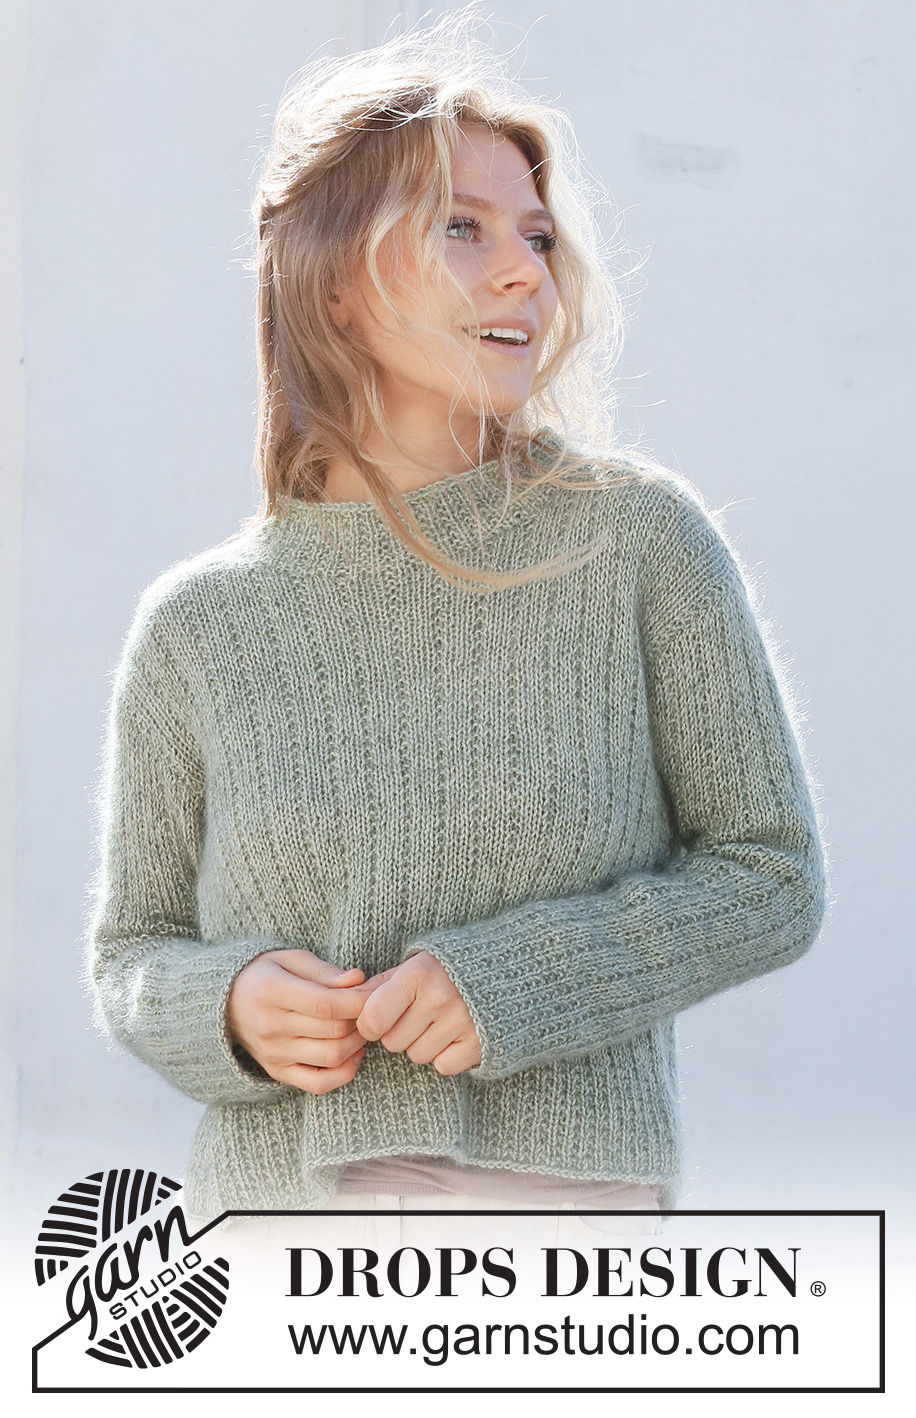
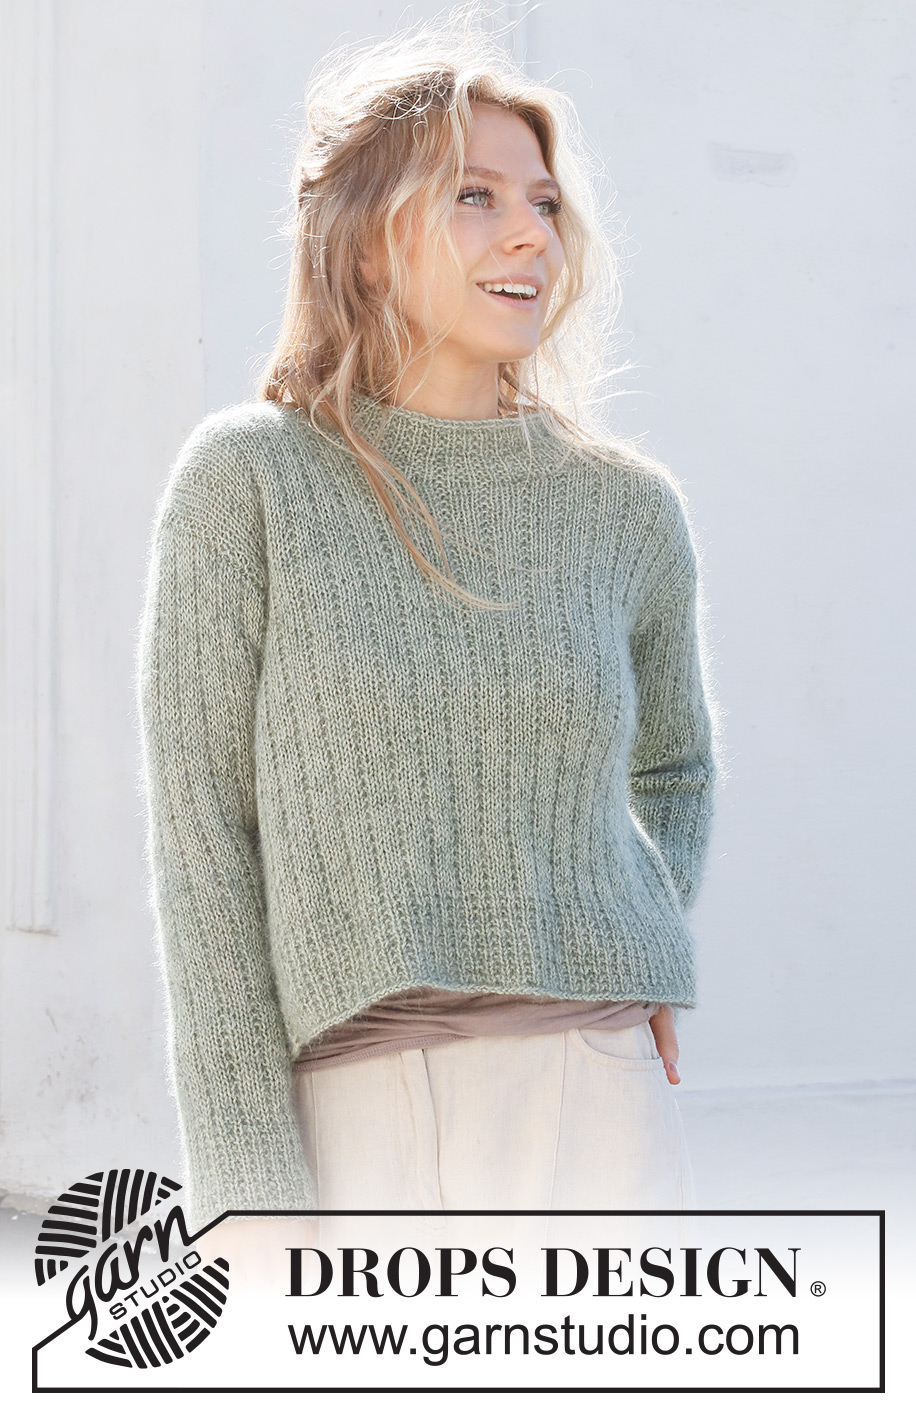
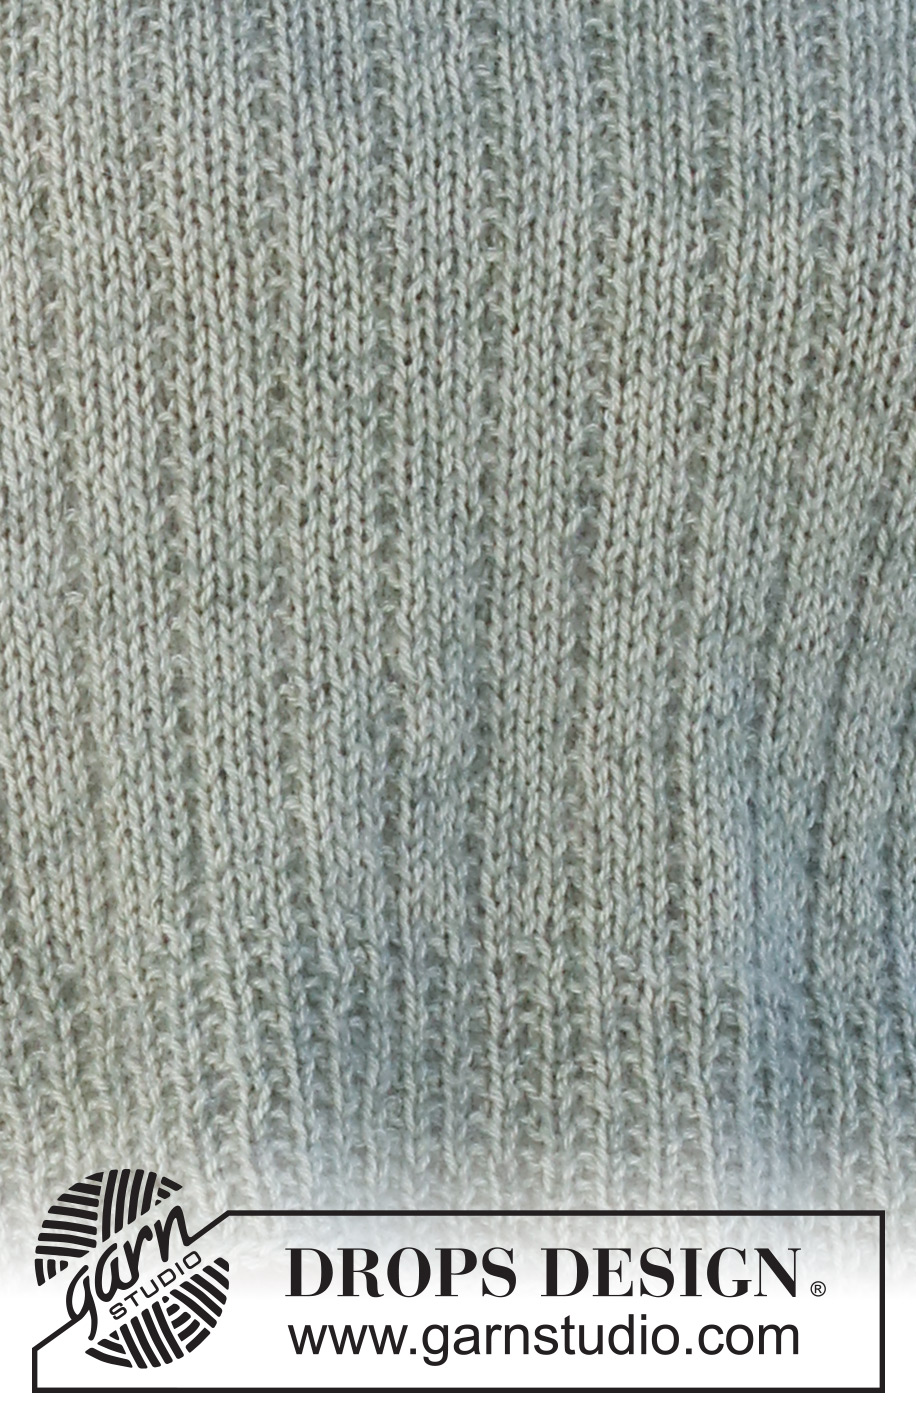
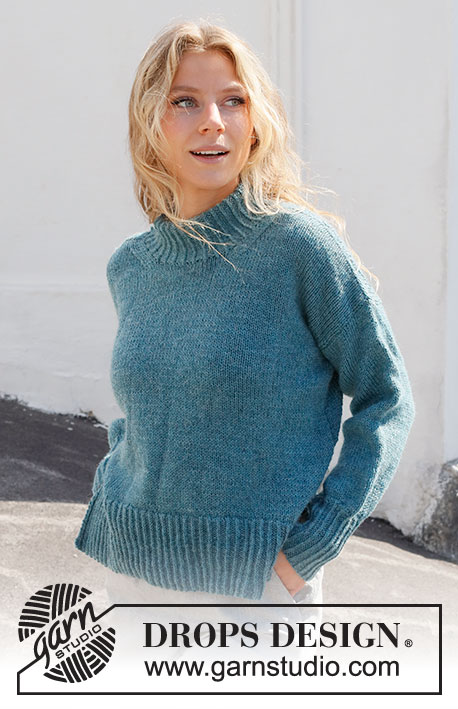
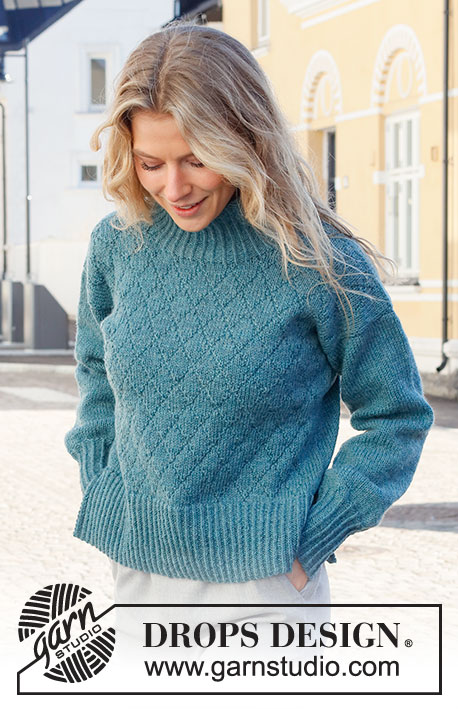
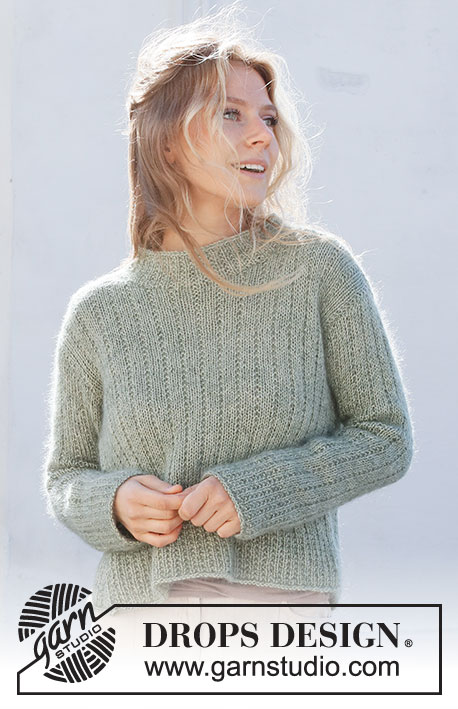
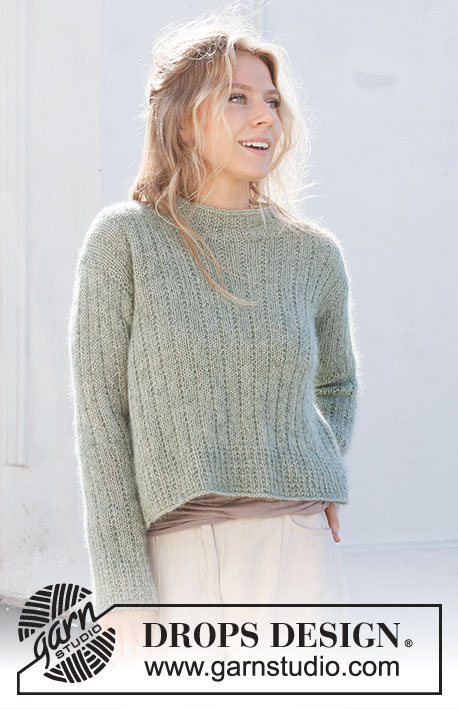
Knitted jumper in DROPS Flora and DROPS Kid-Silk. Piece is knitted in textured pattern. Size: S - XXXL
DROPS 227-5 |
||||||||||
|
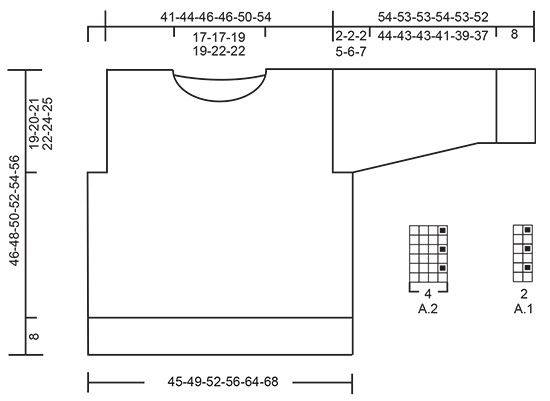
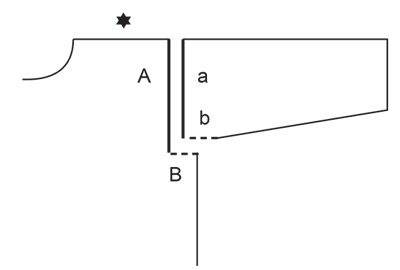
---------------------------------------------------------- EXPLANATION FOR THE PATTERN: ---------------------------------------------------------- GARTER STITCH (back and forth): Knit all rows. 1 ridge vertically = knit 2 rows. PATTERN: See diagrams A.1 and A.2. Diagrams show all rows in pattern seen from the right side. INCREASE TIP (applies to mid under sleeves): Increase 1 stitch on each side of stitch with marker as follows: Work until stitch with marker, make 1 yarn over, work stitch with marker as before, make 1 yarn over (= 2 stitches increased). On next round work yarn overs twisted to avoid holes. Then work the new stitches in pattern (A.2). CAST-OFF TIP: To avoid a tight cast-off edge when casting off, you may use a larger needle. If this still is too tight make 1 yarn over after approx. every 8th stitch while casting off (cast off yarn overs as stitches). ---------------------------------------------------------- START THE PIECE HERE: ---------------------------------------------------------- JUMPER - SHORT OVERVIEW OF THE PIECE: Work body in the round on circular needle, from the bottom and up to armholes. Then finish back piece and front piece back and forth on circular needle separately until finished measurements. Sleeves are worked in the round on double pointed needles/a short circular needle, from the bottom and up to armholes. Then work sleeve cap back and forth on circular needle until finished measurements. Sew the piece together as explained in pattern. Finish with a neck edge on a short circular needle. BODY: Cast on 152-168-176-192-216-232 stitches on circular needle size 4 mm with 1 strand of each colour (= 2 strands). Knit 1 round. Then work A.1 in the round. Continue pattern like this until edge measures 8 cm. Switch to circular needle size 5 mm. Insert 1 marker in first stitch on round and 1 marker in 77th-85th-89th-97th-109th-117th stitch on round (insert markers in a stitch in garter stitch). There are 75-83-87-95-107-115 stitches on front piece and back piece between stitches with markers – markers mark the sides on body. Then work A.2 in the round. REMEMBER THE KNITTING TENSION! When piece measures 27-28-29-30-30-31 cm, cast off for armholes, i.e. work next round as follows: Begin 3-4-4-8-11-12 stitches before first stitch with marker, cast off 7-9-9-17-23-25 stitches for armhole (= stitches with marker + 3-4-4-8-11-12 stitches on each side of this), work as before over the next 69-75-79-79-85-91 stitches, cast off 7-9-9-17-23-25 stitches for armhole (= stitch with marker + 3-4-4-8-11-12 stitches on each side of this), and work as before over the remaining 69-75-79-79-85-91 stitches. Finish back piece and front piece separately. BACK PIECE: = 69-75-79-79-85-91 stitches. Continue the pattern back and forth as before with 1 edge stitch in garter stitch in each side. When piece measures 44-46-48-50-52-54 cm, cast off the middle 25-25-29-29-33-33 stitches for neck, and finish each shoulder separately. Work in stocking stitch and cast off 1 stitch on next row from the neck = 21-24-24-24-25-28 stitches remain on row. Continue to work until piece measures 46-48-50-52-54-56 cm. Cast off knitting from right side. Work the other shoulder the same way. FRONT PIECE: = 69-75-79-79-85-91 stitches. Continue the pattern back and forth as before with 1 edge stitch in garter stitch in each side. When piece measures 39-41-43-44-46-48 cm, slip the middle 11-11-13-13-17-17 stitches on a stitch holder for neck, and finish each shoulder separately. Continue as before and cast off for neck at the beginning of every row from neck as follows: Cast off 3 stitches 0-0-1-1-1-1 time, 2 stitches 3-3-2-2-2-2 times and 1 stitch 2-2-2-2-2-2 times = 21-24-24-24-25-28 stitches remain on needle. Continue to work until piece measures 46-48-50-52-54-56 cm. Cast off knitting from right side. Work the other shoulder the same way. SLEEVES: Cast on 40-44-44-48-48-52 stitches on double pointed needles size 4 mm with 1 strand of each quality (= 2 strands). Knit 1 round. Then work A.1 in the round. Continue pattern like this until edge measures 8 cm. Switch to double pointed needles size 5 mm. Insert 1 marker in first stitch on round (insert marker in a stitch in garter stitch). Marker marks mid under sleeve and is used when increasing mid under sleeve. Then work A.2 in the round. When piece measures 10-10-10-12-13-13 cm, increase 2 stitches mid under sleeve – read INCREASE TIP. Increase like this every 3½-3½-3-2½-2-2 cm 12-12-14-14-16-16 times in total = 64-68-72-76-80-84 stitches. Continue until piece measures 52-51-51-49-47-45 cm (shorter measurements in the larger sizes because of wider shoulders and longer sleeve cap). On next round cast off stitch with marker = 63-67-71-75-79-83 stitches on needle. Continue pattern back and forth with 1 edge stitch in garter stitch in each side until piece measures 54-53-53-54-53-52 cm from cast-on edge – sleeve cap measures approx. 2-2-2-5-6-7 cm from where stitch with marker was cast off. Cast off knitting from right side. Work the other sleeve the same way. ASSEMBLY: Sew shoulder seams inside cast-off edge. Sew sleeve cap to armhole inside 1 edge stitch. Then sew vent at the top of sleeve to bottom of armhole - see chart. NECK EDGE: Begin at one shoulder, and pick up approx. 68 to 90 stitches around the neck (including stitches on stitch holder at front) on a short circular needle size 4 mm with 1 strand in each quality (= 2 strands). Work A.1 in the round - but adjust to that pattern fits nicely over stitches on stitch holder at the front. Continue the pattern like this until edge measures 5-5-5-6-6-6 cm. Cast off by knitting - read CAST-OFF TIP! |
||||||||||
Diagram explanations |
||||||||||
|
||||||||||
 |
||||||||||
 |
||||||||||
Have you finished this pattern?Tag your pictures with #dropspattern #wildmintteasweater or submit them to the #dropsfan gallery. Do you need help with this pattern?You'll find 31 tutorial videos, a Comments/Questions area and more by visiting the pattern on garnstudio.com. © 1982-2025 DROPS Design A/S. We reserve all rights. This document, including all its sub-sections, has copyrights. Read more about what you can do with our patterns at the bottom of each pattern on our site. |
||||||||||


With over 40 years in knitting and crochet design, DROPS Design offers one of the most extensive collections of free patterns on the internet - translated to 17 languages. As of today we count 320 catalogues and 12092 patterns translated into English (UK/cm). 12092
We work hard to bring you the best knitting and crochet have to offer, inspiration and advice as well as great quality yarns at incredible prices! Would you like to use our patterns for other than personal use? You can read what you are allowed to do in the Copyright text at the bottom of all our patterns. Happy crafting!
Post a comment to pattern DROPS 227-5
We would love to hear what you have to say about this pattern!
If you want to leave a question, please make sure you select the correct category in the form below, to speed up the answering process. Required fields are marked *.