
Popularne kategorie
Szukasz włóczki?


Komentarze / Pytania (27)
![]() Della napisała::
Della napisała::
Hi. I’m wondering how I am going to fit 154 stitches at the end of A1 on a 15mm x 80cm circular needle. I’ve just started this garment and I’m doing the neck on the 12mm x 80cm and 44 stitches just fit 😳
22.08.2021 - 16:21Odpowiedź DROPS Design :
Dear Della, our knitters didn't really had problems fitting the stitches on the needles, but you can always use a longer circular, or even two circs, if you feel they are too crowded. Happy Stitching!
22.08.2021 - 17:33
![]() Emmanuelle napisała::
Emmanuelle napisała::
Merci pour votre réponse ultra rapide. C\'est parti, je me lance ! Bonne journée, Emmanuelle
02.08.2021 - 08:01
![]() Emmanuelle napisała::
Emmanuelle napisała::
Bonjour, très joli modèle. Une question toutefois avant de me lancer : je n'ai pas d'aiguille double pointe en 12. Peut-on commencer à tricoter dès le début (col) en rond avec les aiguilles circulaires 12 ? Merci par avance de votre réponse.
01.08.2021 - 10:45Odpowiedź DROPS Design :
Bonjour Emmanuelle et merci. Effectivement, vous pouvez tricoter le col sur une aiguille circulaire de 80 cm en utilisant la technique dite du magic loop jusqu'à ce que vous ayez augmenté suffisamment de mailles pour continuer sur une 60 ou sur la 80 mais en rond "normalement". Bon tricot!
02.08.2021 - 07:23
![]() Alica napisała::
Alica napisała::
Dear Drops, I have a problem with the yarn. Wanted to buy it, but I do not know which color is that colour 05, tan. When I choose colour 05 it is more brown. What does it mean tan? I would like to have the same colour as on the picture here. Pls help:)
04.05.2021 - 07:09Odpowiedź DROPS Design :
Hei Alica, The name of Polaris no 5 is Taupe (not tan) and is the colour you see in the picture - a dark mauve/grey. Happy knitting!
04.05.2021 - 07:42
![]() Madou napisała::
Madou napisała::
Merci pour les explications et les précisions ! Mon pull est à présent terminé et mon chat me le pique déjà... Le pull tient vraiment chaud et est très confortable à porter ! Conseil : ne pas hésiter à bien serrer l'encolure ! J'ai réalisé le modèle en taille Medium et je tiens juste à préciser qu'il me reste encore à peu près 150 g de laine, donc 1000 g vont bien pour cette taille, alors même que j'ai rallongé un peu les manches. Très beau pull, merci !
10.04.2021 - 16:09
![]() Madou napisała::
Madou napisała::
Bonjour, J'adore ce modèle et je viens de finir l'empiècement devant et dos, il ne me reste donc plus que les manches à tricoter. J'ai repris mes 24 mailles pour tricoter la première manche, et dois monter 2 mailles sous la manche. Dois-je les monter sur l'aiguille gauche ou droite ? Aussi, pourquoi suis-je censée avoir 28 mailles après avoir monter 24 + 2 mailles sous la manche ? Je vous remercie d'avance. Madou
08.04.2021 - 16:12Odpowiedź DROPS Design :
Bonjour Madou, montez 2 m de chaque côté des mailles en attente, par ex: montez 2 m, tricotez les 24 m de la manche et montez 2 m. La correction a été faite, merci. Bon tricot!
09.04.2021 - 07:11
![]() Laura Z Rhodes napisała::
Laura Z Rhodes napisała::
Hello, wonderfully patient DROPS design team. I have another sleeve question, regarding decreases. Are the decreases over 24 rows (one stitch decrease right side, one row no decreases, one row decrease left side, one row no decreases, for a total of 2 stitches decreased over 4 rows), or are the decreases over 12 rows (one stitch decrease start of knit row, one stitch decrease start of purl row, for a total of 2 stitches decreased over 2 rows)? Thank you.
17.02.2021 - 19:14Odpowiedź DROPS Design :
Dear Mrs Rhodes, the decreases will be worked over 24 rows, (1 row decreasing 1 st on the right side, 1 row without decreasing, 1 row decreasing on the left side, 1 row without decreasing), repeat from (to) a total of 6 times = 6 sts have been decreased on each side and 24 rows have been worked, 16 sts remain - decrease either at the beginning or at the end of a row from RS. Happy knitting!
18.02.2021 - 09:12
![]() Laura Rhodes napisała::
Laura Rhodes napisała::
Thank you so much for clearing up my question about the end of row marker. I am now ready to do the sleeves, but I don’t understand what you mean by casting on stitches mid under sleeve? I am to cast on 2 stitches (I am making the M), but twice, for a total of 28 stitches? Where is mid under sleeve? Thanks so much. The knitting is going super and I am excited to finish. :-)
15.02.2021 - 03:26Odpowiedź DROPS Design :
Hi Laura, The sleeve is worked over the stitches from the one thread as well as 2 stitches cast on, on each side = 4 new stitches (these stitches are used when the sleeve is sewn to the body when it is finished). You work back and forth until the sleeve is finished, then the sleeve seam and the opening under the sleeve are sewn together. Mid under the sleeve will be the underside of the sleeve, where the seam is. Hope this helps and happy knitting!
15.02.2021 - 07:54
![]() Laura Z Rhodes napisała::
Laura Z Rhodes napisała::
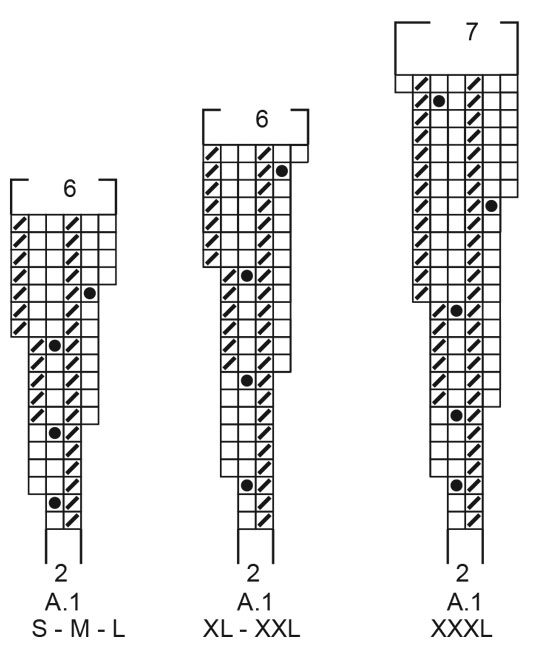
Thanks for your reply, but I am still confused about where the pattern starts in each row. At the start of A.1, I placed the marker before the first P. I understand increasing, but rnd7 seems to begin with a K placed BEFORE the marker. Is this the last K on rnd6? Then marker, then P1, K1, P1, K1 pattern? Rnd11 pattern is P1, P1 incr, P1, K1? Rnd12 is P1, K2, P1, K1? Rnd14 is P1, K2, P1, P incr? Or do you want the first incr on the last K of rnd13? Rnd15-18 is P1, K2? All start at EOR marker.
11.02.2021 - 17:30Odpowiedź DROPS Design :
Dear Mrs Rhodes, you increase on row 6 and the stitch before the P stitch on row 7 is the new stitch that will be worked K, this means the marker on beg of round stays here and over P1, K1 (= increase on row 6), K1, you will now work: K1, P1, K1, P1. On row 11 work K1, P1, inc, P1 and row 12: K1, P1, K2, P1 etc... ie just work the stitches as they are shown in diagram. Hope this helps. Happy knitting!
12.02.2021 - 06:49
![]() Laura Z Rhodes napisała::
Laura Z Rhodes napisała::
Hello! I am following along the pattern chart, working from lower right to upper left, and I am at the row (row 7) where it looks like the pattern begins one stitch *before* the end-of-round marker. Is this correct? And then, in row 15, it again looks like I am adding stitches before the end-of-round marker. This would keep the purl stitches in line, which I assume you want? Thanks so much.
11.02.2021 - 02:44Odpowiedź DROPS Design :
Dear Mrs Rhodes, yes that's correct, you increased one stitch in each repeat on previous round, and now you work K1, P1, K1, P1 over the (P1, K1 worked with the increase, P1). On row 15, you will start with K2 since you increased on previous row 1 stitch in the first stitch of the repeat. Hope this helps. Happy knitting!
11.02.2021 - 06:52
|
||||||||||
November Woodland#novemberwoodlandsweater |
||||||||||
 |
 |
|||||||||
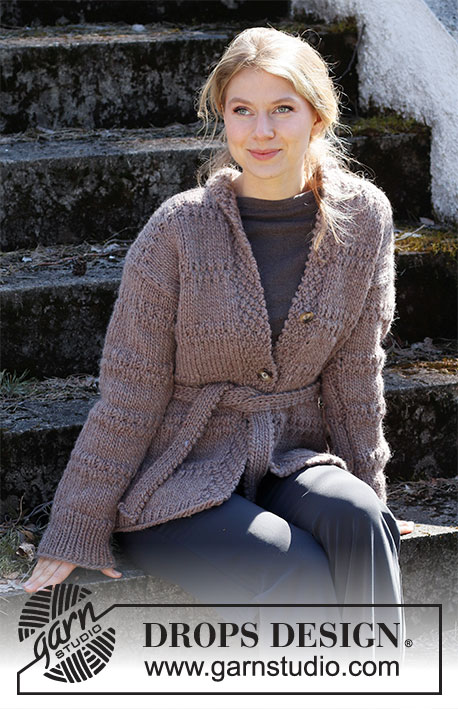
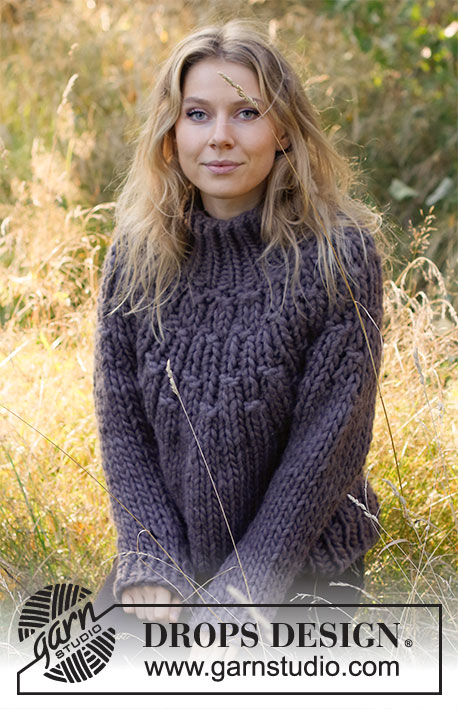
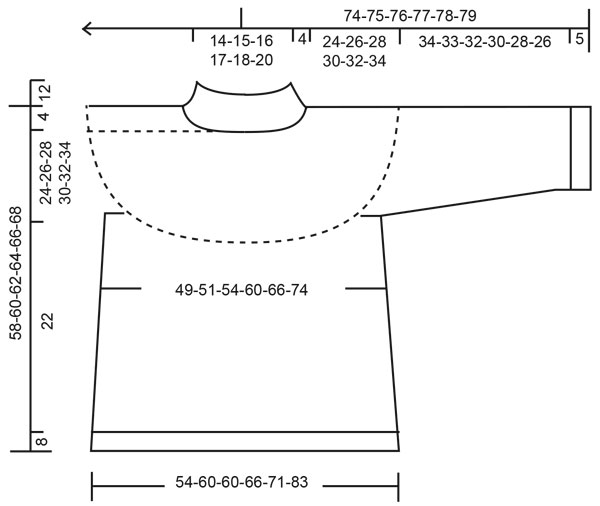
Sweter na drutach, przerabiany od góry do dołu, z wysokim wykończeniem dekoltu (golfem) i zaokrąglonym karczkiem, z włóczki DROPS Polaris. Od S do XXXL
DROPS 216-24 |
||||||||||
|
------------------------------------------------------- WYKORZYSTYWANE TECHNIKI: ------------------------------------------------------- ŚCIEG FANTAZYJNY: Patrz schemat A.1 Patrz schemat odpowiedni dla rozmiaru. MAGIC LOOP: Jeżeli druty z żyłką są zbyt długie, gdy przerabiamy na okrągło, można wykonać magic loop następująco: zsunąć wszystkie oczka na środek drutu. Podzielić oczka na 2 części i wyciągnąć żyłkę drutów na środku tych 2 części. Przesunąć oczka z jednej strony na początek drutu i przerabiać oczka z jednej strony. Wyjąć żyłkę na środku między 2 oczkami z drugiej strony i dalej przerabiać w taki sam sposób, aż będzie wystarczająca liczba oczek, aby przerabiać na okrągło. DODAWANIE OCZEK (boki swetra): Aby dodać 1 oczko należy wykonać 1 narzut. W następnym okrążeniu przerobić oczka przekręcone w miejscu narzutów na prawo, aby uniknąć dziur. ZAMYKANIE OCZEK (rękawy): UWAGA! Aby zamykać oczka na przemian po prawej i po lewej stronie robótki należy postępować następująco: Przerabiać na przemian na początku i na końcu rzędu z zamykaniem oczek: zamykać na prawej stronie robótki następująco: przerobić 2 oczka razem na prawo. zamykać na lewej stronie robótki następująco: przerobić 2 oczka razem na lewo. ------------------------------------------------------- ROBÓTKĘ ROZPOCZYNAMY TUTAJ: ------------------------------------------------------- SWETER – SKRÓCONY OPIS ROBÓTKI: Przerabiany od góry do dołu, na okrągło na drutach pończoszniczych/drutach z żyłką. Rękawy są przerabiane w tę i z powrotem na drutach z żyłką i doszywane na końcu. WYKOŃCZENIE DEKOLTU: Na drutach pończoszniczych nr 12 nabrać 34-36-38-40-42-44 oczka włóczką Polaris. Przerabiać na okrągło, ściągaczem = 1 oczko prawe/1 oczko lewe przez 12 cm. KARCZEK: Patrz MAGIC LOOP powyżej. Umieścić 1 marker tutaj, OD TEGO MOMENTU MIERZYĆ STĄD! Dalej przerabiać na drutach z żyłką nr 15 i przerabiać schemat A.1 na okrągło – patrz schemat odpowiedni dla rozmiaru. ZACHOWAĆ TAKIE SAMO NAPRĘŻENIE NICI JAK W PRZYPADKU PRÓBKI! Gdy schemat A.1 jest zakończony jest 102-108-114-120-126-154 oczka. Przerobić 1 okrążenie na prawo, w tym samym czasie równomiernie dodając 0-4-2-8-10-2 oczka – patrz DODAWANIE OCZEK powyżej = 102-112-116-128-136-156 oczek. Dalej przerabiać dżersejem, aż długość robótki od markera wynosi 24-26-28-30-32-34 cm. Przerobić kolejne okrążenie następująco: przerobić 15-16-17-19-20-23 pierwsze oczka (= połowa tyłu), zdjąć 21-24-24-26-28-32 następne oczka na nitkę na rękaw i nabrać 4-4-4-4-6-6 oczek (= bok, pod rękawem), przerobić 30-32-34-38-40-46 następnych oczek (= przód), zdjąć 21-24-24-26-28-32 następne oczka na nitkę na rękaw i nabrać 4-4-4-4-6-6 oczek (= bok, pod rękawem), przerobić 15-16-17-19-20-23 ostatnie oczka (= połowa tyłu). Kończyć teraz tył/przód i rękawy oddzielnie. OD TEGO MOMENTU MIERZYĆ STĄD! TYŁ & PRZÓD: = 68-72-76-84-92-104 oczka. Przerabiać na okrągło dżersejem, aż długość robótki od jej podziału wynosi 22 cm we wszystkich rozmiarach. Dalej przerabiać na drutach z żyłką nr 12 ściągaczem, 1 oczko prawe/1 oczko lewe przez 8 cm we wszystkich rozmiarach. Zamykać luźno oczka prawe na prawo, a lewe na lewo. Całkowita długość swetra od ramienia wynosi ok. 58-60-62-64-66-68 cm. RĘKAWY: Rękawy są przerabiane w tę i z powrotem na drutach z żyłką i zszywane. Wziąć z powrotem 21-24-24-26-28-32 oczka z nitki z jednej strony robótki i przełożyć je na druty z żyłką nr 15 i nabrać 2-2-2-2-3-3 oczka z każdej strony = 25-28-28-30-34-38 oczek. Przerabiać dżersejem w tę i z powrotem, w tym samym czasie w następnym rzędzie na prawej stronie robótki zamknąć 1-0-0-0-0-0 oczek (zamykamy tylko w rozmiarze S) przerabiając 2 oczka razem na prawo po lewej stronie robótki = 24-28-28-30-34-38 oczek. Gdy długość robótki wynosi 4-2-2-4-4-2 cm zamknąć 1 oczko z prawej strony robótki – patrz ZAMYKANIE OCZEK. Zamykać na przemian po lewej i po prawej stronie w sumie 8-12-12-14-14-18 razy (= 4-6-6-7-7-9 razy z każdej strony) co 2-2-2-1-1-1 rzędy = 16-16-16-16-20-20 oczek. Przerabiać aż długość rękawa od podziału robótki wynosi 34-33-32-30-28-26 cm. (UWAGA: Krócej dla większych rozmiarów, gdyż ramiona są szersze). Dalej przerabiać na drutach z żyłką nr 12 ściągaczem, 1 oczko prawe/1 oczko lewe przez 5 cm. Zamykać luźno oczka prawe na prawo, a lewe na lewo. Drugi rękaw wykonać tak samo. WYKOŃCZENIE: Zszyć rękaw wkłuwając igłę w skrajne pętelki oczek, aby szew nie był zbyt gruby – nitka do zszywania powinna być cieńsza, dlatego warto podzielić nitkę na pół. Zszyć otwory pod rękawami. |
||||||||||
Objaśnienia do schematu |
||||||||||
|
||||||||||
 |
||||||||||
 |
||||||||||
Skończyłaś ten wzór?Otaguj swoje zdjęcia #dropspattern #novemberwoodlandsweater lub prześlij je do #dropsfan gallery. Potrzebujesz pomocy w związku z tym wzorem?Zobacz 24 instrukcje video, sekcję Komentarze/Pytania i jeszcze więcej, wchodząc na stronę wzoru na garnstudio.com © 1982-2026 DROPS Design A/S. Wszelkie prawa zastrzeżone. Ten dokument, w całości, jest chroniony prawem. Zobacz co możesz robić z naszymi wzorami na dole każdego wzoru na naszej stronie. |
||||||||||


Posiadając 40 lat doświadczenia w projektowaniu wzorów na druty i szydełko, DROPS Design oferuje jedną z największych kolekcji bezpłatnych wzorów w internecie – przetłumaczonych na 17 języków. Obecnie jest dostępnych 325 katalogów i 12298 wzorów w języku polskim.
Dokładamy wszelkich starań, aby oferować Wam druty i szydełka, inspiracje, fachowe porady oraz doskonałej jakości włóczki w najlepszych cenach! Zamierzasz wykorzystać nasze wzory inaczej niż tylko do osobistego użytku? Przeczytaj jakie masz prawa w Copyright, który znajdziesz na końcu każdego wzoru. Miłej pracy!
Dodaj komentarz do modelu DROPS 216-24
Chcielibyśmy się dowiedzieć co masz do powiedzenia o tym wzorze!
Jeśli chcesz zadać pytanie i szybko uzyskać odpowiedź, upewnij się, że została wybrana właściwa kategoria w formularzu poniżej. Pola obowiązkowe są oznaczone *.