


Komentarze / Pytania (93)
![]() Ana napisała::
Ana napisała::
Hi, I think I understand the pattern and instructions for DROPS / 60 / 13 . But I have one question. I’m making a size L. Do I start each round as the first round, from the beginning of the chart or should I just keep knitting in the round repeating the chart on and on?
26.06.2021 - 06:26Odpowiedź DROPS Design :
Dear Ana, for the pattern, start with the first row, then go on according to the diagram. Happy Stitching!
26.06.2021 - 09:15
![]() Eva Angervik napisała::
Eva Angervik napisała::
Vi är några (en person stickar M, den andra L) som har problem med att få mönstret snyggt vid sidorna, dvs mellan fram- och bakstycke. Vi är erfarna stickare och när vi stickat andra modeller har intagningar/ utlägg sett likadant ut på bägge sidor. Mönstret har snyggt anpassats. Detta får vi trots ansträngningar inte till. Vad gör vi för fel?
20.06.2021 - 12:54Odpowiedź DROPS Design :
Hei Eva. Usikker på hva som blir feil hos dere, men har dere lest Strikketips? Fell slik på retten: Før 3 kantmaskene: 2 rett sammen. Etter 3 kantmasker: 1 maske løs av, strikk 1 rett, løft den løse masken over. Fell slik på vrangen: Før 3 kantmasker: 2 vridd vrang sammen. Etter 3 kantm: 2 vrang sammen. mvh DROPS design
21.06.2021 - 11:52
![]() Anke napisała::
Anke napisała::
Na de gerstekorrel beginnen met meerderen aan de zijkanten maar hoe kan ik dan verder in patroon aan de zijkanten?
22.05.2021 - 16:43Odpowiedź DROPS Design :
Dag Anke,
Je breit de gemeerderde steken in patroon, volgens de teltekening. Dus als j e na de gerstekorrel meerdert, brei je die steken in tricotsteek. Na 4 keer meerderen heb je 1 patroonherhaling erbij in de breedte.
24.06.2021 - 09:39
![]() Cinzia Quarti napisała::
Cinzia Quarti napisała::
Buongiorno, sto facendo taglia S. Nel primo ferro che si inizia lo schema dopo il punto riso ho aumentato subito accanto al marca punto seguendo sullo schema il punto evidenziato S e ho apportato gli aumenti richiesti ma alla fine del giro con l’ultimo aumento prima del marcapunto finisco con una maglia rovescia e lo schema quindi non mi viene completo continuando con inizio giro con 3 maglie dritte. È giusto che venga così??
10.04.2021 - 12:14Odpowiedź DROPS Design :
Buongiorno Cinzia, ha iniziato sulla maglia corretta del diagramma? Le ripetizioni successive del diagramma sul gjro sono intere, di 8 maglie. Buon lavoro!
11.04.2021 - 12:03
![]() Annet Voss napisała::
Annet Voss napisała::
Waar moet ik beginnen met het afkanten van de armsgaten, bij de eerste steek van de pen of halverwege (dus bij het volgende armsgat?
03.02.2021 - 13:15Odpowiedź DROPS Design :
Dag Annet,
Je kunt telkens aan het begin van de naald afkanten voor het armsgat.
06.02.2021 - 11:29
![]() Lorinda napisała::
Lorinda napisała::
So I will work every round this way? Start with the second stitch, complete the round using all eight stitches finish the round with Stitch 1 of the diagram? I guess I would have to in order for the seed stitch to line up, correct?
04.11.2020 - 14:21Odpowiedź DROPS Design :
Dear Lorinda, yes correct, the first repeat on the round is worked over the last 7 sts, then you repeat the 8 sts and finish with the first stitch in diagram. Happy knitting!
04.11.2020 - 17:02
![]() Lorinda napisała::
Lorinda napisała::
Hello, just need clarification. I am making size S and I begin the chart at the corresponding arrow. Does that mean the chart for me will repeat every 7 stitches instead of 8? Or is that arrow only for the beginning of first round only?
04.11.2020 - 12:42Odpowiedź DROPS Design :
Dear Lorinda, no you just start with the 2nd stitch in diagram (= first repeat on the round), then work the 7 sts in diagram, now repeat all the 8 sts to the end of the round and finish with the first stitch in diagram just before the end of the round. And continue working diagram like this. Happy knitting!
04.11.2020 - 13:47
![]() Lorinda napisała::
Lorinda napisała::
Hello. Love this design. I have a question on the chart. I am making size S and begin 2 sts into the chart. This works out fine to the end of the front. Does the chart continue as though there is no marker denoting the back, or does the chart start over once going to the back? Do I skip the first 2 chart sts again when working on the back section or just keep going with the chart? The front and back are not aligned. The pattern is shifted and there is a wider area of stockinette once row ends
18.10.2020 - 15:18Odpowiedź DROPS Design :
Hi Lorinda, You start at the arrow, then continue the complete chart to the end of the round (all stitches). Happy knitting!
19.10.2020 - 07:06
![]() Ribault Martine napisała::
Ribault Martine napisała::
Bonjour, Je suis toujours sans réponse aux dernières observations et questions que je vous ai adressé hier. Comme je l'ai écrit, je n'arrive pas à faire en sorte que les 3m de point de riz soit bien régulières avec l'inclusion des augment à faire au fur et à mesure. Avez vous une solution à proposer ? L'idéal serait de pouvoir disposer d'1 diagramme complet de l'ouvrage avec l'emplacement des augmentations tous les 5 cm. Je reste dans l'attente de votre réponse. Cdlt
28.07.2020 - 12:40Odpowiedź DROPS Design :
Bonjour Mme Ribault, désolée pour le retard des réponses pour cause de vacances d'été. Les augmentations se tricotent dans le point fantaisie sur les côtés pour que vous ayez toujours le même motif sur le devant et sur le dos, autrement dit 5 mailles jersey espacées de 3 m point de riz, vous devrez donc tricoter les augmentations soit au point de riz, soit en jersey - le motif ne tombera naturellement plus juste au niveau des marqueurs sur les côtés. Rappelez-vous de contacter votre magasin, il sera beaucoup plus simple pour eux de vous aider, même par téléphone. Bon tricot!
29.07.2020 - 11:27
![]() Ribault Martine napisała::
Ribault Martine napisała::
Bonjour, (suite du message précédent) Je suis le point d\'abandonner la réalisation de ce modèle, qui pour moi est irréalisable en l'état avec ces explications, trop sugsinte à mon goût pour la réalisation des augmtat en point fantaisie au fur et à mesure. Avez vous une solution ? Peut être une vidéo avec les augmemt dans du point de riz, si c' est ça la solution, pour que le point fantaisie soit régulier dans ce modèle tricoté en rond ?
27.07.2020 - 16:47Odpowiedź DROPS Design :
Bonjour Mme Ribault, rappelez-vous que, pour toute assistance et aide personnalisée à la réalisation d'un modèle, vous pouvez vous adresser directement au magasin où vous avez acheté votre laine, même par mail ou téléphone, on saura vous conseiller et vous assister. Bon tricot!
29.07.2020 - 11:12
|
|||||||
Summer Charm |
|||||||
|
|
|||||||
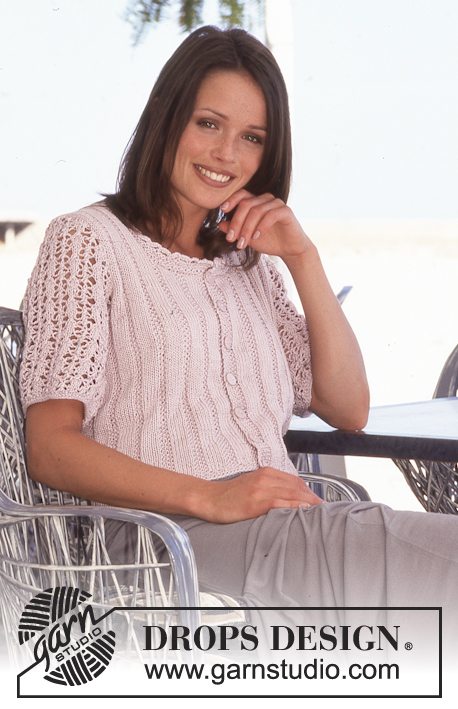
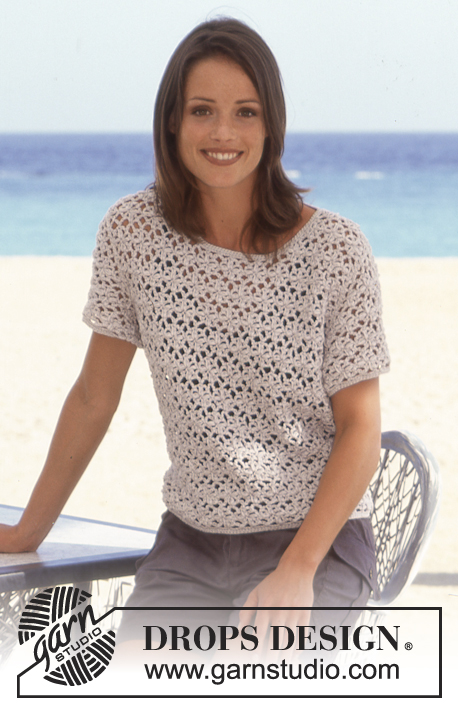
Top DROPS z włóczki Muskat
DROPS 60-13 |
|||||||
|
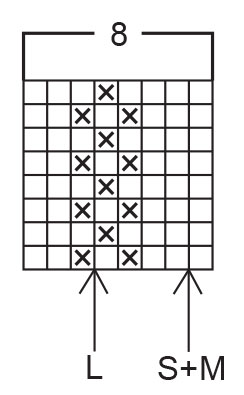
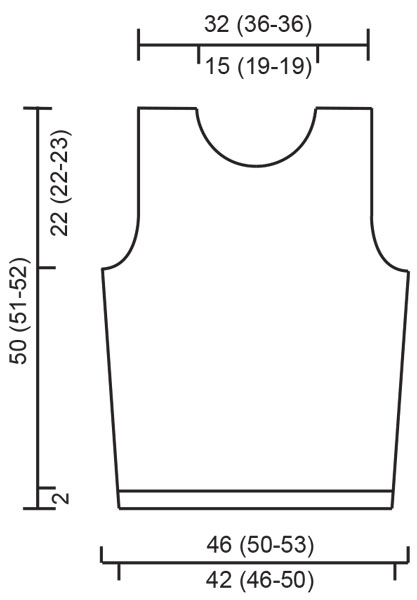
Próbka: przerabiając dżersejem 21 o. x 28 rz. powinniśmy otrzymać próbkę o wymiarach 10 x 10 cm ŚCIEG FRANCUSKI (w tę i z powrotem): przerabiać wszystkie rzędy na prawo. ŚCIEG FRANCUSKI (na okrągło): *1 okrążenie na prawo, 1 okrążenie na lewo * powtórzyć od *do * ŚCIEG RYŻOWY (dla parzystej liczby oczek): Rz. 1: *1 o.p., 1 o.l. * Rz. 2: *1 o.l., 1 o.p. * Ścieg ryżowy (dla nieparzystej liczby oczek): w każdym rzędzie: 1 o.p., *1 o.l., 1 o.p. * ŚCIEG RYŻOWY (na okrągło): Okr. 1: *1 o.p., 1 o.l. * Okr. 2: przerabiać oczka prawe na lewo, a lewe na prawo. Powtórzyć okr. 2. Ścieg fantazyjny: patrz schemat poniżej. Schemat przedstawia ścieg fantazyjny na prawej stronie robótki. Strzałki pokazują początek w zależności od rozmiaru. Zamykanie oczek: Zamykać oczka na prawej stronie robótki: Przed 3 o.: 2 o. razem na prawo Za 3 o.: zdjąć 1 o. jak do przerobienia na prawo, 1 o.p., przełożyć oczko zdjęte nad przerobionym oczkiem. Zamykać na lewej stronie robótki: Przed 3 o.: 2 o. przekręcone i przerobione razem na lewo Za 3 o.: 2 o. razem na lewo Tył i przód: nabrać 176-192-208 o. Połączyć na okrągło i marker na początku okrążenia. Przerobić 2 rzędy ściegiem francuskim, dalej 3 rzędy ściegiem ryżowym. Umieścić po 1 markerze z każdej strony: przód = 87-95-103 o. i tył = 89-97-105 o. Dalej przerabiać ŚCIEGIEM FANTAZYJNYM (zacząć od strzałki odpowiedniej dla schematu). Po przerobieniu brzegu ściegiem ryżowym dodać 1 o. z każdej strony każdego markera 4 razy co 5 cm = 192-208-224 o. Przód = 95-103-111 o., tył = 97-105-113 o. Przerabiać dodawane oczka ściegiem fantazyjnym w miarę postępu robótki. Na wys. 27-28-28 cm przer. 3 rzędy ściegiem ryżowym ponad 6-6-7 o. z każdej strony każdego markera, dalej zamknąć na podkroje rękawów 3-3-4 o. z każdej strony każdego markera, dalej przerabiać każdą część w tę i z powrotem – przód = 89-97-103 o., tył = 91-99-105 o. Przód : = 89-97-103 o. Zamknąć na podkroje rękawów 1 o. z każdej strony w odl. 3 o. od brzegów (przerabiać te oczka ściegiem ryżowym) 5-5-8 razy w każdym rzędzie, dalej 4 razy co 2 rzędy i 2 razy co 4 rzędy = 67-75-75 o. Na wys. 37 cm przerobić 3 rzędy ściegiem ryżowym ponad 15-23-23 o. środkowymi, następnie zamknąć na dekolt 9-17-17 o. środkowych i zamknąć 1 o. od strony dekoltu – w odl. 3 o. od brzegów (przerabianych ściegiem ryżowym) 6 razy w każdym rzędzie, dalej 2 razy co 2 rzędy, i wreszcie 2 razy co 4 rzędy. Zamknąć pozostałe oczka gdy dł. robótki wynosi ok. 50-51-52 cm. Tył: = 91-99-105 o. Formować podkroje rękawów z każdej strony w odl. 3 o. od brzegu jak z przodu = 69-77-77 o. Na wys. 47-48-49 cm przerobić 3 rzędy ściegiem ryżowym ponad 33-41-41 o. środkowymi, następnie zamknąć na dekolt 27-35-35 o. środkowych. Zamykać 1 o. od strony dekoltu w odl. 3 o. od brzegów (przerabianych ściegiem ryżowym) 2 razy w każdym rzędzie. Zamknąć pozostałe oczka na wys. 50-51-52 cm. Wykończenie: zszyć ramiona. Na szydełku wykonać następujący brzeg wokół dekoltu, na prawej stronie robótki: Okr. 1: 1 psł, *4 oł ponad 2 przerobionymi oczkami, 1 oz w 3-cie o. * powtórzyć od * do* Okr. 2: *4 psł w łuk, 1 oz w oz poprzedniego okrążenia * powtórzyć od * do *. |
|||||||
Objaśnienia do schematu |
|||||||
|
|||||||
 |
|||||||
 |
|||||||
Skończyłaś ten wzór?Otaguj swoje zdjęcia #dropspattern lub prześlij je do #dropsfan gallery. Potrzebujesz pomocy w związku z tym wzorem?Zobacz 22 instrukcje video, sekcję Komentarze/Pytania i jeszcze więcej, wchodząc na stronę wzoru na garnstudio.com © 1982-2026 DROPS Design A/S. Wszelkie prawa zastrzeżone. Ten dokument, w całości, jest chroniony prawem. Zobacz co możesz robić z naszymi wzorami na dole każdego wzoru na naszej stronie. |
|||||||


Posiadając 40 lat doświadczenia w projektowaniu wzorów na druty i szydełko, DROPS Design oferuje jedną z największych kolekcji bezpłatnych wzorów w internecie – przetłumaczonych na 17 języków. Obecnie jest dostępnych 324 katalogów i 12239 wzorów w języku polskim.
Dokładamy wszelkich starań, aby oferować Wam druty i szydełka, inspiracje, fachowe porady oraz doskonałej jakości włóczki w najlepszych cenach! Zamierzasz wykorzystać nasze wzory inaczej niż tylko do osobistego użytku? Przeczytaj jakie masz prawa w Copyright, który znajdziesz na końcu każdego wzoru. Miłej pracy!
Dodaj komentarz do modelu DROPS 60-13
Chcielibyśmy się dowiedzieć co masz do powiedzenia o tym wzorze!
Jeśli chcesz zadać pytanie i szybko uzyskać odpowiedź, upewnij się, że została wybrana właściwa kategoria w formularzu poniżej. Pola obowiązkowe są oznaczone *.