
Popularne kategorie
Szukasz włóczki?


Komentarze / Pytania (16)
![]() Sylvie napisała::
Sylvie napisała::
C'est joli mais les explications sont incompréhensibles....pourquoi faire simple quand on peut faire compliqué!!
06.10.2025 - 22:33Odpowiedź DROPS Design :
Bonjour Sylvie, navrée de lire que vous avez des problèmes de compréhension pour réaliser ce modèle, n'hésitez pas à nous indiquer quelle partie vous ne comprenez pas pour que nous puissions tenter de vous aider au mieux; Merci pour votre compréhension. Bon tricot!
07.10.2025 - 08:28
![]() Kate napisała::
Kate napisała::
I changed the hood to avoid stitching - cast on 46 stitches loosely. Knit along the row, then pick up 46 stitches from the base of the row you've just done and knit back along. I used the "magic loop method" for being able to turn the sharp corner. I continued knitting using this method, back and forth, remembering to knit 6 stitches at the beginning and ends of the purled rows, and hood worked well.
21.11.2024 - 15:52
![]() Ann napisała::
Ann napisała::
Good evening. I'm afraid, but I don't think that 92 stiches will fit on an head S and on once per XXXL too. However I'd like to knit it, the description looks very unclear. A picture showing the measurement is missing furthermore (see a comment from US 2 years ago). What's an female head in S oder XXXL for Drops :-) and how can knitters adjust their project well
04.11.2024 - 21:49Odpowiedź DROPS Design :
Dear Ann, 92 sts is the total width of the piece of the beginning. At the beginning of the pattern you will have a flat piece which is worked back and forth. Then, after 28cm you join it in the round and the lower part of the cowl is worked in the round, with increases depending on the size. The head is a standard size; according to the gauge, the hood should measure approx. 54 cm when flat (17 sts = 10 cm, so 92 = 54 cm), which is then folded double and the cast-on edge is sewn together. So the hood's side is 27cm width and 28 cm length, before the shoulders. If this doesn't fit you you can calculate the pattern for your desired measurements. Happy knitting!
10.11.2024 - 18:08
![]() Ayra napisała::
Ayra napisała::
Hello Plz explain ( cut the yarn insert the marker thread in the mid back) Do I have to cut the yarn before I start the next row from right side and do I have to knit the stitches before the marker also. because in the pattern it says start the round from mid back. Thanks
01.02.2022 - 19:57Odpowiedź DROPS Design :
Dear Ayra, the hood part is now done and you will cast on new stitches for the front piece, so you have to cut the yarn, then add a marker on mid back, slip the stitches to the marker without working them and join the yarn to start now from here = mid back. Work now in the round as explained, casting on new sts for front piece on first round. Happy knitting!
02.02.2022 - 08:39
![]() Kathleen Smith napisała::
Kathleen Smith napisała::
Thank you for this pattern. It would be so helpful if a diagram with measurements was included.
14.01.2022 - 23:55
![]() Anita Louisa Andre napisała::
Anita Louisa Andre napisała::
Hello, Please explain better how to do the 6 ridges in front, I added 16 stitches, did 6 ridges, My side augm. are slanted.Do not look straight like on foto, Did 6 ridges & only got 108 sts. Want to do XL. Made numerous of your patterns, This front is not clearly explained. Also how to do the Twist. did not knit in round to do the 6 ridges, PLease explain middle augment sides front better way. Thank You
05.02.2021 - 00:35Odpowiedź DROPS Design :
Dear Mrs Andre, you start with 92 sts - after 28 cm, cut the yarn and start now from mid back (= in the middle of previous rows and work now in the round casting on the new sts for mid front and increasing on each side of the new stitches), cast on 16 sts for mid front and increase 1 stitch on each side of the middle 30 sts (= YO, K1, 6+16+6 sts in garter st, K1, YO) a total of 6 times on every other round = 92 + 16 + 6x2= 120 sts. Hope this helps. Happy knitting!
05.02.2021 - 08:49
![]() Barbara napisała::
Barbara napisała::
Buongiorno, sono arriva a questo punto ma non riesco a capire come devo procede una volta tagliato il filo: “Tagliare il filo. Inserire un segno al centro, sul dietro. Per evitare di iniziare il giro al centro delle coste a legaccio sul davanti, iniziare ora il giro da qui.” Vi ringrazio saluti
01.07.2020 - 17:10Odpowiedź DROPS Design :
Buongiorno Barbara. Il lavoro inizia dal cappuccio; si lavora prima avanti e indietro, poi in tondo. Prima di unire in tondo, mette un segno al centro sul dietro, taglia il filo, passa la prima metà delle maglie senza lavorarle e inizia a lavorare in tondo, a partire dal segno. Lavora finché non rimangono 7 maglie (6 m a legaccio + 1 maglia), 1 maglia gettata, lavorare le 7 m successive, avviare 16 m (parte centrale del davanti, lavorata a legaccio), lavora le 7 m successive (sono le prime maglie passate senza averle lavorate), 1 maglia gettata e prosegue fino al segno. Buon lavoro!
01.07.2020 - 17:48
![]() Jantine napisała::
Jantine napisała::
Wordt bij de afwerking van de capuchon de capuchon aan de binnenkant gemaasd zodat aan de buitenkant de naad komt? Groeten, Jantine
24.05.2020 - 11:51Odpowiedź DROPS Design :
Dag Jantine,
Nee, het is de bedoeling dat de naad aan de binnenkant komt.
05.06.2020 - 11:57
![]() Carol Lee napisała::
Carol Lee napisała::
I’ve just completed the increase directions to have 120 stitches on my needles. I’m making the XL version. The next instructions are confusing to When piece measures 3-4-2 cm / 1 1/8"-1 ½"-¾" from last ridge worked mid “ it seems that there are more cm/inches for the smaller version. I would think for the XL you would use the next to largest measurement I.e. 3 or 1 1/8? Thank you in advance for your reply.
08.02.2020 - 02:43Odpowiedź DROPS Design :
Dear Mrs Lee, in 2nd size you work until the garter stitch section measures 4 cm = 1.57 inches (in first size this section measures 3 cm = 1.18 inches) - you can convert into cm here. Happy knitting!
10.02.2020 - 07:48
![]() Terka napisała::
Terka napisała::
Good evening. I have one question. Will you translate this hooded cowl 192-3 to Czech language? Thank you for your answer.
06.01.2020 - 20:40Odpowiedź DROPS Design :
Milá Terko, ano - návod bude k dipozici co nevidět :-) Sledujte, prosím naše stránky a seznam nejnověji přidaných překladů, zde Hezký večer! Hana
06.01.2020 - 21:12
|
|
Loxley#loxleyhood |
|
 |
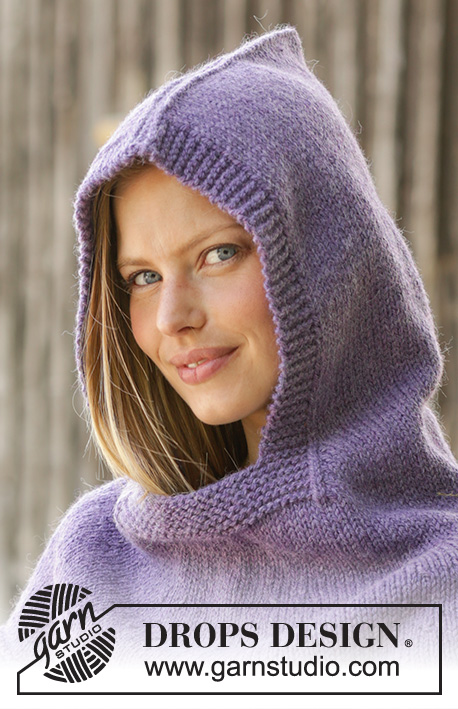 |
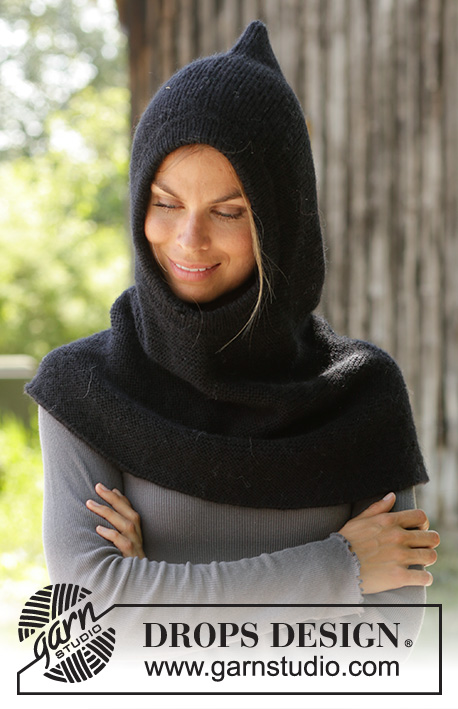
Kominiarka na drutach / balaclava, przerabiana od góry do dołu, z włóczki DROPS Nepal, ściegiem francuskim. Od S do XXXL
DROPS 192-3 |
|
|
WYKORZYSTYWANE TECHNIKI: ---------------------------------------------------------- ŚCIEG FRANCUSKI (na okrągło): 1 ściągacz francuski = 2 okrążenia. Przerobić 1 okrążenie na prawo i 1 okrążenie na lewo. ŚCIEG FRANCUSKI (w tę i z powrotem): 1 ściągacz francuski = przerobić 2 rzędy na prawo. DODAWANIE OCZEK-1: Wykonać 1 narzut z każdej strony 30 oczek na środku przodu (= 28 oczek ściegiem francuskim + 1 oczko prawe z każdej ich strony). W następnym okrążeniu przerobić oczka przekręcone w miejscu narzutów na prawo, aby uniknąć dziur. Następnie przerabiać nowe oczka dżersejem. DODAWANIE OCZEK-2: Dodać 1 oczko z każdej strony każdej nitki markera (= dodane 16 oczek w okrążeniu z dodawaniem oczek) następująco: przerabiać aż zostaje 1 oczko przed 1-szą nitką markerem, 1 narzut, przerobić 2 oczka prawe (nitka marker jest na środku tych oczek), 1 narzut. Powtórzyć w miejscu każdej z następnych nitek markerów. W następnym okrążeniu przerobić oczka przekręcone w miejscu narzutów na prawo, aby uniknąć dziur. ---------------------------------------------------------- ROBÓTKĘ ROZPOCZYNAMY TUTAJ: ---------------------------------------------------------- KOMINIARKA – SKRÓCONY OPIS ROBÓTKI: Przerabiany od góry do dołu na drutach z żyłką. Najpierw przerabiać w tę i z powrotem, nabrać oczka na środku przodu komina i dalej przerabiać na okrągło. KOMINIARKA : Na drutach z żyłką nr 5 nabrać 92 oczka włóczką Nepal we wszystkich rozmiarach. Przerobić 1 ściągacz ściegiem francuskim w tę i z powrotem – patrz powyżej. Teraz przerabiać dżersejem z 6 oczkami ściegiem francuskim z każdej strony, aż długość robótki wynosi 28 cm, dopasować, aby kolejny rząd był przerabiany na prawej stronie robótki. ZACHOWAĆ TAKIE SAMO NAPRĘŻENIE NICI JAK W PRZYPADKU PRÓBKI! Odciąć nitkę. Umieścić nitkę marker na środku tyłu. Aby nie zaczynać okrążenia na środku ściągacza francuskiego przodu, zaczynamy teraz okrążenia tutaj. Przerabiać następująco: przerabiać na prawo aż zostaje 1 oczko przed 6 pierwszymi oczkami ściegiem francuskim, wykonać 1 narzut, 1 oczko prawe, przerobić 6 oczek ściegiem francuskim, nabrać 16 oczek (= środek przodu), przerobić 6 oczek ściegiem francuskim z drugiej strony, 1 oczko prawe, wykonać 1 narzut, przerobić pozostałe oczka w okrążeniu na prawo. Są dodane 2 oczka - PATRZ DODAWANIE OCZEK1. Dalej przerabiać tak samo na okrągło i przerabiać ściegiem francuskim nowe oczka nabierane na środku przodu (= 28 oczek ściegiem francuskim na środku przodu), W TYM SAMYM CZASIE dalej dodawać z każdej strony oczek ściegiem francuskim jeszcze 5 razy co 2 okrążenia (= w sumie dodanych 6 oczek z każdej strony oczek ściegiem francuskim) = 120 oczek. Po przerobieniu 6 ściągaczy francuskich ponad oczkami na środku przodu i gdy zostaną dodane wszystkie oczka, dalej przerabiać na okrągło, dżersejem. Gdy dł. robótki od ostatniego ściągacza francuskiego na środku przodu wynosi 3-4-2 cm, umieścić 8 nitek markerów następująco: umieścić nitkę marker na początku okrążenia (= środek tyłu), kolejnych 7 nitek markerów rozmieścić co 15 oczek. W 1-szym okrążeniu zacząć dodawanie oczek – PATRZ DODAWANIE OCZEK-2. Dodawać tak samo w sumie 4-5-6 razy co ok. 5-4-4 cm = 184-200-216 oczek. Po dodaniu ostatniego oczka długość robótki wynosi ok. 51-53-55 cm. Przerabiać ściegiem francuskim przez 5 cm. Zakończyć. Aby zamykane oczka nie ściągały robótki, wykonać 1 narzut za ok. każdym 5-tym oczkiem. Zamykać narzuty jak zwykłe oczka. Długość komina z kapturem wynosi ok. 56-58-60 cm, od góry do dołu. WYKOŃCZENIE: Zszyć oczka kaptura razem – nie zaciskać zbyt mocno nitki podczas zszywania. |
|
Skończyłaś ten wzór?Otaguj swoje zdjęcia #dropspattern #loxleyhood lub prześlij je do #dropsfan gallery. Potrzebujesz pomocy w związku z tym wzorem?Zobacz 20 instrukcje video, sekcję Komentarze/Pytania i jeszcze więcej, wchodząc na stronę wzoru na garnstudio.com © 1982-2026 DROPS Design A/S. Wszelkie prawa zastrzeżone. Ten dokument, w całości, jest chroniony prawem. Zobacz co możesz robić z naszymi wzorami na dole każdego wzoru na naszej stronie. |
|


Posiadając 40 lat doświadczenia w projektowaniu wzorów na druty i szydełko, DROPS Design oferuje jedną z największych kolekcji bezpłatnych wzorów w internecie – przetłumaczonych na 17 języków. Obecnie jest dostępnych 324 katalogów i 12290 wzorów w języku polskim.
Dokładamy wszelkich starań, aby oferować Wam druty i szydełka, inspiracje, fachowe porady oraz doskonałej jakości włóczki w najlepszych cenach! Zamierzasz wykorzystać nasze wzory inaczej niż tylko do osobistego użytku? Przeczytaj jakie masz prawa w Copyright, który znajdziesz na końcu każdego wzoru. Miłej pracy!
Dodaj komentarz do modelu DROPS 192-3
Chcielibyśmy się dowiedzieć co masz do powiedzenia o tym wzorze!
Jeśli chcesz zadać pytanie i szybko uzyskać odpowiedź, upewnij się, że została wybrana właściwa kategoria w formularzu poniżej. Pola obowiązkowe są oznaczone *.