
Popularne kategorie
Szukasz włóczki?


Komentarze / Pytania (27)
![]() María Gonzalez napisała::
María Gonzalez napisała::
"Comenzar en el 4º punto bajo y trabajar a partir de la 3ª vuelta de los diagramas de la manera siguiente: Trabajar A.2a en el punto bajo..." me quedé aauí porque no se como identificar ese 4to punto bajo, desde donde se empieza a contar? con el video me fue muy bien y entiendo basicamente el gráfico pero esto no lo entendí, gracias por su ayuda
25.10.2020 - 20:45Odpowiedź DROPS Design :
Hola Maria! Debes contar el 4º punto bajo antes de la esquina (hay 3 arcos de cadenas antes de la esquina) y comenzar aqui. Buen trabajo!
19.11.2020 - 09:16
![]() Sharon Beck napisała::
Sharon Beck napisała::
I have written out the instructions for this pattern. Would you be willing to publish them on your website? I see that several people have requested them.
05.06.2020 - 00:40Odpowiedź DROPS Design :
Dear Mrs Beck, thanks for your feedback, there are already 2 videos to this pattern so that it is very easy to follow them. Happy crocheting!
05.06.2020 - 12:01
![]() Deborah Baxter napisała::
Deborah Baxter napisała::
Is there a written pattern somewhere? I don’t understand diagrams. It’s a beautiful blanket and I would love to crochet this but unfortunately diagrams aren’t my thing. I think there’s probably a lot of people who don’t understand diagrams.
28.06.2019 - 18:10Odpowiedź DROPS Design :
Dear Deborah, unfortunately we cannot accomondate every wish about pattern writing. Our patterns are available in many languages, and we found the best way to give the pattern to everyone in chart forms. Charts do have their advantages, you can see not only a row (and what comes right after a stitch), but you can also see the relations of stitches to each other, and how rows should follow one another. It is not that difficult to memorize the explanation of the stitches (after a few repeats the mind remembers almost automatically). If you are still stuck, remember, you can always ask for help in person in the store where you bought your DROPS yarn from. Happy Crafting!
28.06.2019 - 21:25
![]() Sarah napisała::
Sarah napisała::
Het derde symbool werd verkeerd vertaald vanuit het Engels: " 1 double crochet around chain stitch space/between 2 trebles". Dit werd vertaald naar halve vaste, maar moet een vaste zijn rond de lossenlus. Ook in het filmpje is te zien dat de persoon een vaste haakt....
30.04.2019 - 14:09
![]() Olga Jaén Pareja napisała::
Olga Jaén Pareja napisała::
Ustedes dicen que la lana que hay que utilizar es una del grupo C, pero luego indican utilizar una aguja del 3,5mm. ¿Es correcto esto?
30.03.2019 - 12:55Odpowiedź DROPS Design :
Hola Olga. Lo importante es la tensión del tejido, en este caso 18 puntos altos x 10.5 filas = 10 cm x 10 cm. El tamaño de la aguja es orientativo.
02.04.2019 - 14:56
![]() Diane napisała::
Diane napisała::
I've been crocheting for several decades, and I have no issues reading standard charts, but the instructions here are about as incomprehensible as they come and very confusing. As far as I can tell, round 1 ring is 4 chains, but then what? What stitches and how many in the ring?? If I can't even get it started, then I may just have to find another pattern, this is a Christmas project, I don't have a lot of time to waste deciphering this :-/ Thanks
08.10.2017 - 22:26Odpowiedź DROPS Design :
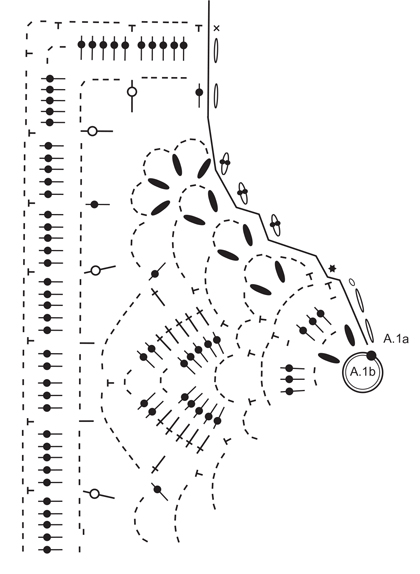
Dear Diane, after the initial circle made from 4 chain stitch, and closed with a slip stitch, you do 3 treble (UK)/ double (US) (this is ahown in A.1a). [*Then two treble (UK) / double (US) crocheted together, 2 chain stitch.* Repeat *-* one more time (this is A.1b)]. Then repeat [-] 4 times, then close the round with a lip stitch. And so on. A.1 only shows the stitches that are used in order to raise the row to the next level. A1.b is repeated 4 times in the round. I hope this helps. Happy Crocheting!
08.10.2017 - 23:09
![]() Kathleen napisała::
Kathleen napisała::
The diagrams are fine as far as they go, however they don't go nearly far enough. In fact, after following the first snippet of diagram shown, it's nearly impossible to figure out where you are. Those who are having problems with the diagrams (and I've followed diagrams for years), it's not you, it's the creator of the diagram.
26.03.2017 - 17:00Odpowiedź DROPS Design :
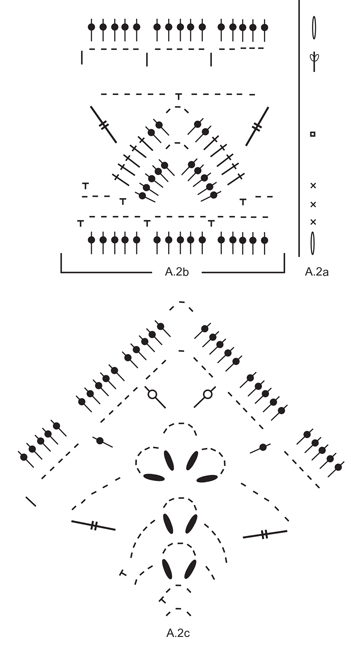
Dear kathleen, in A.1 you just repeat 4 times A.1b in the round, in A.2a-A.2c work A.2b along the sides and A.2c in the corner, A.2a is only showing how to start/finish the round. Happy crocheting!
27.03.2017 - 10:17
![]() Michelle Achee napisała::
Michelle Achee napisała::
Is there a written pattern for this? I bought the wool thinking it would have a regular written pattern, but all I see is a diagram which I cannot understand. Very frustrated.
22.02.2017 - 20:32Odpowiedź DROPS Design :
Dear Mrs Achee, there is only diagram to this pattern, each symbol is matching a st/group of sts and is explaining under diagram text. For any further personnal assistance you are welcome to contact the DROPS store where you bought your yarn, they would be able to assist you, even per mail or telephone. Happy crocheting!
23.02.2017 - 09:51
![]() Naty Gagnon napisała::
Naty Gagnon napisała::
Merci, pas nécessairement en vidéo mais comme le tutoriel de drops children 24-6, tour par tour par écrit pas en diagramme. Merci.
30.01.2017 - 19:54
![]() Naty Gagnon napisała::
Naty Gagnon napisała::
Bonjour, je viens de commencer ce modèle et j'ai un peu de difficulté avec les diagrammes, auriez-vous les explications tour après tour comme pour le patron DROPS children 24-6 (Lovely Lily) que j'ai réussi avec succès. En passant votre site est merveilleux.
30.01.2017 - 03:46Odpowiedź DROPS Design :
Bonjour Mme Gagnon, votre demande a bien été enregistrée, en attendant la vidéo, vous pouvez suivre le diagramme en vérifiant bien la légende de chaque symbole: A.1a = début/fin de chaque tour, A.1b = à répéter pour former le carré. Bon crochet!
30.01.2017 - 12:08
|
|||||||||||||||||||||||||||||||||||||||||||||||||
Orient Dream#orientdreamblanket |
|||||||||||||||||||||||||||||||||||||||||||||||||
 |
 |
||||||||||||||||||||||||||||||||||||||||||||||||
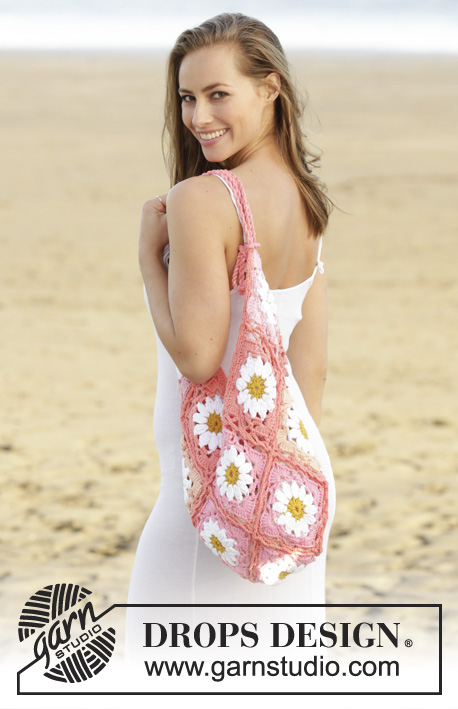
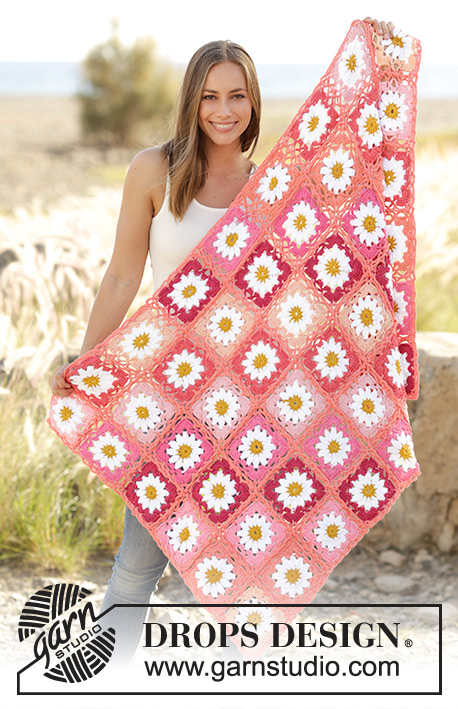
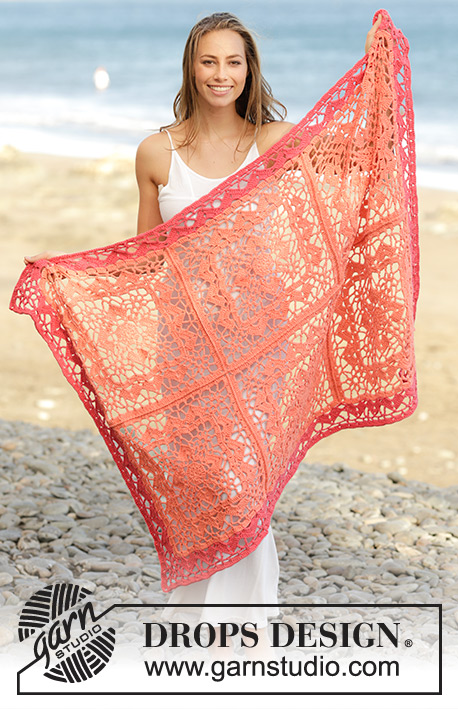
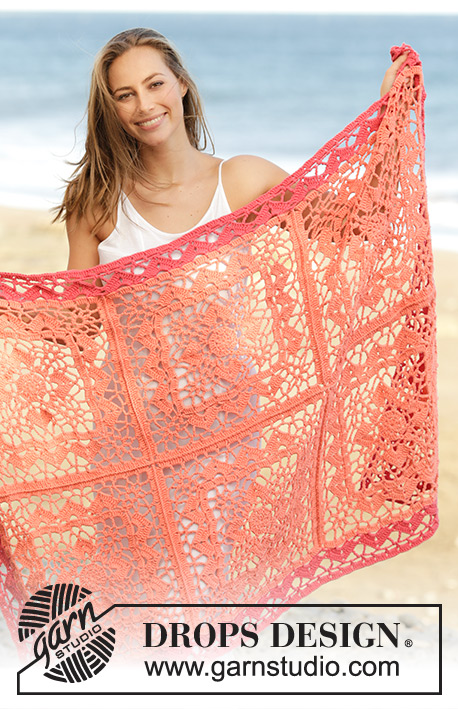
Koc z kwadratami na szydełku i ściegiem ażurowym, z włóczki DROPS Paris.
DROPS 175-10 |
|||||||||||||||||||||||||||||||||||||||||||||||||
|
ŚCIEG FANTAZYJNY: Patrz schematy A.1 i A.2. ---------------------------------------------------------- KOC: Wykonać 6 kwadratów, następnie na szydełku połączyć je razem i na końcu wykonać brzeg wokół koca. KWADRAT NA SZYDEŁKU: Na szydełku nr 3,5 kolorem morela przerabiać wg schematu A.1b, w sumie 4 razy przez całe okrążenie - schemat A.1a pokazuje jak zaczynać i kończyć okrążenia i jest przerabiany dodatkowo obok schematu A.1b. ZACHOWAĆ TAKIE SAMO NAPRĘŻENIE NICI JAK W PRZYPADKU PRÓBKI! Gdy schematy A.1a i A.1b zostaną przerobione 1 raz na wysokość, kwadrat ma wymiary ok. 24 x 24 cm. Odciąć nitkę. Zaczynając od 4-tego półsłupka przed rogiem i przerabiać od 3-ciego okrążenia schematów następująco: A.2a w półsłupek (schemat A.2a pokazuje jak zaczynać i kończyć okrążenia), schemat A.2b ponad 3 pierwszymi łukami, *A.2c (= róg), A.2b ponad 9 następnymi łukami (= 3 motywy)*, powtórzyć od *-* jeszcze 2 razy, przerobić schemat A.2c w róg i zakończyć przerabiając A.2b ponad 6 ostatnimi łukami (= 2 motywy). Gdy zostanie przerobione ostatnie okrążenie schematów A.2a-A.2c, zakończyć. Kwadrat na szydełku ma wymiary ok. 39 x 39 cm. Wykonać jeszcze 5 takich samych kwadratów na szydełku = w sumie 6 kwadratów. WYKOŃCZENIE: Połączyć teraz 6 kwadratów razem, przerabiając je razem na szydełku włóczką w kolorze morela, wkłuwając szydełko przez 2 warstwy następująco: Ułożyć 2 kwadraty jeden naprzeciw drugiego na lewej stronie robótki, przerobić 1 półsłupek wokół łuku w rogu, *1 półsłupek, wkłuwając szydełko przez 2 warstwy, następnego słupka, 2 oczka łańcuszka, ominąć 1 słupek*, powtórzyć od *-* aż zostanie połączony cały bok, przerobić 1 półsłupek wokół łuku. Powtórzyć to samo w przypadku pozostałych kwadratów, tak aby były 2 pasy po 3 kwadraty na długość. Dalej połączyć 2 pasy razem, tak aby były 2 kwadraty na szerokość i 3 kwadraty na długość. Patrz schemat. BRZEG: Wykonać brzeg wokół całej robótki kolorem koralowym. Zaczynając od 1 półsłupka wokół łuku w rogu, przerabiać od 2-giego okrążenia schematów następująco: UWAGA: w 2-gim okrążeniu schematów przerobić 1 półsłupek w miejscu przejścia między 2 kwadratami (tj. tam gdzie były łączone ze sobą) zamiast 1 półsłupka wokół łuku w rogach dla każdego kwadratu. Jest teraz 15 łuków wzdłuż boków kwadratów, przerobić schemat A.2a (pokazuje jak zaczynać i kończyć okrążenia), *A.2b do następnego rogu koca, A.2c (= róg)*, powtórzyć od *-* jeszcze 3 razy. Gdy są gotowe wszystkie okrążenia schematów A.2a-A.2c, zakończyć. |
|||||||||||||||||||||||||||||||||||||||||||||||||
Objaśnienia do schematu |
|||||||||||||||||||||||||||||||||||||||||||||||||
|
|||||||||||||||||||||||||||||||||||||||||||||||||
 |
|||||||||||||||||||||||||||||||||||||||||||||||||
 |
|||||||||||||||||||||||||||||||||||||||||||||||||
 |
|||||||||||||||||||||||||||||||||||||||||||||||||
Skończyłaś ten wzór?Otaguj swoje zdjęcia #dropspattern #orientdreamblanket lub prześlij je do #dropsfan gallery. Potrzebujesz pomocy w związku z tym wzorem?Zobacz 12 instrukcje video, sekcję Komentarze/Pytania i jeszcze więcej, wchodząc na stronę wzoru na garnstudio.com © 1982-2026 DROPS Design A/S. Wszelkie prawa zastrzeżone. Ten dokument, w całości, jest chroniony prawem. Zobacz co możesz robić z naszymi wzorami na dole każdego wzoru na naszej stronie. |
|||||||||||||||||||||||||||||||||||||||||||||||||


Posiadając 40 lat doświadczenia w projektowaniu wzorów na druty i szydełko, DROPS Design oferuje jedną z największych kolekcji bezpłatnych wzorów w internecie – przetłumaczonych na 17 języków. Obecnie jest dostępnych 324 katalogów i 12290 wzorów w języku polskim.
Dokładamy wszelkich starań, aby oferować Wam druty i szydełka, inspiracje, fachowe porady oraz doskonałej jakości włóczki w najlepszych cenach! Zamierzasz wykorzystać nasze wzory inaczej niż tylko do osobistego użytku? Przeczytaj jakie masz prawa w Copyright, który znajdziesz na końcu każdego wzoru. Miłej pracy!
Dodaj komentarz do modelu DROPS 175-10
Chcielibyśmy się dowiedzieć co masz do powiedzenia o tym wzorze!
Jeśli chcesz zadać pytanie i szybko uzyskać odpowiedź, upewnij się, że została wybrana właściwa kategoria w formularzu poniżej. Pola obowiązkowe są oznaczone *.