
Popularne kategorie
Szukasz włóczki?


Komentarze / Pytania (56)
![]() Patrizia napisała::
Patrizia napisała::
Buonasera, non riesco a capire perché da 160 maglie si passa a lavorare su 80m + 2 cat. Dopo aver finito lo schema A2 mi potete spiegare meglio cosa devo fare per realizzare gli scaldi? Grazie mille. Patrizia
29.06.2023 - 00:47
![]() Aziza napisała::
Aziza napisała::
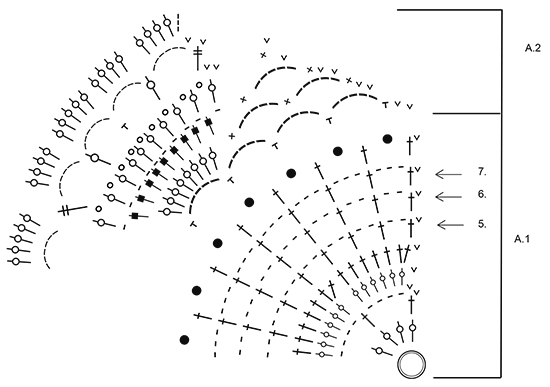
Hi, I finished A1 than went to A2 which completed the big round design on the last picture..how many times do I do A2..it says 7 repitions?.do i keep doing all the rows of A2 than go back to A1 starting at row 5?..this pattern not clear.. thank you
04.06.2023 - 10:30Odpowiedź DROPS Design :
Dear Aziza, you have 7 repeats of A.2 on the round. That is, to work over all of the stitches of A.1 in the previous round, you need to repeat the first round of A.2 7 times in the same round. Continue working the chart. When you finish working A.2 once, work A.1 again, now starting on the 5th round of the chart (marked with an arrow). Happy crocheting!
04.06.2023 - 17:39
![]() Susan Richardson napisała::
Susan Richardson napisała::
Hello! Me again! Thanks for earlier reply, now clear regarding slip stitches at beginning of rounds. I am now nearly at :Work 7th Round 1-3-5 times, AT THE SAME TIME inc 2 tr evenly on every row, i.e. two times on every row. Is there a best place to put these increases? I assume NOT in the arm hole areas, as this would alter the stitches for the arms? Or it may not! This pattern is challenging me, but with your help I will finish it ! Thank you.
26.02.2023 - 14:35Odpowiedź DROPS Design :
Dear Susan, as long as they are not adjacent/next to each other you can work the increases anywhere in the row, even in the armhole areas. Happy crocheting!
26.02.2023 - 23:55
![]() Susan Richardson napisała::
Susan Richardson napisała::
Thanks for answering my 1st question. I have now started this pattern & it is the first time I have used a diagram pattern. I can work out the stitches needed from the key, but am struggling with working out which stitches in the diagram are in which row at the beginning of the rows, mainly slip stitches in A2. Did row 3 of A2 OK, but when I started row 5 found I had got row 4 wrong 1 extra picot put in. Can you give me written instructions for rows 4 and 5, is start row 4 sl st, dc,sl st,tr?
22.02.2023 - 19:32Odpowiedź DROPS Design :
Dear Mrs Richardson, the slip stitches at the beginning of A.2 helps at the beg of round to start on correct place - at the beg of row 4 start with 1 slip st in first ch-space, *1 dc around ch-space, then (1 tr, 1 picot) x 9, 1 tr = 9 picots (10 tr with 1 picot between each), then repeat from * all the round - you should have 7 repeats of A.2 in total. Finish 4th round with 1 slip st in the first dc, then sl st to the first picot (= 3 sl sts), and start with 1 tr (= 4ch) + 6 chains, etc... Happy crocheting!
23.02.2023 - 13:30
![]() Susan Richardson napisała::
Susan Richardson napisała::
I am using Bomull lin for this pattern. Checked & believe it is an equivalent weight yarn. I am crocheting tension squares to check tension. 1st square made with 5.5 mm hook gives measurement of 9cm wide x 13 cm high, 13tr x 8 rows. 2nd square with 5 mm hook gives measurement of 8cm wide x 12cm high , 13tr x 8 rows. So neither correct. I am unsure what to do. I f I use smaller hook, I will end up with an even narrower width, & maybe reach 11 cm height. My tension is not giving a Square!
18.02.2023 - 17:44Odpowiedź DROPS Design :
Dear Susan, in these cases, it's more important the width (with the right amount of stitches) than the height (the amount of rows), since you could always work a few less rows, but it's more difficult to adjust the number of stitches. Therefore, you can work with a 5.5mm hook or even try if the width will match with a 6mm hook. Then, you will need to adjust the amount of rows to work (making rules of 3 of the length indicated for your size in a specific point in the pattern and the rows you have worked and have yet to work). Happy crocheting!
19.02.2023 - 19:27
![]() Denise napisała::
Denise napisała::
Looking at the picture, it looks like the last 2 rounds of A2 were not completed. According to the picture, the last round completed was the picot between dc around chain space. Am I correct?
23.09.2021 - 06:12Odpowiedź DROPS Design :
Hi Denise, All the rounds in A.2 are completed. Happy crocheting!
28.09.2021 - 14:48
![]() Patricia P napisała::
Patricia P napisała::
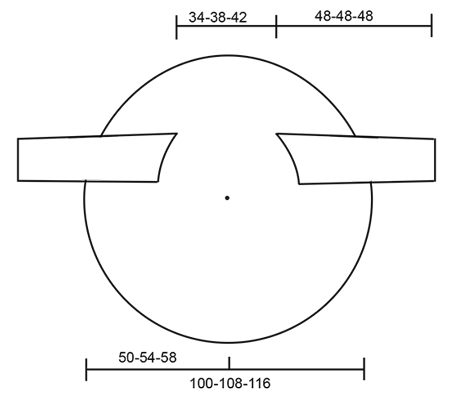
Hello, What size is this pattern making? How do you adjust to make S or XXXL? Does the hook size determine the size of the finished jacket? Thank you!
10.04.2019 - 20:15Odpowiedź DROPS Design :
Dear Patricia, for the finished size, please refer to the scematics at the bottom of the pattern. And yes, the sice of the hook does change the size of the finished item (the crocheted fabric will be thighter and the piece will be smaller with a smaller hook, and it will be looser and bigger with a bigger hook). Happy Crafting!
11.04.2019 - 08:57
![]() Julia Kaufmann napisała::
Julia Kaufmann napisała::
Hallo! Ich würde diese Kreisjacke gerne mit einem Farbwechsel-Bobbel häkeln. Sind da 750 m Lauflänge (3-fädig, 150 g) ausreichend? Danke.
17.07.2018 - 07:59Odpowiedź DROPS Design :
Liebe Frau Kaufmann, wir bitten um Verständnis, dass wir nicht Produkte unserer Konkurrenz empfehlen können und dass der Kauf des Materials uns hilft, weiterhin kostenlose Anleitungen zur Verfügung stellen zu können.
17.07.2018 - 09:28
![]() Gilda napisała::
Gilda napisała::
Salve, vorrei un chiarimento sul punto, dopo gli scalfi, non ho capito bene cosa si intende in verticale; mi viene da pensare che devo lavorare fin sopra gli scalfi, ma non lavorare il collo; qualcuno può aiutarmi per favore?
26.04.2018 - 13:59Odpowiedź DROPS Design :
Buongiorno Gilda. Abbiamo corretto il testo. Deve ripetere il giro 7 il numero di volte indicato per la sua taglia. Buon lavoro!
26.04.2018 - 14:10
![]() Chou-coulate napisała::
Chou-coulate napisała::
Bonjour, Je viens de terminer le dernier rang de A2 et je ne comprends pas lorsqu'il est écrit " au dernier tour de A.2 diminuer 1 B = 160 B". Je dois effectuer des diminutions avant d'entamer la partie disant de reprendre A1 au 5eme rang ?
19.01.2018 - 16:17Odpowiedź DROPS Design :
Bonjour Chou-coulate, au dernier rang de A.2, vous avez 23 brides dans chaque A.2 x 7 A.2 = 161 brides, diminuez 1 m (crochetez par ex 4 brides au lieu de 5 autour d'un arceau) pour que vous ayez bien 160 brides à la fin de A.2. Bon crochet!
22.01.2018 - 08:44
|
||||||||||||||||||||||||||||||||||
Evening Tide#eveningtidejacket |
||||||||||||||||||||||||||||||||||
 |
 |
|||||||||||||||||||||||||||||||||
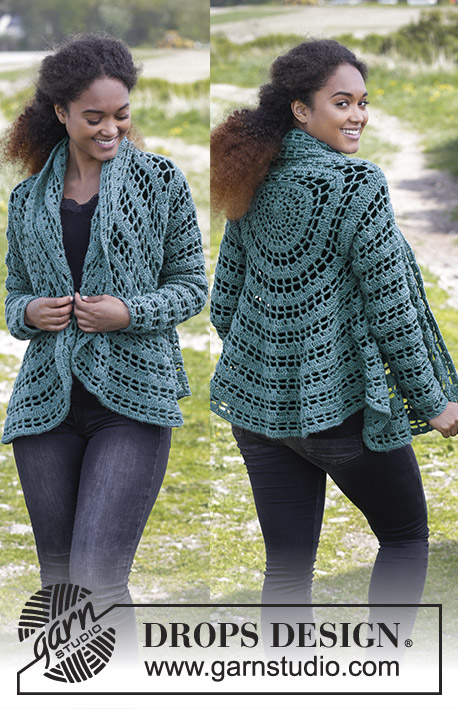
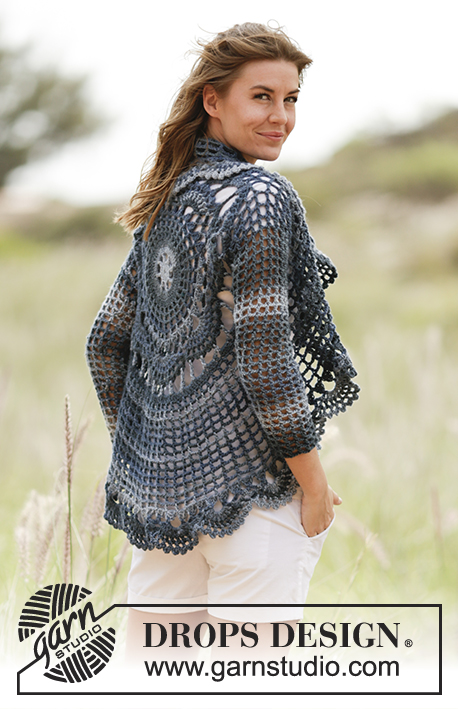
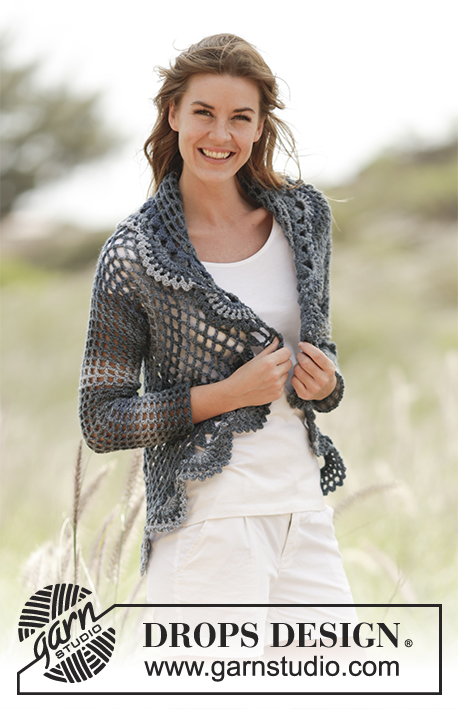
Ażurowy sweter DROPS na okrągło, na szydełku, z włóczki „Big Delight”. Od S do XXXL.
DROPS 168-27 |
||||||||||||||||||||||||||||||||||
|
MAGICZNE KOŁO: Podczas przerabiania na okrągło, używamy tej techniki, aby uniknąć dziury na środku (zamiast kółeczka z oł): weź nitkę w lewą rękę i nawiń ją raz wokół palca wskazującego tworząc pętelkę (od lewej do prawej). Przytrzymaj pętelkę kciukiem i lewym palcem wskazującym, umieścić nitkę ponad lewym palcem wskazującym. Włóż szydełko w pętelkę, wykonaj 1 narzut i przeciągnij nitkę, wykonaj 3 oł, następnie przer. 15 sł wokół pętelki, zakończyć przerabiając 1 oz w 3-cie oł = 16 sł. Dalej przer. jak w opisie poniżej – W TYM SAMYM CZASIE pociągnąć końcówkę nitki, aby zacisnąć pętelkę, a dziurka zniknie. ŚCIEG FANTAZYJNY: Patrz schematy A.1 i A.2. WSKAZÓWKA: Zastąpić 1-szy sł na pocz. okrążenia przez 3 oł. Zakończyć okrążenie przerabiając 1 oz w 3-cie oł na pocz. okrążenia. Zastąpić 1-szy sł2 w okrążeniu przez 4 oł. Zakończyć okrążenie przerabiając 1 oz w 4-te oł na pocz. okrążenia. ---------------------------------------------------------- SWTER: Wykonać MAGICZNE KOŁO – patrz powyżej, na szydełku nr 5,5 włóczką Big Delight. Dalej przer. schemat A.1 - UWAGA: 1-sze okr. schematu A.1 jest wyjaśnione pod opisem magicznego koła, przer. 4 razy schemat A.1 na szerokość. Oczka zamykające (oz) na pocz. schematu A.1 są wykonywane tylko na początku okrążenia. PATRZ WSKAZÓWKA! ZACHOWAĆ TAKIE SAME NAPRĘŻENIE NICI JAK W PRZYPADKU PRÓBKI! Gdy schemat A.1 zostanie przerobiony, dalej przer. wg schematu A.2, przer. 7 razy schemat A.2 na szerokość, w ost. okrążeniu schematu A.2 zamknąć 1 sł = 160 sł. Dalej przer. wg schematu A.1, ale zacząć teraz w 5-tym okr. - patrz strzałka. Przer. 1-2-3 okr. jak 5-te okr. schematu A.1 (= 80 sł + 2 oł), dalej przer. podkroje rękawów następująco: *1 sł + 2 oł w 1-szy sł *, powt. od *-* ponad 20 pierwszymi sł, przer. 22-24-26 oł, ominąć 10-11-12 sł (= 1-szy podkrój rękawa), przer. *1 sł + 2 oł w nast. sł*, powt. od *-* ponad 40-38-36 nast. sł, przer. 22-24-26 oł, ominąć 10-11-12 sł (= 2-gi podkrój rękawa), zakończyć przerabiając 1 oz na początku okrążenia. Dalej przer. jak 6-te okr. schematu następująco: 1 sł + 2 oł w każdy sł aż do 1-szego podkroju rękawa, *przer. 1 sł + 2 oł wokół łańcuszka*, powt. od *-* jeszcze 10-11-12 razy, dalej przer. 1 sł + 2 oł aż do 2-giego podkroju rękawa, *1 sł + 2 oł wokół łańcuszka*, powt. od *-* jeszcze 10-11-12 razy = 82 sł rozdzielone każdy przez 2 oł. Następnie powt. 8-7-6 razy 7-me okr. Przer. jeszcze 1-3-5 razy 7-me okr., W TYM SAMYM CZASIE równomiernie dodać 2 sł w każdym okr., tj. 2 razy w każdym okrążeniu, przer. następująco: 1 sł + 3 oł + 1 sł + 3 oł w 1 sł = 84-88-92 sł rozdzielone każdy przez 3 oł. Średnica robótki wynosi ok. 80-88-96 cm (= 40-44-48 cm od środka koła). Przer. ost. okr. schematu A.1, dalej przer. wg schematu A.2 (= 21-22-23 razy na szerokość). Zakończyć. RĘKAWY: Przerabiane na okrągło z góry na dół, od pokrojów rękawów. Przer. 1 sł + 2 oł w każdy sł ominięty od strony koła i 1 sł + 2 oł na dole każdego sł łańcuszka = 21-23-25 sł rozdzielone każdy przez 2 oł. Umieścić 1 marker na środku pod rękawem. Dalej przer. 1 sł + 2 oł w każdy sł. Po przerobieniu 4 cm zamknąć 1 sł + 2 oł na środku pod rękawem następująco: przer. ost. sł przed markerem, ale nie wykonywać ost. narzutu, przer. nast. sł (nie przer. 2 oł), po ost. narzucie przeciągnąć nitkę przez 3 pętelki na szydełku (= zamknięty został 1 sł + 2 oł). Zamykać tak jeszcze 7 razy co 5 cm, na przemian, przed i za markerem = 13-15-17 sł rozdzielonych każdy przez 2 oł. Dalej przer., aż dł. robótki wynosi 48 cm dla każdego rozmiaru, zakończyć. 2-gi rękaw wykonać tak samo. |
||||||||||||||||||||||||||||||||||
Objaśnienia do schematu |
||||||||||||||||||||||||||||||||||
|
||||||||||||||||||||||||||||||||||
 |
||||||||||||||||||||||||||||||||||
 |
||||||||||||||||||||||||||||||||||
Skończyłaś ten wzór?Otaguj swoje zdjęcia #dropspattern #eveningtidejacket lub prześlij je do #dropsfan gallery. Potrzebujesz pomocy w związku z tym wzorem?Zobacz 8 instrukcje video, sekcję Komentarze/Pytania i jeszcze więcej, wchodząc na stronę wzoru na garnstudio.com © 1982-2026 DROPS Design A/S. Wszelkie prawa zastrzeżone. Ten dokument, w całości, jest chroniony prawem. Zobacz co możesz robić z naszymi wzorami na dole każdego wzoru na naszej stronie. |
||||||||||||||||||||||||||||||||||


Posiadając 40 lat doświadczenia w projektowaniu wzorów na druty i szydełko, DROPS Design oferuje jedną z największych kolekcji bezpłatnych wzorów w internecie – przetłumaczonych na 17 języków. Obecnie jest dostępnych 324 katalogów i 12290 wzorów w języku polskim.
Dokładamy wszelkich starań, aby oferować Wam druty i szydełka, inspiracje, fachowe porady oraz doskonałej jakości włóczki w najlepszych cenach! Zamierzasz wykorzystać nasze wzory inaczej niż tylko do osobistego użytku? Przeczytaj jakie masz prawa w Copyright, który znajdziesz na końcu każdego wzoru. Miłej pracy!
Dodaj komentarz do modelu DROPS 168-27
Chcielibyśmy się dowiedzieć co masz do powiedzenia o tym wzorze!
Jeśli chcesz zadać pytanie i szybko uzyskać odpowiedź, upewnij się, że została wybrana właściwa kategoria w formularzu poniżej. Pola obowiązkowe są oznaczone *.