
Popularne kategorie
Szukasz włóczki?


Komentarze / Pytania (195)
![]() Klára napisała::
Klára napisała::
Dobrý den, mám problém se sešitím celého svetru dohromady. Nedaří se mi zakomponovat trup ke zbytku dílů. Sešila jsem náramenice předního a zadního dílu a na zátylku jsem sešila légu. Zbyl mi trup, který zdánlivě nikam nepatří. Doufám, že není špatně upletený. Prosím o názornější návod případně lepší fotografie výsledného produktu i zezadu. Děkuji za odpověď
02.08.2017 - 14:28Odpowiedź DROPS Design :
Dobrý den, svetr se plete téměř vcelku - tělo jako jeden díl rozdělený u průramků na 2 přední + záda a pak samostatně 2x rukáv. Máte-li sešité náramenice i légu, máte trup komplet :-) Zbývá vsadit rukávy. Hodně zdaru! Hana
03.08.2017 - 13:01
![]() Paola napisała::
Paola napisała::
Buongiorno!! Vorrei sapere se la misura della larghezza segnata sul modello (48cm per la taglia s) va raddoppiata per controllare la larghezza totale o se la banda traforata si sovrappone, per cui vanno aggiunti i cm corrispondenti. Grazie!!
29.06.2017 - 15:09Odpowiedź DROPS Design :
Buongiorno Paola. La banda traforata sul davanti è sovrapposta. La larghezza indicata, quindi 48 cm, è la larghezza del dietro. Buon lavoro!
29.06.2017 - 15:46
![]() Dajana napisała::
Dajana napisała::
Hallo, wie muss man das mit dem Linken Vorderteil gemeint? fange ich vorne bei dem Muster an oder bei glatt rechts? weil eine absatz später soll man ja die Maschen für die Schluter abnehmen aber das is ja in der Hinreihe die ja rechts gestrickt wird wäre schön, wenn Sie mir helfen könnten lg :)
22.02.2017 - 20:50Odpowiedź DROPS Design :
Liebe Dajana, für das linke Vorderteil stricken Sie glatt mit 1 Randm an der Seite und die Blendemaschen wie zuvor bis die Arbit misst 62-72cm (siehe Größe), dann die Maschen für die Schulter abketten (am Anfang einer Hinreihe). Viel Spaß beim stricken!
23.02.2017 - 09:54
![]() Mariette napisała::
Mariette napisała::
Hallo,Als ik met patroon A1 begin en heb nog 21 steken op de naald begin ik dan weer met een omslag ? Of bewaar ik die omslag tot voor de laatste kantsteek?
16.02.2017 - 15:58Odpowiedź DROPS Design :
Hoi Mariette. Je breit het telpatroon zoals eerst (van de goede kant): 1 omsl, 2 r samen tot aan de kantsteek.
22.02.2017 - 12:32
![]() June napisała::
June napisała::
Hi, I'm having the same problem as Jo re the front neck edge and working it into the back. Seems like too much "edging" to fit !!!
13.08.2016 - 19:59Odpowiedź DROPS Design :
Dear June, the 9-10-11 cm (see size) you are working on each collar sts will be sewn along neckline on back piece and the sts on collar on left front piece and on right front piece will be sewn tog. Happy knitting!
15.08.2016 - 10:55Jo napisała::
I am having a lot of trouble with the band at the neck join of the L and R front pieces...It is too long. Do you only cast off the 5 stitches on the R side? And is it right that the join is in a point? Thanking you in anticipation. I don't think I can bear unpicking it again.
12.08.2016 - 02:40Odpowiedź DROPS Design :
Dear Jo, when working on left front piece, you will cast off the 5 sts at the beg of next 3 row from RS + cast off the remaining 5-7 sts. These 20-22 sts will be sewn tog to the collar sts on right front piece to shape collar. The collar (beg/end of rows) will then be sewn along neckline on back piece (sts cast off for neckline). Happy knitting!
15.08.2016 - 10:30
![]() June napisała::
June napisała::
In the pattern it shows 2 rows for A1, different instructions. When I watch the tutorial, it was one row repeated (knit row). When is the 2nd row used??
27.07.2016 - 01:19Odpowiedź DROPS Design :
Dear June, A.1 is worked over 2 sts and 4 rows, Row 1 (from RS): YO, slip 1, K1, psso Row 2 (from WS): P2 Row 3: K2 tog, YO Row 4: P2 Happy knitting!
27.07.2016 - 08:09
![]() Sara napisała::
Sara napisała::
When completing the band at front where it says to bind off 5 stitches on each of the right side row 3 times then bind off last 5 stitches when you begin these bind offs are you working in the pattern stitches of A1or do you switch to stockinette at this point?
06.05.2016 - 22:07Odpowiedź DROPS Design :
Dear Sara, continue working the sts in A.1 as before when shaping the collar. Happy knitting!
09.05.2016 - 09:14
![]() Gaby napisała::
Gaby napisała::
Ik begin en eindig iedere naald van het lijf met een kantsteek, toch zien de zijkanten van linker en rechter voorbies er anders uit. Hoe krijg ik deze hetzelfde?
17.04.2016 - 15:34Odpowiedź DROPS Design :
Hoi Gaby. Hoe brei je de kantsteek? Brei je de kantsteek r in elke naald? Dan zou de steken aan beide zijkanten ook gelijk zijn.
18.04.2016 - 14:15
![]() Doris napisała::
Doris napisała::
Liebes Drops, Zum einen wollte ich bemerken, dass auch ich wie so viele andere nicht auf 16 M auf 10 cm komme. Ich nehme trotzdem 5,5 Nadeln und hab es umgerechnet. Bei mir sind es 13,5 M auf 10 cm. Meine Frage nun ist: wie breit ist das halbe Rumpfteil wirklich, inkl. Blenden, das Mass bei Ihnen ist 48 cm für Größe S. Ich vermute, dass die Blenden doppelt gelegt sind im Schaubild/Diagramm. Und: wie breit ist die Blende? Danke schoen und viele Gruesse Doris
04.02.2016 - 20:44Odpowiedź DROPS Design :
Sie sollten es vielleicht noch einmal mit einer kleineren Nadel versuchen. Das ganze Rumpfteil misst ca. 116 cm, davon entfallen ca. 17 cm auf jede Blende.
06.02.2016 - 09:08
|
||||||||||||||||
Nathalie#nathaliecardigan |
||||||||||||||||
 |
 |
|||||||||||||||
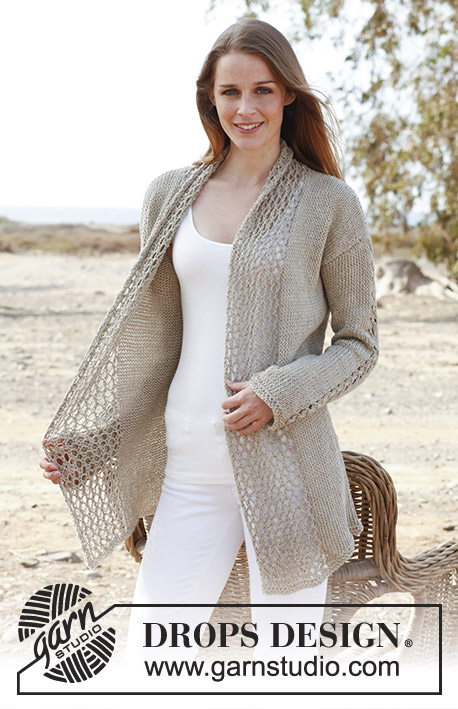
Sweter DROPS z włóczki „Bomull Lin” lub „Paris”. Od S do XXXL.
DROPS 146-1 |
||||||||||||||||
|
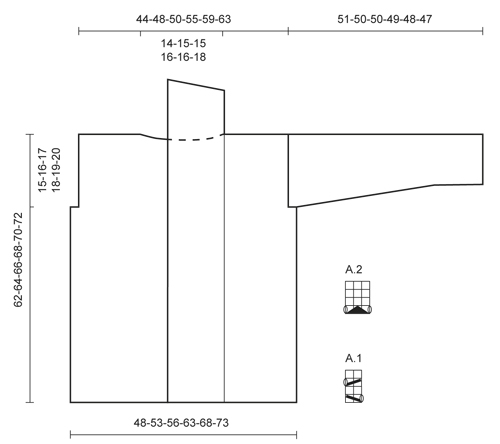
ŚCIEG FRANCUSKI: Przer. w tę i z powrotem we wszystkich rzędach na prawo. 1 „ściągacz” francuski = 2 rz. na prawo. ŚCIEG FANTAZYJNY: Patrz schematy A.1 i A.2. Schemat przedstawia wszystkie rzędy ściegu fantazyjnego, widok na prawej stronie robótki. DODAWANIE OCZEK: Aby dodać 1 o.: wykonać 1 narzut, w nast. rzędzie przer. narzut przekręcony (wkłuwając drut z tyłu robótki zamiast z przodu), aby uniknąć dziur. -------------------------------------------------------- TYŁ & PRZODY: Przer. w tę i z powrotem na drutach z żyłką od środka przodu. Na druty z żyłką nr 6 nabrać luźno 170-184-196-218-234-248 o. włóczką Bomull-Lin. Przer. 4 rz. ściegiem francuskim - patrz wyjaśnienia powyżej – i dalej przer. kolejny rząd (= na prawej stronie robótki) następująco: 1 o. brzeg. ściegiem francuskim, powt. schemat A.1 w sumie 9-9-9-10-10-10 razy (= 19-19-19-21-21-21 o. na obszycie prawego przodu), przer. dżersejem aż zostaje 19-19-19-21-21-21 o., przer. schemat A.1 w sumie 9-9-9-10-10-10 razy, zakończyć przerabiając 1 o. brzeg. ściegiem francuskim (= 19-19-19-21-21-21 o. na obszycie lewego przodu). Dalej przer. A.1 przez obszycia przodów z każdej strony, a dżersejem przez oczka na środku. ZACHOWAĆ TAKIE SAME NAPRĘŻENIE NICI JAK W PRZYPADKU PRÓBKI! Na wys. 47-48-49-50-51-52 cm od dołu robótki, umieścić 2 markery w 47-50-53-59-63-66 o. z każdej strony (= 76-84-90-100-108-116 o. między markerami na tył). W nast. rzędzie zamknąć 3-4-5-6-7-8 o. na podkrój rękawów z każdej strony 2 markerów (= 6-8-10-12-14-16 o. zamkniętych na bokach). Podzielić teraz robótkę i zakańczać każdą część oddzielnie. TYŁ: = 70-76-80-88-94-100 o. Dalej przer. dżersejem z 1 o. brzeg. ściegiem francuskim z każdej strony, aż dł. robótki wynosi 60-62-64-66-68-70 cm. Następnie zamknąć 20-22-22-24-24-26 o. środk. na dekolt i zakańczać każde ramię osobno. Zamknąć jeszcze 1 o. w nast. rzędzie od strony dekoltu = zostaje 24-26-28-31-34-36 o. na ramię. Zamknąć na wys. 62-64-66-68-70-72 cm od dołu robótki. LEWY PRZÓD: = 44-46-48-53-56-58 o. Dalej przer. dżersejem z 1 o. brzeg. ściegiem francuskim z boku i 19-19-19-21-21-21 o. obszycia przodu na środku przodu, aż dł. robótki wynosi 62-64-66-68-70-72 cm. W nast. rzędzie na prawej stronie robótki zamknąć 24-26-28-31-34-36 pierwszych o. na ramię = zostaje 20-20-20-22-22-22 o. obszycia. Dalej przer. ŚCIEGIEM FANTAZYJNYM A.1 z 1 o. brzeg. ściegiem francuskim z każdej strony, aż dł. obszycia od ramienia wynosi 9-10-10-10-10-11 cm. Na pocz. 3 nast. rz. na prawej stronie robótki, zamknąć 5 pierwszych o. = zostaje 5-5-5-7-7-7 o. Zamknąć luźno te oczka w nast. rzędzie na prawej stronie robótki. PRAWY PRZÓD: Przer. jak lewy przód tylko w odwrotnym układzie. RĘKAWY: Przer. w tę i z powrotem. Nabrać luźno 35-37-39-39-41-43 o. i przer. 4 rz. ściegiem francuskim. Przer. kolejny rząd (= na prawej stronie robótki) następująco: 1 o. brzeg. ściegiem francuskim, 15-16-17-17-18-19 o.p., przer. A.2 ponad 3 nast. o., 15-16-17-17-18-19 o.p., zakończyć przerabiając 1 o. brzeg. ściegiem francuskim. Dalej przer. dżersejem przerabiając schemat A.2 ponad 3 o. środk. do końca. Na wys. 8 cm od dołu robótki, dodać 1 o. w odl. 1 o. od brzegu z każdej strony - patrz DODAWANIE OCZEK powyżej. Powt. DODAWANIE OCZEK jeszcze 6-7-8-9-10-10 razy (w sumie 7-8-9-10-11-11 razy) co 6½-5½-4½-4-3½-3½ cm = 49-53-57-59-63-65 o. Na wys. 49-48-47-45-44-42 cm od dołu robótki, umieścić jeden marker z każdej strony (oznaczenie do wykończenia). Na wys. 51-50-50-49-48-47 cm od dołu robótki (krócej dla większych rozmiarów, gdyż ramiona są szersze), zamknąć luźno wszystkie o. WYKOŃCZENIE: Zszyć ramiona. Doszyć do siebie zamykane oczka obszyć lewą stroną do lewej. Doszyć obszycia wzdłuż dekoltu tyłu. Wszyć rękawy, zszyć rękawy w odl. 1 o. od brzegu – UWAGA: część przerobiona za markerami na górze rękawów powinna odpowiadać oczkom zamkniętym na podkrój rękawa. |
||||||||||||||||
Objaśnienia do schematu |
||||||||||||||||
|
||||||||||||||||
 |
||||||||||||||||
Skończyłaś ten wzór?Otaguj swoje zdjęcia #dropspattern #nathaliecardigan lub prześlij je do #dropsfan gallery. Potrzebujesz pomocy w związku z tym wzorem?Zobacz 24 instrukcje video, sekcję Komentarze/Pytania i jeszcze więcej, wchodząc na stronę wzoru na garnstudio.com © 1982-2026 DROPS Design A/S. Wszelkie prawa zastrzeżone. Ten dokument, w całości, jest chroniony prawem. Zobacz co możesz robić z naszymi wzorami na dole każdego wzoru na naszej stronie. |
||||||||||||||||


Posiadając 40 lat doświadczenia w projektowaniu wzorów na druty i szydełko, DROPS Design oferuje jedną z największych kolekcji bezpłatnych wzorów w internecie – przetłumaczonych na 17 języków. Obecnie jest dostępnych 324 katalogów i 12290 wzorów w języku polskim.
Dokładamy wszelkich starań, aby oferować Wam druty i szydełka, inspiracje, fachowe porady oraz doskonałej jakości włóczki w najlepszych cenach! Zamierzasz wykorzystać nasze wzory inaczej niż tylko do osobistego użytku? Przeczytaj jakie masz prawa w Copyright, który znajdziesz na końcu każdego wzoru. Miłej pracy!
Dodaj komentarz do modelu DROPS 146-1
Chcielibyśmy się dowiedzieć co masz do powiedzenia o tym wzorze!
Jeśli chcesz zadać pytanie i szybko uzyskać odpowiedź, upewnij się, że została wybrana właściwa kategoria w formularzu poniżej. Pola obowiązkowe są oznaczone *.