
Popularne kategorie
Szukasz włóczki?


Komentarze / Pytania (62)
![]() Diane napisała::
Diane napisała::
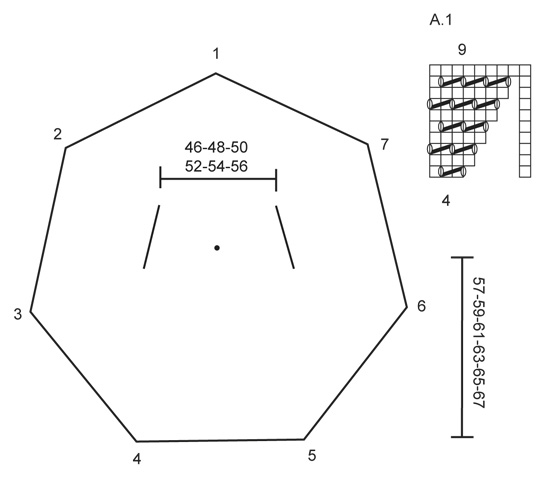
I am starting the A1 chart. I understand the first row of the chart where you increase. I also understand the 2nd row of the chart of just knitting. My problem is the 3rd row of A1. I now have 35 stitches on my needle divided into 7 parts of 5 stitches each. Can you please tell me exactly how I do the first 5 stitches where the increase is?
31.08.2024 - 22:07Odpowiedź DROPS Design :
Dear Diane, in the 3rd round: *knit 1, yarn over, knit 2 together, yarn over, knit 2 together, yarn over* between each set of markers. So you increase 1 stitch in each section, to 42. Happy knitting!
31.08.2024 - 23:38
![]() Isabelle napisała::
Isabelle napisała::
Bonjour Je viens de terminer pour la deuxième fois la partie veste de ce tricot et je remarque que j'ai à nouveau une pointe qui se forme dans le dos. J'ai utilisé une mini aiguille circulaire dès le 4ème rang à la place des aiguilles doubles pointes. Honnêtement je n'ai pas envie de recommencer une troisième fois. N'y aurait-il pas une erreur dans les explications? Merci
27.03.2024 - 18:36Odpowiedź DROPS Design :
Bonjour Isabelle, il ne doit pas y avoir de pointe, pensez à bien vérifier votre tension pour qu'elle soit la même tout du long et éviter ainsi d'éventuelles déformations, resserrez les 7 mailles du montage pour voir si vous arrivez à supprimer cette pointe, ou bien tentez un blocage, ça pourra aider aussi. Bon tricot!
02.04.2024 - 12:45
![]() Fiona Caldwell napisała::
Fiona Caldwell napisała::
What do the blank spaces mean in A1 diagram. Thank you
07.11.2022 - 19:15Odpowiedź DROPS Design :
Dear Mrs Caldwell, the first row in A.1 is worked over 4 sts but the last row over 9 sts, since you will increase sts on every other round, we need to have space after the first stitch until all increases are done, ie work 1st row as follows: *K1, YO, K2 tog, YO, K1* and repeat from *-*. Happy knitting!
08.11.2022 - 08:59
![]() Alice napisała::
Alice napisała::
I am confused about the double pointed needle size. At the top of the page where it indicates what size to use for the project, it says, "DROPS DOUBLE POINTED NEEDLES AND CIRCULAR NEEDLE (40 and 80 cm / 16'' and 32'') SIZE 7 mm/US 10.75 " But in the instructions it says, "Cast on 7 sts with Alaska and distribute them on 4 double pointed needles size 6 mm / US 10." Thank you.
06.08.2022 - 06:03Odpowiedź DROPS Design :
Dear Alice, yes, there seems to be a mistake in the pattern. You use double pointed 6mm needles for the initial lace pattern, so they should be included in the upper part of the pattern. We will correct the header as soon as possible. Thank you.
07.08.2022 - 23:05
![]() Jelena napisała::
Jelena napisała::
I was adding those 7 stitches as the instruction says, but the diagram itself is adding stitches as we go (if I read it correctly, if not, maybe there is my mistake).
08.03.2022 - 22:30Odpowiedź DROPS Design :
Dear Jelena, you are working A.1 a total of 7 times in the round, and working as shown in diagram you will automatically increase 1 stitch in each A.1 = 7 sts in total on every other round.After A.1 is done in height, repeat diagram in height until there are 31-33-35-37-39-41 sts between each marker. Hope it will help, happy knitting!
09.03.2022 - 17:49
![]() Jelena napisała::
Jelena napisała::
While working on diagram parts, I ended up with more than 100 stitches between markers, which is 2-3 times more than it's mentioned in instructions. Where did I go wrong?
08.03.2022 - 21:28Odpowiedź DROPS Design :
Dear Jelena, you should work diagram A.1 increasing 7 sts on every other round until there are 31-33-35-37-39-41 sts between each marker ( 27-28-29-30-31-32 cm from center of circle, if your tension is right). Can this help?
08.03.2022 - 22:21
![]() Corinna napisała::
Corinna napisała::
Hallo, verstehe diesen Teil nicht, können sie mir das bitte genauer erklären?Nach Diagramm A.1 das Muster mit 7 Zunahmen in jeder 2. Rd fortsetzen, die zugenommenen M fortlaufend in das Muster einarbeiten. Vielen Dank
05.03.2021 - 10:10Odpowiedź DROPS Design :
Liebe Corinna, stricken Sie wie zuvor mit *1 M re, 1 Umschlag, Lochmuster wie zuvor in A.1* und von *bis* immer so wiederholen, dh nach jeder rechte Masche am Anfang von A.1 mit 1 Umschlag zunehmen und das Lochmuster wie zuvor weiterstricken = Es wurde 7 Mal A.1 in der Runde wiederholt und jeweils 7 Masche zugenommen, wenn Sie so weiterstricken, werden Sie jeweils 7 Masche in jede 2. Runde wie zuvor zunehmen. Viel Spaß beim stricken!
05.03.2021 - 13:07
![]() Mary-Anne napisała::
Mary-Anne napisała::
I think there is a mistake where you bind off for the second sleeve. According to the diagram it should be between the 6th and 7th marker, but the pattern says to knit to 7th marker and then bind off.
01.05.2020 - 17:38Odpowiedź DROPS Design :
Dear Mary-Anne, which language are you following? The UK and US-English say both to work to 6th marker and to bind off until 7th marker (= sts between 6th and 7th will be bound off). Thank you! Happy knitting!
04.05.2020 - 10:54
![]() Cecilia napisała::
Cecilia napisała::
Buonasera vorrei tanto realizzare questo capo ma sono una principiante,sinceramente sto imparando grazie a voi.ma a volte non riesco a capire,il di dietro lo vedo anche complicato.i ferri a doppia punta mai usati,potrei farlo tutto a maglia rasata?grazie sempre gentili.
16.09.2017 - 16:24Odpowiedź DROPS Design :
Buonasera Cecilia. Spesso la lavorazione sembra più difficile di quanto non lo sia realmente. Nel caso di questa giacca, lavorarla a maglia rasata vorrebbe dire cambiare le caratteristiche della giacca stessa e ci risulterebbe difficile aiutarla. Per imparare può consultare la sezione dei video o rivolgersi al suo rivenditore Drops di fiducia. Buon lavoro!
16.09.2017 - 19:49
![]() Sylvia napisała::
Sylvia napisała::
Liebes drops Team, bitte beschreiben sie mir nochmal, Diagramm A1. Wie viele Reihen hat ein Mustersatz und ab wann nehme ich die 7 Maschen zu? Vielen Dank
22.05.2015 - 22:11Odpowiedź DROPS Design :
Sie beginnen mit A.1, wenn Sie 28 M in der Rd haben. Die Lücken im Diagramm ignorieren Sie einfach. In der 1. Rd hat A.1 4 M, Sie stricken A.1 also 7x in der Rd (zwischen 2 Markierern ist 1 Rapport A.1). In der 1. Rd machen Sie 1 Umschlag mehr, als Sie zus.str (1x zus.str, 2 Umschläge in der 1. Rd), also haben Sie nach der 1. Rd pro Rapport 1 M zugenommen, = 5 M pro Rapport, = 35 M in der 2. Rd. In der 3. Rd machen Sie wieder 1 Umschlag mehr, als Sie M zus.str (2x zus.str, 3 Umschl.), haben also in der 4. Rd 6 M pro Rapport, usw. bis A.1 9 M hat. Dann setzen Sie das Muster von A.1 zwischen den Markierern genauso weiter fort, also je 1 Umschlag mehr, das sind die 7 Zun. pro Rd.
23.05.2015 - 09:47
|
|||||||||||||
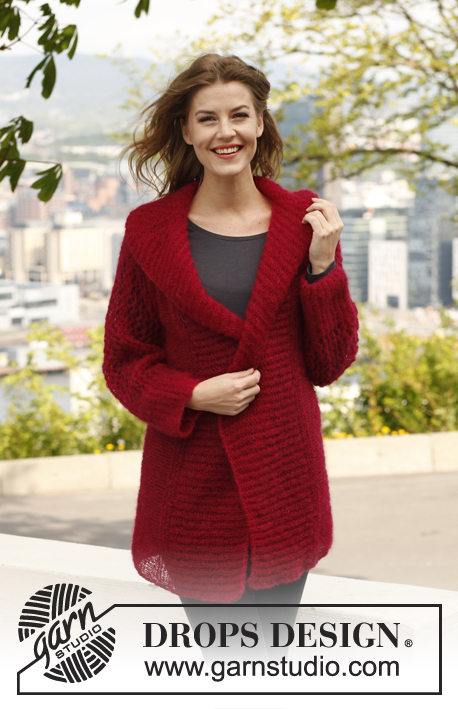
Warm Circle#warmcirclejacket |
|||||||||||||
|
|
|||||||||||||
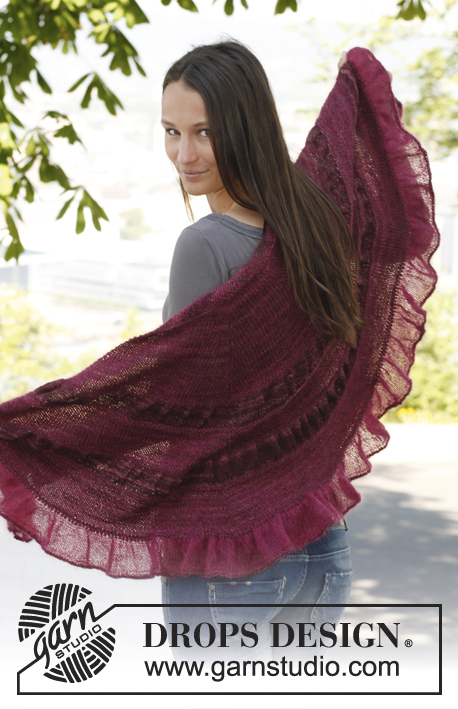
Sweter DROPS przerabiany na okrągło ze ściągaczami, z włóczki „Alaska”. Od S do XXXL.
DROPS 140-35 |
|||||||||||||
|
ŚCIEG FANTAZYJNY: Patrz schemat A.1. ŚCIEG FRANCUSKI (na okrągło na drutach z żyłką): 1 „ściągacz” francuski = 2 okr. * przer. 1 okr. na prawo, 1 okr. na lewo *, powt. od *-*. --------------------------------------------------------- SWETER: Przer. na okrągło, w kółko zaczynając od środka tyłu. Włóczką Alaska nabrać 7 o. i rozłożyć na 4 druty pończosznicze nr 6. Przer. 1 okr. na prawo, W TYM SAMYM CZASIE przer. 2 razy na prawo każde oczko = 14 o. Umieścić 7 markerów oddalonych o 2 o. od siebie: 1-szy marker = początek okrążenia = od strony dekoltu tyłu. Dalej przer. na prawo, w nast. okrążeniu przer. 2 razy na prawo 1 o. na 2 = 21 o. W nast. okrążeniu przer. 2 razy 1 o. na 3 = 28 o. Dalej przer. wg schematu A.1, przer. 1 raport ponad 4 o. między każdym markerem. Po przer. schematu A.1, zacząć przer. ściegiem fantazyjnym i dodać 7 o. co 2 okr., przer. dodawane oczka ściegiem fantazyjnym. Dalej przer. na drutach z żyłką nr 6, jeśli to konieczne. ZACHOWAĆ TAKIE SAME NAPRĘŻENIE NICI JAK W PRZYPADKU PRÓBKI! W odl. 27-28-29-30-31-32 cm od środka, przer. 2 ściągacze ŚCIEGIEM FRANCUSKIM – patrz powyżej – przez wszystkie o. (jest teraz ok. 31-33-35-37-39-41 o. między każdym markerem = w sumie 217-231-245-259-273-287 o.). Przer. na prawo do 2-giego markera. Zamknąć wszystkie oczka między 2-gim i 3-cim markerem (= ok. 31-33-35-37-39-41 o.). Przer. do 6-tego markera. Zamknąć wszystkie o. do 7-mego markera (= ok. 31-33-35-37-39-41 o.). Przer. do 1-szego markera. Przer. 1 okr. na lewo, W TYM SAMYM CZASIE, nabrać taką samą liczbę oczek jaka została zamknięta, ponad zamkniętymi oczkami. Przer. 1 „ściągacz” francuski. Dalej przer. na drutach z żyłką nr 7 i przer. dżersejem przez wszystkie oczka, W TYM SAMYM CZASIE, co 2 okr., dodać 1 o. w miejscu każdego markera – dodawać na przemian po prawej i po lewej stronie markera (= 7 dodanych o. co 2 okr.) – w nast. rzędzie przer. dodane oczka przekręcone i przer. na prawo, aby uniknąć dziur. Dalej przer. dżersejem i dodawać oczka, aż robótka mierzy 20-21-22-23-24-25 cm od podkroju rękawa (powinno być ok. 49-52-55-58-61-64 o. między każdym markerem i w sumie ok. 343-364-385-406-427-448 o.). Wziąć ponownie druty z żyłką nr 6 i przer. 1 rz. na prawo, w tym samym czasie dopasować liczbę oczek, aby uzyskać wielokrotność 6. Dalej przer. ściągaczem 3 o.p. / 3 o.l. Kiedy wys. ściągacza wynosi 3 cm, dodać 1 o.l. w każdej grupie oczek lewych, kiedy dł. ściągacza wynosi 6 cm dodać 1 o.l. w każdej grupie 4 o.l. Dalej przer. ściągacz 3 o.p. / 5 o.l., aż wys. ściągacza wynosi 10 cm. Zamknąć o. tak jak schodzą z drutu. Robótka mierzy ok. 57-59-61-63-65-67 cm mierząc od środka. RĘKAWY: Na krótkich drutach z żyłką nr 7 nabrać 62-66-70-74-78-82 o. wokół podkroju rękawa i przer. dżersejem na okrągło, aż dł. rękawa wynosi 15 cm. Dalej przer. na krótkich drutach z żyłką nr 6, przer. 1 okr. dżersejem, w tym samym czasie równomiernie dodać 16-18-20-22-24-26 o. = 78-84-90-96-102-108 o. Dalej przer. ściągaczem 3 o.p. / 3 o.l., aż dł. rękawa wynosi 30-31-32-33-34-35 cm. Zamknąć o. tak jak schodzą z drutu. |
|||||||||||||
Objaśnienia do schematu |
|||||||||||||
|
|||||||||||||
 |
|||||||||||||
Skończyłaś ten wzór?Otaguj swoje zdjęcia #dropspattern #warmcirclejacket lub prześlij je do #dropsfan gallery. Potrzebujesz pomocy w związku z tym wzorem?Zobacz 10 instrukcje video, sekcję Komentarze/Pytania i jeszcze więcej, wchodząc na stronę wzoru na garnstudio.com © 1982-2026 DROPS Design A/S. Wszelkie prawa zastrzeżone. Ten dokument, w całości, jest chroniony prawem. Zobacz co możesz robić z naszymi wzorami na dole każdego wzoru na naszej stronie. |
|||||||||||||


Posiadając 40 lat doświadczenia w projektowaniu wzorów na druty i szydełko, DROPS Design oferuje jedną z największych kolekcji bezpłatnych wzorów w internecie – przetłumaczonych na 17 języków. Obecnie jest dostępnych 324 katalogów i 12290 wzorów w języku polskim.
Dokładamy wszelkich starań, aby oferować Wam druty i szydełka, inspiracje, fachowe porady oraz doskonałej jakości włóczki w najlepszych cenach! Zamierzasz wykorzystać nasze wzory inaczej niż tylko do osobistego użytku? Przeczytaj jakie masz prawa w Copyright, który znajdziesz na końcu każdego wzoru. Miłej pracy!
Dodaj komentarz do modelu DROPS 140-35
Chcielibyśmy się dowiedzieć co masz do powiedzenia o tym wzorze!
Jeśli chcesz zadać pytanie i szybko uzyskać odpowiedź, upewnij się, że została wybrana właściwa kategoria w formularzu poniżej. Pola obowiązkowe są oznaczone *.