
Popularne kategorie
Szukasz włóczki?


Komentarze / Pytania (102)
![]() Sara napisała::
Sara napisała::
In the first round of the edging, it says ch 56 on each side. Why chain so many when in the next round I’m only supposed to do 42 dc over those 56 chains. Either I will have ugly gaps between each dc which also makes the armholes very bubbly, or a 7 cm chain left after the 42 dc. How can I fix this?
16.04.2016 - 12:53Odpowiedź DROPS Design :
Dear Sara, when crocheting a chain most of the time chains are more tight than your sts will be on next row, to avoid that the first row to be too tight on armholes, you work more chains (56) but will then crochet only 42 dc on 1st row skipping ch evenly. That way, your armholes won't be too tight. If your chains are loose enough, you can then crochet the correct number of sts, or then work more and add a small crochet edge to finish armholes. Happy crocheting!
18.04.2016 - 09:10
![]() Maya napisała::
Maya napisała::
I´v made the size S/M. But, the other thing is, with crocheting of the hook 4 you do need 350 g of the yarn, NOT only 300, what is written. I was going to make the size L and thank of it I had 350 g and I could fortunately end it. I hope, this will help:)
26.09.2015 - 03:25Odpowiedź DROPS Design :
Thank you for this info! Crocheting is so individual technique that is not very easy to count yarn amount correct for everyone - so every feed-back is helpful :-)
30.09.2015 - 09:57
![]() Maya napisała::
Maya napisała::
Hello:) i´ve just finished this wonderfull piece. I´d like to mention , that the shape of the pattern at the bottom is incorrect. Back piece is actual longer, because during making the beginning of the edge you add 2 rows of tr extra, don´t you?
26.09.2015 - 03:22Odpowiedź DROPS Design :
Hello, this piece is really very nice :-)! At the beginning of edge you only make the armholes, there are no extra rows, whole edge is made as one piece. Happy crocheting! Hana
30.09.2015 - 09:52Cris napisała::
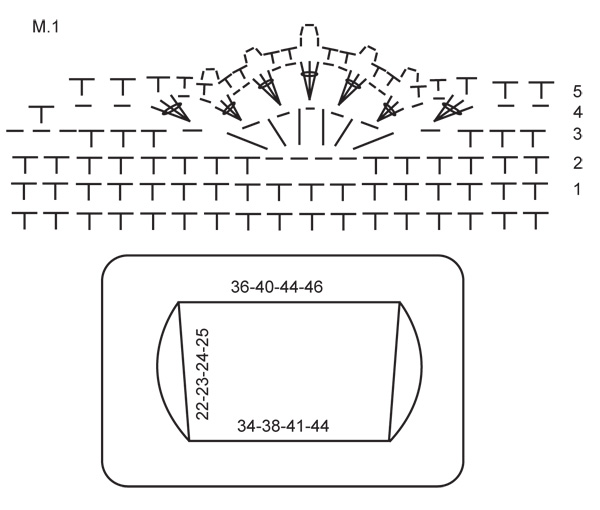
Hello, on row 2 of the m.1.... how many sc in between each set of ch stitches? The diagram is a little confusing because there are more on one side than the other? Thank you again
25.09.2015 - 09:17Odpowiedź DROPS Design :
Dear Cris, on row 2, work: *6 sc, ch 4, skip 3 sc, 8 sc*, and repeat from *-*, you will work around over 17 sc all the round. Happy crocheting!
25.09.2015 - 09:48Cris napisała::
I need more help with this patter. I'm on the edge, I just did a set of the 3 rows and I see that it says, "when edge measures 5, 10 and 15 cm / 2", 4" and 6'' (adjust to a row of sc) inc 34-34-34-36 sc evenly on round" after I begin R1 again, it will then be 5 cm, or do I increase in r2? also, how do I do the increase of 34 sc in the round, is there certain places I need to place them? I also wondered if there is a better explanation of M.1 ? Thank you for all your help.
22.09.2015 - 09:47Odpowiedź DROPS Design :
Dear Cris, the increase should be done when working a sc row, so when your piece measures 5, 10 and then 15 cm again (3 rounds with inc) - make sure you have to crochet either row 2 or 3 (= sc-row), inc evenly 34 sc. See here how to inc evenly. M.1 is the name of the diagram for the edge - see above measurement chart. Happy crocheting!
22.09.2015 - 11:20Cris napisała::
Ok so I'm struggling with the beginning of this pattern. I'm doing the s/m so I chain 78, in the end I am supposed to end with 2 in the last remaining chains, do I skip a ch st after the 3 dc and then the 2 or 5 in total ? Also I did a swatch and am using a smaller hook but my piece already measures just over 40 cm. I don't think that's correct ? Do I need to go with smaller hook still ?
18.09.2015 - 19:49Odpowiedź DROPS Design :
Dear Chris, at the end of row you should skip 1 ch (as stated under from *-*) and finish with 1 dc in the last 2 ch. remember to check and keep the correct tension, ie 17 dc x 10 rows = 10 x 10 cm / 4'' x 4''. Happy crocheting!
19.09.2015 - 09:58
![]() Cobie napisała::
Cobie napisała::
Goedemorgen, Ik wil graag de patronen drops 119-22 en drops 153-10 gaan maken maar ik wil ze graag iets langer hebben, hoe moet ik dat doen, kunt u mij dat uit leggen, ik heb namelijk geen barbie figuur. Alvast bedankt vr.gr. Cobie
23.07.2015 - 11:21Odpowiedź DROPS Design :
Hoi Cobie. Ik kan je helaas niet helpen met individuele aanpassingen op de gratis patronen. Let op dat deze modellen gaan tot maat XXXL.
28.07.2015 - 15:51Cris napisała::
I would like to know how to determine which size. I noticed other patterns have bust measurements to find out which size to crochet but I don't see that with this pattern. Will it work if I use the bust size info from anther drops bolero pattern ? Than you in advance.
21.07.2015 - 22:47Odpowiedź DROPS Design :
Dear Cris, you will find at the bottom of the pattern a measurement chart with all measurements in cm taken flat from side to side, compare these to a similar garment you have and like the shape to find out the matching size (compare back piece measurements to get the correct size). Happy crocheting!
27.07.2015 - 16:26
![]() Linda napisała::
Linda napisała::
Goedendag, Ik ben met dit vestje bezig en moet 56 l haken en volgende toer 42 l op die 56 l haken, Wat doe ik dan met de overige 14 l.? Ik begrijp wel dat dat het armsgat is, maar blijft er dan een ketting van 14 l gewoon los hangen? bvd.
09.07.2015 - 08:28Odpowiedź DROPS Design :
Hoi Linda. Je haakt om de l-ketting, dus niet in. Ik heb het even aangepast van in naar om zodat het duidelijker is.
30.07.2015 - 13:50
![]() ChristinFindIchGur napisała::
ChristinFindIchGur napisała::
Hallo Leider verstehe ich schon am Anfang nicht was ihr mit "und mit je 1 Stb in die 2-2-2-3 letzten Lm abschliessen = 58-64-70-74 Stb" meint? Danke für eure Hilfe RÜCKENTEIL: Mit Muskat auf Nadel Nr. 4, 78-86-94-99 lockere Lm häkeln. 1 Stb in die 4. Lm von der Nadel, * 1 Stb in jede der 3 nächsten Lm, 1 Lm überspringen *, von *-* wiederholen und mit je 1 Stb in die 2-2-2-3 letzten Lm abschliessen = 58-64-70-74 Stb.
03.07.2015 - 17:39Odpowiedź DROPS Design :
Sie häkeln so lange den Rapport von * bis *, bis noch 2-2-2-3 Lm übrig sind und häkeln in diese letzten Lm je 1 Stb. "Abschließen" bedeutet lediglich, dass die R mit 2 bzw. 3 Stb endet.
05.07.2015 - 08:49
|
|||||||||||||
Peach Perfection#peachperfectionbolero |
|||||||||||||
 |
 |
||||||||||||
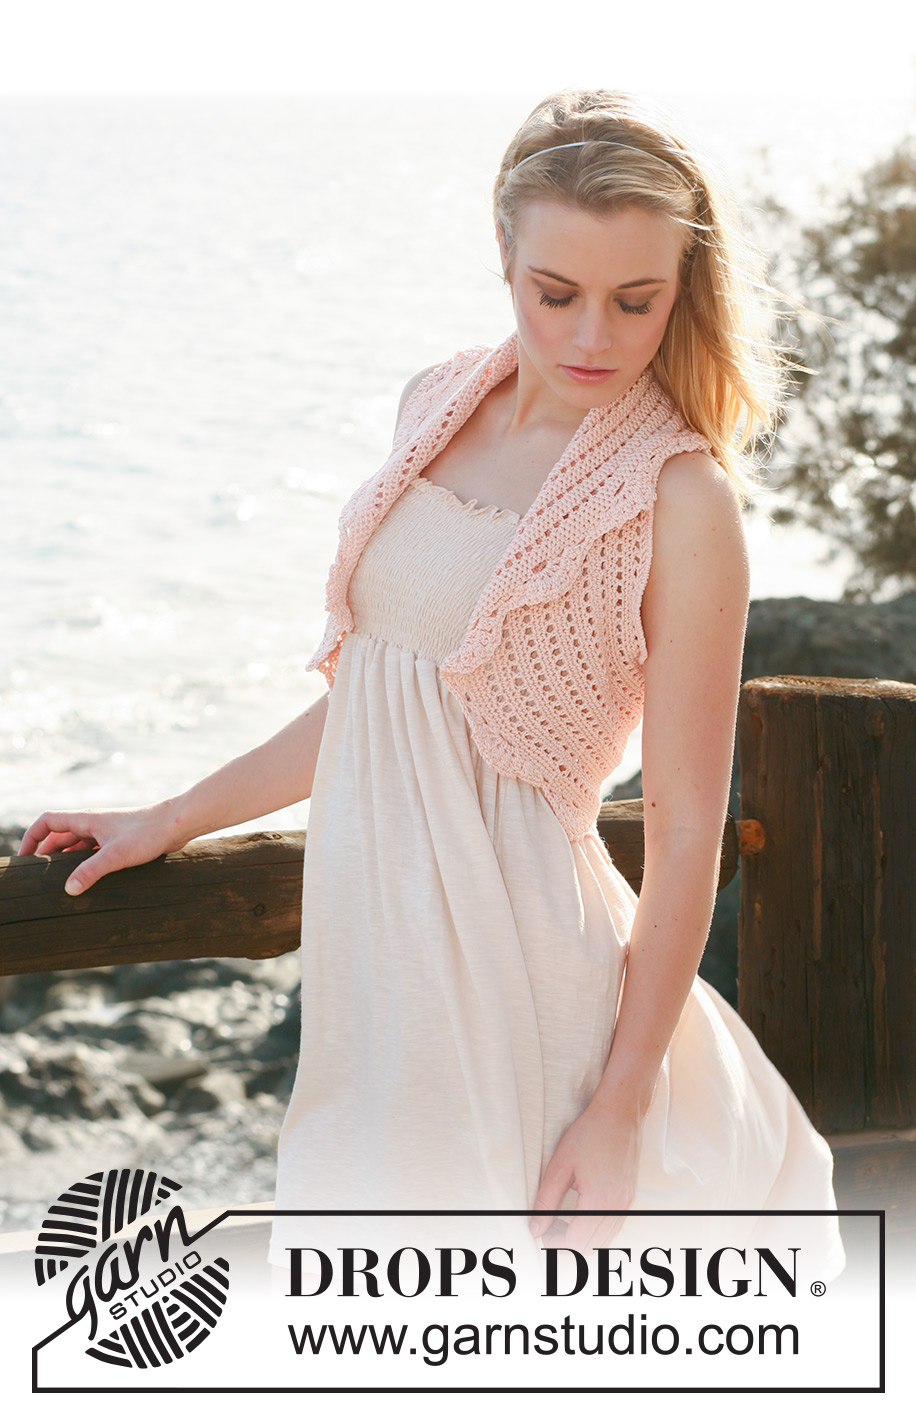
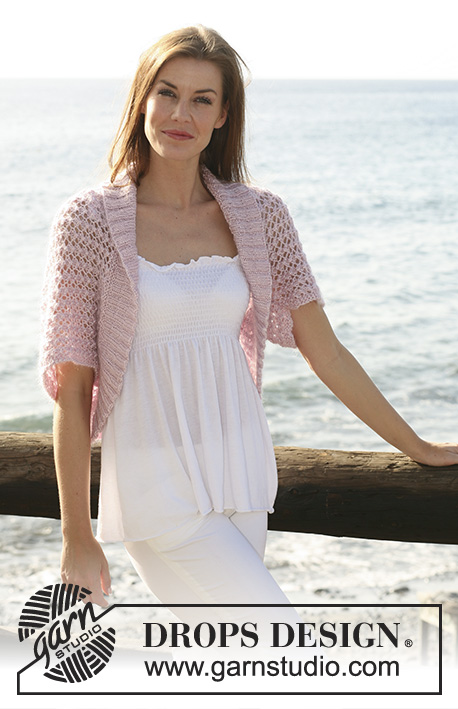
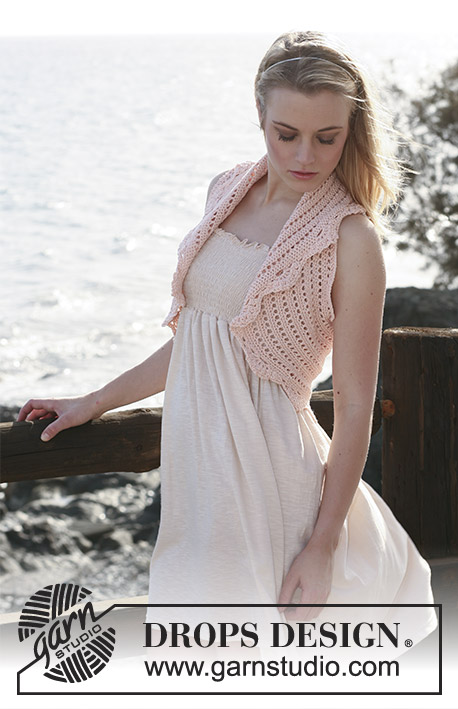
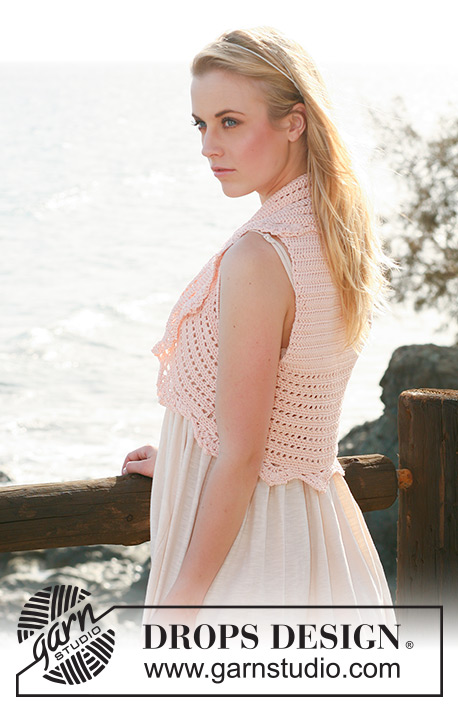
Rozpinany sweter / narzutka na szydełku, z włóczki DROPS Muskat. Od S do XXXL.
DROPS 119-22 |
|||||||||||||
|
WSKAZÓWKA SZYDEŁKO: Tył: Zastąpić 1-szy półsłupek w każdym rzędzie przez 1 oczko łańcuszka. Brzeg: Zastąpić 1-szy półsłupek w każdym okrążeniu przez 1 oczko łańcuszka. Zakończyć każde okrążenie przerabiając 1 oczko zamykające w ostatnie oczko łańcuszka na początku poprzedniego rzędu. Zastąpić 1-szy słupek w każdym okrążeniu przez 3 oczka łańcuszka. Zakończyć każde okrążenie przerabiając 1 oczko zamykające w ostatnie oczko łańcuszka na początku poprzedniego okrążenia. DODAWANIE OCZEK: Dodać 1 oczko przerabiając 2 oczka w to samo oczko. ------------------------------------------------------------- ------------------------------------------------------------- TYŁ: Włóczką Muskat i na szydełku nr 4 luźno wykonać 78-86-94-99 oczek łańcuszka. Przerobić 1 słupek w 4-te oczko łańcuszka od szydełka, *1 słupek w każde z 3 następnych oczek łańcuszka, ominąć 1 oczko łańcuszka*, powtarzać od *do* i kończyć przerabiając 1 słupek w każde z 2-2-2-3 ostatnich oczek łańcuszka = 58-64-70-74 słupki. Dalej przerabiać słupkami (= 1 słupek w każdy słupek). Na wys. 7 cm dodać 1 słupek z każdej strony – patrz dodawanie oczek - i powtarzać dodawanie oczek na wys. 15 cm = 62-68-74-78 słupków. Dalej przerabiać do wys. 22-23-24-25 cm. BRZEG: Przerobić 1 słupek w każdy słupek wzdłuż góry tyłu, następnie wykonać 56-58-60-64 oczka łańcuszka, 1 słupek w każdy słupek wzdłuż dołu tyłu, 56-58-60-64 oczka łańcuszka i kończyć przerabiając 1 oczko zamykające w 1-szy słupek na górze tyłu. Dalej przerabiać 1 słupek w każdy słupek tyłu, a w każdy łańcuszek przerobić 42-44-46-48 słupków = 204-220-236-248 słupków. Dalej przerabiać na okrągło następująco: 1-sze OKRĄŻENIE: 1 słupek w 1-szy słupek, *1 oczko łańcuszka, ominąć 1 słupek, 1 słupek w następny słupek*, powtarzać od *do* i kończyć przerabiając 1 oczko łańcuszka, ominąć 1 słupek, 1 oczko zamykające w słupek na początku okrążenia. 2-gie OKRĄŻENIE: 1 półsłupek w każdy słupek i 1 półsłupek w każde oczko łańcuszka. 3-cie OKRĄŻENIE: 1 półsłupek w każdy półsłupek. Powtarzać te 3 okrążenia, W TYM SAMYM CZASIE na wys. 5, 10 i 15 cm (dopasować, aby był to rząd półsłupków) równomiernie dodać 34-34-34-36 oczek – PATRZ DODAWANIE OCZEK = 306-322-338-356 półsłupków. Gdy wys. brzegu wynosi 17-18-19-20 cm (dopasować aby następny rząd był rzędem półsłupków) przerobić 1 rząd półsłupków, W TYM SAMYM CZASIE równomiernie dodać 0-1-2-1 oczek = 306-323-340-357 półsłupków. Dalej przerabiać wg schematu M1. UWAGA: Zacząć od rzędu 1 schematu. Przerobić 1 raz schemat M1 na wysokość, odciąć i wrobić nitkę. |
|||||||||||||
Objaśnienia do schematu |
|||||||||||||
|
|||||||||||||
 |
|||||||||||||
Skończyłaś ten wzór?Otaguj swoje zdjęcia #dropspattern #peachperfectionbolero lub prześlij je do #dropsfan gallery. Potrzebujesz pomocy w związku z tym wzorem?Zobacz 7 instrukcje video, sekcję Komentarze/Pytania i jeszcze więcej, wchodząc na stronę wzoru na garnstudio.com © 1982-2026 DROPS Design A/S. Wszelkie prawa zastrzeżone. Ten dokument, w całości, jest chroniony prawem. Zobacz co możesz robić z naszymi wzorami na dole każdego wzoru na naszej stronie. |
|||||||||||||


Posiadając 40 lat doświadczenia w projektowaniu wzorów na druty i szydełko, DROPS Design oferuje jedną z największych kolekcji bezpłatnych wzorów w internecie – przetłumaczonych na 17 języków. Obecnie jest dostępnych 324 katalogów i 12290 wzorów w języku polskim.
Dokładamy wszelkich starań, aby oferować Wam druty i szydełka, inspiracje, fachowe porady oraz doskonałej jakości włóczki w najlepszych cenach! Zamierzasz wykorzystać nasze wzory inaczej niż tylko do osobistego użytku? Przeczytaj jakie masz prawa w Copyright, który znajdziesz na końcu każdego wzoru. Miłej pracy!
Dodaj komentarz do modelu DROPS 119-22
Chcielibyśmy się dowiedzieć co masz do powiedzenia o tym wzorze!
Jeśli chcesz zadać pytanie i szybko uzyskać odpowiedź, upewnij się, że została wybrana właściwa kategoria w formularzu poniżej. Pola obowiązkowe są oznaczone *.