
Popularne kategorie
Szukasz włóczki?


Komentarze / Pytania (80)
![]() DROPS Design napisała::
DROPS Design napisała::
R2 : K1, *place yarn in front of work, slip next st as if to P, K tog yo + sl st from previous row (the yarn will wrap the right needle = yo)*, end with placing yarn in front of work, sl 1 as if to P, K1. R3: K1, *K tog yo + sl st from previous row, place yarn in front of work, slip next st as if to P (yarn will wrap the right needle)*, end with K tog yo and sl st, K1. Happy knitting!
10.01.2013 - 10:58
![]() DROPS Design napisała::
DROPS Design napisała::
This is how to work English ribs with yarn in the right hand and yos : R1 : K1, *K1, place yarn in front work, slip next st as if to P* (the yarn will wrap the right needle and you'll get the yo), end with K2. (set up row)
10.01.2013 - 10:58Renée napisała::
I checked the video before I sent my first question to you & it's very confusing. Furthermore, it is not English/Fisherman's rib that's being knitted in the video. As previously stated, no k1b (knit 1 into stitch below) is being performed in the video, so I do not see how this is English/Fisherman's rib. Also, I knit in the English not continental style, so your videos can be hard to follow for English style knitters. Also, I do not see the function of the YO in English/Fisherman's rib?
10.01.2013 - 10:07Odpowiedź DROPS Design :
Dear Renée, English ribs can be worked different ways, either with K1b, or with yos. We use that method with yos, and I'll explain you row after row in the comments. Hope it will help you ! Happy knitting !
10.01.2013 - 10:54Renée napisała::
This pattern states English/Fisherman's rib. These are 2 different types of knitting that use p1, k1 and k1b stitches in different alternating formats. This pattern does not resemble either of these and does not use the classic k1b stitch which forms both English and Fisherman's rib. Can you please explain what type of stitch you are advocating here and why it does not include the k1b stitch? Thank you!
09.01.2013 - 16:52Odpowiedź DROPS Design :
Dear Renée, there is a video linked at the very bottom of the pattern explaining how to work this kind of English rib. It should help you to figure out how to work this pattern. Happy Knitting !
09.01.2013 - 17:50Renée napisała::
On row 1 of the pattern it states: 1 garter stitch. I am assuming this mean to do 1 knit stitch, as garter stitch is not an actual type of stitch but a type of knitting composed of only knit stitches. Your patterns though quite creative and beautiful are unfortunately very vague and often quite poorly translated into English and consequentially often difficult to follow. Therefore, clarification would be greatly appreciated. Thank you.
09.01.2013 - 16:21Odpowiedź DROPS Design :
Dear Renée, 1 garter st means actually K1 from RS and from WS. Please have a look on the video linked if it can help. Happy knitting !
09.01.2013 - 17:42
![]() Caro-H napisała::
Caro-H napisała::
P.S.: Das Patentmuster kommt wunderbar fluffig raus, ist nur insgesamt zu eng. Werde es mit ein paar Maschen mehr versuchen.
04.01.2013 - 13:29
![]() Caro-H napisała::
Caro-H napisała::
...nein, nicht rundgestrickt. Anschlag auf 2 Nadeln Nr. 3. Keine Ahnung warum das bei mir nicht richtig rauskommt. Aber danke für deine Mühe.
04.01.2013 - 13:00
![]() Marion napisała::
Marion napisała::
Caro,hast du das doch rundgestrickt? Da würde das Muster nicht fluffig rauskommen u.nicht stimmen. Habs eben ausprobiert---Anschlag auf 2 Nadeln?
03.01.2013 - 13:48
![]() Caro-H napisała::
Caro-H napisała::
Danke Marion! Bei mir hat das Bündchen - ungedehnt - leider nur 30cm und der Patentteil ca. 46cm. Werde ich wohl noch mal aufmachen müssen, sitzt sehr stramm. Ich versteh trotzdem nicht, warum die Maschenprobe bei mir ok war...
03.01.2013 - 12:25
![]() Caro-H napisała::
Caro-H napisała::
Danke für die rasche Info, dann werde ich erst mal weitermachen, obwohl ein Rest Skepsis bleibt, optisch und rechnerisch: Bei 21M=10cm lande ich mit 95M nur bei 45cm und in der Anleitung für das Modell Nr. U-605 (das ich mir zunächst ausgesucht hatte) schlägt man immerhin bei gleicher Maschenprobe 117-129M an. Ziehen sich die Muster so verschieden in die Breite?
02.01.2013 - 19:14Odpowiedź DROPS Design :
Liebe Caro, da haben Sie natürlich recht! Dennoch dehnt sich das Patentmuster enorm und die Maschenprobe wird ungedehnt gemessen. Ich habe diese Mütze selbst schon nachgearbeitet und sie sitzt sehr gut – das Bündchen liegt an und der obere Teil hat Volumen durch das Patentmuster.
03.01.2013 - 10:35
|
|
Cathrine#cathrinehat |
|
|
|
|
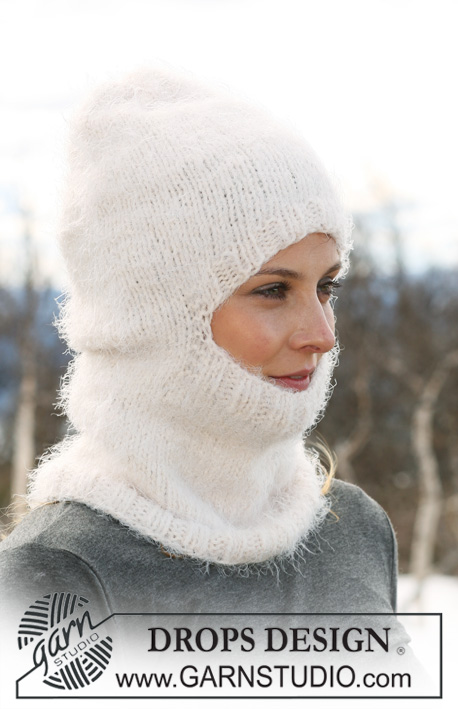
Czapka DROPS w paski ściegiem angielskim z włóczki „Karisma” lub DROPS ♥ You #3.
DROPS 114-30 |
|
|
DRUTY Z ŻYŁKĄ DROPS (60 cm) nr 3 - na ściągacze. ŚCIEG FRANCUSKI (w tę i z powrotem): Przer. we wszystkich rzędach na prawo. ŚCIEG ANGIELSKI (w tę i z powrotem): Rz. 1: 1 o. ściegiem francuskim, *1 o.p., 1 narzut, zdjąć nast. oczko jak do przerobienia na lewo *, powt. od *do* aż zostaje 2 o., 1 o.p., 1 o. ściegiem francuskim. Rz. 2: 1 o. ściegiem francuskim, *1 narzut, zdjąć nast. oczko jak do przerobienia na lewo, przer. razem na prawo narzut i oczko zdjęte *, powt. od *do* aż zostaje 2 o., zakończyć przerabiając 1 narzut, zdjąć 1 o. jak do przerobienia na prawo, 1 o. ściegiem francuskim. Rz. 3: 1 o. ściegiem francuskim, *przer. razem na prawo narzut i oczko zdjęte, 1 narzut, zdjąć nast. oczko jak do przerobienia na lewo *, powt. od *do* aż zostaje 3 o., przer. razem na prawo narzut i oczko zdjęte, 1 o. ściegiem francuskim. Powt. rz. 2 i 3 . ------------------------------------------------------------- ------------------------------------------------------------- CZAPKA: Przerabiana w tę i z powrotem na drutach z żyłką. Włóczką Karisma kolor beżowo-brązowy i na drutach z żyłką nr 3 nabrać 89-95 o. Przer. 1 rz. na lewo na lewej stronie robótki i dalej przer. na prawej stronie robótki następująco: 1 o. ściegiem francuskim – patrz powyżej – , ściągacz 1 o.p. / 1 o.l. aż zostaje 2 o., zakończyć przerabiając 1 o.p., 1 o. ściegiem francuskim. Gdy wys. ściągacza wynosi 3 cm wziąć nitkę w kolorze ecru. Gdy wys. ściągacza wynosi 6 cm (dopasować za rzędem na lewej stronie robótki) dalej przer. na drutach z żyłką nr 4 kolorem beżowo-brązowym. Dalej przer. ŚCIEGIEM ANGIELSKIM – patrz powyżej – w nast. rzędzie na prawej stronie robótki, W TYM SAMYM CZASIE zmieniać kolor co 3 cm do końca (dopasować, aby zmienić kolor na prawej stronie robótki); ZACHOWAĆ TAKIE SAME NAPRĘŻENIE NICI JAK W PRZYPADKU PRÓBKI! Na wys. 24 cm od dołu robótki (dopasować za jednym paskiem) zmienić kolor, W TYM SAMYM CZASIE dalej przer. ściągaczem 1 o.p./ 1 o.l. z 1 o. ściegiem francuskim z każdej strony. Dalej przer. ściągaczem przez 3 cm. Dalej przer. 1 rz. dżersejem tym samym kolorem, W TYM SAMYM CZASIE przer. każde 2 kolejne o. razem na prawo przez cały rząd. Wys. czapki wynosi ok. 28 cm od dołu robótki. Odciąć nitkę i przeciągnąć ją przez pozostałe o. i zszyć czapkę, brzeg do brzegu. |
|
Skończyłaś ten wzór?Otaguj swoje zdjęcia #dropspattern #cathrinehat lub prześlij je do #dropsfan gallery. Potrzebujesz pomocy w związku z tym wzorem?Zobacz 11 instrukcje video, sekcję Komentarze/Pytania i jeszcze więcej, wchodząc na stronę wzoru na garnstudio.com © 1982-2026 DROPS Design A/S. Wszelkie prawa zastrzeżone. Ten dokument, w całości, jest chroniony prawem. Zobacz co możesz robić z naszymi wzorami na dole każdego wzoru na naszej stronie. |


Posiadając 40 lat doświadczenia w projektowaniu wzorów na druty i szydełko, DROPS Design oferuje jedną z największych kolekcji bezpłatnych wzorów w internecie – przetłumaczonych na 17 języków. Obecnie jest dostępnych 324 katalogów i 12290 wzorów w języku polskim.
Dokładamy wszelkich starań, aby oferować Wam druty i szydełka, inspiracje, fachowe porady oraz doskonałej jakości włóczki w najlepszych cenach! Zamierzasz wykorzystać nasze wzory inaczej niż tylko do osobistego użytku? Przeczytaj jakie masz prawa w Copyright, który znajdziesz na końcu każdego wzoru. Miłej pracy!
Dodaj komentarz do modelu DROPS 114-30
Chcielibyśmy się dowiedzieć co masz do powiedzenia o tym wzorze!
Jeśli chcesz zadać pytanie i szybko uzyskać odpowiedź, upewnij się, że została wybrana właściwa kategoria w formularzu poniżej. Pola obowiązkowe są oznaczone *.