
Popularne kategorie
Szukasz włóczki?


Komentarze / Pytania (126)
![]() Rosario Elias Liñero napisała::
Rosario Elias Liñero napisała::
Hola Quisiera preguntarte cómo coloco los hilos marcadores por ejemplo cada 25 puntos un hilo marcador? O cuantos pts son para manga espalda manga y delantero para colocar los marcadores ya hice el resorte, hago una vuelta de derecho para poner los hilos y empezar con los aumentos? Muchas gracias
03.05.2022 - 05:21Odpowiedź DROPS Design :
Hola Rosario, en el patrón solo ponen marcador para el inicio de la vuelta. Si quieres insertar marcadores para facilitar trabajar A.1, puedes insertar marcadores cada 16 puntos (o cualquier múltiplo de 4, que es el número de puntos en A.1). No tienes que trabajar ninguna fila extra después del resorte para insertar los marcadores, comienzas directamente con el diagrama y los aumentos. La división para la manga, espalda, manga y delantero se hace al final del canesú, después de los aumentos.
05.05.2022 - 22:16
![]() Helene napisała::
Helene napisała::
Hej jag vill att tröjan skall bli lite utställd som Dandelion Dreams och lika lång som den. Jag kommer sticka Swing by Spring Top i stl XXL och undrar hur många nystan jag behöver beställa. 8, 9 eller 10?
26.04.2022 - 14:24Odpowiedź DROPS Design :
Hej Helene, så skal du nok bruge 10 nøgler. God fornøjelse!
26.04.2022 - 15:50
![]() Dominique Bruggmann napisała::
Dominique Bruggmann napisała::
Merci de votre réponse. Ai-je bien compris ? vous proposez de faire la réhausse après le col ( cad après les côtes 1/1) ? mais alors faut-il la faire en jersey (mais alors on ne peut plus raccrocher A1 aux côtes 1/1) ou alors la faire en côte 1/1 ?
25.04.2022 - 20:42Odpowiedź DROPS Design :
Bonjour Mme Bruggmann, je pense qu'effectivement une réhausse serait plus discrète tricoté en côtes après le col, ainsi l'enchaînement avec A.1 se fera en douceur. Bon tricot!
26.04.2022 - 09:40
![]() Anna Laura Casu napisała::
Anna Laura Casu napisała::
Buongiorno. Sono Anna Laura da Cagliari. In riferimento al modello 222-32, ho difficoltà a capire il diagramma A.2 della taglia L. In particolare il passaggio dalla riga 3 in cui ci sono 8 maglie, al passaggio alla riga 4 in cui compaiono 12 maglie nonostante ci siano, nell intervallo, 2 diminuzioni (per una maglia accavallate e 2 maglie lavorate assieme) e 3 aumenti in una sola maglia
24.04.2022 - 11:10Odpowiedź DROPS Design :
Buonasera Anna Laura, per la taglia L nella riga 3 per il simbolo a stellina si lavorano 7 maglie in 1 maglia, ecco perchè cambia il n° di maglie. Buon lavoro!
24.04.2022 - 16:38
![]() Dominique Bruggmann napisała::
Dominique Bruggmann napisała::
Bonjour, Je viens de terminer ce modèle que j'aime beaucoup et ai trouvé très agréable à tricoter. Mais l'encolure me gêne , j'aimerais le refaire avec une rehausse au dos de l'encolure, en rangs raccourcis (jamais fait ), est-ce possible, et si oui, comment. Merci de votre réponse
17.04.2022 - 19:49Odpowiedź DROPS Design :
Bonjour Mme Bruggmann, vous pouvez effectivement choisir de tricoter une réhausse pour l'encolure dos à la fin du col (avant de commencer l'empiècement). Tricotez en rangs raccourcis le nombre de rangs souhaités pour la différence encolure dos/devant; vous pouvez vous aider d'un modèle de tension similaire avec une réhausse si besoin. Bon tricot!
19.04.2022 - 11:14
![]() Lilli-Ann Studsgaard napisała::
Lilli-Ann Studsgaard napisała::
Jeg er gået i stå ved mønsteret forneden på kjolen hvor mønsteret skal strikkes efter A3, men jeg kan ikke se noget diagram A3. Er der noget jeg har misforstået? Vh Lilli-Ann
03.04.2022 - 08:46Odpowiedź DROPS Design :
Hei Lilli-Ann. Om du har sett på oppskriften du har lagt dit spørsmål under er det oppskrift på en bluse (DROPS 222-32). Men om du ser på oppskrift 223-2 finner du oppskrift på kjolen og der vil du se diagram A.3. mvh DROPS Design
04.04.2022 - 13:34
![]() Anne-Birthe Bladt napisała::
Anne-Birthe Bladt napisała::
Kan ikke få diagrammet til at passe i A2. Man ender jo uden masker til sidst når man kun tager ind ?
25.02.2022 - 17:06Odpowiedź DROPS Design :
Hei Anne-Birthe Om du ser på diagrammene og på de hvite og sorte stjernene, og leser diagramforklaringene så skal det økes 3 eller 7 masker i 1 maske. Se også hjelpevideo på hvordan man øker om du trenger det. mvh DROPS Design
28.02.2022 - 14:31
![]() Małogrzata napisała::
Małogrzata napisała::
Chciałabym zrobić ten sweter w rozmiarze L, ale o długości 65 cm. Nie wiem, ale włóczki kupić. proszę o pomoc. Dziękuję
15.09.2021 - 20:38Odpowiedź DROPS Design :
Witaj Gosiu, dół musi być szerszy więc będziesz potrzebować łącznie jakieś 450 g. Pozdrawiamy!
16.09.2021 - 10:17
![]() Tove Hanssen napisała::
Tove Hanssen napisała::
Ferdig med vrangborden, skiftet pinne til 4 Så står det:Strikk A1 rundt på omgangen(25 raportet a 4 masker, blir jo 5 med kastet som skal strikkes vridd på neste omgang, og da stemmer jo ikke maskeantallet??
02.08.2021 - 17:18Odpowiedź DROPS Design :
Hei Tove, Neste omgang, som du sier, har kastene, men A.1 begynner med 4 masker x 25 = 100 masker, som er det du har etter vrangbord. Når A.1 er ferdig har du 200 masker på omgangen. God fornøyelse!
03.08.2021 - 08:45
![]() Caroline napisała::
Caroline napisała::
Hej! I sista rapporten på A2 står det att omslaget ska stickas vridet på nästa varv så det inte blir hål. Men ska det inte bli hål? Tycker det ser ut som det på fotot.
25.07.2021 - 10:19
|
|||||||||||||||||||||||||
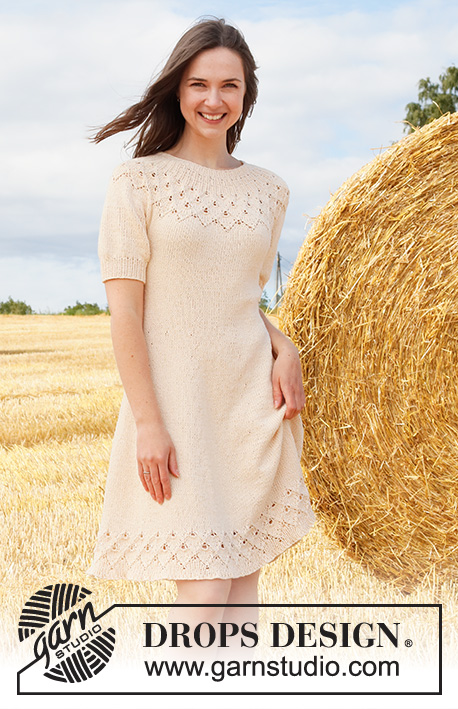
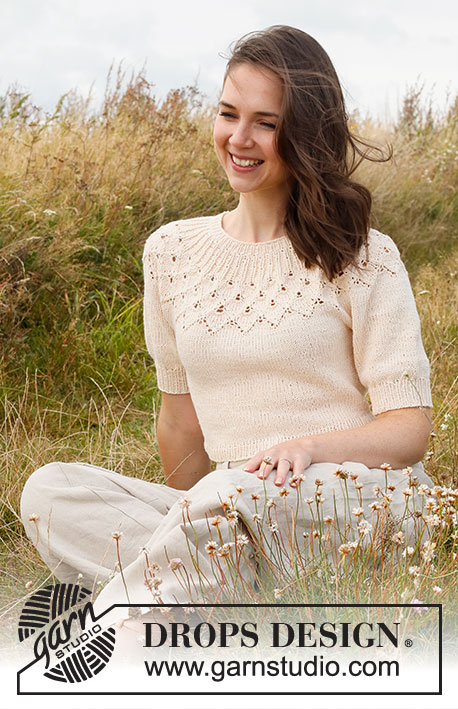
Swing by Spring Top#swingbyspringtop |
|||||||||||||||||||||||||
 |
 |
||||||||||||||||||||||||
Sweter na drutach przerabiany od góry do dołu, z zaokrąglonym karczkiem ściegiem ażurowym, wzorem liści i krótkimi bufiastymi rękawkami, z włóczki DROPS Belle. Od S do XXXL
DROPS 222-32 |
|||||||||||||||||||||||||
|
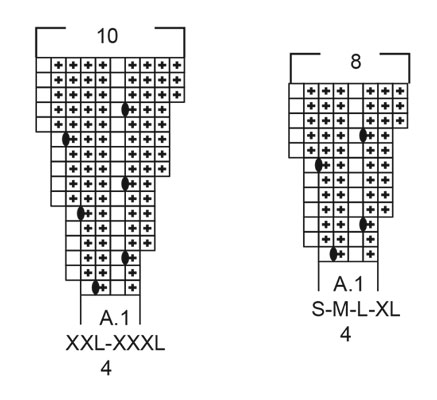
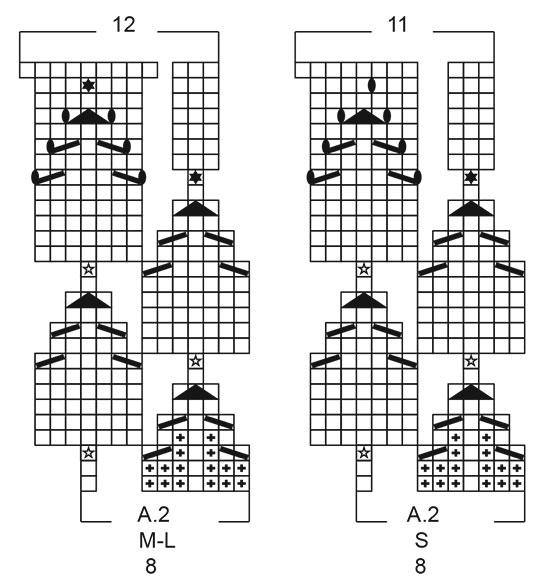
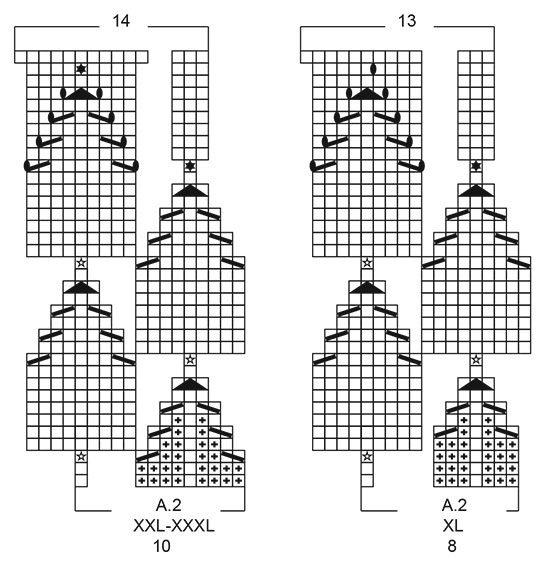
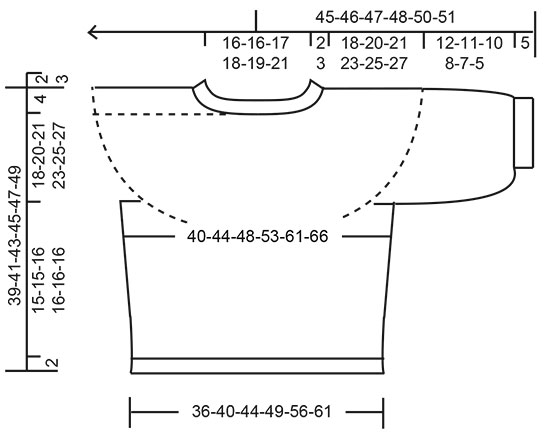
------------------------------------------------------- WYKORZYSTYWANE TECHNIKI: ------------------------------------------------------- ŚCIEG FANTAZYJNY: Patrz schematy A.1 i A.2. Patrz schemat odpowiedni dla rozmiaru. ZAMYKANIE OCZEK (boki swetra): Zamknąć 1 oczko z każdej strony nitki markera następująco: przerabiać aż zostaje 3 oczka przed nitką markerem i przerobić 2 oczka razem na prawo, 2 oczka prawe (nitka marker jest między tymi 2 oczkami), zdjąć 1 oczko jak do przerobienia na prawo, 1 oczko prawe, przełożyć oczko zdjęte nad przerobionym oczkiem. WSKAZÓWKA DO ZAMYKANIA OCZEK: Aby zamykane oczka nie ściągały robótki, do zamykania można użyć grubszych drutów. Jeżeli mimo to brzeg jest nadal zbyt ścisły, wykonać 1 narzut za ok. każdym 4-tym oczkiem i zamykać narzuty jak zwykłe oczka. ------------------------------------------------------- ROBÓTKĘ ROZPOCZYNAMY TUTAJ: ------------------------------------------------------- SWETER – SKRÓCONY OPIS ROBÓTKI: Wykończenie dekoltu i karczek są przerabiane od góry do dołu, na okrągło od środka tyłu. Następnie dzielimy karczek na tył/przód i rękawy. Tył/przód są przerabiane od góry do dołu, na okrągło na drutach z żyłką. Rękawy są przerabiane na okrągło na drutach pończoszniczych/krótkich drutach z żyłką, od góry do dołu. WYKOŃCZENIE DEKOLTU: Na drutach z żyłką nr 3 nabrać 100-100-104-108-112-120 oczek włóczką Belle. Przerobić 1 okrążenie na prawo. Dalej przerabiać ściągaczem = 1 oczko prawe/1 oczko lewe. Gdy wysokość ściągacza wynosi 2-2-3-3-3-3 cm, zacząć przerabiać na drutach z żyłką nr 4. Umieścić 1 marker na początku okrążenia, na środku tyłu, długość karczku będzie mierzona od tego markera! KARCZEK: Przerabiać schemat A.1 na okrągło (= 25-25-26-27-28-30 motywów po 4 oczka). Po przerobieniu schematu A.1, jest 200-200-208-216-280-300 oczek. Długość robótki od markera wynosi teraz 4-4-4-4-6-6 cm. Dalej przerabiać schemat A.2 na okrągło (= 25-25-26-27-28-30 motywów po 8-8-8-8-10-10 oczek). ZACHOWAĆ TAKIE SAMO NAPRĘŻENIE NICI JAK W PRZYPADKU PRÓBKI! Po przerobieniu schematu A.2, jest 275-300-312-351-392-420 oczek, a długość robótki od markera wynosi ok. 14-14-14-17-19-19 cm (tj. 16-16-17-20-22-22 cm od rzędu nabierania oczek). Przerabiać dżersejem, aż długość robótki od markera wynosi 18-20-21-23-25-27 cm. Teraz podzielić robótkę na tył/przód i rękawy. Przerobić kolejne okrążenie następująco: przerobić 38-42-44-50-58-63 oczka prawe (= ½ tyłu), zdjąć 62-66-68-76-80-84 następne oczka na nitkę na rękaw, nabrać 8-8-12-12-12-12 oczek (= bok, pod rękawem), przerobić 75-84-88-99-116-126 oczek prawych (= przód), zdjąć 62-66-68-76-80-84 następne oczka na nitkę na rękaw, nabrać 8-8-12-12-12-12 oczek (= bok, pod rękawem), przerobić 38-42-44-50-58-63 ostatnie oczka na prawo (= ½ tyłu). Kończyć tył/przód i rękawy oddzielnie. OD TEGO MOMENTU MIERZYĆ STĄD! TYŁ & PRZÓD: = 167-184-200-223-256-276 oczek. Umieścić 1 nitkę marker na środku 8-8-12-12-12-12 nowych oczek pod każdym rękawem (= oznaczenia boków swetra). Jest teraz 83-92-100-111-128-138 oczek na przód i 84-92-100-112-128-138 oczek na tył. Przesuwać nitki markery w miarę postępu robótki; wskazują miejsca, gdzie będą zamykane oczka. Przerabiać na okrągło, dżersejem. Gdy długość robótki od jej podziału wynosi 3 cm, zamknąć 1 oczko z każdej strony każdej nitki markera – patrz ZAMYKANIE OCZEK (= zostają zamknięte 4 oczka). Zamykać tak samo w sumie 4-4-4-4-5-5 razy co 2 cm = 151-168-184-207-236-256 oczek. Przerabiać na okrągło dżersejem, aż długość robótki od jej podziału wynosi 15-15-16-16-16-16 cm – lub ma inną długość wg potrzeb (zostaje ok. 2 cm do końca). Przerobić 1 okrążenie na prawo, w tym samym czasie równomiernie dodając 23-26-28-31-36-38 oczek = 174-194-212-238-272-294 oczka. Dalej przerabiać na drutach z żyłką nr 3 ściągaczem (1 oczko prawe/1 oczko lewe) na okrągło przez 2 cm. Zamknąć oczka tak jak schodzą z drutu – patrz WSKAZÓWKA DO ZAMYKANIA OCZEK. Całkowita długość swetra od ramienia wynosi ok. 39-41-43-45-47-49 cm. RĘKAWY: Wziąć z powrotem 62-66-68-76-80-84 oczka z nitki z jednej strony robótki i przełożyć je na druty pończosznicze/krótkie druty z żyłką nr 4 i nabrać 1 oczko w każde z 8-8-12-12-12-12 nowych oczek nabranych z boku pod rękawem = 70-74-80-88-92-96 oczek. Przerabiać na okrągło dżersejem, aż długość rękawa od podziału robótki wynosi 12-11-10-8-7-5 cm (zostaje ok. 5 cm do końca, przymierzyć sweter i przerabiać do odpowiedniej długości). Przerobić 1 okrążenie na prawo, w tym samym czasie równomiernie zamykając 16-16-14-14-14-14 oczek = 54-58-66-74-78-82 oczka. Dalej przerabiać na drutach pończoszniczych nr 3. Przerabiać na okrągło, ściągaczem = 1 oczko prawe/1 oczko lewe przez 5 cm. Zamknąć oczka tak jak schodzą z drutu – pamiętać o WSKAZÓWCE DO ZAMYKANIA OCZEK! Długość rękawa od podziału robótki wynosi ok. 17-16-15-13-12-10 cm. Drugi rękaw wykonać tak samo. |
|||||||||||||||||||||||||
Objaśnienia do schematu |
|||||||||||||||||||||||||
|
|||||||||||||||||||||||||
 |
|||||||||||||||||||||||||
 |
|||||||||||||||||||||||||
 |
|||||||||||||||||||||||||
 |
|||||||||||||||||||||||||
Skończyłaś ten wzór?Otaguj swoje zdjęcia #dropspattern #swingbyspringtop lub prześlij je do #dropsfan gallery. Potrzebujesz pomocy w związku z tym wzorem?Zobacz 31 instrukcje video, sekcję Komentarze/Pytania i jeszcze więcej, wchodząc na stronę wzoru na garnstudio.com © 1982-2026 DROPS Design A/S. Wszelkie prawa zastrzeżone. Ten dokument, w całości, jest chroniony prawem. Zobacz co możesz robić z naszymi wzorami na dole każdego wzoru na naszej stronie. |
|||||||||||||||||||||||||


Posiadając 40 lat doświadczenia w projektowaniu wzorów na druty i szydełko, DROPS Design oferuje jedną z największych kolekcji bezpłatnych wzorów w internecie – przetłumaczonych na 17 języków. Obecnie jest dostępnych 324 katalogów i 12291 wzorów w języku polskim.
Dokładamy wszelkich starań, aby oferować Wam druty i szydełka, inspiracje, fachowe porady oraz doskonałej jakości włóczki w najlepszych cenach! Zamierzasz wykorzystać nasze wzory inaczej niż tylko do osobistego użytku? Przeczytaj jakie masz prawa w Copyright, który znajdziesz na końcu każdego wzoru. Miłej pracy!
Dodaj komentarz do modelu DROPS 222-32
Chcielibyśmy się dowiedzieć co masz do powiedzenia o tym wzorze!
Jeśli chcesz zadać pytanie i szybko uzyskać odpowiedź, upewnij się, że została wybrana właściwa kategoria w formularzu poniżej. Pola obowiązkowe są oznaczone *.