
Popularne kategorie
Szukasz włóczki?


Komentarze / Pytania (126)
![]() Jonna napisała::
Jonna napisała::
Strikker str L. Mønster A2 pind 21 .....strik 7 m i en - slå om, 2 sm, 3 ret, 2 sammen, slå om...... skal man ikke droppe omslaget......
06.07.2025 - 22:28Odpowiedź DROPS Design :
Hei Jonna. Så flott at du fant ut av det, kos deg med strikkingen :) mvh DROPS design
11.07.2025 - 10:46
![]() Kaarina napisała::
Kaarina napisała::
Hei Malli A2 En ymmärrä mitä tyhjä tila tarkoittaa Kiitos avusta
15.06.2025 - 13:22Odpowiedź DROPS Design :
Hei, kun neulot, jätä tämä tyhjä tila väliin, eli siirry piirroksen seuraavaan ruutuun. Tyhjän tilan kohdalle lisätään myöhemmin silmukoita.
16.06.2025 - 19:30
![]() Kaarina napisała::
Kaarina napisała::
Malli A2 En ymmärrä mitä tyhjä tila tarkoittaa. Saanko apua kiitos
15.06.2025 - 13:21
![]() Britta Hessellund napisała::
Britta Hessellund napisała::
Hej, jeg kan ikke forstå hvordan 4. pind i diagram A1skal strikkes. Hvis jeg kun strikke 2vrang før den ekstra maske, rykker retmasken sig jo hele tiden, og ligger ikke lige under hinanden, som det ser ud til på den færdige bluse? Er det meningen, at den skal rykke mere og mere hele vejen rundt? Vh. Britta
01.06.2025 - 21:25Odpowiedź DROPS Design :
Hei Britta. Kastet som gjøres på 3. omgang strikkes vridd vrang på neste pinne, slik at på 4. omgang strikkes det slik: 2 vrang (1 vrang og 1 kast), 1 rettmaske over rettmasken fra forrige omgang, 2 vrangmasker, 1 rettmaske over rettmasken fra forrige omgang. Så gjentas dette. Da vil rettmaskene komme over rettmaskene. mvh DROPS Design Den ekstra masken i pinne 4 skal strikkes som en vrangmaske
02.06.2025 - 13:44
![]() Catherine Luchier napisała::
Catherine Luchier napisała::
Bonjour Je ne comprend A2, xxxl tricoter -9 fois la même maille ainsi: 1 maille endroit, mais sans lâcher la maille de l'aiguille gauche, continuer ainsi... tricoter 3-3-3-4-4-4 fois de *-* au total,. Jai regardé les vidéos. Maiw à quoi correspond 9 fois et 4 fois Merciiiiiiii
28.05.2025 - 21:58Odpowiedź DROPS Design :
Bonjour Mme Luchier, vous allez tricoter cette maille 9 fois pour augmenter 8 mailles, vous allez donc procéder ainsi: tricotez la maille indiquée, puis *faites 1 jeté, tricotez la même maille encore 1 fois à l'endroit) => vous avez maintenant 3 mailles sur l'aiguille droite, répétez de * à * encore 3 fois (4 fois au total), vous avez augmentez 3 fois 2 m en plus + les 3 mailles déjà sur l'aiguille après la 1ère fois, vous avez 9 mailles sur l'aiguille droite, vous pouvez maintenant lâcher la maille de l'aiguille gauche. Bon tricot!
30.05.2025 - 08:25
![]() Luz Lores napisała::
Luz Lores napisała::
Hola estoy haciendo esta labor por pone que está modificada donde de puede ver está modificación?? Porque con el diagrama del A2 no me está quedando igual?
26.05.2025 - 11:15Odpowiedź DROPS Design :
Hola Luz, las modificaciones ya han sido aplicadas a la versión online del patrón, así que si estás usando esta versión todo debería estar correcto; la notificación es para avisar a aquellos que hayan impreso el patrón antes de la fecha de la corrección. En estos videos puedes ver cómo trabajar el inicio de A.2 y la segunda parte de A.2 .
31.05.2025 - 23:46
![]() Bente Hansen napisała::
Bente Hansen napisała::
Vedr. diagram 2 str L. . Pind 3 ved stjerne? Kan godt se det bliver 9 masker. Men skal man så strikke pinden fra begyndelsen igen?\\r\\nDer står 4 gange. Er det ikke hele omgangen?
17.05.2025 - 16:44Odpowiedź DROPS Design :
Hej Bente, i størrelse L strikker du de 8 masker i A,2 26 gange :)
21.05.2025 - 14:30
![]() Elżbieta napisała::
Elżbieta napisała::
Teraz rozumiem, bardzo dziękuję za pomoc. Pozdrawiam 😊
12.05.2025 - 22:13
![]() Elżbieta napisała::
Elżbieta napisała::
Witam. Dziękuję za odpowiedź i pomoc. Próbkę wykonałam dżersejem. Próbka wykonana drutami 3mm wygląda dobrze. Rozumiem, że jeśli wychodzi mniej oczek w próbce niż powinno, to oznacza, że jeśli dziergałabym drutami 4mm, to projekt mógłby wyjść za duży? Miałam zamiar zrobić rozmiar M i wykonam ten rozmiar na drutach 3mm. Pozdrawiam 😊
11.05.2025 - 13:51Odpowiedź DROPS Design :
Witaj Elu! Nie wiem czy się dobrze zrozumiałyśmy, może to co napiszę pozwoli Ci lepiej dobrać rozmiar dla Twojej próbki i drutów nr 3. Pamiętaj, że Twoja próbka jest w dalszym ciągu niezgodna (19 zamiast 21 o.). W rozmiarze M, gdy próbka jest zgodna i ma 21 o. na 10 cm obwód swetra w najszerszym miejscu (biust) wyniesie 88 cm (184 o.: 21o.=ok. 88 cm). UWAGA: u Ciebie obwód będzie inny: 184:19=ok. 97 cm. Czy taki wymiar Ci odpowiada? Jeśli tak to działaj. Jeśli nie to musisz wybrać mniejszy rozmiar i przerabiać S (167:19=ok. 88 cm). Pozdrawiam serdecznie!
12.05.2025 - 10:08
![]() Elżbieta napisała::
Elżbieta napisała::
Witam. Nie wychodzi mi próbka i nie wiem jak ruszyć dalej. Próbka wykonana drutami 4mm po blokowaniu 17 oczek, próbka wykonana drutami 3mm - 19 oczek, próbka w projekcie powinna mieć 21 oczek. Jak ruszyć z tym projektem? Proszę o pomoc, jestem początkująca jeśli chodzi o druty. Będę wdzięczna za pomoc. Pozdrawiam serdecznie
09.05.2025 - 15:38Odpowiedź DROPS Design :
Witaj Elu, czy próbka jest wykonana dżersejem? Napisz mi jeszcze czy próbka wykonana na drutach nr 3 wygląda dla Ciebie ok (dzianina nie jest zbyt zbita, czy na odwrót - za luźna). Jeśli taki wygląd dzianiny Ci odpowiada, to wybrałabym sweterek o rozmiar mniejszy i przerabiała na drutach nr 3. W razie wątpliwości pisz. Pozdrawiamy!
10.05.2025 - 16:23
|
|||||||||||||||||||||||||
Swing by Spring Top#swingbyspringtop |
|||||||||||||||||||||||||
 |
 |
||||||||||||||||||||||||
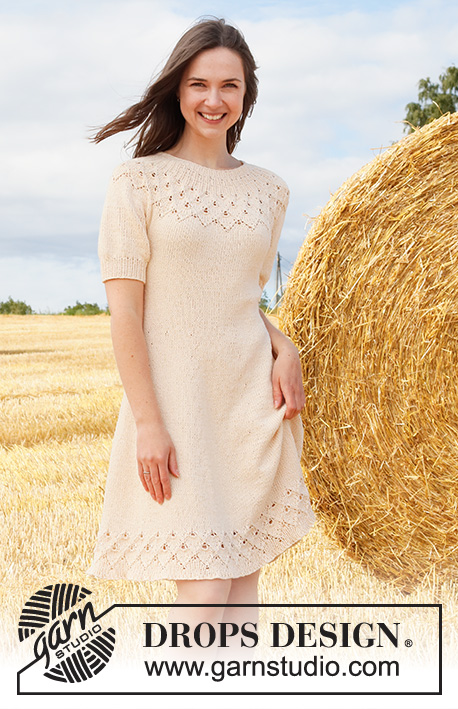
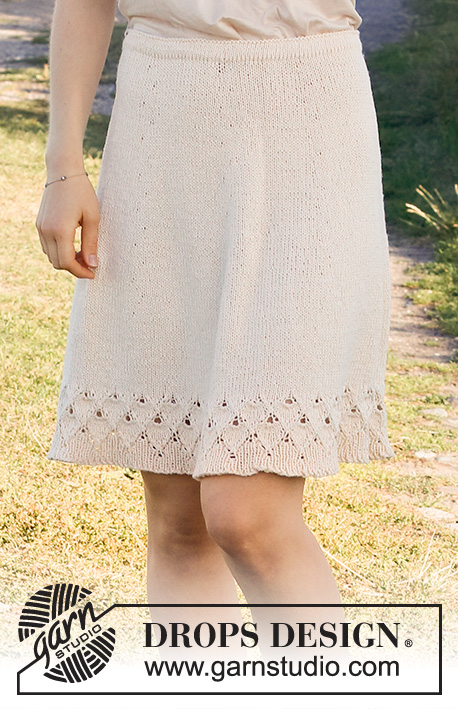
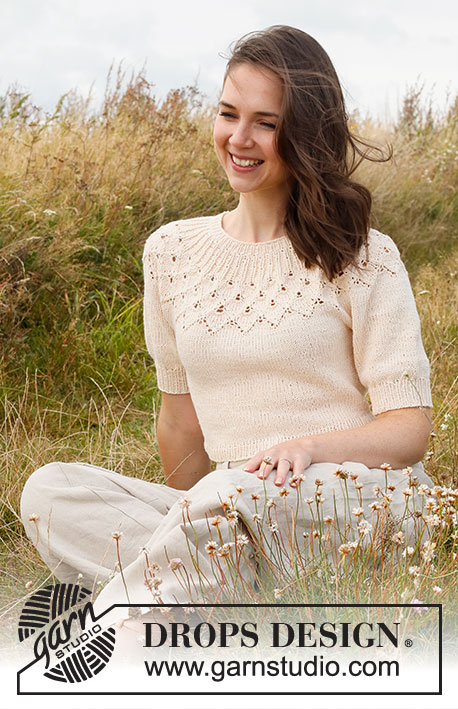
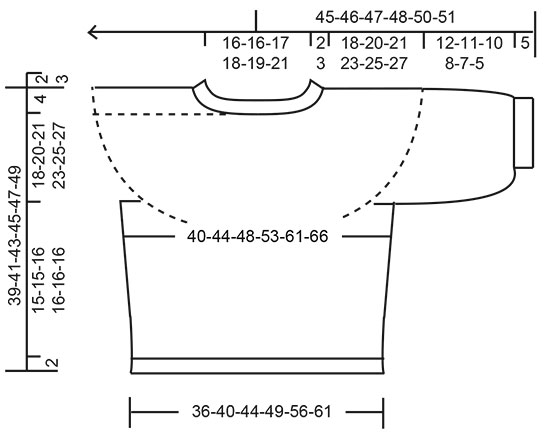
Sweter na drutach przerabiany od góry do dołu, z zaokrąglonym karczkiem ściegiem ażurowym, wzorem liści i krótkimi bufiastymi rękawkami, z włóczki DROPS Belle. Od S do XXXL
DROPS 222-32 |
|||||||||||||||||||||||||
|
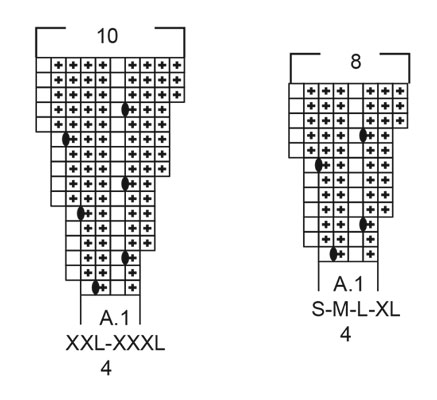
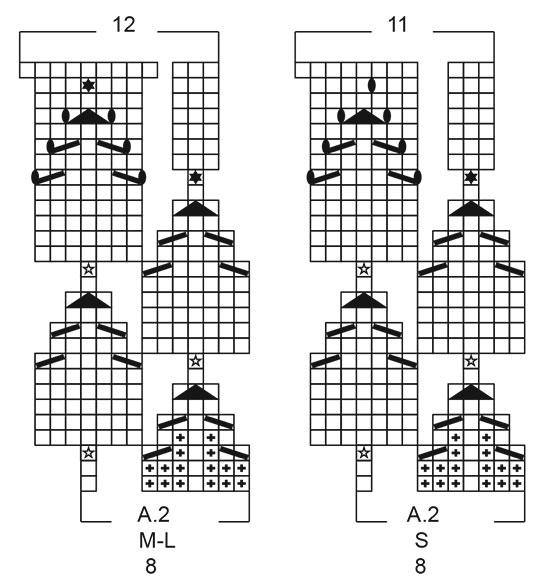
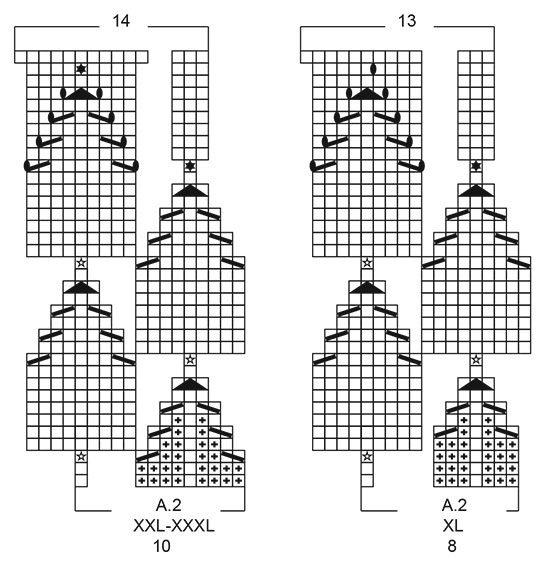
------------------------------------------------------- WYKORZYSTYWANE TECHNIKI: ------------------------------------------------------- ŚCIEG FANTAZYJNY: Patrz schematy A.1 i A.2. Patrz schemat odpowiedni dla rozmiaru. ZAMYKANIE OCZEK (boki swetra): Zamknąć 1 oczko z każdej strony nitki markera następująco: przerabiać aż zostaje 3 oczka przed nitką markerem i przerobić 2 oczka razem na prawo, 2 oczka prawe (nitka marker jest między tymi 2 oczkami), zdjąć 1 oczko jak do przerobienia na prawo, 1 oczko prawe, przełożyć oczko zdjęte nad przerobionym oczkiem. WSKAZÓWKA DO ZAMYKANIA OCZEK: Aby zamykane oczka nie ściągały robótki, do zamykania można użyć grubszych drutów. Jeżeli mimo to brzeg jest nadal zbyt ścisły, wykonać 1 narzut za ok. każdym 4-tym oczkiem i zamykać narzuty jak zwykłe oczka. ------------------------------------------------------- ROBÓTKĘ ROZPOCZYNAMY TUTAJ: ------------------------------------------------------- SWETER – SKRÓCONY OPIS ROBÓTKI: Wykończenie dekoltu i karczek są przerabiane od góry do dołu, na okrągło od środka tyłu. Następnie dzielimy karczek na tył/przód i rękawy. Tył/przód są przerabiane od góry do dołu, na okrągło na drutach z żyłką. Rękawy są przerabiane na okrągło na drutach pończoszniczych/krótkich drutach z żyłką, od góry do dołu. WYKOŃCZENIE DEKOLTU: Na drutach z żyłką nr 3 nabrać 100-100-104-108-112-120 oczek włóczką Belle. Przerobić 1 okrążenie na prawo. Dalej przerabiać ściągaczem = 1 oczko prawe/1 oczko lewe. Gdy wysokość ściągacza wynosi 2-2-3-3-3-3 cm, zacząć przerabiać na drutach z żyłką nr 4. Umieścić 1 marker na początku okrążenia, na środku tyłu, długość karczku będzie mierzona od tego markera! KARCZEK: Przerabiać schemat A.1 na okrągło (= 25-25-26-27-28-30 motywów po 4 oczka). Po przerobieniu schematu A.1, jest 200-200-208-216-280-300 oczek. Długość robótki od markera wynosi teraz 4-4-4-4-6-6 cm. Dalej przerabiać schemat A.2 na okrągło (= 25-25-26-27-28-30 motywów po 8-8-8-8-10-10 oczek). ZACHOWAĆ TAKIE SAMO NAPRĘŻENIE NICI JAK W PRZYPADKU PRÓBKI! Po przerobieniu schematu A.2, jest 275-300-312-351-392-420 oczek, a długość robótki od markera wynosi ok. 14-14-14-17-19-19 cm (tj. 16-16-17-20-22-22 cm od rzędu nabierania oczek). Przerabiać dżersejem, aż długość robótki od markera wynosi 18-20-21-23-25-27 cm. Teraz podzielić robótkę na tył/przód i rękawy. Przerobić kolejne okrążenie następująco: przerobić 38-42-44-50-58-63 oczka prawe (= ½ tyłu), zdjąć 62-66-68-76-80-84 następne oczka na nitkę na rękaw, nabrać 8-8-12-12-12-12 oczek (= bok, pod rękawem), przerobić 75-84-88-99-116-126 oczek prawych (= przód), zdjąć 62-66-68-76-80-84 następne oczka na nitkę na rękaw, nabrać 8-8-12-12-12-12 oczek (= bok, pod rękawem), przerobić 38-42-44-50-58-63 ostatnie oczka na prawo (= ½ tyłu). Kończyć tył/przód i rękawy oddzielnie. OD TEGO MOMENTU MIERZYĆ STĄD! TYŁ & PRZÓD: = 167-184-200-223-256-276 oczek. Umieścić 1 nitkę marker na środku 8-8-12-12-12-12 nowych oczek pod każdym rękawem (= oznaczenia boków swetra). Jest teraz 83-92-100-111-128-138 oczek na przód i 84-92-100-112-128-138 oczek na tył. Przesuwać nitki markery w miarę postępu robótki; wskazują miejsca, gdzie będą zamykane oczka. Przerabiać na okrągło, dżersejem. Gdy długość robótki od jej podziału wynosi 3 cm, zamknąć 1 oczko z każdej strony każdej nitki markera – patrz ZAMYKANIE OCZEK (= zostają zamknięte 4 oczka). Zamykać tak samo w sumie 4-4-4-4-5-5 razy co 2 cm = 151-168-184-207-236-256 oczek. Przerabiać na okrągło dżersejem, aż długość robótki od jej podziału wynosi 15-15-16-16-16-16 cm – lub ma inną długość wg potrzeb (zostaje ok. 2 cm do końca). Przerobić 1 okrążenie na prawo, w tym samym czasie równomiernie dodając 23-26-28-31-36-38 oczek = 174-194-212-238-272-294 oczka. Dalej przerabiać na drutach z żyłką nr 3 ściągaczem (1 oczko prawe/1 oczko lewe) na okrągło przez 2 cm. Zamknąć oczka tak jak schodzą z drutu – patrz WSKAZÓWKA DO ZAMYKANIA OCZEK. Całkowita długość swetra od ramienia wynosi ok. 39-41-43-45-47-49 cm. RĘKAWY: Wziąć z powrotem 62-66-68-76-80-84 oczka z nitki z jednej strony robótki i przełożyć je na druty pończosznicze/krótkie druty z żyłką nr 4 i nabrać 1 oczko w każde z 8-8-12-12-12-12 nowych oczek nabranych z boku pod rękawem = 70-74-80-88-92-96 oczek. Przerabiać na okrągło dżersejem, aż długość rękawa od podziału robótki wynosi 12-11-10-8-7-5 cm (zostaje ok. 5 cm do końca, przymierzyć sweter i przerabiać do odpowiedniej długości). Przerobić 1 okrążenie na prawo, w tym samym czasie równomiernie zamykając 16-16-14-14-14-14 oczek = 54-58-66-74-78-82 oczka. Dalej przerabiać na drutach pończoszniczych nr 3. Przerabiać na okrągło, ściągaczem = 1 oczko prawe/1 oczko lewe przez 5 cm. Zamknąć oczka tak jak schodzą z drutu – pamiętać o WSKAZÓWCE DO ZAMYKANIA OCZEK! Długość rękawa od podziału robótki wynosi ok. 17-16-15-13-12-10 cm. Drugi rękaw wykonać tak samo. |
|||||||||||||||||||||||||
Objaśnienia do schematu |
|||||||||||||||||||||||||
|
|||||||||||||||||||||||||
 |
|||||||||||||||||||||||||
 |
|||||||||||||||||||||||||
 |
|||||||||||||||||||||||||
 |
|||||||||||||||||||||||||
Skończyłaś ten wzór?Otaguj swoje zdjęcia #dropspattern #swingbyspringtop lub prześlij je do #dropsfan gallery. Potrzebujesz pomocy w związku z tym wzorem?Zobacz 31 instrukcje video, sekcję Komentarze/Pytania i jeszcze więcej, wchodząc na stronę wzoru na garnstudio.com © 1982-2026 DROPS Design A/S. Wszelkie prawa zastrzeżone. Ten dokument, w całości, jest chroniony prawem. Zobacz co możesz robić z naszymi wzorami na dole każdego wzoru na naszej stronie. |
|||||||||||||||||||||||||


Posiadając 40 lat doświadczenia w projektowaniu wzorów na druty i szydełko, DROPS Design oferuje jedną z największych kolekcji bezpłatnych wzorów w internecie – przetłumaczonych na 17 języków. Obecnie jest dostępnych 324 katalogów i 12291 wzorów w języku polskim.
Dokładamy wszelkich starań, aby oferować Wam druty i szydełka, inspiracje, fachowe porady oraz doskonałej jakości włóczki w najlepszych cenach! Zamierzasz wykorzystać nasze wzory inaczej niż tylko do osobistego użytku? Przeczytaj jakie masz prawa w Copyright, który znajdziesz na końcu każdego wzoru. Miłej pracy!
Dodaj komentarz do modelu DROPS 222-32
Chcielibyśmy się dowiedzieć co masz do powiedzenia o tym wzorze!
Jeśli chcesz zadać pytanie i szybko uzyskać odpowiedź, upewnij się, że została wybrana właściwa kategoria w formularzu poniżej. Pola obowiązkowe są oznaczone *.