
Categorie popolari
State cercando un filato?


Commenti / Domande (260)
![]() Sylvie ha scritto:
Sylvie ha scritto:
Bonsoir, je fais la taille M cela demande de monter 116 mailles quand on met en place les marqueurs on se retrouve avec plus de mailles de plus est ce normal que les demi dos n'est pas le même nombre de mailles 18 + 19+37+19+ 19
24.08.2025 - 00:34DROPS Design ha risposto:
Bonjour Sylvie, les tours commencent au milieu dos et notez que les fils marqueurs vont être placés dans une maille (et pas entre les mailles), vous aurez ainsi: 18+1+19+1+37+1+19+1+19=116 mailles (soit 18+19=37 pour le dos, soit autant que pour le devant). Bon tricot!
25.08.2025 - 09:32
![]() Hélène ha scritto:
Hélène ha scritto:
Bonjour, je n'arrive pas au bon nombre de mailles en partant le travail. J'ai noté la taille L et j'arrive avec les nombres de la taille M. Aussi, vous répondez à Mandy pour expliquer comment lire A.1, A.2 et A.3 mais, à A3, vous écrivez 1 jeté supplémentaire que je ne vois pas sur le diagramme. Je n'arrive donc pas au bon nombre de mailles avec le modèle.
23.08.2025 - 15:29
![]() Sylvi ha scritto:
Sylvi ha scritto:
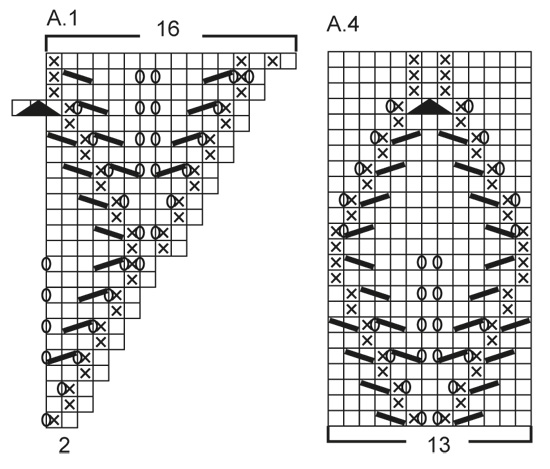
Kommer ikke lengre enn til 2. pinne, får ikke mønstret til å stemme ?? A. 1 - A2- og A3 , , skjønner ikke for på 1. omgang i A 2 er det. Rett - kast- ei rang - 2 sammen— ( er 5 masker) når du da på neste omgang skal strikke 2 rett og ei rang over de 2 sammen?? Da stemmer det ikke for meg Dette trenger jeg hjelp til….
20.08.2025 - 15:16DROPS Design ha risposto:
Hej Sylvi. Pröva bara att sticka det så ska du se att du får det att se riktigt ut, ta det maska för maska från höger sida. Mvh DROPS Design
03.09.2025 - 12:10
![]() Melanie ha scritto:
Melanie ha scritto:
Hallo Könnt ihr mir erklären, was „Jedes Mal, wenn A.1, A.2 und A.3 1 x in der Höhe gestrickt wurden, 2 Rapporte mehr von A.2 zwischen A.1 und A.3 stricken“ bedeutet? 2 Rapporte bedeutet doch Wiederholungen von A2? Aber ich habe doch nur die 14 Maschen zur Verfügung und keine 28 beim Ärmel? Liebe Grüße Melanie
31.07.2025 - 11:58DROPS Design ha risposto:
Liebe Melanie, wenn die Diagramme einmal in der Höhe gestrickt sind, wurden 14 Maschen in A.1 und 14 Maschen in A.3 gestrickt, so nächstes Mal stricken Sie: A.1 über die ersten Maschen vorigen A.1 + A.2 über die letzten Maschen vorigen A.1 + A.2 wie zuvor bis die 17 M vorigen A.3 übrig sind, dann stricken Sie A.2 über die ersten 14 M und A.3 über die letzten 3 Maschen = so haben Sie 2 Rapporte A.2 mehr in der Breite zwischen A.1 und A.3. Viel Spaß beim Stricken!
31.07.2025 - 16:09
![]() Pia ha scritto:
Pia ha scritto:
Hallo liebes Drops Team, ich habe genau dasselbe Problem in Reihe 12 wie Andrea . Die Reihe 12 beginnt 2 Maschen vor der eigentlichen Musterreihe von Reihe 11. und die 2. Masche ist ein Umschlag in Reihe 11. Und laut Musterreihe 12 sind für die ersten 2 Maschen in der Reihe davor (11) gar keine Masche. Es ist etwas verwirrend für mich.\\r\\nViele Grüße, Pia
23.07.2025 - 17:37
![]() Andrea ha scritto:
Andrea ha scritto:
Liebes Drops-Team, Ich verstehe leider überhaupt nicht den Anfang von Reihe 12. eigentlich habe ich ja am Anfang von A.1 immer erst eine rechte und dann eine linke Masche. Aber in Reihe 11 ist ja die zweite Masche ein Umschlag. Können Sie mir da weiterhelfen? Liebe Grüße Andrea
20.07.2025 - 10:46DROPS Design ha risposto:
Liebe Andrea, am Anfang der 11. Reihe haben Sie 2 Maschen zugenommen, (3 Umschläge aber nur 1 Abnahmen); so beginnt die 12. Reihe mit 1 Masche rechts (die erste Masche in A.1 wie zuvor), 1 Masche links (1. Umschlag von der vorigen Runde), 1 Masche rechts (die vorige linke Masche), 1 Masche links (2. Umschlag von der vorigen Runde). Viel Spaß beim Stricken!
24.07.2025 - 15:55
![]() Florence Hussy ha scritto:
Florence Hussy ha scritto:
Bonjour, je suis à la fin de l'empiecement et j'ai monté les mailles supplémentaires mais je ne comprends pas bien comment changer de place pour un début de tour car mes aiguilles ne sont pas au bon endroit (demi-dos) Dois-je glisser les mailles jusqu'à la bonne position de départ ?
18.07.2025 - 17:37DROPS Design ha risposto:
Bonjour Florence, exactement. Bon tricot!
19.07.2025 - 15:35
![]() Kim ha scritto:
Kim ha scritto:
A la ligne 12 du diagramme, on nous indique end. env. end. env. Mon soucis est que les envers tombent sur les jetés du rang précédent est ce normal ou me suis-je trompée quelque part ? Et lorsque je dois reprendre les diagramme A1 A2 et A3 pour faire les 28 augmentation, il y a un décalage qui se créé.
15.07.2025 - 09:09DROPS Design ha risposto:
Bonjour Kim, les envers ici tombent sur les jetés du rang précédent, c'est tout a fait correct. Pourriez vous m'envoyer la photo avec ce decalage (poland@dropsproject.com). Je vais voir ce qui ne va pas. Cordialement!
18.07.2025 - 11:55
![]() Katarzyna ha scritto:
Katarzyna ha scritto:
Dzień dobry. Jak czytać aktualizację? Czy jest już w opisie?
06.07.2025 - 10:34DROPS Design ha risposto:
Witaj Kasiu, aktualizacja jest uwzględniona w opisie. Pozdrawiamy!
07.07.2025 - 08:39
![]() Magdalena ha scritto:
Magdalena ha scritto:
Dzień dobry ! Podczas robienia schematu A.1 w 11 rzędzie z prawej strony dodane jest 1 oczko przed oczkiem lewym, w rzędzie 12 ze schematu wynika, że zostały dodane dwa oczka .
04.07.2025 - 08:13DROPS Design ha risposto:
Witaj Magdo, ja widzę, że w schemacie A.1 w rzędzie 11 są dodane 2 oczka po prawej stronie, następnie zamknięte 1 oczko i na końcu rzędu znów dodane 1 oczko (2-1+1=2). Ogółem w tym rzędzie dodajemy 2 oczka, co znajduje odzwierciedlenie w rzędzie 12, gdzie pojawiają się dodatkowe 2 oczka na schemacie. Wszystko jest w porządku. Jak czytać schematy w robótce na drutach znajdziesz TUTAJ. Pozdrawiamy!
08.07.2025 - 10:52
|
|||||||||||||||||||
Catch the Wind#catchthewindtop |
|||||||||||||||||||
 |
 |
||||||||||||||||||
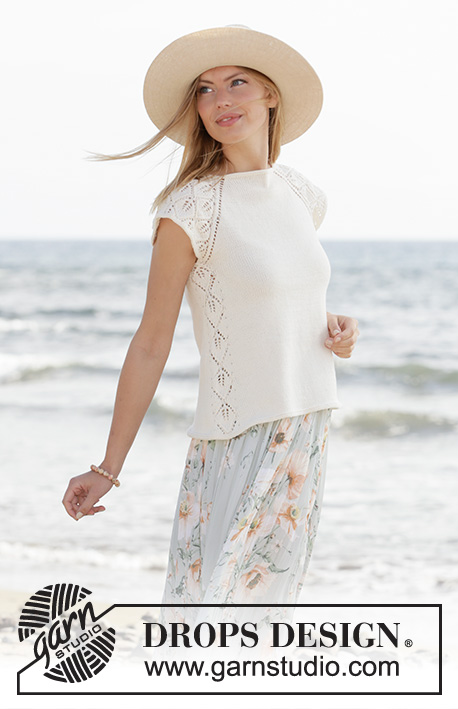
Top lavorato ai ferri con raglan e maniche corte in DROPS Safran. Lavorato dall’alto in basso con motivo traforato. Taglie: XS - XXL.
DROPS 211-5 |
|||||||||||||||||||
|
------------------------------------------------------- TECNICHE IMPIEGATE: ------------------------------------------------------- COSTA/MAGLIA LEGACCIO (lavorata in tondo): 1 costa = 2 giri. Lavorare 1 giro diritto e 1 giro rovescio. MOTIVO: Vedere i diagrammi A.1 - A.4. RAGLAN: Aumentare per il raglan a ogni lato del dietro e a ogni lato del davanti (verso le maniche). Aumentare facendo 1 gettato prima/dopo la maglia con il segnapunti; sul giro successivo lavorare i gettati a diritto per creare buchi. Gli aumenti per le maniche sono indicate nel motivo A.1 e A.3. ------------------------------------------------------- INIZIO DEL LAVORO: ------------------------------------------------------- TOP – BREVE RIASSUNTO DEL LAVORO: Lavorare il collo e lo sprone in tondo con i ferri circolari, dall’alto in basso. Dividere lo sprone per il corpo e le maniche e continuare il corpo in tondo. Lavorare un piccolo bordo attorno agli scalfi. COLLO: Avviare 106-110-116-120-124-132 maglie con i ferri circolari n° 3 mm e Safran. Lavorare 2 COSTE – leggere la descrizione sopra. Poi lavorare lo sprone come descritto sotto. SPRONE: Inserire 4 segnapunti nel lavoro come descritto sotto (senza lavorare le maglie). I segnapunti verranno usati per gli aumenti del raglan. Contare 16-17-18-19-20-22 maglie (= metà dietro), inserire 1 segnapunti nella maglia successiva, contare 19 maglie (= manica), inserire 1 segnapunti nella maglia successiva, contare 32-34-37-39-41-45 maglie (= davanti) inserire 1 segnapunti nella maglia successiva, contare 19 maglie (= manica), inserire 1 segnapunti nella maglia successiva. Ci sono 16-17-19-20-21-23 maglie dopo l’ultimo segnapunti (metà dietro). Il primo giro è lavorato come segue: lavorare a maglia rasata fino al 1° segnapunti, fare 1 gettato (1° aumento del RAGLAN – leggere la descrizione sopra), lavorare la maglia con il segnapunti a maglia rasata, A.1 (= 2 maglie), A.2 (= 14 maglie) e A.3 ( = 3 maglie) (= 19 maglie per la manica), lavorare la maglia con il segnapunti a maglia rasata, 1 gettato, lavorare a maglia rasata fino alla maglia con il segnapunti successiva (= davanti), 1 gettato, lavorare la maglia con il segnapunti a maglia rasata, A.1 (= 2 maglie), A.2 (= 14 maglie) e A.3 (= 3 maglie) (= 19 maglie per la manica), lavorare la maglia con il segnapunti a maglia rasata, 1 gettato, lavorare a maglia rasata sulle maglie rimaste (= metà dietro). Continuare questo motivo a maglia rasata sul davanti e dietro e A.1, A.2 e A.3 sulle maniche. Ogni volta che vengono lavorati A.1, A.2 e A.3 in altezza, si lavorano 2 ripetizioni in più di A.2 tra A.1 e A.3. FARE ATTENZIONE ALLA TENSIONE DEL LAVORO! ALLO STESSO TEMPO continuare ad aumentare per il raglan ogni 2 giri per un totale di 22-26-28-31-35-39 volte all’altezza di ogni segnapunti (compreso il 1° aumento descritto sopra). Lavorare le nuove maglie a maglia rasata sul davanti e dietro e con il motivo traforato come mostrato nei diagrammi sulle maniche. Alla fine degli aumenti per il raglan ci sono 294-334-356-388-424-468 maglie sul ferro. Lavorare il giro successivo come segue: lavorare 39-44-47-51-56-62 maglie (= metà dietro), mettere le 69-79-83-91-99-109 maglie successive in sospeso per la manica, avviare 9-9-9-11-13-15 nuove maglie sul ferro (= a lato sotto la manica), lavorare 78-88-95-103-113-125 maglie (= davanti), maglie successive in sospeso per la manica, avviare 9-9-9-11-13-15 nuove maglie sul ferro (= a lato sotto la manica), lavorare le ultime 39-44-48-52-57-63 maglie (= metà dietro). Finire il corpo e le maniche in modo separato. ORA MISURARE IL LAVORO DA QUI! CORPO: = 174-194-208-228-252-280 maglie. Inserire 1 segnapunti al centro delle 9-9-9-11-13-15 maglie avviate sotto ogni manica. Tagliare il filo e iniziare il giro 6 maglie prima di 1 delle maglie con il segnapunti. Lavorare A.4 (= 13 maglie), lavorare 74-84-91-101-113-127 maglie a maglia rasata, lavorare A.4 e poi a maglia rasata sulle ultime 74-84-91-101-113-127 maglie. Continuare questo motivo, ALLO STESSO TEMPO, quando il lavoro misura 2 cm, aumentare facendo 1 gettato a ogni lato di A.4, sul giro successivo lavorare i gettati a diritto ritorto per evitare buchi (= 4 aumenti). Ripetere gli aumenti ogni 1 ½ cm per un totale di 18 volte; lavorare gli aumenti a maglia rasata = 246-266-280-300-324-352 maglie. Quando il lavoro misura 28-29-29-30-29-29 cm dalla divisione, lavorare 2 coste su tutte le maglie, poi intrecciare. BORDO DELLE MANICHE: Riportare le 69-79-83-91-99-109 maglie di uno dei fermamaglie sui ferri circolari corti n° 3 mm e riprendere 1 maglia in ognuna delle 9-9-9-11-13-15 nuove maglie sotto la manica = 78-88-92-102-112-124 maglie. Lavorare 2 coste su tutte le maglie, poi intrecciare. Lavorare l’altro bordo della manica nello stesso modo. |
|||||||||||||||||||
Spiegazioni del diagramma |
|||||||||||||||||||
|
|||||||||||||||||||
 |
|||||||||||||||||||
 |
|||||||||||||||||||
 |
|||||||||||||||||||
Avete terminato questo modello?Allora taggate le vostre foto con #dropspattern #catchthewindtop o inviatele alla #dropsfan gallery. Avete bisogno di aiuto con questo modello?Troverete 20 video tutorial, una sezione per i commenti/domande e molto altro guardando il modello su www.garnstudio.com © 1982-2026 DROPS Design A/S. Ci riserviamo tutti i diritti. Questo documento, compreso tutte le sue sotto-sezioni, è protetto dalle leggi sul copyright. Potete leggere quello che potete fare con i nostri modelli alla fine di ogni modello sul nostro sito. |
|||||||||||||||||||


Con oltre 40 anni di esperienza nel design di modelli di maglia e uncinetto, DROPS Design offre la più estesa collezione di modelli gratuiti su internet - tradotti in 17 lingue. Ad oggi vi possiamo fornire 324 cataloghi e 12290 modelli - 9561 dei quali sono tradotti in Italiano.
Ci stiamo impegnando molto per darvi il meglio che vi possiamo offrire in termini di maglia e uncinetto, ispirazioni e consigli così come filati di grande qualità ad un prezzo incredibile! Volete utilizzare i nostri modelli per qualcosa d'altro oltre al vostro uso personale? Potete leggere tutto ciò che è consentito nel testo sul Copyright in basso su tutte le pagine dei nostri modelli. Buon lavoro!
Lasciare un commento sul modello DROPS 211-5
Noi saremmo felici di ricevere i tuoi commenti e opinioni su questo modello!
Se vuoi fare una domanda, fai per favore attenzione a selezionare la categoria corretta nella casella qui sotto per velocizzare il processo di risposta. I campi richiesti sono indicati da *.