
Categorie popolari
State cercando un filato?


Commenti / Domande (128)
![]() Ann ha scritto:
Ann ha scritto:
Feil oppgitt garnmengde! Fikk altfor mye mønsterfarge, og for lite hovedfarge.
09.05.2022 - 13:13
![]() Sabine Nagel ha scritto:
Sabine Nagel ha scritto:
Hallo, da meine Enkelin eine Allergie gegen (tierische) Wolle hat, möchte ich wissen, ob es auch ein Baumwolle-Garn gibt, mit dem dieser Pullover gestrickt werden kann? Danke und viele Grüße, Sabine
02.04.2022 - 13:25DROPS Design ha risposto:
Liebe Sabine, benutzen Sie unseren Garnumrechner, so finden Sie darin Alternative mit Baumvolle wie Muskat, Cotton Light or Belle sowie die genaue neue Mengeanzahl in der gewünschten Alternative. Gerne kann Ihnen Ihr DROPS Laden - auch telefonisch oder per E-Mail- damit helfen, die beste Alternative zu wählen. Viel Spaß beim stricken!
04.04.2022 - 08:29
![]() Dorte ha scritto:
Dorte ha scritto:
Jeg har ikke held med at få mønsteret til at passe sammen på ryggen. Altså når jeg går fra en pind til næste pind. Den er altid en række ved siden af, så de ikke matcher. Hvordan løser jeg det?
31.03.2022 - 17:29DROPS Design ha risposto:
Hei Dorte. Om du har det maskeantallet det skal være i den størrelsen du strikker, så strikkes det 11-12-11-12-12-13 eller 13 hele rapporter av diagrammet, slik at det matcher ved omgangs skriftet. mvh DROPS Design
04.04.2022 - 13:53
![]() Fanny Barreto ha scritto:
Fanny Barreto ha scritto:
Je le trouve trop beau ce petit pull
04.12.2021 - 11:21
![]() Aude ha scritto:
Aude ha scritto:
Bonjour, Je tricote le pull en 3/4 ans. J’arrive à l’étape de séparation des manches et je n’ai pas fini le diagramme A1. Je ne comprends pas très bien comment je dois le finir sur les manches, le dos et le devant
26.10.2021 - 17:12DROPS Design ha risposto:
Bonjour Aude, vous pouvez arreter le jacquard et continuer en une couleur ou continuer le jacquard. Si il y a des differences, placez-les sous les manches / sur les cotes du pull, pour qu'elles se soient pas visibles. Bon tricot!
26.10.2021 - 17:27
![]() Eva Britt ha scritto:
Eva Britt ha scritto:
Jag har börjat sticka Littfest Missy tröja. Tröjan stickas uppifrån och ner. När jag kommer till diagrammet A1 börjat första raden med att sticka 7 maskor och ett omslag. Det gör man i 12 rapporter.Andra varvet inga ökningar. På femte varvet börjar problemet. Hur görs ökningar. år det inte att sztämma. Jag stickar storlek 7/8. Ska jag börja med ett omslag och sticka rapporten ut och ett omslag och sticka rapporten ut. Jag stickar med gult garn i botten och vitt som mönster.
18.06.2021 - 11:09DROPS Design ha risposto:
Hej Eva Britt. Ja det stämmer, på 5e varvet gör du ett omslag och stickar sedan 8 maskor (i färg enligt diagrammet) och detta upprepas hela varvet ut. Mvh DROPS Design
18.06.2021 - 13:26
![]() Montse Gamo ha scritto:
Montse Gamo ha scritto:
Hola buenos días. Estoy realizando el jersey para niños (patrón me-043-bn) talla 3/4 Al finalizar el canesú tenia que haber obtenido 209 puntos pero en mi labor solo tengo 171 puntos (no he realizado la elevación) creo haber seguido correctamente el diagrama 7 (3/4). No se donde tengo el error. Gracias
04.04.2021 - 19:46DROPS Design ha risposto:
Hola Montse, todos los aumentos están incluidos en el diagrama. Para la talla de 3/4, en el diagrama A.1 tienes que pasar de 7 puntos iniciales, tras todos los aumentos, a repeticiones de 19 puntos, que tienen que cuadrar con los 209 puntos totales.
07.04.2021 - 23:53
![]() Belén ha scritto:
Belén ha scritto:
Bonjour, je n'arrive pas à trouve le diagramme pour faire le dessin. Pouvez vous m'aider ?. Merci
15.03.2021 - 17:35DROPS Design ha risposto:
Bonjour Mme Belén, nous rencontrons actuellement des problèmes avec le chargement des images sur notre site et travaillons à la résolution de ce problème. Merci pour votre compréhension et patience.
16.03.2021 - 08:20
![]() Outi ha scritto:
Outi ha scritto:
Miten tehdään lisäykset koossa 3/4..tai toisin sanoen miten monta kertaa kierroksella lisätään ka miten nuo kuviot saa onnistumaan lisäyskierroksella.
03.03.2021 - 06:59DROPS Design ha risposto:
Koossa 3/4 kerrokselle tulee 11 piirroksen A.1 mallikertaa. Esim. 1.kerroksella työhön lisätään tällöin 22 silmukkaa (2 silmukkaa joka mallikerrassa). Seuraavalla kerroksella langankierrot neulotaan kiertäen piirroksen mukaisesti.
23.03.2021 - 16:35
![]() Sammie ha scritto:
Sammie ha scritto:
Ik heb deze trui bijna af. Op één plaats wordt het niet zo mooi en dat is de plaats waar ik 8 extra steken heb opgezet (met lussen) en later bij het begin van het breien van de mouw deze steken heb opgenomen. Aan weerszijden van deze plek is het heel los en/of zit er een gat (bij beide mouwen). Ik wil twee van deze truien breien. Hoe kan ik voorkomen dat dit bij de tweede trui weer gebeurt?
08.02.2021 - 21:31DROPS Design ha risposto:
Dag Sammie,
Zorg er in ieder geval voor dat als je de lussen maakt, de draad goed aantrekt, zodat er geen hyaat komt. Ook kun je de lussen met een extra draai in de draad opzetten. Je kunt de ontstane gaatjes later ook dicht naaien.
27.03.2021 - 15:51
|
||||||||||
Little Missy#littlemissysweater |
||||||||||
 |
 |
|||||||||
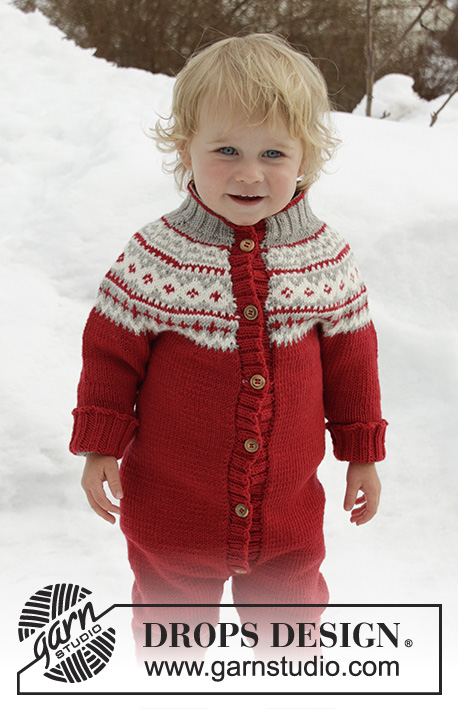
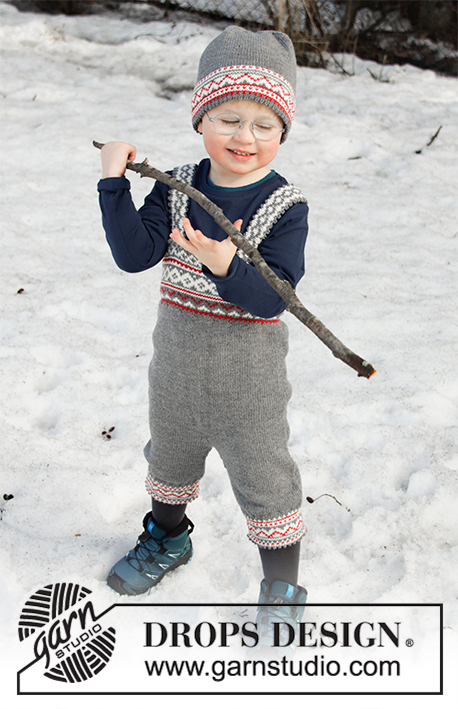
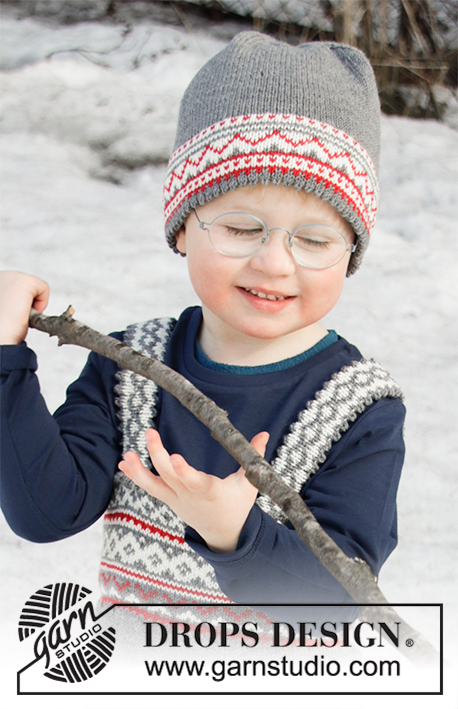
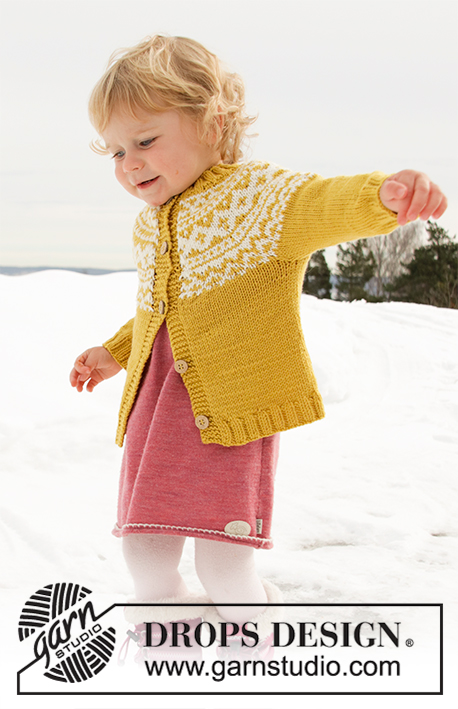
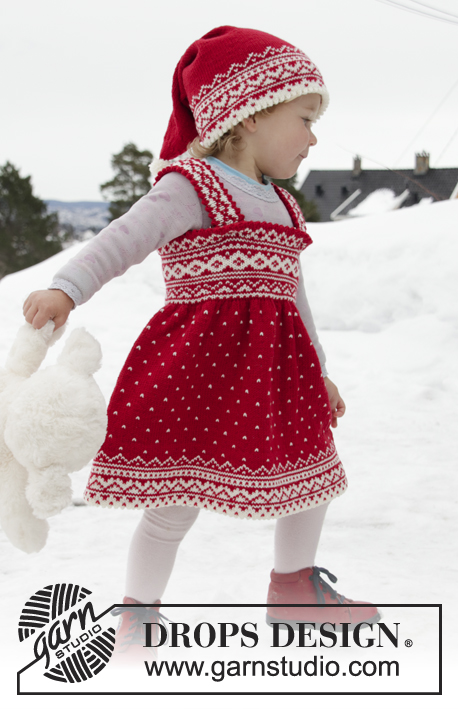
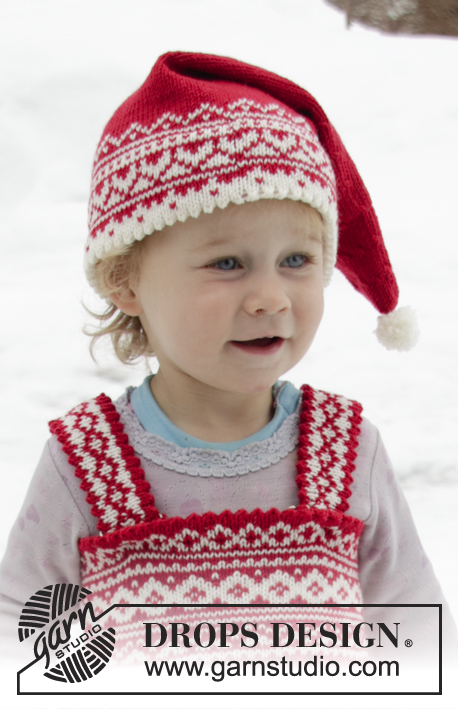
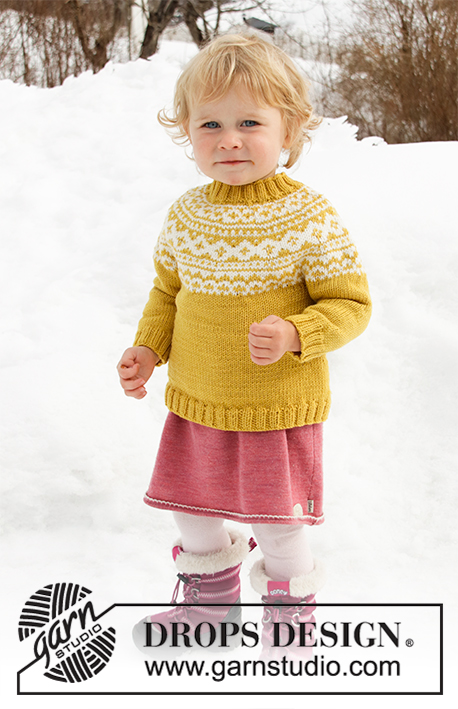
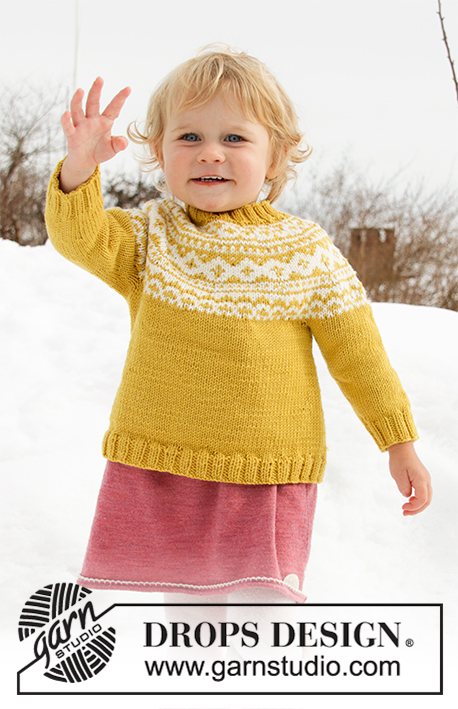
Maglione lavorato ai ferri per baby e bambini con sprone rotondo in DROPS Merino Extra Fine. Lavorato dall’alto in basso con motivo nordico. Taglie: 12 mesi – 12 anni.
DROPS Children 32-7 |
||||||||||
|
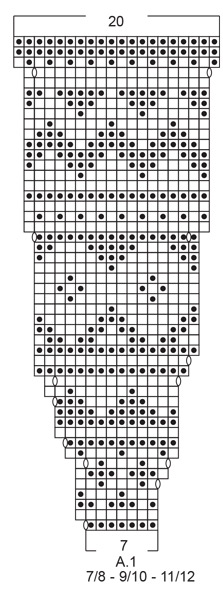
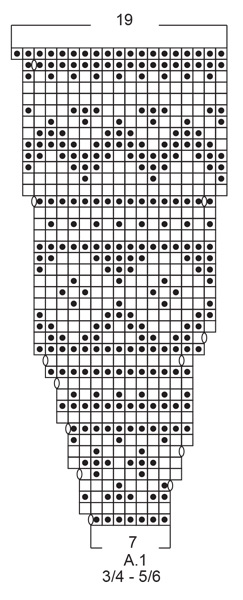
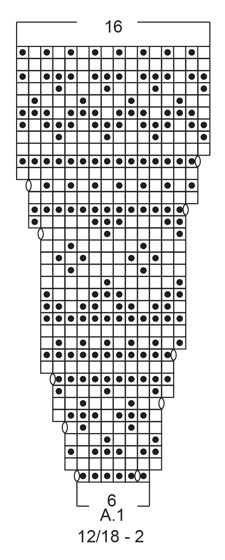
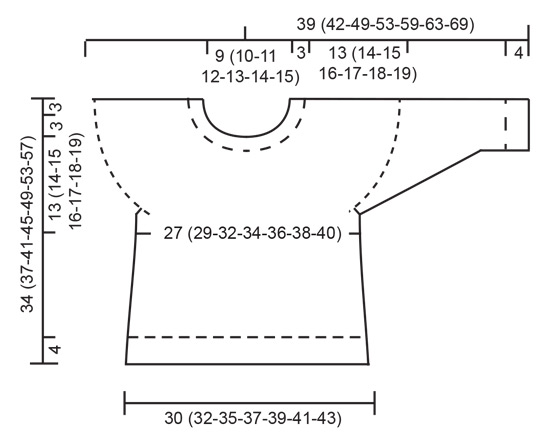
------------------------------------------------------- SPIEGAZIONI DEL MODELLO: ------------------------------------------------------- MOTIVO: Vedere il diagramma A.1. Scegliere il diagramma per la vostra taglia. Lavorare tutto il motivo a maglia rasata. SUGGERIMENTO PER GLI AUMENTI/DIMINUZIONI: Per stabilire ogni quanto diminuire/aumentare sul giro, prendere il n° totale di maglie sul ferro (ad esempio 72 maglie) e dividerlo per il n° di diminuzioni/aumenti da fare (ad esempio 6) = 12. In questo esempio, diminuire lavorando insieme ogni 11esima e 12esima maglia, o aumentare dopo ogni 12esima maglia facendo 1 gettato (lavorare i gettati a ritorto sul ferro successivo per evitare buchi). SUGGERIMENTO PER GLI AUMENTI (ai lati del corpo): Aumentare 1 maglia a ogni lato del segnapunti come segue: iniziare 2 maglie prima del segnapunti, 1 gettato, 4 maglie diritto (= il segnapunti è al centro di queste 4 maglie), 1 gettato (= 2 aumenti). Aumentare in questo modo all’altezza di entrambi i segnapunti (4 aumenti).Sul giro successivo lavorare il gettato a ritorto per evitare buchi. SUGGERIMENTO PER LE DIMINUZIONI (al centro sotto le maniche): Diminuire 1 maglia a ogni lato del segnapunti come segue: iniziare 3 maglie prima del segnapunti, 2 maglie insieme a diritto, 2 maglie diritto (= il segnapunti è al centro di queste 2 maglie), passare 1 maglia a diritto senza lavorarla, 1 maglia diritto, accavallare la maglia passata sopra quella appena lavorata (= 2 diminuzioni). ALZATA (dietro del collo): Saltare questo paragrafo se non volete l’alzata. Inserire 1 segnapunti all'inizio del giro (= centro dietro). Lavorare 6 maglie diritto, girare, tirare il filo e lavorare 12 maglie rovescio, girare, tirare il filo e continuare a lavorare con 8 (8-8-10-10-10-10) maglie in più del giro precedente ad ogni giro, altre 3 volte a ogni lato (= 4 volte in totale a ogni lato), dopo l'ultimo giro, e lavorare a diritto fino al centro dietro. ------------------------------------------------------- INIZIO DEL LAVORO: ------------------------------------------------------- MAGLIONE – BREVE RIASSUNTO DEL LAVORO: Lavorato in tondo, dall’alto in basso. Lavorare prima lo sprone, poi dividere il lavoro per il corpo e le maniche. Il giro inizia circa al centro dietro. Lavorare il corpo in tondo con i ferri circolari. Lavorare le maniche in tondo con i ferri a doppia punta. COLLO: Avviare 72 (76-80-84-88-96-100) maglie con i ferri a doppia punta/ferri circolari corti n° 3 mm (nelle 2 taglie più piccole potete avviare e lavorare con i ferri a doppia punta fino a quando ci saranno abbastanza maglie per usare i ferri circolari; per le altre taglie potete avviare e lavorare con i ferri circolari corti). Lavorare 1 giro diritto. Poi lavorare a coste (= 2 maglie diritto / 2 maglie rovescio). Continuare queste coste per 3 cm. SPRONE: Passare ai ferri a doppia punta/ferri circolari corti n° 4 mm. Lavorare 1 giro diritto e diminuire 6 (4-3-0-4-5-9) maglie in modo uniforme sul giro – leggere il SUGGERIMENTO PER LE DIMINUZIONI/AUMENTI = 66 (72-77-84-84-91-91) maglie. Ora potete lavorare un’alzata sul dietro del collo in modo che lo sprone sia leggermente più alto sul dietro. E’ possibile saltare quest’alzata; il collo sarà identico sul davanti e sul dietro – lavorare l’ALZATA – leggere la descrizione sopra o continuare il lavoro. Lavorare il motivo A.1 - NOTA: Scegliere il diagramma per la vostra taglia (= 11 (12-11-12-12-13-13) ripetizioni di 6 (6-7-7-7-7-7) maglie). Continuare questo motivo e aumentare come indicato nel diagramma. FARE ATTENZIONE ALLA TENSIONE DEL LAVORO! Alla fine di A.1 ci sono 176 (192-209-228-240-260-260) maglie sul ferro. Continuare a maglia rasata con il senape. Sul giro successivo aumentare 7 (7-10-7-3-0-11) maglie in modo uniforme sul giro = 183 (199-219-235-243-260-271) maglie. Quando il lavoro misura 13 (14-15-16-17-18-19) cm al centro davanti (misurati senza il collo), dividere il lavoro come segue: lavorare 25 (27-30-32-34-36-38) maglie, mettere le 42 (46-50-54-54-58-60) maglie successive in sospeso per la manica (senza lavorarle), avviare 8 maglie, lavorare 49 (53-59-63-67-72-75) maglie, mettere le 42 (46-50-54-54-58-60) maglie successive in sospeso per la manica (senza lavorarle), avviare 8 maglie, lavorare le 25 (27-30-32-34-36-38) maglie rimaste come prima = 115 (123-135-143-151-160-167) maglie. CORPO: Inserire 1 segnapunti al centro delle 8 maglie avviate sotto ogni manica (= 57 (61-67-71-75-80-83) maglie tra i segnapunti sul davanti). ORA MISURARE IL LAVORO DA QUI! Quando il lavoro misura 3 cm dal punto di divisione, aumentare a ogni lato di entrambi i segnapunti – leggere il SUGGERIMENTO PER GLI AUMENTI. Ripetere questi aumenti quando il lavoro misura 6 e 9 cm dal punto di divisione = 127 (135-147-155-163-172-179) maglie. Quando il lavoro misura 11 (13-16-19-22-25-28) cm dal punto di divisione, aumentare 9 (9-9-9-9-8-9) maglie in modo uniforme sul giro successivo = 136 (144-156-164-172-180-188) maglie. Passare ai ferri circolari n° 3 mm. Lavorare a coste (= 2 maglie diritto / 2 maglie rovescio) per 4 cm. Poi intrecciare con diritto su diritto e rovescio su rovescio. Tutto il maglione misura circa 34 (37-41-45-49-53-57) cm, misurato dalla spalla. MANICA: Riportare le maglie da un fermamaglie sui ferri a doppia punta n° 4 mm e riprendere 1 maglia in ognuna delle 8 maglie avviate sotto la manica = 50 (54-58-62-62-66-68) maglie. Inserire 1 segnapunti al centro di queste 8 maglie (= centro sotto la manica). ORA MISURARE IL LAVORO DA QUI! Lavorare a maglia rasata in tondo con il senape. Quando la manica misura 1 cm dal punto di divisione, diminuire 2 maglie al centro sotto la manica – leggere il SUGGERIMENTO PER LE DIMINUZIONI. Diminuire in questo modo ogni 1½ (2-2-2½-3-3½-3½) cm per un totale di 6 (6-8-8-8-8-9) volte = 38 (42-42-46-46-50-50) maglie. Quando la manica misura 14 (16-21-24-28-31-35) cm dal punto di divisione, diminuire 2 maglie in modo uniforme sul giro = 36 (40-40-44-44-48-48) maglie. Passare ai ferri a doppia punta n° 3 mm e lavorare a coste in tondo (= 2 maglie diritto / 2 maglie rovescio) per 4 cm o fino alla lunghezza desiderata. Poi intrecciare con diritto su diritto e rovescio su rovescio. La manica misura circa 18 (20-25-28-32-35-39) cm in totale dal punto di divisione. Lavorare l’altra manica nello stesso modo. |
||||||||||
Spiegazioni del diagramma |
||||||||||
|
||||||||||
 |
||||||||||
 |
||||||||||
 |
||||||||||
 |
||||||||||
Avete terminato questo modello?Allora taggate le vostre foto con #dropspattern #littlemissysweater o inviatele alla #dropsfan gallery. Avete bisogno di aiuto con questo modello?Troverete 29 video tutorial, una sezione per i commenti/domande e molto altro guardando il modello su www.garnstudio.com © 1982-2026 DROPS Design A/S. Ci riserviamo tutti i diritti. Questo documento, compreso tutte le sue sotto-sezioni, è protetto dalle leggi sul copyright. Potete leggere quello che potete fare con i nostri modelli alla fine di ogni modello sul nostro sito. |
||||||||||


Con oltre 40 anni di esperienza nel design di modelli di maglia e uncinetto, DROPS Design offre la più estesa collezione di modelli gratuiti su internet - tradotti in 17 lingue. Ad oggi vi possiamo fornire 325 cataloghi e 12298 modelli - 9569 dei quali sono tradotti in Italiano.
Ci stiamo impegnando molto per darvi il meglio che vi possiamo offrire in termini di maglia e uncinetto, ispirazioni e consigli così come filati di grande qualità ad un prezzo incredibile! Volete utilizzare i nostri modelli per qualcosa d'altro oltre al vostro uso personale? Potete leggere tutto ciò che è consentito nel testo sul Copyright in basso su tutte le pagine dei nostri modelli. Buon lavoro!
Lasciare un commento sul modello DROPS Children 32-7
Noi saremmo felici di ricevere i tuoi commenti e opinioni su questo modello!
Se vuoi fare una domanda, fai per favore attenzione a selezionare la categoria corretta nella casella qui sotto per velocizzare il processo di risposta. I campi richiesti sono indicati da *.