
Categorie popolari
State cercando un filato?


Commenti / Domande (128)
![]() Marie Pierre ha scritto:
Marie Pierre ha scritto:
Bonjour, je ne comprends pas votre façon de mesurer le travail 3 cm de cotes +15 cm d empiècement+ 16 cm de jersey + 4 cm de cote = 38 cm donc le pull fini doit faire 38 cm depuis les cotes du col? Alors qu on nous annonce 41 cm. A quoi correspond le deuxième 3 cm en partant du haut du schéma du pull? Faut il comprendre que l empiècement fais 18 cm? le pull en taille 3,4 ans mesure combien?
14.01.2023 - 14:33DROPS Design ha risposto:
Bonjour Marie-Pierre, ces 3 cm correspondent à la hauteur d'épaules, et viennent s'ajouter à la hauteur de l'empiècement car on a toutes les mailles sur l'aiguille, encolure dos, devant + épaules. Ainsi, en taille 3/4 ans, le pull mesure 41 cm de hauteur totale de l'épaule jusqu'à la bordure du bas. Bon tricot!
16.01.2023 - 08:36
![]() Belin Elisabeth ha scritto:
Belin Elisabeth ha scritto:
Bonjour J'essaie de réaliser le modèle en taille 10 ans, mais moi aussi j ai des problèmes avec les augmentations. Lorsqu'il y a un jeté en début de rang du diagramme doit on le répéter, de même pour chacun des jetés car j'ai aussi des problèmes de décalage. Je vous remercie de votre réponse.
02.01.2023 - 15:25DROPS Design ha risposto:
Bonjour Mme Belin, vous n'êtes pas censée avoir de décalage, vous devez répéter les motifs tout simplement comme ils sont montrés dans le diagramme, autrement dit, lorsqu'il y a un jeté au début de chaque A.1 (faites le dans la couleur principale de ce tour), cette nouvelle maille sera la 1ère maille du motif du tour suivant. Placez un marqueur entre chaque diagramme peut vous aider à mieux vous repérer. Bon tricot!
02.01.2023 - 16:28
![]() Avice Chantal ha scritto:
Avice Chantal ha scritto:
Bonjour, sur le modèle little missy en 12/18 mois pouvez vous me dire combien de mailles je devrais avoir en attente pour les manches ? Je n'arrive pas à avoir le nombre de mailles voulues et je ne comprends pas pourquoi. merci pour votre réponse. Chantal
18.11.2022 - 09:27DROPS Design ha risposto:
Bonjour Mme Avice, en 12/18 mois, vous devez avoir 183 mailles après M.1 (soit 11 fois A.1 (= 16 m) + 7 augmentations) et vous répartissez ces mailles ainsi: 25 m (demi-dos), 42 m en attente pour la manche, 8 m pour sous la manche, 49 m (devant), 42 m en attente pour la manche, 8 m pour sous la manche, 25 m (demi-dos), soit: 25+42+49+42+25=183 m - et pour le dos/devant: 25+8+49+8+25=115 mailles. Bon tricot!
18.11.2022 - 15:35
![]() Hawk ha scritto:
Hawk ha scritto:
Hi, I'm starting to work on A.1 (3/4-5/6) diagram, and I'm not clear if the additional yarnovers are 2 per each round, or I actually have to repeat these every 7 stitches, for example? Like in the 1st round of A.1? If it's only 2 per round, then do I add the 1st yarn over at the very beginning of the round, and the 2nd one at the very end, or literally follow the diagram for the first 7 stitches, and then forget about them until the next round? Thank you!
27.10.2022 - 23:59DROPS Design ha risposto:
Hi Hawk, You repeat A.1 on the round (the number of times is dependent on whether you are working 3/4 or 5/6) and increase by making 1 yarn over after stitch 1 and again at the end of each repeat. On round 5 you make 1 yarn over at the end of each repeat and on round 7 at the beginning of each repeat, etc.. Hope this helps and happy knitting!
28.10.2022 - 07:48
![]() Renate Schewe ha scritto:
Renate Schewe ha scritto:
Ich habe eine Frage zum Diagramm A1. Wenn ich die Zunahmen an den angegebenen Stellen mache, dann verschiebt sich doch das Muster? Oder ich mache etwas falsch? Danke für Hilfe
07.10.2022 - 17:19DROPS Design ha risposto:
Liebe Frau Schewe, das Muster in jedem A.1 muss genauso wie beim Diagram aussehen, die Umschläge machen Sie wie gezeigt, dann stricken Sie alle Masche bei den nächsten Reihe wie gezeichnet - Diagramme lesen Sie bei jeder Reihe rechts nach links. Viel Spaß beim stricken!
10.10.2022 - 08:15
![]() Christine ha scritto:
Christine ha scritto:
Je n'arrive pas à comprendre comment faire pour passer d'un rang à l'autre lorsqu'on fait le diagramme A1 pour qu'il n'y ait pas de décalage entre les rangs. Merci pour votre aide
24.09.2022 - 08:29DROPS Design ha risposto:
Bonjour Christine, il n'est pas forcément possible de systématiquement camoufler le début des tours car quand on tricote en rond, on tricote comme une spirale, toutefois, sur certains tours, vous pourrez camoufler cette différence comme on peut le faire pour les rayures (cf vidéo). Bon tricot!
26.09.2022 - 09:07
![]() Gisela Stehno ha scritto:
Gisela Stehno ha scritto:
Hallo, ich stricke gerade diesen Pullover in der Größe 98/104. Anschlag 80 Maschen danach verteilt 3 Ma. abnehmen. 80:3=?. Welche Positionen haben die Abnahmen der 3 Maschen? Liebe Grüße Gisela
21.09.2022 - 17:27DROPS Design ha risposto:
Liebe Frau Stehno, hier lesen Sie, wie man regelmäßig verteilt ab- (oder zu-)nimmt. Viel Spaß beim stricken!
22.09.2022 - 09:20
![]() Christine ha scritto:
Christine ha scritto:
Hallo, ich stricke gerade das Modell in Größe 98/104. Es ist wunderschön und die Anleitung sehr klar und übersichtlich. Die Garnmenge in der Hauptfarbe reicht leider nicht. Es fehlt 1 Knäuel. In Natur habe dafür 1 übrig. Leider habe ich die Kommentare zu spät gelesen. Auch andere Strickerinnen haben schon geschrieben, dass die Garnmenge nicht passt. Kann das bitte geprüft und ggf. angepasst werden? Ich habe das Originalgarn bestellt und verstrickt und die Maschenprobe passt.
18.09.2022 - 09:06DROPS Design ha risposto:
Liebe Christine, und danke für den Hinweis; hat Ihre Maschenprobe in der Breite sowie auch in der Höhe gestimmt? dh 21 Maschen aber auch 28 Reihen glatt rechts = 10 x 10 cm?
19.09.2022 - 10:08
![]() Marijke ha scritto:
Marijke ha scritto:
Volgens mij is er nog iets dat niet helemaal klopt in dit patroon. Er staat dat je na het breien van de pas het werk moet verdelen (mouwen en lijf) als het werk 16 cm (leeftijd 5/6) meet. De pas zelf, netjes volgens patroon en niet te strak of los, meet bij mij al bijna 18 cm.
06.06.2022 - 15:35DROPS Design ha risposto:
Dag Marijke,
Heb je de pas midden voor gemeten, dus zonder de halsboord en zonder de verhoging?
10.06.2022 - 22:22
![]() Marijke ha scritto:
Marijke ha scritto:
Ik brei maat 5/6 jaar. Ik heb de pas nu af, en blijk aan één bol witte Merino extra fine genoeg te hebben. In het patroon staat: 3 bollen! Misschien moet dat beter aangepast worden?
06.06.2022 - 14:24
|
||||||||||
Little Missy#littlemissysweater |
||||||||||
 |
 |
|||||||||
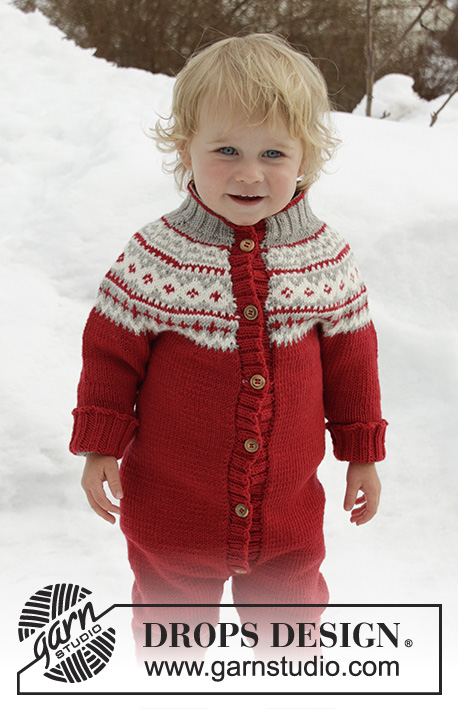
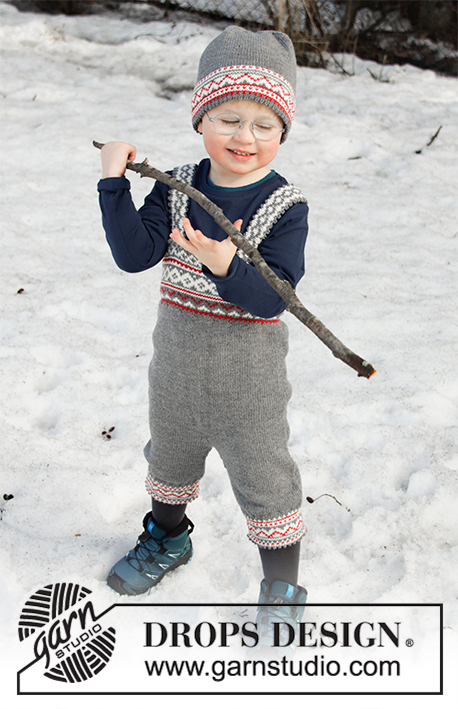
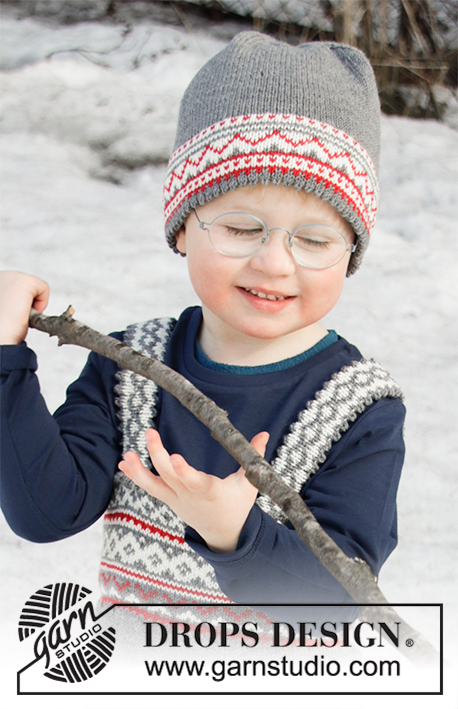
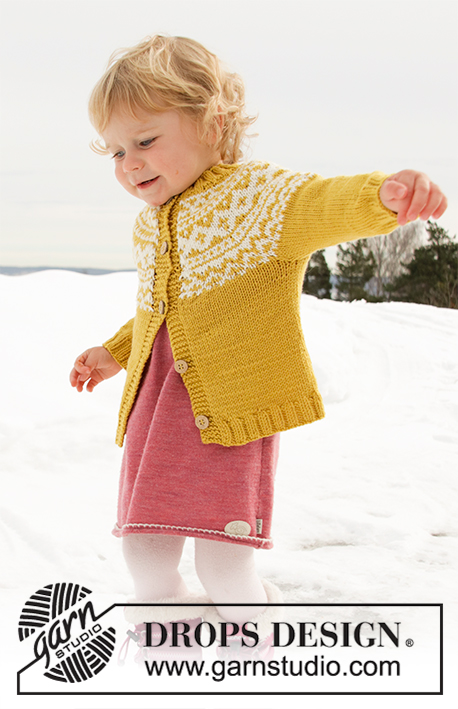
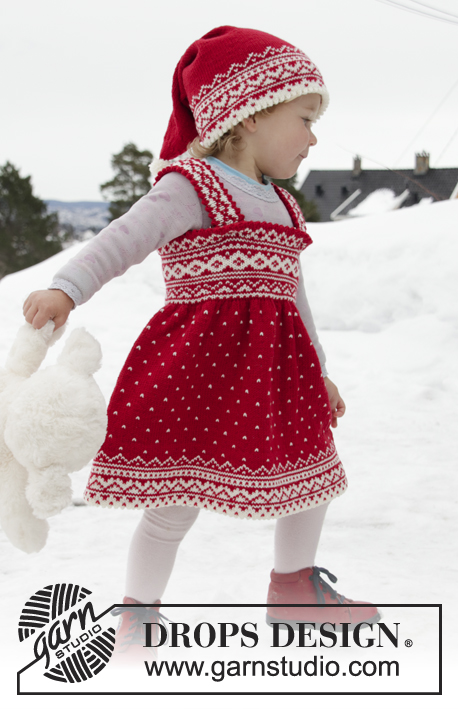
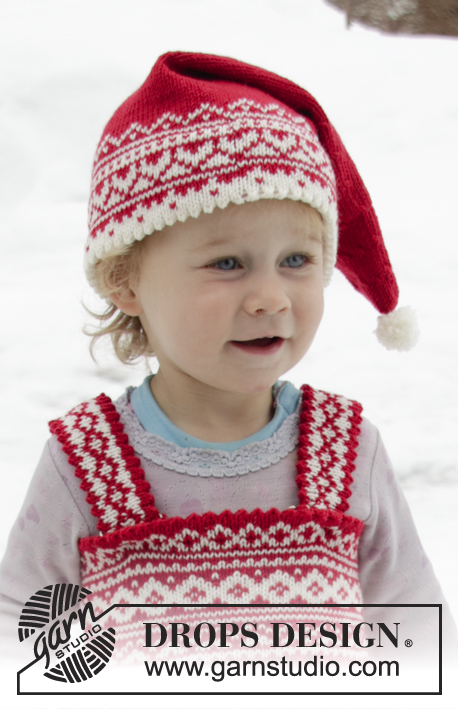
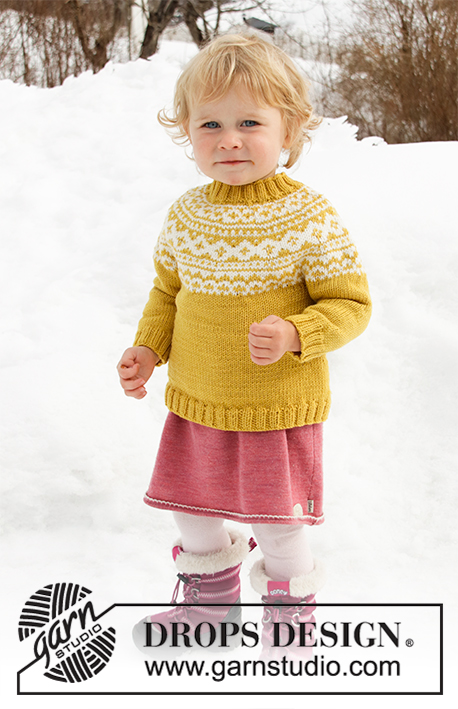
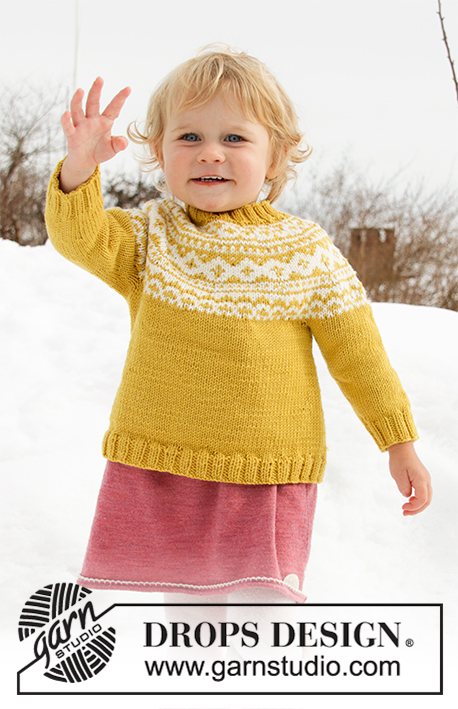
Maglione lavorato ai ferri per baby e bambini con sprone rotondo in DROPS Merino Extra Fine. Lavorato dall’alto in basso con motivo nordico. Taglie: 12 mesi – 12 anni.
DROPS Children 32-7 |
||||||||||
|
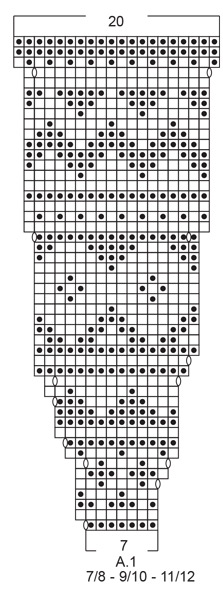
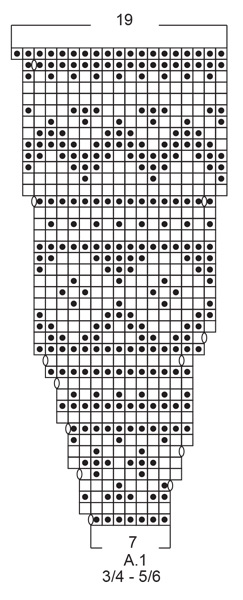
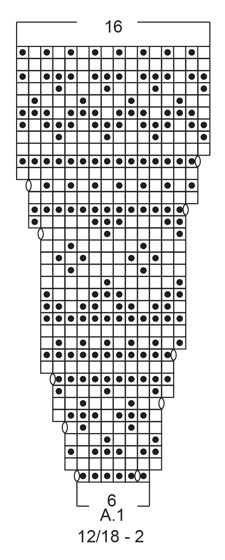
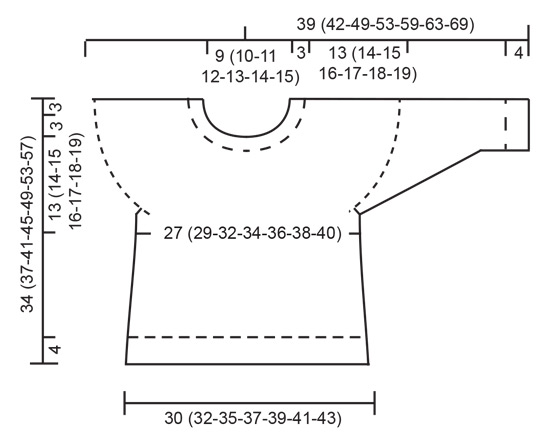
------------------------------------------------------- SPIEGAZIONI DEL MODELLO: ------------------------------------------------------- MOTIVO: Vedere il diagramma A.1. Scegliere il diagramma per la vostra taglia. Lavorare tutto il motivo a maglia rasata. SUGGERIMENTO PER GLI AUMENTI/DIMINUZIONI: Per stabilire ogni quanto diminuire/aumentare sul giro, prendere il n° totale di maglie sul ferro (ad esempio 72 maglie) e dividerlo per il n° di diminuzioni/aumenti da fare (ad esempio 6) = 12. In questo esempio, diminuire lavorando insieme ogni 11esima e 12esima maglia, o aumentare dopo ogni 12esima maglia facendo 1 gettato (lavorare i gettati a ritorto sul ferro successivo per evitare buchi). SUGGERIMENTO PER GLI AUMENTI (ai lati del corpo): Aumentare 1 maglia a ogni lato del segnapunti come segue: iniziare 2 maglie prima del segnapunti, 1 gettato, 4 maglie diritto (= il segnapunti è al centro di queste 4 maglie), 1 gettato (= 2 aumenti). Aumentare in questo modo all’altezza di entrambi i segnapunti (4 aumenti).Sul giro successivo lavorare il gettato a ritorto per evitare buchi. SUGGERIMENTO PER LE DIMINUZIONI (al centro sotto le maniche): Diminuire 1 maglia a ogni lato del segnapunti come segue: iniziare 3 maglie prima del segnapunti, 2 maglie insieme a diritto, 2 maglie diritto (= il segnapunti è al centro di queste 2 maglie), passare 1 maglia a diritto senza lavorarla, 1 maglia diritto, accavallare la maglia passata sopra quella appena lavorata (= 2 diminuzioni). ALZATA (dietro del collo): Saltare questo paragrafo se non volete l’alzata. Inserire 1 segnapunti all'inizio del giro (= centro dietro). Lavorare 6 maglie diritto, girare, tirare il filo e lavorare 12 maglie rovescio, girare, tirare il filo e continuare a lavorare con 8 (8-8-10-10-10-10) maglie in più del giro precedente ad ogni giro, altre 3 volte a ogni lato (= 4 volte in totale a ogni lato), dopo l'ultimo giro, e lavorare a diritto fino al centro dietro. ------------------------------------------------------- INIZIO DEL LAVORO: ------------------------------------------------------- MAGLIONE – BREVE RIASSUNTO DEL LAVORO: Lavorato in tondo, dall’alto in basso. Lavorare prima lo sprone, poi dividere il lavoro per il corpo e le maniche. Il giro inizia circa al centro dietro. Lavorare il corpo in tondo con i ferri circolari. Lavorare le maniche in tondo con i ferri a doppia punta. COLLO: Avviare 72 (76-80-84-88-96-100) maglie con i ferri a doppia punta/ferri circolari corti n° 3 mm (nelle 2 taglie più piccole potete avviare e lavorare con i ferri a doppia punta fino a quando ci saranno abbastanza maglie per usare i ferri circolari; per le altre taglie potete avviare e lavorare con i ferri circolari corti). Lavorare 1 giro diritto. Poi lavorare a coste (= 2 maglie diritto / 2 maglie rovescio). Continuare queste coste per 3 cm. SPRONE: Passare ai ferri a doppia punta/ferri circolari corti n° 4 mm. Lavorare 1 giro diritto e diminuire 6 (4-3-0-4-5-9) maglie in modo uniforme sul giro – leggere il SUGGERIMENTO PER LE DIMINUZIONI/AUMENTI = 66 (72-77-84-84-91-91) maglie. Ora potete lavorare un’alzata sul dietro del collo in modo che lo sprone sia leggermente più alto sul dietro. E’ possibile saltare quest’alzata; il collo sarà identico sul davanti e sul dietro – lavorare l’ALZATA – leggere la descrizione sopra o continuare il lavoro. Lavorare il motivo A.1 - NOTA: Scegliere il diagramma per la vostra taglia (= 11 (12-11-12-12-13-13) ripetizioni di 6 (6-7-7-7-7-7) maglie). Continuare questo motivo e aumentare come indicato nel diagramma. FARE ATTENZIONE ALLA TENSIONE DEL LAVORO! Alla fine di A.1 ci sono 176 (192-209-228-240-260-260) maglie sul ferro. Continuare a maglia rasata con il senape. Sul giro successivo aumentare 7 (7-10-7-3-0-11) maglie in modo uniforme sul giro = 183 (199-219-235-243-260-271) maglie. Quando il lavoro misura 13 (14-15-16-17-18-19) cm al centro davanti (misurati senza il collo), dividere il lavoro come segue: lavorare 25 (27-30-32-34-36-38) maglie, mettere le 42 (46-50-54-54-58-60) maglie successive in sospeso per la manica (senza lavorarle), avviare 8 maglie, lavorare 49 (53-59-63-67-72-75) maglie, mettere le 42 (46-50-54-54-58-60) maglie successive in sospeso per la manica (senza lavorarle), avviare 8 maglie, lavorare le 25 (27-30-32-34-36-38) maglie rimaste come prima = 115 (123-135-143-151-160-167) maglie. CORPO: Inserire 1 segnapunti al centro delle 8 maglie avviate sotto ogni manica (= 57 (61-67-71-75-80-83) maglie tra i segnapunti sul davanti). ORA MISURARE IL LAVORO DA QUI! Quando il lavoro misura 3 cm dal punto di divisione, aumentare a ogni lato di entrambi i segnapunti – leggere il SUGGERIMENTO PER GLI AUMENTI. Ripetere questi aumenti quando il lavoro misura 6 e 9 cm dal punto di divisione = 127 (135-147-155-163-172-179) maglie. Quando il lavoro misura 11 (13-16-19-22-25-28) cm dal punto di divisione, aumentare 9 (9-9-9-9-8-9) maglie in modo uniforme sul giro successivo = 136 (144-156-164-172-180-188) maglie. Passare ai ferri circolari n° 3 mm. Lavorare a coste (= 2 maglie diritto / 2 maglie rovescio) per 4 cm. Poi intrecciare con diritto su diritto e rovescio su rovescio. Tutto il maglione misura circa 34 (37-41-45-49-53-57) cm, misurato dalla spalla. MANICA: Riportare le maglie da un fermamaglie sui ferri a doppia punta n° 4 mm e riprendere 1 maglia in ognuna delle 8 maglie avviate sotto la manica = 50 (54-58-62-62-66-68) maglie. Inserire 1 segnapunti al centro di queste 8 maglie (= centro sotto la manica). ORA MISURARE IL LAVORO DA QUI! Lavorare a maglia rasata in tondo con il senape. Quando la manica misura 1 cm dal punto di divisione, diminuire 2 maglie al centro sotto la manica – leggere il SUGGERIMENTO PER LE DIMINUZIONI. Diminuire in questo modo ogni 1½ (2-2-2½-3-3½-3½) cm per un totale di 6 (6-8-8-8-8-9) volte = 38 (42-42-46-46-50-50) maglie. Quando la manica misura 14 (16-21-24-28-31-35) cm dal punto di divisione, diminuire 2 maglie in modo uniforme sul giro = 36 (40-40-44-44-48-48) maglie. Passare ai ferri a doppia punta n° 3 mm e lavorare a coste in tondo (= 2 maglie diritto / 2 maglie rovescio) per 4 cm o fino alla lunghezza desiderata. Poi intrecciare con diritto su diritto e rovescio su rovescio. La manica misura circa 18 (20-25-28-32-35-39) cm in totale dal punto di divisione. Lavorare l’altra manica nello stesso modo. |
||||||||||
Spiegazioni del diagramma |
||||||||||
|
||||||||||
 |
||||||||||
 |
||||||||||
 |
||||||||||
 |
||||||||||
Avete terminato questo modello?Allora taggate le vostre foto con #dropspattern #littlemissysweater o inviatele alla #dropsfan gallery. Avete bisogno di aiuto con questo modello?Troverete 29 video tutorial, una sezione per i commenti/domande e molto altro guardando il modello su www.garnstudio.com © 1982-2026 DROPS Design A/S. Ci riserviamo tutti i diritti. Questo documento, compreso tutte le sue sotto-sezioni, è protetto dalle leggi sul copyright. Potete leggere quello che potete fare con i nostri modelli alla fine di ogni modello sul nostro sito. |
||||||||||


Con oltre 40 anni di esperienza nel design di modelli di maglia e uncinetto, DROPS Design offre la più estesa collezione di modelli gratuiti su internet - tradotti in 17 lingue. Ad oggi vi possiamo fornire 325 cataloghi e 12298 modelli - 9569 dei quali sono tradotti in Italiano.
Ci stiamo impegnando molto per darvi il meglio che vi possiamo offrire in termini di maglia e uncinetto, ispirazioni e consigli così come filati di grande qualità ad un prezzo incredibile! Volete utilizzare i nostri modelli per qualcosa d'altro oltre al vostro uso personale? Potete leggere tutto ciò che è consentito nel testo sul Copyright in basso su tutte le pagine dei nostri modelli. Buon lavoro!
Lasciare un commento sul modello DROPS Children 32-7
Noi saremmo felici di ricevere i tuoi commenti e opinioni su questo modello!
Se vuoi fare una domanda, fai per favore attenzione a selezionare la categoria corretta nella casella qui sotto per velocizzare il processo di risposta. I campi richiesti sono indicati da *.