
Categorie popolari
State cercando un filato?


Commenti / Domande (83)
![]() Lyne Larouche ha scritto:
Lyne Larouche ha scritto:
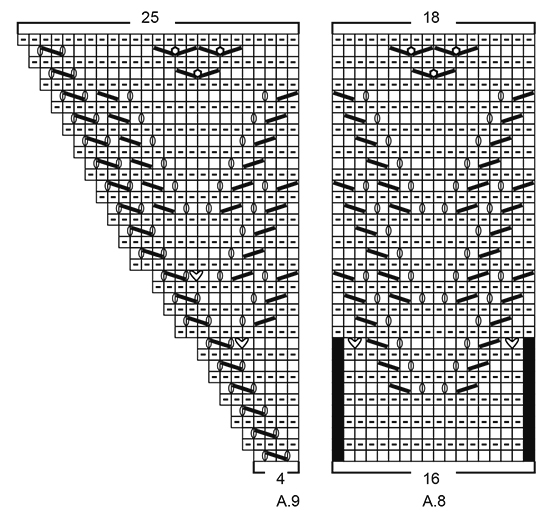
Dans le diagramme A8 au 11 ième rangs entre la première et deuxième maille et la 15 et 16 mailles si il faut faire 2 jetes merci
20.02.2018 - 01:22DROPS Design ha risposto:
Bonjour Mme Larouche, tout à fait, on fait 2 jetés au 11ème rang après la 1ère maille et 2 jetés avant la dernière m de A.8. Au rang suivant, tricotez le 1er jeté et lâchez le 2ème = vous augmentez ainsi 2 m dans A.8 et le trou est un peu plus grand. Bon tricot!
20.02.2018 - 08:48
![]() Jozefien De Bruijn ha scritto:
Jozefien De Bruijn ha scritto:
Dat deed ik, maar het resultaat is steeds hetzelfde. Ik moet maar een ander patroon kiezen. Jammer.
20.02.2018 - 00:19DROPS Design ha risposto:
Hallo Jozefien, Je kan evt. ook altijd om hulp vragen bij het verkooppunt waar je het garen hebt gekocht.
20.02.2018 - 16:32
![]() Jozefien De Bruijn ha scritto:
Jozefien De Bruijn ha scritto:
Het gaat over schema's 2 t/m 6. De gaatjes verspringen steeds. Rij 1 t/m 4 gaan goed = 39 steken op de naald, maar bij rij vijf (kantsteek, omslag, 6 rechts, mindering, omslag, gemarkeerde steek) zit die gemarkeerde steek dus al naar rechts. Brei ik verder (7 rechts, omslag, middelste steek) dan zit de middelste steek NIET in het midden. Verder hoef ik dan al niet te breien, want dan klopt het verder ook niet. Ergens moet ik een fout maken maar ik zie niet waar. U wel ?
19.02.2018 - 20:15DROPS Design ha risposto:
Hallo Jozefien, Het is jammer dat ik vanaf hier niet mee kan kijken, maar zoals je het beschrijft zou het toch moeten kloppen, en het telpatroon klopt ook. Misschien heb je toch ergens iets over het hoofd gezien. Het kan soms helpen om een test te maken met vrij dik garen; dan zie je sneller wat er evt. fout gaat.
19.02.2018 - 21:10
![]() Jozefien De Bruijn ha scritto:
Jozefien De Bruijn ha scritto:
Na zes keer opnieuw begonnen te zijn moet ik concluderen dat de eerste en derde rij gaatjes niet boven elkaar komen. Ik heb ervaring in het lezen van schema's, maar hier kom ik niet aan uit. Waar zit de fout ?
07.02.2018 - 11:39DROPS Design ha risposto:
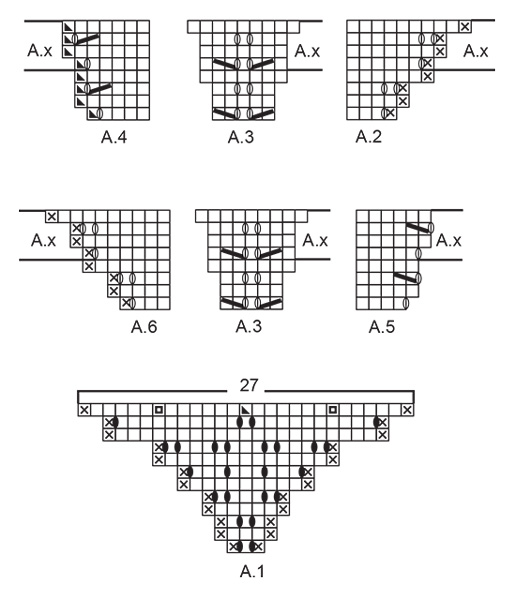
Hoi Jozefien, Waar ben je precies in het patroon? Gaat het om telpatroon A.1? Je zet 3 steken op en begint dan met breien van A.1. De eerste naald is drie steken en tussen de 1e en 2e steek maak je een omslag. De tweede naald brei je op de verkeerde kant. Bij de derde rij maak je na de tweede en derde steek een omslag, zodat deze boven de omslagen van naald 1 komen.
07.02.2018 - 20:33
![]() Lyne Larouche ha scritto:
Lyne Larouche ha scritto:
Je tricote le Ax en hauteur tel quel et je rajoute 12 mailles en augmentation en plus 24 fois
06.02.2018 - 20:55DROPS Design ha risposto:
Bonjour Mme Larouche, à chaque fois que vous tricotez A.x en hauteur, vous avez augmenté 12 m au total. Bon tricot!
07.02.2018 - 08:40
![]() Lyne Larouche ha scritto:
Lyne Larouche ha scritto:
Si je comprend bien je tricote les huit rang en hauteur de A2 a A6 24 fois et je fais les augmentations du Ax aussi
01.02.2018 - 17:40DROPS Design ha risposto:
Bonjour Mme Larouche, vous tricotez 1 fois les 8 rangs de A.2-A.6 puis vous répétez 24 fois la partie A.x de A.2-A.6 (A.x aura été tricoté 25 fois au total en hauteur, soit 51 m + (25 x 12 augmentations) = 339 m. Bon tricot!
02.02.2018 - 08:34
![]() Lyne Larouche ha scritto:
Lyne Larouche ha scritto:
J'ai déjà tricoter A2 a A6 1 fois.J'aimerais savoir pour continuer si il faut que je le répète 24 fois au complet avec Ax ou bien seulement Ax 24 fois.les augmentations ne dérangeront pas les motifs du Ax et ou les placer sur le rang? merci
30.01.2018 - 23:13DROPS Design ha risposto:
Bonjour Mme Larouche, vous répétez 24 fois Ax après les premiers A.2-A.6 en hauteur, continuez à augmenter dans A.2, A.4, A.5 et A.6 comme indiqué dans les diagrammes et veillez à ce que A.3 soit toujours bien aligné, les nouvelles mailles avant/après A.3 se tricotent en jersey. Bon tricot!
31.01.2018 - 08:39
![]() Solange ha scritto:
Solange ha scritto:
Combien faut-il de laine pour tricoter le modèle svp ?
28.12.2017 - 18:36DROPS Design ha risposto:
Bonsoir, il vous faut 100 g de laine DROPS LACE (2 pelotes). Bon tricot!
28.12.2017 - 20:42
![]() Jozefien ha scritto:
Jozefien ha scritto:
Er zouden drie markeerdraden in de steken moeten worden geplaatst en gaandeweg meegenomen worden. Nu heb ik geen idee hoe je dat moet doen, als de markeerdraad echt in de steek zit. Kunt u mij dat even uitleggen, want het is de eerste driehoek die ik wil gaan breien in kant.
22.12.2017 - 21:08DROPS Design ha risposto:
Hoi Jozefien, Je knipt een draadje van ongeveer 10 cm af van een totaal andere kleur (gewoon een restant). Deze trek je door de betreffende steek zodat het a.h.w. in het werk hangt van de voorkant naar de achterkant. Een stukje verderop kun je hem weer door de steek trekken maar dan een aantal naalden hoger. Op deze manier neem je hem zigzag mee, steeds van voor naar achter.
29.12.2017 - 20:23Eva Wernisch ha scritto:
Dear Team, when starting, in A2 to A6 there is a mistake in the Ax rows: first row in your diagramm there is one, then 2 loops, six 2 tog two loops, 2 tog and 7 - its the other way round: first seven, then six. 2nd round following is the same - not 8 and 8, but 9 and 7 (however these things are called, my english referring to crocheting is better...) yours, Eva
03.12.2017 - 20:36DROPS Design ha risposto:
Dear Mrs Wernisch, in row 1 section A.x you inc 1 st (= 1 YO) in A.2 and 1 st (= 1 YO) in A.4. On row 3 you inc 2 sts (= 2 YOs: 1 yo, K1, 1 yo) in A.2 and in A.4 you will K2 tog, then YO (= the 2 sts inc are included in A.3). Happy knitting!
04.12.2017 - 10:50
|
||||||||||||||||||||||||||||||||||||||||
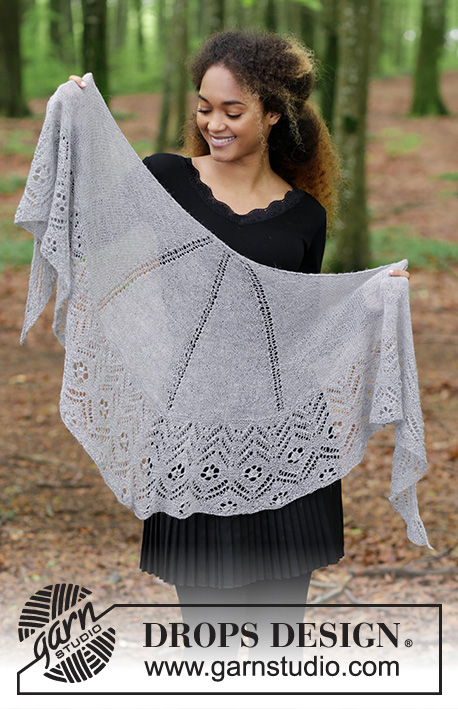
Wings of Love#wingsofloveshawl |
||||||||||||||||||||||||||||||||||||||||
 |
 |
|||||||||||||||||||||||||||||||||||||||
Scialle lavorato ai ferri con motivo traforato a maglia rasata e maglia legaccio. Lavorato in DROPS Lace.
DROPS 181-4 |
||||||||||||||||||||||||||||||||||||||||
|
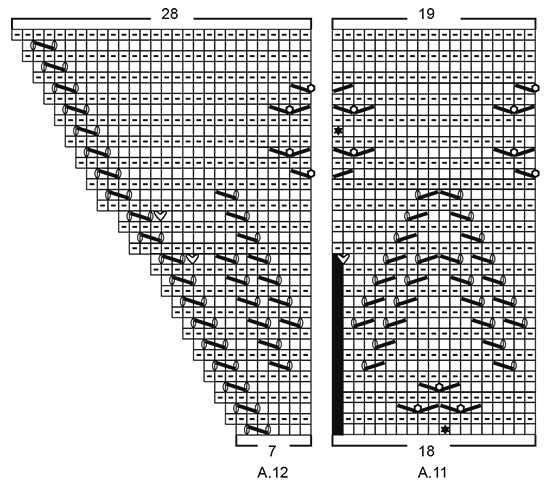
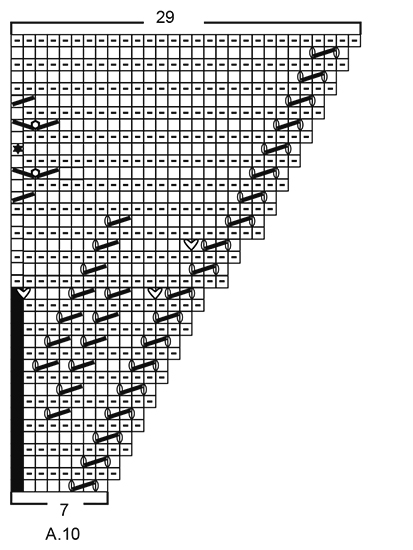
INFORMAZIONI PER IL LAVORO: COSTA/MAGLIA LEGACCIO (lavorata avanti e indietro): 1 costa = 2 ferri diritto. MOTIVO: Vedere i diagrammi A.1-A.12. Il diagramma mostra tutti i ferri del motivo visti dal diritto del lavoro. Ferro 1 = diritto del lavoro. MESSA IN FORMA: Se state usando un altro filato del gruppo A, non avrete bisogno di portare lo scialle alle misure corrette, ma bagnatelo e mettetelo delicatamente in forma. Lasciarlo asciugare. Ripetere il processo ogni volta che lo scialle viene lavato. SUGGERIMENTO PER LA CHIUSURA: Per evitare che il bordo di chiusura risulti tirato, potete intrecciare con un ferro di ½ misura più grande. ---------------------------------------------------------- SCIALLE: Lavorato avanti e indietro con i ferri circolari, dall’alto in basso. Lavorare dal centro del bordo superiore a maglia rasata e motivo traforato e finire in basso con un bordo con motivo traforato e maglia legaccio. Avviare 3 maglie con i ferri n° 3 mm e Lace – leggere CAMPIONE sopra. Lavorare seguendo il diagramma A.1 (= 3 maglie) – leggere MOTIVO sopra. Sull’ultimo ferro, inserire 3 segnapunti come mostrato nel diagramma. Alla fine di tutto il diagramma A.1, ci sono 27 maglie sul ferro. LAVORARE SEGUENDO I DIAGRAMMI A.2-A.6 COME SEGUE DAL DIRITTO DEL LAVORO: lavorare A.2 (= 4 maglie), A.3 (= 5 maglie – il 1° segnapunti è al centro di A.3), A.4 (= 5 maglie – il 2° segnapunti è nell’ultima maglia di A.4), A.5 (= 4 maglie), A.3 (= 5 maglie – il 3° segnapunti è al centro di A.3) e A.6 (= 4 maglie). Alla fine dei diagrammi A.2-A.6, ci sono 51 maglie sul ferro. Ripetere gli aumenti come mostrato in A.x – aumentare in modo alternato 4 e 8 maglie su ogni ferro dal diritto del lavoro (quindi 12 aumenti per ogni ripetizione di A.x in altezza), gli aumenti vengono lavorati a maglia rasata a ogni lato di A.3. Ripetere come mostrato in A.x 24 volte in totale in altezza = 339 maglie sul ferro. Il lavoro misura circa 36 cm. Sul ferro successivo dal diritto del lavoro, lavorare e aumentare 4 maglie come mostrato sul 1° ferro di A.x = 343 maglie. Lavorare 1 ferro rovescio dal rovescio del lavoro (la maglia di vivagno a ogni lato è lavorata a MAGLIA LEGACCIO – leggere la descrizione sopra, per tutto il lavoro). Lavorare 1 ferro dal diritto del lavoro e aumentare 1 maglia all’interno della maglia di vivagno a maglia legaccio a ogni lato e aumentare 1 maglia solo vicino alla maglia centrale (= 3 aumenti) = 346 maglie sul ferro e lavorare 1 ferro rovescio dal rovescio del lavoro. Non avrete più bisogno dei 3 segnapunti da qui in poi. LAVORARE SEGUENDO I DIAGRAMMI A.7-A.9 COME SEGUE DAL DIRITTO DEL LAVORO: Lavorare 1 maglia di vivagno a maglia legaccio, A.7 su 4 maglie, ripetere A.8 fino a quando rimangono 8 maglie sul ferro (= 21 ripetizioni di 16 maglie), A.9 su 4 maglie e 1 maglia di vivagno a maglia legaccio. NOTA! Sul 11° ferro del diagramma, aumentare 2 maglie in ogni ripetizione di A.7, A.8 e A.9. Sul 17° ferro aumentare 2 maglie in ogni A.7 e A.9. Alla fine dei diagrammi A.7-A.9, ci sono 430 maglie sul ferro. LAVORARE SEGUENDO I DIAGRAMMI A.10-A.12 COME SEGUE DAL DIRITTO DEL LAVORO: Lavorare 1 maglia di vivagno a maglia legaccio, A.10 su 7 maglie, ripetere A.11 fino a quando rimangono 8 maglie sul ferro (= 23 ripetizioni di 16 maglie), A.12 su 7 maglie e 1 maglia di vivagno a maglia legaccio. NOTA! Sul 17° ferro del diagramma, aumentare 3 maglie in A.10, 1 maglia in A.11 e 2 maglie in A.12. Sul 21° ferro aumentare 2 maglie in A.10 e A.12. Alla fine dei diagrammi A.10-A.12, ci sono 496 maglie sul ferro – intrecciare senza stringere sull’ultimo ferro dal rovescio del lavoro – leggere il SUGGERIMENTO PER LA CHIUSURA sopra. MESSA IN FORMA: Lasciare lo sicalle in acqua tiepida fino a quando è completamente bagnato. Far uscire delicatamente l’acqua dallo scialle – non dev’essere strizzato, poi arrotolarlo in un asciugamano e premere ancora per far uscire altra acqua – lo scialle ora sarà umido. Se state usando un altro filato del gruppo A – leggere MESSA IN FORMA sopra. Lasciare lo scialle su un tappeto o materasso – metterlo in forma delicatamente e usare degli spilli per tenerlo teso. Lasciare asciugare. Ripetere il processo ogni volta che lo scialle viene lavato. |
||||||||||||||||||||||||||||||||||||||||
Spiegazioni del diagramma |
||||||||||||||||||||||||||||||||||||||||
|
||||||||||||||||||||||||||||||||||||||||
 |
||||||||||||||||||||||||||||||||||||||||
 |
||||||||||||||||||||||||||||||||||||||||
 |
||||||||||||||||||||||||||||||||||||||||
 |
||||||||||||||||||||||||||||||||||||||||
 |
||||||||||||||||||||||||||||||||||||||||
Avete terminato questo modello?Allora taggate le vostre foto con #dropspattern #wingsofloveshawl o inviatele alla #dropsfan gallery. Avete bisogno di aiuto con questo modello?Troverete 23 video tutorial, una sezione per i commenti/domande e molto altro guardando il modello su www.garnstudio.com © 1982-2026 DROPS Design A/S. Ci riserviamo tutti i diritti. Questo documento, compreso tutte le sue sotto-sezioni, è protetto dalle leggi sul copyright. Potete leggere quello che potete fare con i nostri modelli alla fine di ogni modello sul nostro sito. |
||||||||||||||||||||||||||||||||||||||||


Con oltre 40 anni di esperienza nel design di modelli di maglia e uncinetto, DROPS Design offre la più estesa collezione di modelli gratuiti su internet - tradotti in 17 lingue. Ad oggi vi possiamo fornire 324 cataloghi e 12290 modelli - 9561 dei quali sono tradotti in Italiano.
Ci stiamo impegnando molto per darvi il meglio che vi possiamo offrire in termini di maglia e uncinetto, ispirazioni e consigli così come filati di grande qualità ad un prezzo incredibile! Volete utilizzare i nostri modelli per qualcosa d'altro oltre al vostro uso personale? Potete leggere tutto ciò che è consentito nel testo sul Copyright in basso su tutte le pagine dei nostri modelli. Buon lavoro!
Lasciare un commento sul modello DROPS 181-4
Noi saremmo felici di ricevere i tuoi commenti e opinioni su questo modello!
Se vuoi fare una domanda, fai per favore attenzione a selezionare la categoria corretta nella casella qui sotto per velocizzare il processo di risposta. I campi richiesti sono indicati da *.