
Categorie popolari
State cercando un filato?


Commenti / Domande (57)
![]() Michelle ha scritto:
Michelle ha scritto:
Bonjour. Ce modèle m interesse... j aimerais savoir si dans le dos vu qu il n y a pas de photo du dos. il y a de la dentelle ou est ce du jersey? merci 😁😁
25.09.2020 - 13:13DROPS Design ha risposto:
Bonjour Michelle, le point fantaisie ajouré est le même dans le dos que devant. Bon tricot!
25.09.2020 - 14:38
![]() Richard ha scritto:
Richard ha scritto:
HELP! I am in need of 3 x 50g balls of 'Drops Cotton Merino' - Colour 17- Dye Lot 52848. Any help or suggestions, gratefully received. Also, If I make a hat using Cotton Merino, but the pattern calls for 'Fingering Merino' will it make much difference?? Thank you. Richard.
27.01.2020 - 13:12DROPS Design ha risposto:
Dear Richard, please contact your DROPS store (and more stores if necessary) or even our DROPS Workshop - CottonMerino is a 8 ply/Dk/Worsted yarn - see shadecard - see here all patterns you can use for Cotton Merino. Happy knitting!
27.01.2020 - 14:24
![]() Richard ha scritto:
Richard ha scritto:
Sorry, the last comment should read with "I placed the marker to the side (on my RIGHT)!" Thanks.
24.01.2020 - 15:28
![]() Richard ha scritto:
Richard ha scritto:
Hi, Thanks for your replies & I've mastered the difficult start - as you say, with double-pointed needles. The raglan decreasing is another matter. As I look at the sleeve (to my left), I have placed a marker on the stitch nearest to the side. I have then placed another marker on the 1st stitch of the side (which is to my left). Now, you say to start 3 stitches before this marker- yes? Where to I start on the sleeve decrease, please.
24.01.2020 - 15:25DROPS Design ha risposto:
Dear Richard, you should have 1 marker between each piece; so if you look at the sleeve, there is 1 marker at the end of body (either back or front piece) = before the first stitch on sleeve and 1 marker at the end of sleeve, after the last stitch on sleeve = before the first stitch on front/back piece. Start 3 sts before the first of these 2 markers, K2 tog, = 1 stitch remain before marker, work this stitch + the next st (= first after marker) and dec = there are 2 sts decreased at the marker and K2 between the dec (with marker in the middle of these K2). Repeat at each marker. Happy knitting!
24.01.2020 - 16:04
![]() Richard ha scritto:
Richard ha scritto:
Hi, once more. I've placed markers at the sleeves & sides & now trying to knit the raglan decreases! I understand the pattern for instructions for the sides, but starting 3 stitches before the marker (does this include the marker), I end up, after the decrease, taking the first stitch of the sleeve. Your assistance once again would be very much appreciated. Thank you. Richard.
24.01.2020 - 12:29DROPS Design ha risposto:
Dear Richard, there should be 1 stitch on each side of marker on each piece between the raglan decreases, ie you will work at each transition: K2 tog (1 dec), K2 (= Knit the stitch before marker + the stitch after marker), slip 1 as if to K, K1, psso. So starting at the transition between back and one sleeve, you will start (and end) round with K1, Hope it helps, Happy knitting!
24.01.2020 - 14:23
![]() Richard ha scritto:
Richard ha scritto:
Good morning. I have completed the body & both sleeves. But now that I have joined them on one needle, I find that when trying to knit the sleeves, the stitches are stretched (almost impossible to do)! I've had to use double-pointed needles to help me out! I don't remember having this trouble when I made the first one of this pattern (in size medium). Please can you help. Thanks. Richard.
24.01.2020 - 10:15DROPS Design ha risposto:
Dear Richard, that's right, the first few rounds at the beginning of yoke can be somewhat tricky, you can use the double pointed needles or circular needles if you like to, after few rounds, all stitches will have enough place on the circular needle to work them on the round. Happy knitting!
24.01.2020 - 14:08
![]() Richard ha scritto:
Richard ha scritto:
Thank you for the reply to my question. I sent a sketch via email, showing how I was knitting the round. So, from what you are saying, I have to knit A1 (1st row), (only for the complete round)! Then for the next round, I have to knit A1 (2nd row), for the complete round! Then 3rd row, 4th row & so on.... This makes sense. Please can you confirm this for me.. Thanks a million. Richard.
13.01.2020 - 20:17DROPS Design ha risposto:
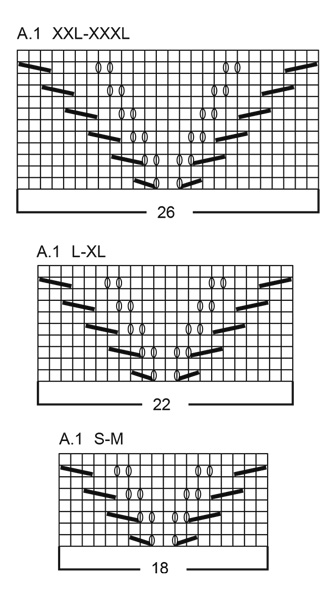
Dear Richard, that's how you should work the diagrams (row 1 in A.1 on all diagrams, then row 2 in A.1 on all diagrams and so on). Happy knitting!
14.01.2020 - 07:50
![]() Richard ha scritto:
Richard ha scritto:
Good morning, again. Continuing from the two Ridge rows, I began the round, as per your instructions. But, I find that the *A1* pattern, repeats 3 times (2 with odd row numbers, 1 even row number. in the first half, up to 124 stitches. But for the continuing *A1* pattern, there is only 1 odd number row! But, there are 2 even row numbers! Is this so? Please. Richard. I have made a drawing which explains better. If I may upload it.
13.01.2020 - 11:03DROPS Design ha risposto:
Dear Richard, not sure I'm getting this properly, when working A.1 in the round, you should work same round in each diagram all the round = round 1 A.1 when working round 1 on yoke, then work round 2 in A.1 and so on. What do I misunderstand?
13.01.2020 - 11:34
![]() Richard ha scritto:
Richard ha scritto:
Sadly, (Hi again). I'm still struggling after completing the two ridges! It is written that I knit 20, purl 3 (23 stitches), then *A1 (22 stitches, purl 6! (A1 = 10 rows @22 stitches) = 220 stitches. But adding the first 23 stitches to the 220 stitches = 243 stitches? Yet it is written, that I then purl 6! Doing this gives a total of 249 stitches! What am I doing wrong please? Forgive me, I am nearly 78 years old. Have a good day.
09.01.2020 - 12:22DROPS Design ha risposto:
Dear Richard, you should work the 248 sts in size L as follows: knit 20, purl 3, *A.1 (= 22 sts), purl 6*, repeat from *-* a total of 2 times (= 28 sts x 2= 56 sts), A.1 (= 22 sts), purl 3, knit 40 , purl 3, repeat from *-* (= 56 sts), A.1 (= 22 sts), purl 3, knit 20 = 20+3 + 56+22 + 3+40+3 + 56+22 +3+20=248 sts. Try to add markers between each section, it can help you to check the number of stitches. Happy knitting!
09.01.2020 - 14:07
![]() Richard ha scritto:
Richard ha scritto:
Hi (once again). This should be the last for awhile. I understand the A1 block now, working from the bottom up! But, please tell me: Do I follow the pattern from left to right or right to left?? I ask this, because, I am reading the block from right to left! I don't believe it makes much difference (but, there again, you are the Expert). Thank you. Richard.
07.01.2020 - 22:07DROPS Design ha risposto:
Dear Richard, diagrams are read bottom up starting from the right corner to the left, ie you will read every row in diagrams from the right towards the left (since you are working in the round) - read more about diagrams here (link is now working). Happy knitting!
08.01.2020 - 09:04
|
|||||||||||||||||||
Lemon Parfait#lemonparfaitsweater |
|||||||||||||||||||
 |
 |
||||||||||||||||||
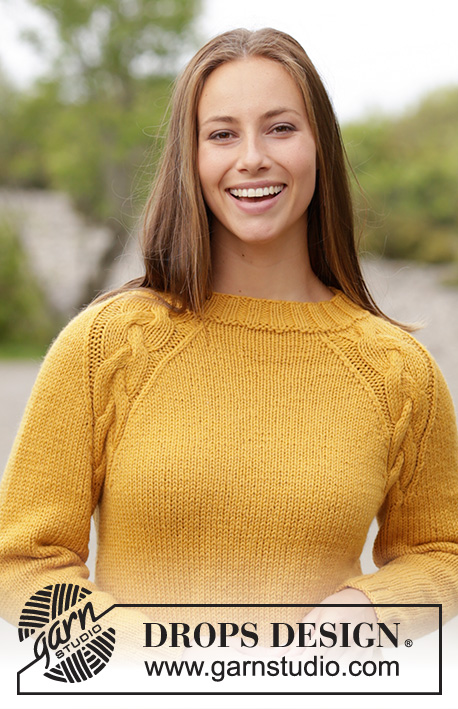
Maglione lavorato ai ferri con motivo a foglie e diminuzioni per il raglan. Taglie: S - XXXL. Lavorato in DROPS Cotton Merino.
DROPS 180-1 |
|||||||||||||||||||
|
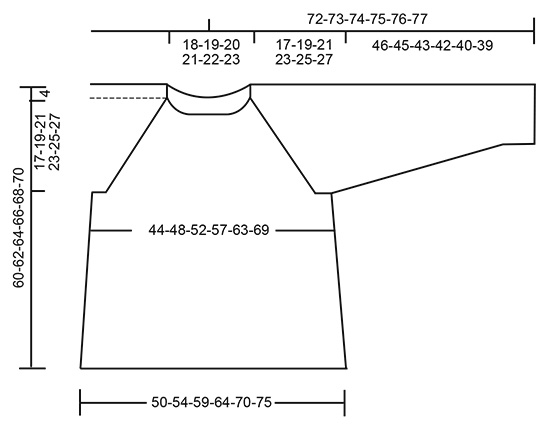
INFORMAZIONI PER IL LAVORO: COSTA/MAGLIA LEGACCIO (lavorata in tondo): 1 costa = 2 giri. 1 giro diritto e 1 giro rovescio. MOTIVO: Vedere il diagramma A.1. Scegliere il diagramma per la vostra taglia. SUGGERIMENTO PER LE DIMINUZIONI (per il lato): Iniziare 3 maglie prima del segnapunto a lato: 2 maglie insieme a diritto, 2 maglie diritto (il segnapunti è al centro di queste 2 maglie), passare 1 maglia a diritto senza lavorarla, 1 maglia diritto, accavallare la maglia passata sopra quella appena lavorata. SUGGERIMENTO PER GLI AUMENTI: Aumentare come segue al centro sotto la manica – iniziare 1 maglia prima del segnapunti: fare 1 gettato, 2 maglie diritto (il segnapunti è al centro di queste 2 maglie), 1 gettato. Sul giro successivo, lavorare i gettati a rovescio ritorto per evitare buchi. RAGLAN: Vengono diminuite 2 maglie in ogni punto di passaggio tra il corpo e le maniche. Iniziare 3 maglie prima del segnapunti: 2 maglie insieme a diritto, 2 maglie diritto (il segnapunti è al centro di queste 2 maglie), passare 1 maglia a diritto senza lavorarla, 1 maglia diritto, accavallare la maglia passata sopra quella appena lavorata. SUGGERIMENTO PER IL LAVORO: Se la tensione del lavoro non è corretta in altezza e il vostro lavoro risulta troppo tirato, lo sprone risulterà troppo corto e lo scalfo troppo piccolo. Questo può essere sistemato lavorando un giro in più senza diminuzioni in modo regolare tra le diminuzioni. ---------------------------------------------------------- CORPO: Lavorato in tondo con i ferri circolari, dal basso verso l’alto. Avviare 212-228-248-268-292-316 maglie con i ferri circolari n° 4 mm e Cotton Merino. Lavorare 2 COSTE – leggere la descrizione sopra. Continuare a lavorare come segue: 17-21-20-25-25-31 maglie diritto, 3 maglie rovescio, *A.1 (= 18-18-22-22-26-26 maglie), 6 maglie rovescio *, lavorare *-* 2 volte in totale, A.1, 3 maglie rovescio, 34-42-40-50-50-62 maglie diritto, 3 maglie rovescio, *A.1, 6 maglie rovescio *, lavorare *-* 2 volte in totale, A.1, 3 maglie rovescio, 17-21-20-25-25-31 maglie diritto. Inserire 1 segnapunti all’inizio del giro e 1 dopo 106-114-124-134-146-158 maglie = lati. Continuare questo motivo verso l’alto. FARE ATTENZIONE ALLA TENSIONE DEL LAVORO! Quando il lavoro misura 8 cm diminuire 1 maglia a ogni lato dei segnapunti ai lati (= 4 maglie diminuite) – LEGGERE IL SUGGERIMENTO PER LE DIMINUZIONI! Diminuire ogni 4½ cm per un totale di 7 volte per tutte le taglie = 184-200-220-240-264-288 maglie. Quando il lavoro misura 39-39-39-39-39-39 cm intrecciare 8-8-10-10-12-14 maglie a ogni lato (= 4-4-5-5-6-7 maglie a ogni lato dei segnapunti). Ora ci sono 84-92-100-110-120-130 maglie sul dietro e davanti. Lasciare il lavoro da parte e lavorare le maniche. MANICA: Lavorata in tondo con i ferri a doppia punta, passare ai ferri circolari quando sono state aumentate abbastanza maglie. Avviare 48-52-56-56-60-64 maglie con i ferri a doppia punta n° 3,5 mm e Cotton Merino. Lavorare 1 giro diritto, poi lavorare a coste, 2 maglie diritto/2 maglie rovescio. Quando il lavoro misura 6 cm passare ai ferri a doppia punta n° 4 mm. Lavorare 1 giro diritto in cui diminuire 4-6-8-6-8-10 maglie in modo uniforme sul giro = 44-46-48-50-52-54 maglie. Inserire 1 segnapunti all’inizio del giro (= centro sotto la manica). Continuare a maglia rasata. Quando il lavoro misura 10-7-7-10-7-7 cm aumentare 2 maglie al centro sotto la manica – LEGGERE IL SUGGERIMENTO PER GLI AUMENTI. Aumentare ogni 3-2½-2-1½-1½-1½ cm per un totale di 12-15-18-19-20-21 volte = 68-76-84-88-92-96 maglie. Quando il lavoro misura 46-45-43-42-40-39 cm (misure più corte per le taglie più grando a causa dello sprone più lungo) intrecciare le 8-8-10-10-12-14 maglie centrali sotto la manica = 60-68-74-78-80-82 maglie. Lasciare il lavoro da parte e lavorare un’altra manica. SPRONE: Mettere le maniche sullo stesso ferro circolare del corpo dove sono state intrecciate le maglie per gli scalfi = 288-320-348-376-400-424 maglie. Inserire un segnapunti in ogni punto di passaggio tra il corpo e le maniche (= 4 segnapunti). Continuare con il motivo come prima e le diminuzioni per il RAGLAN – vedere la spiegazione sopra. Diminuire ogni 4 giri 5-5-6-6-6-7 volte , poi ogni 2 giri 14-16-18-21-23-24 volte = in tutto 19-21-24-27-29-31 volte – mentre si diminuisce, lavorare a maglia rasata le maglie del diagramma A.1 che non possono essere lavorate seguendo il motivo. Alla fine di tutte le diminuzioni, ci sono 136-152-156-160-168-176 maglie sul giro. Lavorare 2 costd su tutte le maglie, ma sul 1° giro, lavorare insieme 2 a 2 a diritto le 22-26-26-24-22-20 maglie su ogni manica, inoltre diminuire 18-28-26-28-34-40 maglid in modo uniforme sul giro = 96-98-104-108-112-116 maglie. Intrecciare a diritto. CONFEZIONE: Cucire le aperture sotto le maniche. |
|||||||||||||||||||
Spiegazioni del diagramma |
|||||||||||||||||||
|
|||||||||||||||||||
 |
|||||||||||||||||||
 |
|||||||||||||||||||
Avete terminato questo modello?Allora taggate le vostre foto con #dropspattern #lemonparfaitsweater o inviatele alla #dropsfan gallery. Avete bisogno di aiuto con questo modello?Troverete 27 video tutorial, una sezione per i commenti/domande e molto altro guardando il modello su www.garnstudio.com © 1982-2026 DROPS Design A/S. Ci riserviamo tutti i diritti. Questo documento, compreso tutte le sue sotto-sezioni, è protetto dalle leggi sul copyright. Potete leggere quello che potete fare con i nostri modelli alla fine di ogni modello sul nostro sito. |
|||||||||||||||||||


Con oltre 40 anni di esperienza nel design di modelli di maglia e uncinetto, DROPS Design offre la più estesa collezione di modelli gratuiti su internet - tradotti in 17 lingue. Ad oggi vi possiamo fornire 324 cataloghi e 12290 modelli - 9561 dei quali sono tradotti in Italiano.
Ci stiamo impegnando molto per darvi il meglio che vi possiamo offrire in termini di maglia e uncinetto, ispirazioni e consigli così come filati di grande qualità ad un prezzo incredibile! Volete utilizzare i nostri modelli per qualcosa d'altro oltre al vostro uso personale? Potete leggere tutto ciò che è consentito nel testo sul Copyright in basso su tutte le pagine dei nostri modelli. Buon lavoro!
Lasciare un commento sul modello DROPS 180-1
Noi saremmo felici di ricevere i tuoi commenti e opinioni su questo modello!
Se vuoi fare una domanda, fai per favore attenzione a selezionare la categoria corretta nella casella qui sotto per velocizzare il processo di risposta. I campi richiesti sono indicati da *.