
Categorie popolari
State cercando un filato?


Commenti / Domande (267)
![]() Sylvia ha scritto:
Sylvia ha scritto:
And what am I doing on the WS? knitting, purling?
22.04.2026 - 02:47DROPS Design ha risposto:
Dear Sylvia, from the wrong side work the stitches as they should appear as before seen from RS to avoid "breaking" the previous pattern. If your RS rows are (P2, K1) in A.1 you will then purl all stitches from WS. Happy knitting!
22.04.2026 - 08:13
![]() Sylvia ha scritto:
Sylvia ha scritto:
Also, I have 90 stitches after finishing an all K row in the pattern. Do I knit the 72 stitches in the PPKPPK etc. pattern because then I won't be doing all knit stitches for the 55 stitches. Or, do I do one round of 90 stitches in the PPKPPK pattern and then knit all 72 stitches before placing a marker and starting row 1 elevated decrease on the right side?
22.04.2026 - 02:47
![]() Sylvia ha scritto:
Sylvia ha scritto:
If the 55 stitches starts between A.2 and the right sleeve, there will only be 3 A.2 sequences to do the K3 tog elevated decrease before I have to turn the work to the wrong side. This gives only 3 x 2 stitches = 6 stitches decreased, not 8. Not sure how the total number of stitches decreased is 8.
22.04.2026 - 02:44
![]() Sylvia ha scritto:
Sylvia ha scritto:
After the 90 stitches have been worked, if I knit 72 stitches, I end up after A.2 (between the end of A.2 and the right sleeve) and place a marker here. Then I start knitting the 55 stitches. When do I start the K3 tog twisted after A.2. Do I start it here - over the first 3 stitches after the marker - or after the next A.2 sequence (between A.2 and the back)?
22.04.2026 - 02:41DROPS Design ha risposto:
Dear Sylvia, you will decrease now only on transitions/raglan between sleeves and back piece, not towards front piece anymore so that you decrease 2 sts a total of 4 times= 8 sts per decrease row. Happy knitting!
22.04.2026 - 08:11
![]() Sylvia ha scritto:
Sylvia ha scritto:
Where do you work the k3 twisted tog in the neck elevation? Do you still do the k2 tog and ssk for the sleeve and back raglans?
21.04.2026 - 03:38DROPS Design ha risposto:
Dear Sylvia, when working the short rows only decrease as explained under RAGLAN DEC (ELEVATION): at raglan stitches, don't decrease with K2 tog/ssk as before, you now decrease 2 sts and not only 1. Happy knitting!
21.04.2026 - 09:44
![]() Sylvia ha scritto:
Sylvia ha scritto:
I can't find the description of how to work the elevation under "Explanations". I don't see explanations anywhere. Also, after the 90 stitches have been worked, do you do a PPK round and then knit across the 72 stitches. Also, are you continuing the decrease for raglan on the sleeves and the back and also decrease elevation all at the same time?
21.04.2026 - 02:49DROPS Design ha risposto:
Dear Sylvia, after you have decreased to 90 stitches for raglan, start the short rows as explained just afterwards, work the first 72 sts from RS as before, insert the marker, then start working the short rows alternately from RS and from WS as explained for your size remember to decrease as explained above under RAGLAN DEC (ELEVATION):. Happy knitting!
21.04.2026 - 09:42
![]() Lin ha scritto:
Lin ha scritto:
I have knitted the swatch and while the length is 10cm, the width is 8cm because it is a rib. On the needle the width is 10cm. Please advise .
05.04.2026 - 21:46DROPS Design ha risposto:
Hi Lin, The knitting tension should be measured while working the ribbed pattern in A.1. So it sounds like your knitting tension is too tight and you need to increase your needle size. Regards, Drops Team.
06.04.2026 - 15:25
![]() Lin ha scritto:
Lin ha scritto:
I knitted the swatch and if I measure flat, it is 10 cm by 8 cm underneath but on the needle 10cm. The rib makes a concertina. Can i assume that my swatch is 10 cm by 10 cm?
05.04.2026 - 17:52DROPS Design ha risposto:
Dear Lin, make sure you get the correct tension otherwise piece might be too narrow/short. Read more about tension here. Happy knitting!
08.04.2026 - 10:39
![]() Jennifer ha scritto:
Jennifer ha scritto:
Is the 72 stitches being knit at the end of the sweater pattern only knit across the back from right sleeve to left sleeve or is it across the front of the sweater? The description unfortunately is difficult to follow.
23.03.2026 - 21:06DROPS Design ha risposto:
Hi Jennifer, The 72 stitches are worked in pattern as before, then these stitches wait while you work an elevation back and forth in short rows (also continuing the pattern) at the back of the neck. There is a description of how to work the elevation and continue decreasing for raglan at the top of the pattern, under Explanations. Regards, Drops Team.
24.03.2026 - 06:27
![]() Grenier ha scritto:
Grenier ha scritto:
Ou commencent les 72 mailles ?
11.03.2026 - 16:51DROPS Design ha risposto:
Cf. Réponse précédente = tricotez ces 72 mailles à partir du début des tours précédents (vous allez désormais tricoter en rangs à partir d'ici). Bon tricot!
12.03.2026 - 09:29
|
|||||||
Twin River#twinriversweater |
|||||||
 |
 |
||||||
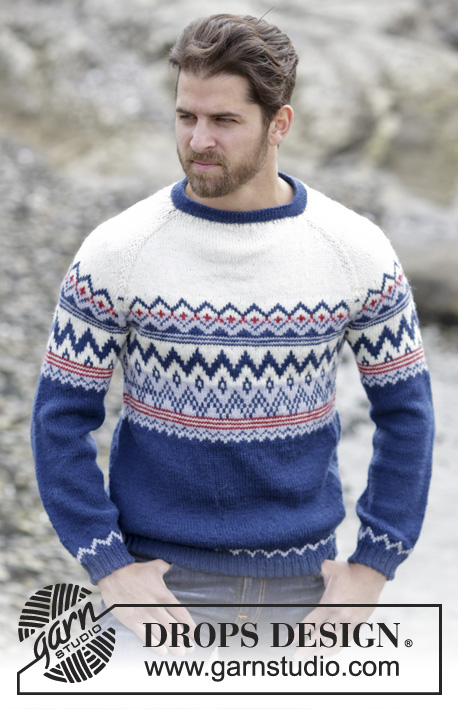
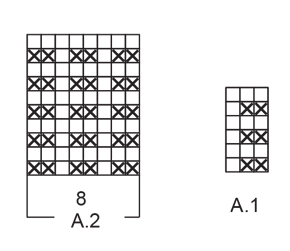
Maglione DROPS per uomo ai ferri con motivo a punto fantasia e raglan in Nepal. Taglie: Dalla S alla XXXL.
DROPS 174-14 |
|||||||
|
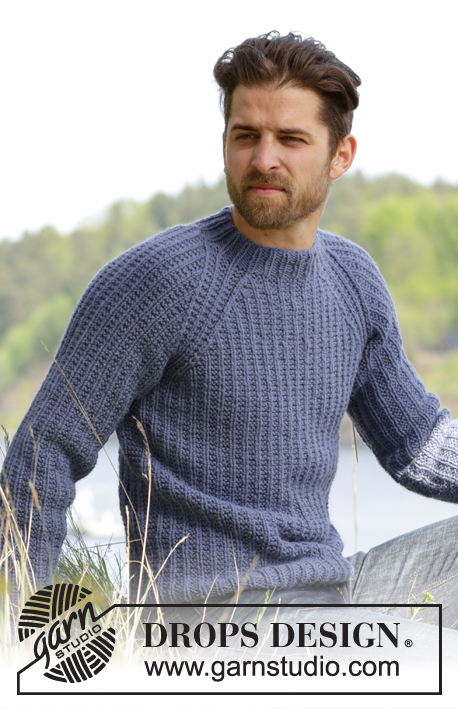
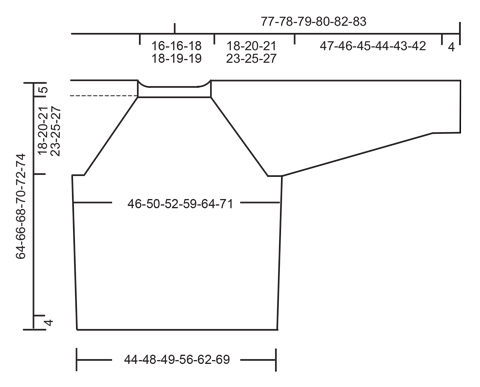
MOTIVO: Vedere i diagrammi A.1 e A.2. RAGLAN: Diminuire come segue prima del diagramma A.2: lavorare finché non rimangono 2 m prima del diagramma A.2, lavorare le 2 m successive insieme a dir. Diminuire come segue dopo il diagramma A.2: passare 1 m a dir senza lavorarla, 1 m dir, accavallare la m passata sulla m lavorata. SUGGERIMENTO PER GLI AUMENTI (sul davanti e dietro): Aumentare 4 m come segue: Lavorare finché non rimane 1 m prima del segno sul lato, 1 m gettata, lavorare 2 m a punto legaccio, 1 m gettata (= 2 m aumentate). Ripetere questi aumenti sull’altro lato del lavoro. Al giro successivo, lavorare le m gettate ritorte (nel filo dietro e non in quello davanti) per evitare che si formino dei buchi. Lavorare le nuove m a punto legaccio. SUGGERIMENTO PER GLI AUMENTI (per le maniche): Aumentare come segue al centro, sotto la manica: Lavorare finché non rimane 1 m prima del segno, 1 m gettata, lavorare 2 m a punto legaccio, 1 m gettata. Al giro successivo, lavorare le m gettate ritorte per evitare che si formino dei buchi. Lavorare le m aumentate seguendo il motivo. ATTENZIONE: Lavorare la m prima e quella dopo il segno a punto legaccio (= 2 m a punto legaccio al centro, sotto la manica). DIMINUZIONI PER IL RAGLAN (per l’alzata): Diminuire sempre sul diritto del lavoro! Diminuire come segue dopo il diagramma A.2: lavorare 3 m insieme a dir ritorto (= nel filo dietro delle m e non in quello davanti). Diminuire come segue prima del diagramma A.2: Lavorare finché non 3 m rimangono prima del diagramma A.2, 3 m insieme a dir. ---------------------------------------------------------- MAGLIONE: Si lavora in tondo. DAVANTI e DIETRO: Avviare 150-162-168-192-210-234 m con il filato Nepal sui ferri circolari n° 5. Lavorare * 1 m rov, (1 m dir, 2 m rov), ripetere da (-) altre 23-25-26-30-33-37 volte, 1 m dir, 1 m rov, inserire un segno qui (= lato) *, ripetere da *-* ancora 1 volta. ATTENZIONE: Spostare i segni verso l’alto man mano che si procede con il lavoro. Proseguire a coste in tondo in questo modo finché il lavoro non misura 4 cm. Lavorare ora il diagramma A.1 come segue: Lavorare le ultime 2 m del diagramma A.1, poi ripetere il diagramma A.1 su tutto il giro finché non rimane 1 m, lavorare questa m come indicato per la prima m del diagramma A.1. RICORDARSI DI MANTENERE LA CORRETTA TENSIONE DEL LAVORO ! Quando il lavoro misura 13-13-14-14-15-15 cm, aumentare 1 m da ciascun lato di ogni segno – vedere il SUGGERIMENTO PER GLI AUMENTI (sul davanti e dietro). Ripetere questi aumenti quando il lavoro misura 27-28-29-29-30-30 cm = 158-170-176-200-218-242 m. Quando il lavoro misura 41-41-42-42-42-42 cm (assicurarsi che il giro successivo da lavorare sia un giro 2 del diagramma A.1), intrecciare le m per gli scalfi come segue: Intrecciare le prime 5 m del giro, lavorare le 69-75-78-90-99-111 m successive, intrecciare le 10 m successive per lo scalfo, lavorare le 69-75-78-90-99-111 m successive, intrecciare le rimanenti 5 m. Tagliare il filo. Lasciare il lavoro in sospeso e proseguire con le maniche. MANICHE: Lavorare le maniche in tondo sui ferri a doppia punta. Avviare 42-42-42-48-48-48 m con il filato Nepal sui ferri a doppia punta n° 5. Inserire un segno all’inizio del giro = centro, sotto la manica. Lavorare a coste, come segue: 1 m rov, 1 m dir, * 2 m rov, 1 m dir *, ripetere da *-* finché non rimane 1 m sul giro, 1 m rov. Proseguire in questo modo in tondo finché le coste non misurano 4 cm. Lavorare ora il motivo come segue: Lavorare le ultime 2 m del diagramma A.1, ripetere il diagramma A.1 finché non rimane 1 m sul giro, lavorare questa m come indicato per la prima m del diagramma A.1. Quando il lavoro misura 9-8-7-6-10-9 cm, aumentare 1 m da ciascun lato del segno – vedere il SUGGERIMENTO PER GLI AUMENTI (per le maniche). Aumentare in questo modo ca. ogni 13-9-7-7-6-5 giri 8-11-14-14-14-17 volte in tutto = 58-64-70-76-76-82 m. Quando il lavoro misura 51-50-49-48-47-46 cm - assicurarsi che il giro successivo da lavorare sia un giro 2 del diagramma A.1, intrecciare le 10 m centrali sotto la manica (= intrecciare quindi le 5 m che precedono e le 5 m che seguono il segno) = 48-54-60-66-66-72 m. Lavorare la seconda manica in modo uguale. SPRONE: Trasferire (senza lavorarle) le m delle maniche sullo stesso ferro circolare n° 5 usato per lavorare il dietro e il davanti, nel punto in cui sono state intrecciate le m per gli scalfi = 234-258-276-312-330-366 m. Inserire un segno in corrispondenza di ogni passaggio tra le maniche ed il davanti/dietro = 4 segni. Iniziare il giro sul dietro, 4 m dopo il segno tra la manica e il dietro. Proseguire ora con il motivo come prima e lavorare inoltre il diagramma A.2 (= 8 m) in corrispondenza di ogni passaggio tra il davanti/dietro e le maniche (i segni sono al centro del diagramma A.2). Al giro successivo, iniziare a diminuire per il RAGLAN – vedere le spiegazioni sopra ! ATTENZIONE: Diminuire in modo diverso sul davanti / dietro e sulle maniche come segue: RAGLAN sul DAVANTI E DIETRO: Diminuire ogni 2 giri 21-24-24-24-26-26 volte e ad ogni giro 0-0-0-6-7-13 volte (= 21-24-24-30-33-39 volte in tutto). RAGLAN sulle MANICHE: Diminuire ogni 4 giri 6-6-4-3-5-5 volte e ogni 2 giri 9-12-17-21-19-22 volte (= 15-18-21-24-24-27 volte in tutto). Terminate tutte le diminuzioni, sul giro rimangono 90-90-96-96-102-102 m (= in tutto sono state diminuite 144-168-180-216-228-264 m). Lavorare ora il motivo come prima sulle prime 72-72-78-78-84-84 m, inserire un segno qui (= tra il diagramma A.2 e la manica destra). Lavorare ora un’alzata per lo scollo, avanti e indietro, seguendo il motivo come prima e, ALLO STESSO TEMPO, diminuire per il RAGLAN ad ogni ferro sul diritto del lavoro sulle m lavorate – VEDERE DIMINUZIONI PER IL RAGLAN (PER L’ALZATA) come segue: ATTENZIONE: Stringere il filo ogni volta che si gira il lavoro per evitare che si formi un buco. FERRO 1 (= diritto del lavoro): Lavorare 55-55-58-58-61-61 m (comprese le 8 m da diminuire), FERRO 2 (= rovescio del lavoro): Girare e lavorare 45-45-48-48-51-51 m, FERRO 3: Girare e lavorare 43-43-46-46-49-49 m (comprese le 8 m da diminuire), FERRO 4: Girare e lavorare 33-33-36-36-39-39 m. Ci sono ora in tutto 74-74-80-80-86-86 m. Girare e proseguire in tondo a coste come segue: Lavorare a dir le m dir e a rov le m a punto legaccio finché le coste non misurano 4 cm. Intrecciare le m lavorando a dir le m dir e a rov le m rov. Il maglione misura 64-66-68-70-72-74 cm dal ferro di avvio delle m fino alla spalla. Tagliare il filo. CONFEZIONE: Cucire le aperture sotto le maniche. |
|||||||
Spiegazioni del diagramma |
|||||||
|
|||||||
 |
|||||||
 |
|||||||
Avete terminato questo modello?Allora taggate le vostre foto con #dropspattern #twinriversweater o inviatele alla #dropsfan gallery. Avete bisogno di aiuto con questo modello?Troverete 26 video tutorial, una sezione per i commenti/domande e molto altro guardando il modello su www.garnstudio.com © 1982-2026 DROPS Design A/S. Ci riserviamo tutti i diritti. Questo documento, compreso tutte le sue sotto-sezioni, è protetto dalle leggi sul copyright. Potete leggere quello che potete fare con i nostri modelli alla fine di ogni modello sul nostro sito. |
|||||||


Con oltre 40 anni di esperienza nel design di modelli di maglia e uncinetto, DROPS Design offre la più estesa collezione di modelli gratuiti su internet - tradotti in 17 lingue. Ad oggi vi possiamo fornire 324 cataloghi e 12290 modelli - 9561 dei quali sono tradotti in Italiano.
Ci stiamo impegnando molto per darvi il meglio che vi possiamo offrire in termini di maglia e uncinetto, ispirazioni e consigli così come filati di grande qualità ad un prezzo incredibile! Volete utilizzare i nostri modelli per qualcosa d'altro oltre al vostro uso personale? Potete leggere tutto ciò che è consentito nel testo sul Copyright in basso su tutte le pagine dei nostri modelli. Buon lavoro!
Lasciare un commento sul modello DROPS 174-14
Noi saremmo felici di ricevere i tuoi commenti e opinioni su questo modello!
Se vuoi fare una domanda, fai per favore attenzione a selezionare la categoria corretta nella casella qui sotto per velocizzare il processo di risposta. I campi richiesti sono indicati da *.