
Categorie popolari
State cercando un filato?


Commenti / Domande (78)
![]() Bec ha scritto:
Bec ha scritto:
Thank you so much for your recent feedback. I think I've done it correctly. The next step has me puzzled - I've just bound of my 1 stitch on the neck, my K1 row will be on the RS, not the WS, am I missing something? TIA
12.08.2024 - 04:29
![]() Bec ha scritto:
Bec ha scritto:
I'm very confused. I'm working the back piece, size small. What does it mean when it says, 'slip the outermost sts at beg of every row in each side on 1 stitch holder for diagonal shoulder as follows: slip 7-8-8-9-10-11 sts 2-3-2-2-3-2 times in total and 8-0-9-10-0-12 sts 1-0-1-1-0-1 times'. Do I slip one st at beginning of every row, so I have 7 sts on each holder, and then slip once more to get 16 sts?
04.08.2024 - 01:32DROPS Design ha risposto:
Hi Bec, You have a stitch holder on each side. At the beginning of the first row you slip the first 7 stitches (after working the stitches to avoid having to cut the strand) onto the one stitch holder, then repeat this at the beginning of the second row onto the other stitch holder. Repeat this on rows 3 and 4. Then slip 8 stitches at the beginning of rows 5 and 6. Hope this helps and happy knitting!
05.08.2024 - 06:37
![]() GHV Eekhout ha scritto:
GHV Eekhout ha scritto:
Heeft u geen patroon voor gewoon 2 panden los van elkaar te breien?? Moeilijk met rond breien met kleinere naalden 4 of 5.
24.07.2024 - 22:15
![]() Sharon Hunt ha scritto:
Sharon Hunt ha scritto:
Am Even more confused am making the largest size and it says am supposed to have 34 sts for the neck.
05.09.2023 - 12:08DROPS Design ha risposto:
Dear Mrfs Hunt, oh the largest size will be then worked as follows (sorry numbers below were for L), seen from right side (back piece): (11+11+12 = 34 sts for first shoulder) + (1+22+1 = 24 sts cast off for neck) + (12+11+11 = 34 sts for 2nd shoulder) = 90 sts in total for XXXL. The 34 sts are for each shoulder, not for neck, for neck you will first cast off the middle 20 stitches then cast off 1 stitch at the beginning of next row from neck towards shoulder (from RS on left shoulder/from WS on right shoulder). Happy knitting!
05.09.2023 - 13:54
![]() Sharon Hunt ha scritto:
Sharon Hunt ha scritto:
Am having som problems with the back. The instructions says to: Slip 7-8-8-9-10-11 sts 2-3-2-2-3-2 times in total and 8-0-9-10-0-12 sts 1-0-1-1-0-1 …. I am making the largest size. I slipped the sts as instructed I think and I have 34 sts on stitch holder for the shoulder but there are 34 sts left to cast off for the nec not 20 as per pattern. 😟. What am I doing wrong here. Thanks for your quick response. Need to finish this vest to wear i 2 weeks. Thanks so much.
04.09.2023 - 19:43DROPS Design ha risposto:
Dear Mrs Hunt, you will slip the stitches for shoulder on a thread and at the same time cast off for neck, so that you should have (seen from right side): (8+8+9 sts =25 sts for shoulder) + (1+18+1 =20 sts cast off for neck) and (9+8+8 = 25 sts for shoulder) = 70 sts in total. Happy knitting!
05.09.2023 - 12:02
![]() Sharon Hunt ha scritto:
Sharon Hunt ha scritto:
Hi, am up to the shoulders where I have divided with 11 + 11 +12 on both sides. Instruction says to slip these stitches to a size 7 needles knit one row from wrong side. Am I supposed to cut the yarn, re-attach so the front is facing me and knit one row even or re-attach the yarn so the wrong side is facing and knit one row? Will be doing a 3 needle bind off for the shoulder. Assuming That’s ok.
03.09.2023 - 01:26DROPS Design ha risposto:
Dear Sharon, you don't need to cut the yarn. When slipping the stitches of the shoulder to the circular needle the next row should be from the wrong side, so the thread is already prepared. You need to add a new thread to work the other shoulder. And yes, you can cast off as you indicated. Happy knitting!
03.09.2023 - 23:37
![]() Sharon Hunt ha scritto:
Sharon Hunt ha scritto:
Thanks for the response. Starting all over again but That’s ok. It appears there is a ridge after the knit 3 purl 3 ribbing. The instruction says yo decrease on the right side and the start stockinett sts. I did not have a ridge on my ripped out project ☹️. Since am starting over I want to get it right this time. Should I knit the wrong side after the decreases. Did not see that in this part of the pattern. Thanks 🙏 so much.
28.08.2023 - 01:49DROPS Design ha risposto:
Dear Mrs Hunt, you mean at the beginnning of the pattern at the transition between ribbing edge and stocking stitch? Then decrease from RS as explained and knit 1 row from wrong side before starting stocking stitch to get this rib (as on the picture, but you are right, missing in the pattern). Happy knitting!
28.08.2023 - 14:27
![]() Sharon Hunt ha scritto:
Sharon Hunt ha scritto:
Hi , I have a last question.😔. Slip sts from stitch holder on circular needle size 7 mm. K 1 row from WS (to avoid holes in transitions where sts were … Since am knitting from the wrong side am assuming I would purl not knit. Is this correct? Thanks. Sharon
25.08.2023 - 21:03DROPS Design ha risposto:
Dear Sharon, no, it's a knit row, so you knit the stitches. This is to make a ridge in garter stitch, so you knit all rows. Happy knitting!
28.08.2023 - 00:20
![]() Sharon Hunt ha scritto:
Sharon Hunt ha scritto:
Hi! AT THE SAME TIME when piece measures 65-67-69-71-73-75 cm, cast off the middle 16-16-18-18-20-20 sts for neck and finish each shoulder separately. Cast off 1 st on next row from neck. When all sts have been dec/put on a stitch holder, there are 22-24-25-28-30-34 sts on stitch. Do I decrease the 2 extra stitches with one stitch from the shoulder sts on each side. 🙏 Sharon
25.08.2023 - 12:37DROPS Design ha risposto:
Dear Mrs Hunt, the 2 extra stitches for neck are cast off at the beginning of next row from neck (1 st on each side), this means on left shoulder back piece at the beg of a row from wrong side and for right shoulder back at the beg of a row from right side (= towards neck, this means on the opposite side of the stitches of the thread for diagonal shoulder). Happy knitting!
25.08.2023 - 13:53
![]() Sharon Hunt ha scritto:
Sharon Hunt ha scritto:
Hi am not understanding or should I say am nog sure I do: Slip 7-8-8-9-10-11 sts 2-3-2-2-3-2 times in total and 8-0-9-10-0-12 sts 1-0-1-1-0-1 time on stitch holder in each side. Am making the second size give which had 66 after the decreases. Sm I supposed to have 24 stitches on stitch holder for each sleeve?
25.08.2023 - 01:49DROPS Design ha risposto:
Dear Mrs Hunt, yes, in 2nd size you will have a total of 24 sts for each shoulder: slip 8 sts at the beg of each row from armhole a total of 3 times, and at the same time, cast off the middle 16 sts + 1 st at the beg of next row from neck so that you have: 8 sts 3 times on a thread, 18 sts for neck (1+16+1) and 8 sts 3 times on a thread = 66 sts. Happy knitting!
25.08.2023 - 08:29
|
|
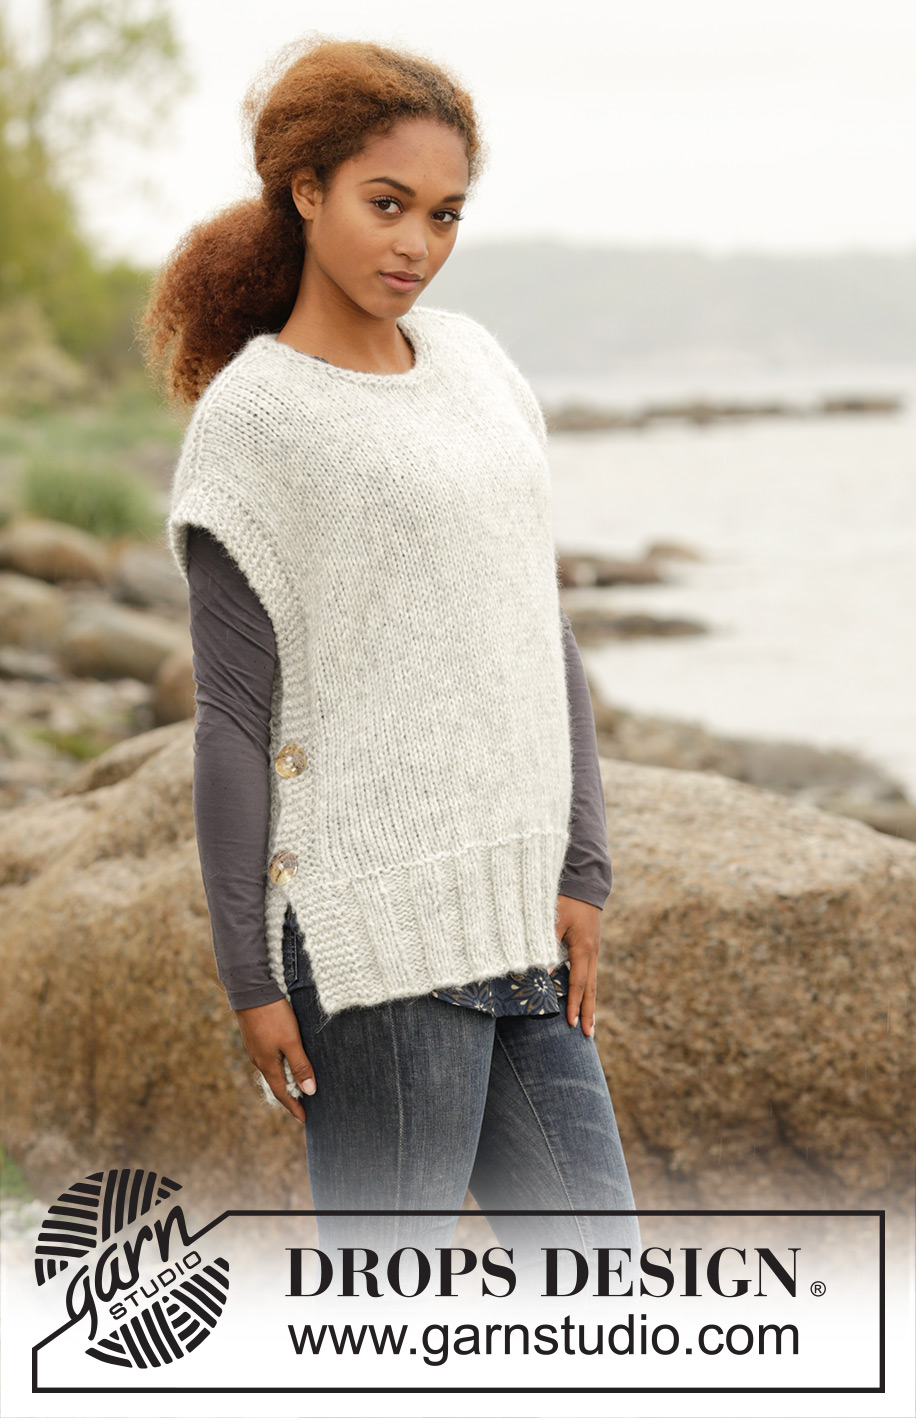
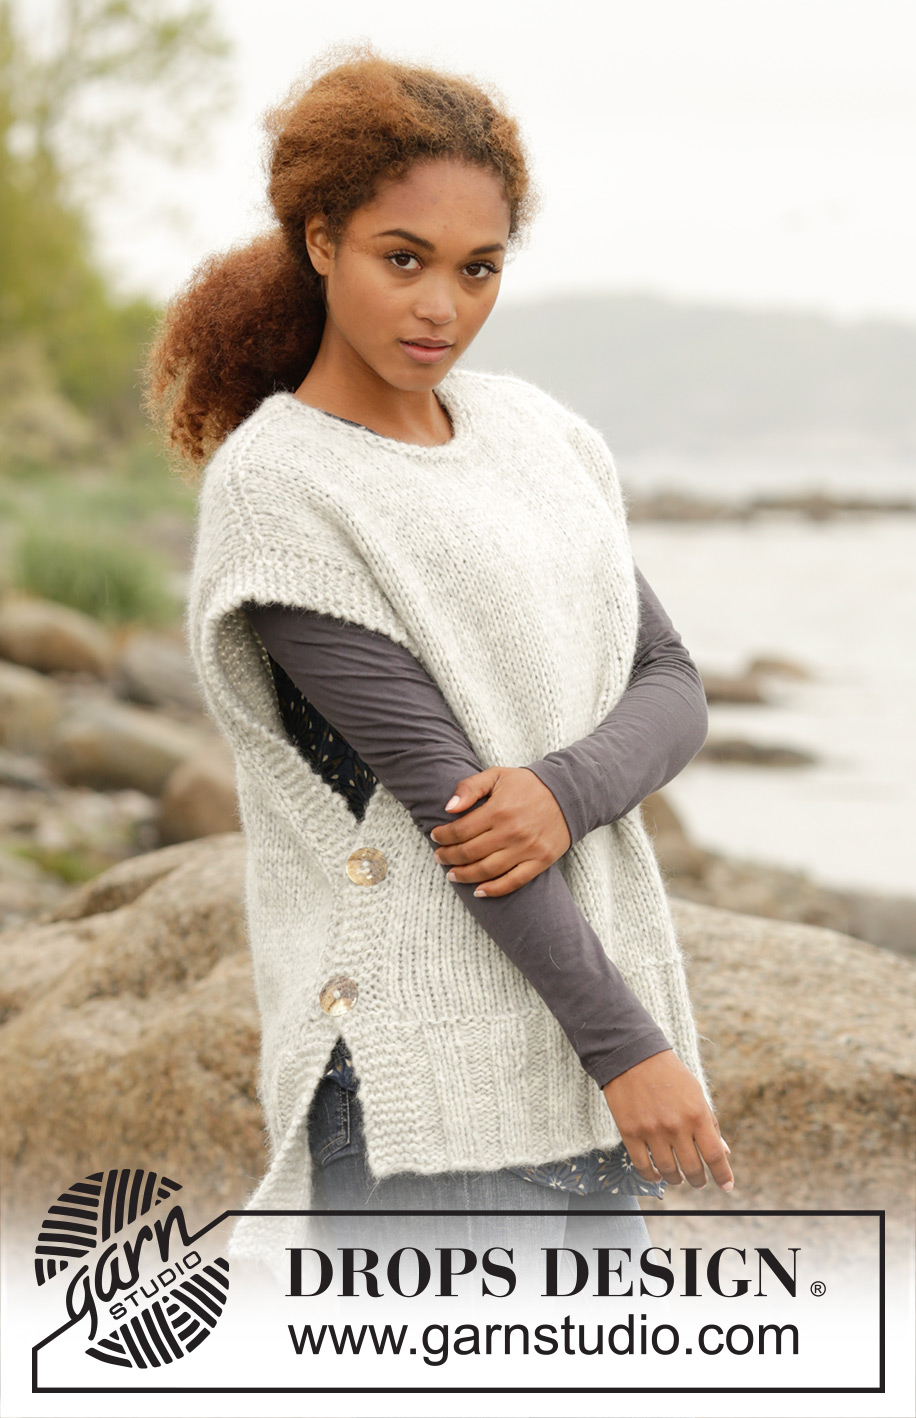
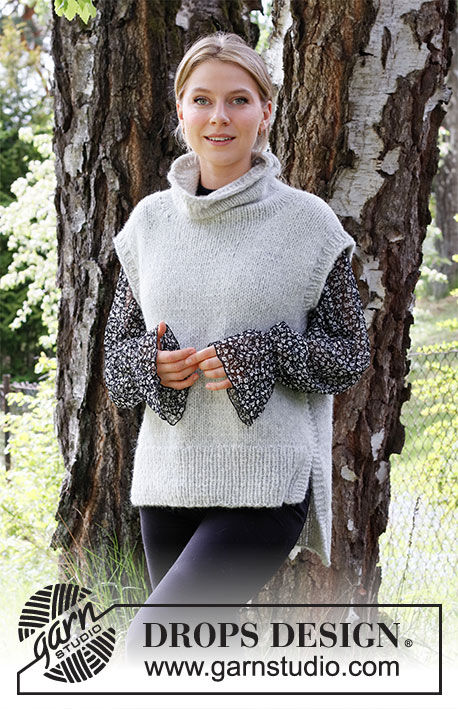
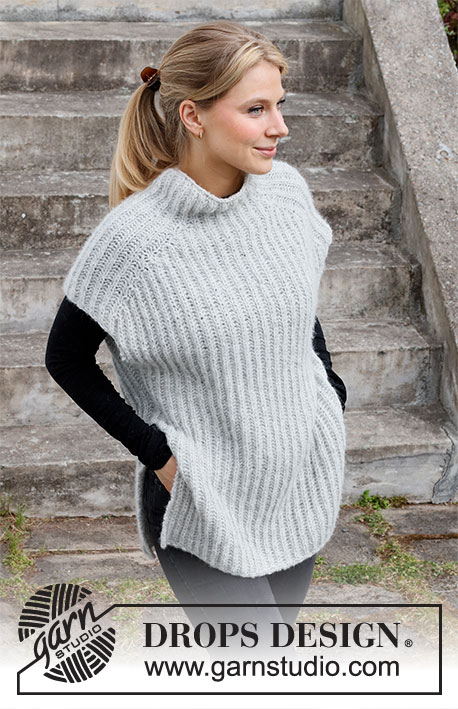
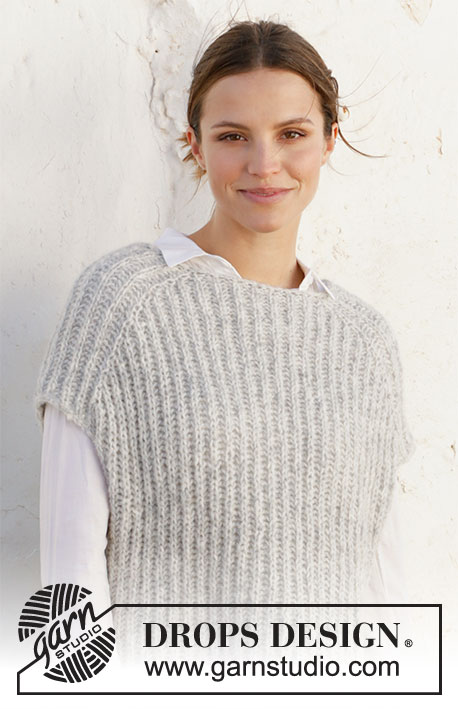
Winter is Coming#winteriscomingslipover |
|
 |
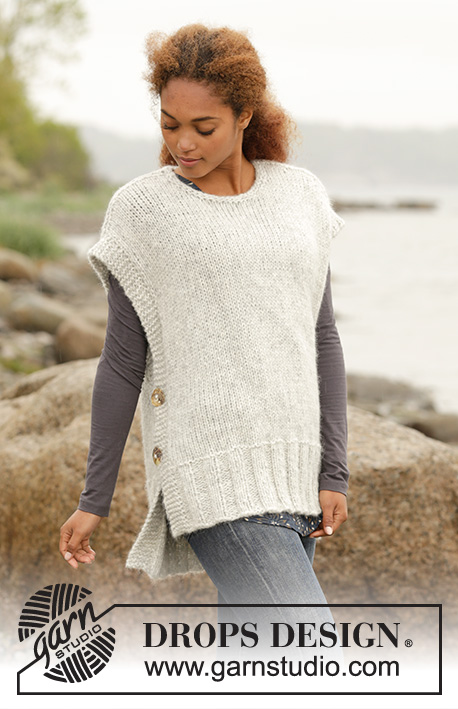 |
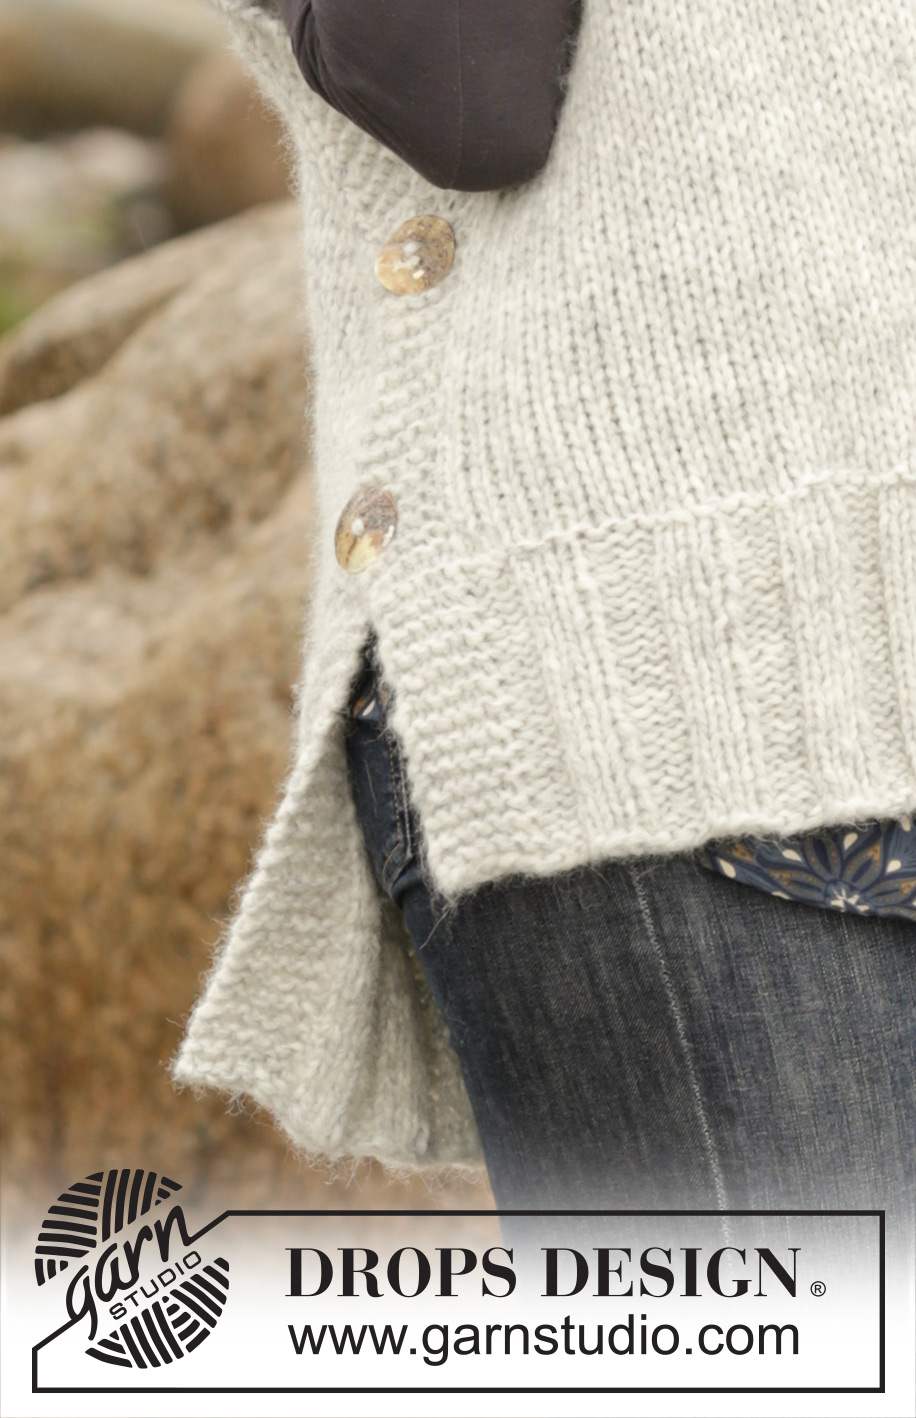
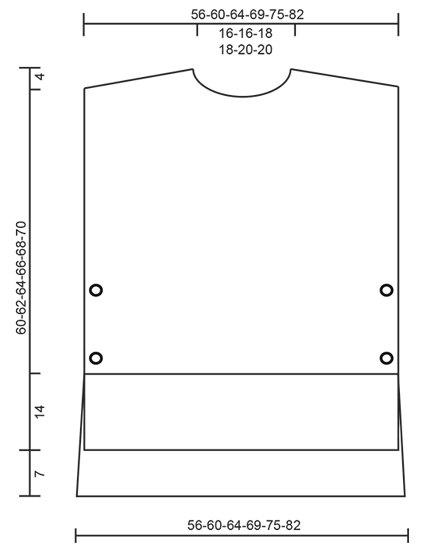
Gilet / smanicato DROPS ai ferri, con spacchi laterali e collo rotondo, con 1 capo di Cloud, 1 capo di Wish o 2 capi di Air. Taglie: Dalla S alla XXXL.
DROPS 173-47 |
|
|
PUNTO LEGACCIO (avanti e indietro sui ferri): Lavorare tutti i ferri a dir. 1 costa a legaccio = 2 ferri a dir. SUGGERIMENTO PER LE DIMINUZIONI: Per calcolare ogni quante m diminuire, sottrarre dal numero complessivo delle m (p.es 75 m) le m dei bordi (p.es 12 m) e dividere il risultato per il numero di diminuzioni da fare (p.es 13) = 4,8. Quindi, in questo caso, bisogna lavorare insieme ogni 4a e 5a m ca (e non diminuire sulle m dei bordi). ASOLE: Intrecciare per 2 asole ai due lati del davanti. 1 asola = intrecciare la 3a e la 4a m dal bordo; al ferro successivo, avviare 2 nuove m sopra le m intrecciate. Intrecciare le m per le asole quando il lavoro misura 16 e 26 cm per tutte le taglie (o la misura voluta). ---------------------------------------------------------- GILET: Si lavora avanti e indietro sui ferri circolari in 2 parti separate cucite insieme sulle spalle. DIETRO: Avviare 75-81-87-93-99-105 m (comprese 6 m vivagno da ciascun lato) sui ferri circolari n° 7 con 1 capo di Cloud, 1 capo di Wish o 2 capi di Air. Lavorare 1 ferro a rov sul rovescio del lavoro. Lavorare il ferro successivo come segue sul diritto del lavoro: 6 m vivagno a PUNTO LEGACCIO - vedere le spiegazioni sopra - * 3 m rov, 3 m dir *, ripetere da *-* finché sui ferri non rimangono 9 m e finire con 3 m rov e 6 m vivagno a punto legaccio. Proseguire a coste in questo modo finché il lavoro non misura 21 cm. Al ferro successivo sul rovescio del lavoro, passare ai ferri circolari n° 8 mm, allo stesso tempo, diminuire 13-15-17-17-17-15 m a intervalli regolari - VEDERE IL SUGGERIMENTO PER LE DIMINUZIONI = 62-66-70-76-82-90 m. Lavorare a maglia rasata con 6 m vivagno a punto legaccio da ciascun lato. RICORDARSI DI MANTENERE LA CORRETTA TENSIONE DEL LAVORO! Quando il lavoro misura 63-65-67-69-71-73 cm, trasferire le prime m all’inizio di ogni ferro da ciascun lato su 1 ferma maglie per la pendenza della spalla, come segue (ATTENZIONE: per evitare di dover tagliare il filo, lavorare le m prima di metterle in attesa sul ferma maglie): trasferire sul ferma maglie 7-8-8-9-10-11 m 2-3-2-2-3-2 volte e 8-0-9-10-0-12 m 1-0-1-1-0-1 volta da ciascun lato. ALLO STESSO TEMPO, quando il lavoro misura 65-67-69-71-73-75 cm, intrecciare le 16-16-18-18-20-20 m centrali per lo scollo e finire ogni spalla separatamente. Al ferro successivo, intrecciare 1 m per lo scollo. Dopo aver intrecciato/messo in attesa sul ferma maglie tutte le m, per la spalla ci sono 22-24-25-28-30-34 m sul ferma maglie e il dietro misura ca.67-69-71-73-75-77 cm dalla spalla verso il basso. Riportare sui ferri circolari n° 7 le m messe in attesa sul ferma maglie. Lavorare 1 ferro a dir sul rovescio del lavoro (per evitare che si formi un buco dove le m sono state trasferite sul ferma maglie, sollevare il filo tra le 2 m sui ferri e lavorarlo insieme a dir ritorto con la m successiva sul ferro). Intrecciare ora le m senza stringere troppo il filo, lavorando a dir sul diritto del lavoro. Ripetere sull’altra spalla. DAVANTI: Avviare le m e lavorare come indicato per il dietro, ma quando le coste misurano 14 cm, diminuire a intervalli regolari come indicato per il dietro (il davanti è 7 cm più corto del dietro). Lavorare come indicato per il dietro, ma quando il lavoro misura 16 e 26 cm, intrecciare per le ASOLE ai due lati - vedere le spiegazioni sopra ! Proseguire finché il lavoro non misura 53-55-57-58-60-62 cm. Mettere ora in attesa su 1 ferma maglie le 10-10-12-12-14-14 m centrali per lo scollo e finire ogni spalla separatamente. Intrecciare ora per lo scollo all’inizio di ogni ferro dallo scollo, come segue: intrecciare 2 m 1 volta e 1 m 2 volte. ALLO STESSO TEMPO, quando il lavoro misura 56-58-60-62-64-66 cm, mettere le m in attesa su un ferma maglie per la pendenza della spalla come indicato per il dietro. Dopo aver trasferito tutte le m sul ferma maglie/intrecciato tutte le m, ci sono 22-24-25-28-30-34 m sul ferma maglie per la spalla e il davanti misura ca.60-62-64-66-68-70 cm dalla spalla verso il basso. Riportare sui ferri circolari n° 7 le m messe in attesa sul ferma maglie e lavorare 1 ferro a dir sul rovescio del lavoro come indicato per il dietro; intrecciare poi le m lavorandole a dir sul diritto del lavoro. Ripetere sull’altra spalla. CONFEZIONE: Cucire le spalle - assicurarsi che la cucitura non sia troppo stretta. Mettere il bordo a punto legaccio con le asole (davanti) sul bordo a punto legaccio del dietro e attaccare i bottoni. Ripetere sull’altro lato. COLLO: Con i ferri circolari corti n° 7 riprendere sul diritto del lavoro ca. da 46 a 58 m intorno allo scollo (comprese le maglie del davanti messe in attesa sul ferma maglie) con 1 capo di DROPS Cloud o 1 capo di DROPS Wish o 2 capi di DROPS Air. Lavorare 1 giro a rov, 1 giro a dir e 1 giro a rov; intrecciare le m in senza stringere troppo il filo e lavorando le m a dir. |
|
 |
|
Avete terminato questo modello?Allora taggate le vostre foto con #dropspattern #winteriscomingslipover o inviatele alla #dropsfan gallery. Avete bisogno di aiuto con questo modello?Troverete 21 video tutorial, una sezione per i commenti/domande e molto altro guardando il modello su www.garnstudio.com © 1982-2026 DROPS Design A/S. Ci riserviamo tutti i diritti. Questo documento, compreso tutte le sue sotto-sezioni, è protetto dalle leggi sul copyright. Potete leggere quello che potete fare con i nostri modelli alla fine di ogni modello sul nostro sito. |
|


Con oltre 40 anni di esperienza nel design di modelli di maglia e uncinetto, DROPS Design offre la più estesa collezione di modelli gratuiti su internet - tradotti in 17 lingue. Ad oggi vi possiamo fornire 324 cataloghi e 12290 modelli - 9561 dei quali sono tradotti in Italiano.
Ci stiamo impegnando molto per darvi il meglio che vi possiamo offrire in termini di maglia e uncinetto, ispirazioni e consigli così come filati di grande qualità ad un prezzo incredibile! Volete utilizzare i nostri modelli per qualcosa d'altro oltre al vostro uso personale? Potete leggere tutto ciò che è consentito nel testo sul Copyright in basso su tutte le pagine dei nostri modelli. Buon lavoro!
Lasciare un commento sul modello DROPS 173-47
Noi saremmo felici di ricevere i tuoi commenti e opinioni su questo modello!
Se vuoi fare una domanda, fai per favore attenzione a selezionare la categoria corretta nella casella qui sotto per velocizzare il processo di risposta. I campi richiesti sono indicati da *.