
Categorie popolari
State cercando un filato?


Commenti / Domande (110)
![]() Nicole Carrier ha scritto:
Nicole Carrier ha scritto:
Bonjour! Je viens de terminer mes rangs raccourcis. Les augmentations: avec un jeté et tricoter normalement au rang suivant, donc ça va former un trou? Ou on tricote une maille torse au rang suivant?
03.04.2023 - 12:45DROPS Design ha risposto:
Bonjour Nicole, pour savoir comment tricotez les jetes dans les diagrammes A.5-A.8, consultez-vous la legende (le jete peut etre tricote torse /ovale noir; ou il est tricote normalement / on va avoir un trou a cet endroit). Bon tricot!
04.04.2023 - 08:05
![]() Nicole Carrier ha scritto:
Nicole Carrier ha scritto:
Je fais la taille médium et je voudrais être sûre de bien comprendre l'étape des rangs raccourcis sur A3 à A5. 2 rangs raccourcis à 26 m des bouts et ensuite 4 rangs raccourcis à 6 m des bouts donc 6 rangs raccourcis? Merci! Ce patron représente un bon défi mais il est magnifique.
27.03.2023 - 15:36DROPS Design ha risposto:
Bonjour Mme Carrier, vous tricotez les mailles comme avant sur l'endroit en laissant les 26 dernières mailles non tricotées, puis vous tournez et tricotez les mailles sur l'envers comme avant jusqu'à ce qu'il reste 26 mailles, tournez. Tricotez maintenant comme avant mais tricotez 6 mailles en moins à la fin des 4 rangs suivant (vous avez en attente: 26 m + 2 x 6 m de chaque côté). Bon tricot!
27.03.2023 - 15:47
![]() Linda Olofsson ha scritto:
Linda Olofsson ha scritto:
Ska till att sticka diagram 5-8 i Belle, och förstår deras plats vid markörernas plats samt hur ett förkortat varv görs. Men på vilka varv ska jag förkorta varven och senare "öka jämnt"? Får inte grepp om när jag börjar, och hur jag fortsätter. Det står "samtidigt" men också "när x varv är stickade", och att upprepa 0 ggr till... ...hittar inte riktigt var jag börjar och slutar.
12.11.2022 - 15:27DROPS Design ha risposto:
Hej Linda, hvilken størrelse strikker du?
16.11.2022 - 14:02
![]() Sharlene Currin ha scritto:
Sharlene Currin ha scritto:
Hi. I have finished the short rows and the pattern says you must continue to do A5 to A8 but the diagram for A5 to A8 only has 8 rows which have now been completed. How do I continue?
15.10.2022 - 06:22DROPS Design ha risposto:
Dear Sharlene, continue repeating these 8 rows as many times as necessary. Happy knitting!
17.10.2022 - 00:28
![]() Thibaud Marjolaine ha scritto:
Thibaud Marjolaine ha scritto:
Bonjour, j'ai beau recompter je ne comprends pas.. je tricote en L. On dit qu'il faut tricoter 2 fois A5-A8 + 8 rangs. Mais quand je recompte : j'ai 10 rangs de rangs raccourcis + 2 rangs ou je tricote tout + 4 rangs ou je rabats. Ça me fait 16 rangs, il doit donc me rester 6 rangs de A5 à A8 hors vous indiquez qu'il en reste 8. Ou est ce que je fait l'erreur ? D'avance merci pour votre réponse ! Le modèle est superbe en tout cas et très agréable à réaliser !
19.05.2022 - 22:38DROPS Design ha risposto:
Bonjour Mme Thibaud, effectivement, il va vous en rester 6, continuez simplement comme indiqué et rabattez les mailes des emmanchures ensuite, tout doit retomber juste. Bonne continuation!
20.05.2022 - 12:41
![]() Ingrid Mertens ha scritto:
Ingrid Mertens ha scritto:
Ik had voor dit patroon in maat xxxl 450 gr wol nodig. Moest 1 bol nabestellen…..
11.05.2022 - 09:03
![]() Karen Milano ha scritto:
Karen Milano ha scritto:
I don't understand the short rows at all!! I knitted through one set but if I start a second set. In the chart, the number of stitches is wrong. Can you please explain this better?
28.04.2022 - 18:43DROPS Design ha risposto:
Dear Mrs Milano, when working the short rows you continue working the stitches from diagrams as before, they won't be affected by the short rows, ie work A.5-A.6 and A.7-A.8 as before from RS and from WS and depending on your size, on the first row (3rd + 5th size), on the 3rd row (1st + 4th size) or on the 7th row of diagrams, start working short rows. Happy knitting!
29.04.2022 - 08:09
![]() Astrid Nijland ha scritto:
Astrid Nijland ha scritto:
Ik heb nog een vraag over deel A1 op een gegeven moment moet ik 3x maal een omslag maken en dan 4 steken breien. Maar ik heb maar 3 steken dan over. Verder klopt het hele patroon.
20.02.2022 - 11:51DROPS Design ha risposto:
Dag Astrid,
Dan heb je wellicht toch ergens een foutje gemaakt. Twee naalden daar voor zit er voor en na het samenbreien een omslag, heb je die misschien over het hoofd gezien?
21.02.2022 - 11:31
![]() Astrid Nijland ha scritto:
Astrid Nijland ha scritto:
Bij patroon A1 ga ik van toer5 (9 steken) goede kant. Naar toer 6 teruggaan toer naar (11steken). Volgens mij klopt dit niet. Ik moet dan toch ook 9 steken hebben.
15.02.2022 - 11:03DROPS Design ha risposto:
Dag Astrid,
In toer 5 van A.1 heb je 7 steken en je meerdert 4 steken (1 steek aan beide kanten van de beide 2 averechte steken ) zodat je 11 steken hebt als je aan toer 6 begint van A.1
17.02.2022 - 10:38
![]() Wong ha scritto:
Wong ha scritto:
Hi, this is my first time knitting on drops design. I am knitting size XXXL. I don't understand "Repeat A.5 to A.8 over the 6 sts on each side of each marker 2-3-2-3-4-5 times in total". Is it doing at the WS - 2nd row of A.5 to A.8 ? How to repeat 5 times (each side (left & right) of each marker only total 4 times)?
19.10.2021 - 10:36DROPS Design ha risposto:
Dear Mrs Wong, work as explained with A.5, A.6, A.7, A.8 and stocking stitch, and when A.5-.A.8 have been worked one time in height, repeat them 4 more times. Markers should remain on the same place as before, and between A.5/A.6 and between A.7/A.8. Happy knitting!
20.10.2021 - 07:23
|
|||||||||||||||||||||||||||||||
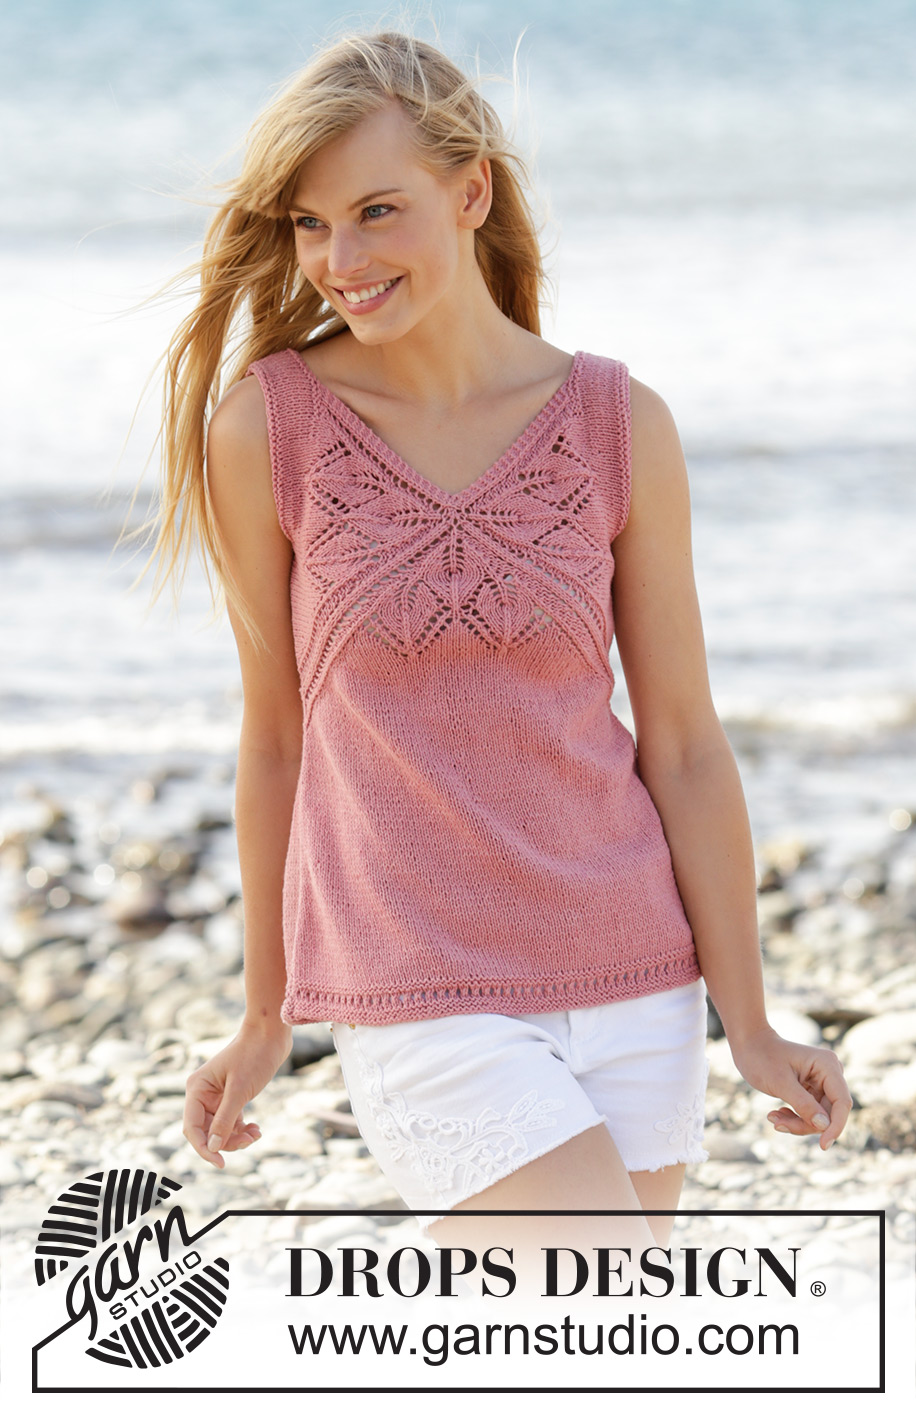
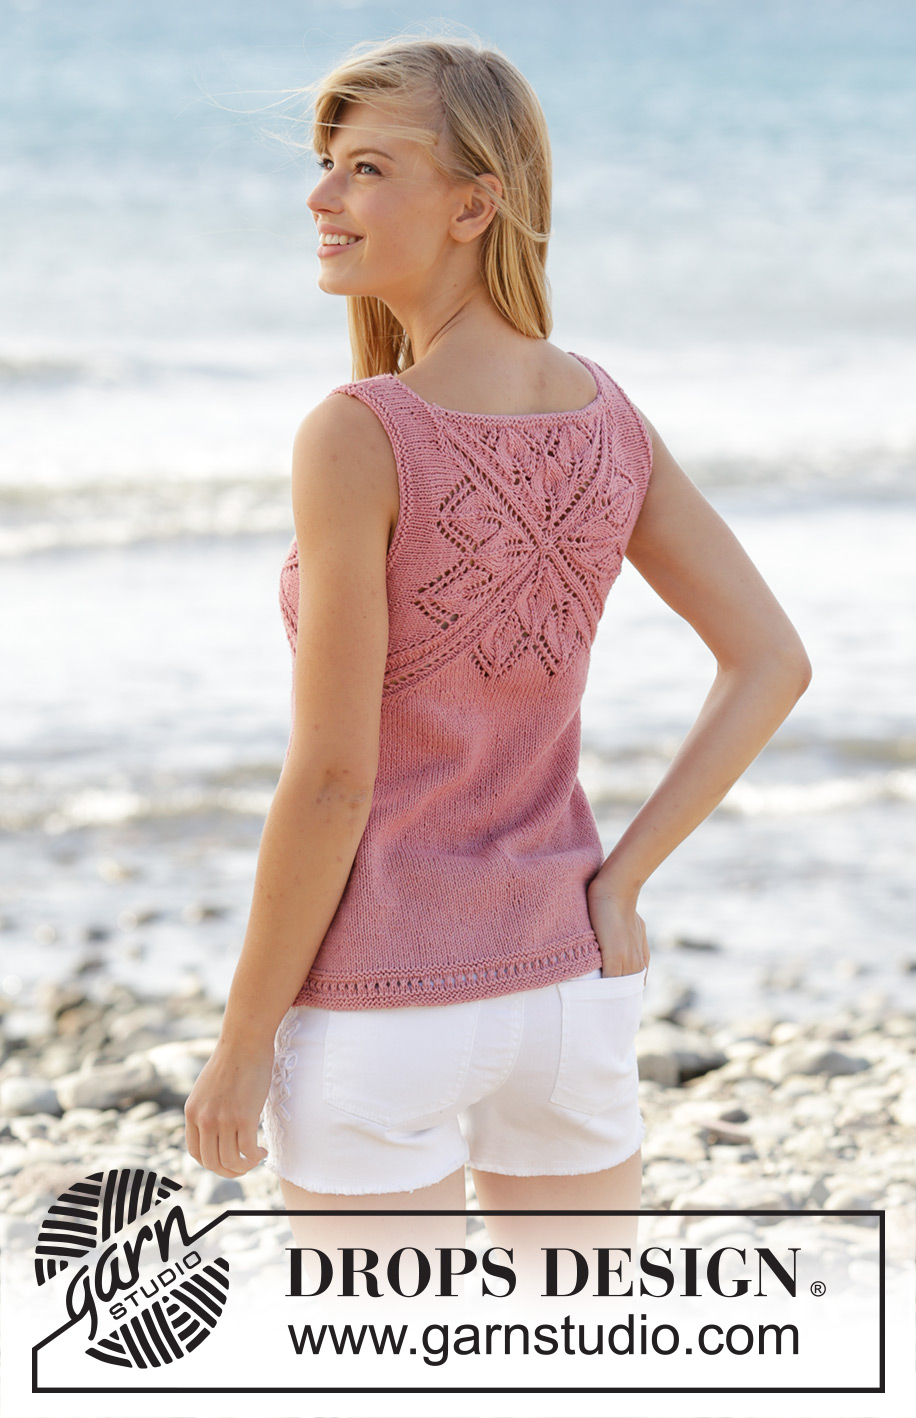
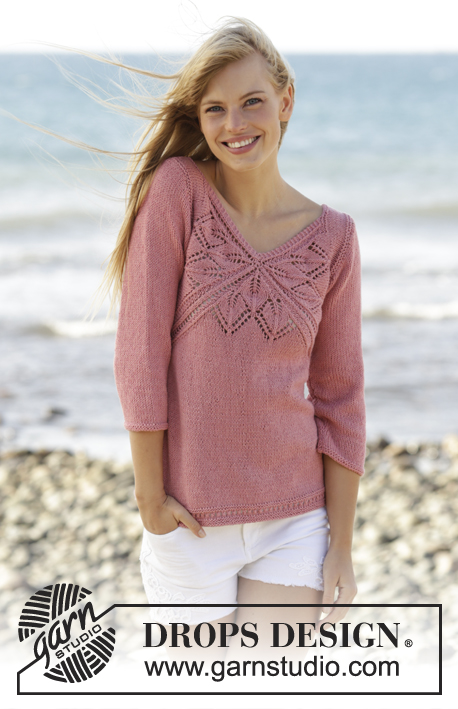
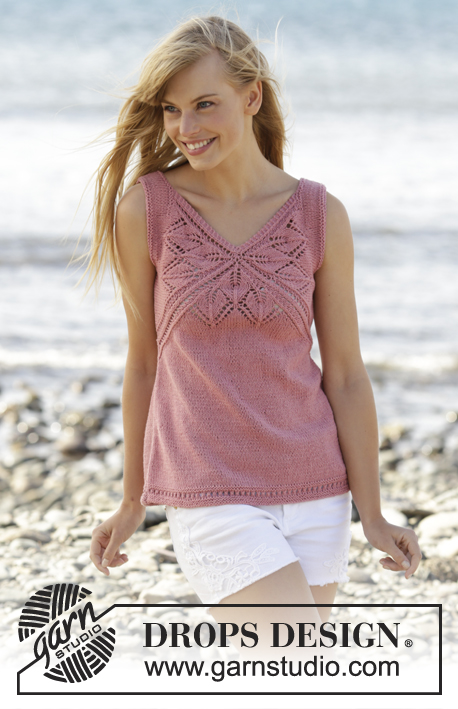
Butterfly Heart Top#butterflyhearttop |
|||||||||||||||||||||||||||||||
 |
 |
||||||||||||||||||||||||||||||
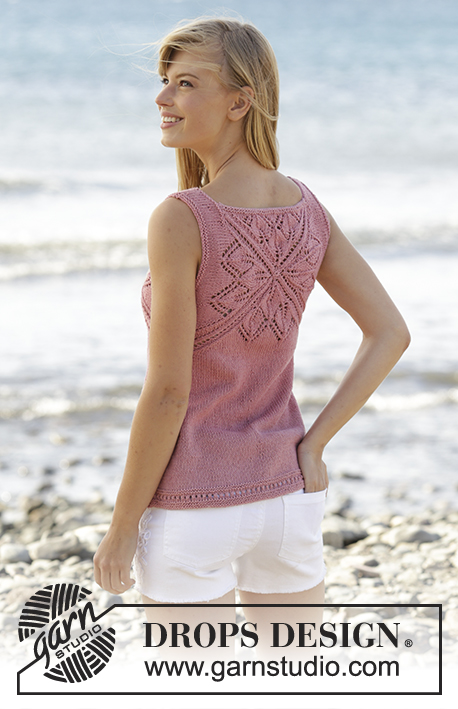
Top DROPS lavorato ai ferri con motivo traforato e collo a V in ”Belle”. Lavorato dall’alto in basso (top down). Taglie: S - XXXL.
DROPS 170-4 |
|||||||||||||||||||||||||||||||
|
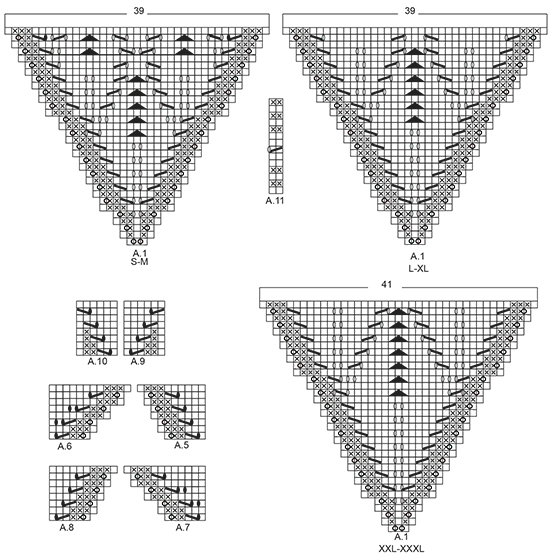
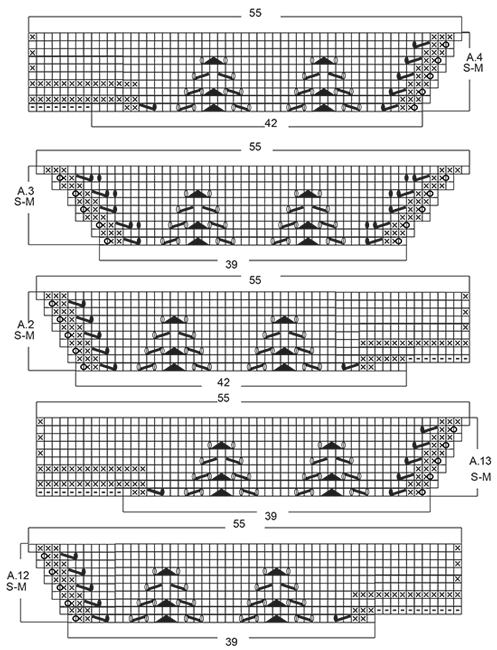
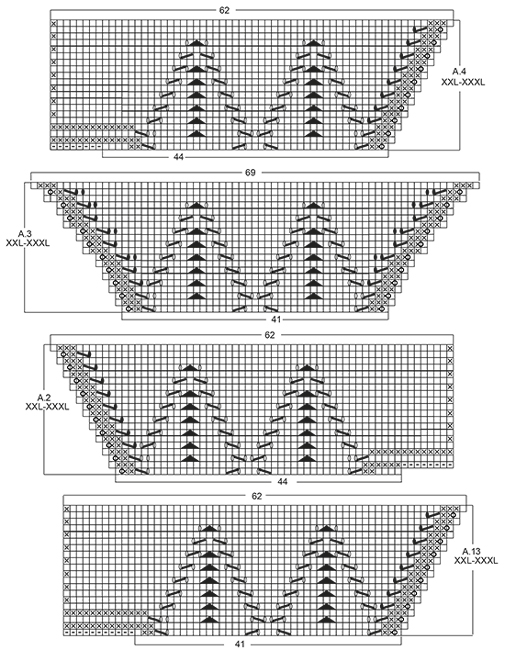
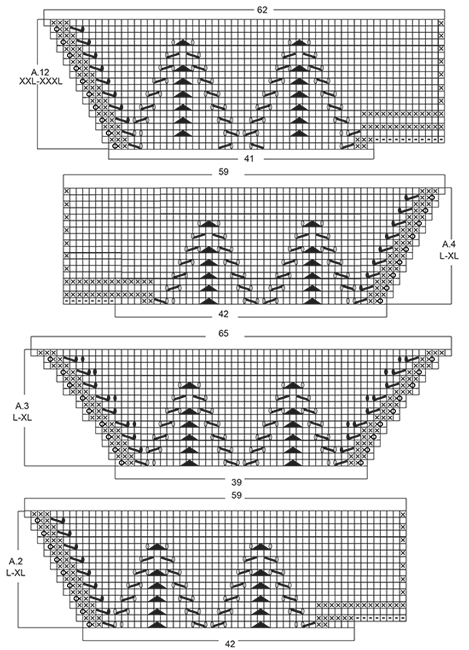
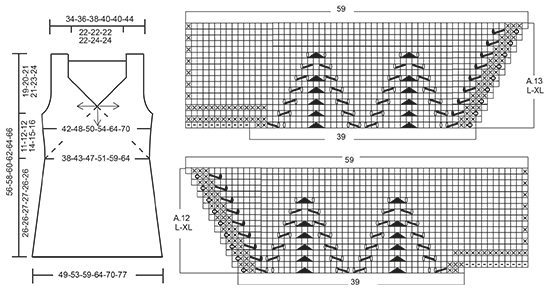
M LEGACCIO (avanti e indietro): Lavorare tutti i f a dir. 1 “costa” a m legaccio = 2 f dir. MOTIVO: Vedere i diagrammi A.1-A.13. I diagrammi mostrano tutti i f del motivo visti dal diritto del lavoro. Vedere il diagramma per la taglia corretta. FERRI ACCORCIATI: Quando si gira il lavoro lavorando a ferri accorciati, passare la 1° m a dir senza lavorarla. Tirare il filo per assicurarsi di evitare un grosso buco. SUGGERIMENTO PER GLI AUMENTI: Tutti gli aumenti vengono fatti dal diritto del lavoro. Aumentare 1 m facendo 1 gettato, sul f successivo lavorare il gettato a rov ritorto per evitare buchi. ---------------------------------------------------------- TOP: Lavorare dal centro del collo a V in fuori in 3 triangoli sul davanti e 4 triangoli sul dietro, poi lavorare verso il basso. DAVANTI: Lavorare avanti e indietro dal collo in giù. Avviare 8 m con i f circolari n° 4 mm con Belle. Lavorare 1 f dir. Sul f successivo aumentare come segue: * 1 m dir, 1 gettato *, ripetere *-* fino a quando rimane 1 m e finire con 1 m dir = 15 m sul f. Lavorare il f successivo come segue (dal diritto del lavoro): lavorare i gettati del f precedente a ritorto, non devono fare buchi. Lavorare 3 m a M LEGACCIO – leggere la spiegazione sopra, A.1, inserire il 1° segnapunti, A.1, inserire il 2° segnapunti, A.1 (= ripetere A.1 3 volte in totale sul f), finire con 3 m a m legaccio. FARE ATTENZIONE ALLA TENSIONE DEL LAVORO! Quando A.1 è stato lavorato 1 volta in verticale, ci sono 123-123-123-123-129-129 m sul f. Il lavoro misura circa 11-11-11-11-12-12 cm dal bordo di avvio. Lavorare il f successivo come segue dal diritto del lavoro: lavorare A.2 sulle prime 42-42-42-42-44-44 m, A.3 sulle 39-39-39-39-41-41 m successive e A.4 sulle ultime 42-42-42-42-44-44 m, dopo A.4 avviare 8 m alla fine del f per la spalla (vedere il diagramma). Lavorare da A.4 fino a A.2 sul f successivo, alla fine di A.2 avviare 8 m alla fine del f per la spalla (vedere il diagramma). Quando A.2-A.4 sono stati lavorati 1 volta in verticale, ci sono 165-165-183-183-193-193 m sul f. Il lavoro misura circa 15-15-17-17-19-19 cm dal bordo di avvio. LEGGERE TUTTA LA SEZIONE SEGUENTE PRIMA DI CONTINUARE! LAVORARE IL MOTIVO COME PRIMA E ALLO STESSO TEMPO LAVORARE A FERRI ACCORCIATI A OGNI LATO DEL LAVORO. MOTIVO: Lavorare il f successivo come segue dal diritto del lavoro: lavorare 1 m a m legaccio, 48-48-52-52-55-55 m a m rasata, lavorare A.5 sulle 6 m successive, (segnapunti), A.6 sulle 6 m successive, 43-43-53-53-57-57 m a m rasata, A.7 sulle 6 m successive, (segnapunti), A.8 sulle 6 m successive, 48-48-52-52-55-55 m a m rasata, finire con 1 m a m legaccio. Ripetere A.5 fino ad A.8 sulle 6 m a ogni lato di tutti i segnapunti 2-3-2-3-4-5 volte in totale, poi ripetere i primi 0-0-6-4-4-4 ferri di A.5-A.8 un’altra volta. FERRI ACCORCIATI: ALLO STESSO TEMPO quando sono stati lavorati 2-6-0-2-0-6 ferri di A.5-A.8, lavorare a FERRI ACCORCIATI – leggere la spiegazione sopra – a ogni lato del lavoro come segue: lavorare fino a quando rimangono 26-26-24-23-18-18 m sul f (lavorare A.5-A.8 come prima), girare e lavorare fino a quando rimangono 26-26-24-23-18-18 m rimaste, girare il lavoro. Poi lavorare a ferri accorciati per le diverse taglie come segue: TAGLIA M: Lavorare 6 m in meno per ogni giro 2 volte a ogni lato del lavoro. TAGLIE L-XL: Lavorare 6 m in meno per ogni giro 1-2 volte a ogni lato del lavoro, poi lavorare 4 m in meno a ogni giro 3-2 volte a ogni lato del lavoro. TAGLIE XXL-XXXL: Lavorare 6 m in meno per ogni giro 1-1 volta a ogni lato del lavoro, poi lavorare 4 m in meno a ogni giro 4-4 volte a ogni lato del lavoro, poi lavorare 2 m in meno a ogni giro 4-5 volte a ogni lato del lavoro. TUTTE LE TAGLIE: Alla fine dei ferri accorciati, lavorare l’ultimo ferro dal rovescio del lavoro, in modo che il f successivo inizi dalla spalla. Poi lavorare su tutte le m dal diritto del lavoro come segue: lavorare a m legaccio sulle prime 42-44-46-48-50-52 m e ALLO STESSO TEMPO distribuire 0-2-4-4-6-6 aumenti in modo uniforme, lavorare come prima (cioè A.5-A.8 e m rasata) fino a quando rimangono 42-44-46-48-50-52 m, lavorare a m legaccio sulle ultime m e ALLO STESSO TEMPO distribuire 0-2-4-4-6-6 aumenti in modo uniforme (= 42-46-50-52-56-58 m a m legaccio a ogni lato del lavoro). Lavorare 3 f a m legaccio sulle 42-46-50-52-56-58 m più esterne a m legaccio a ogni lato del lavoro, motivo e m rasata sulle m rimaste. Sul f successivo dal rovescio del lavoro lavorare come segue: intrecciare a dir le prime 40-44-48-50-54-56 m per lo scalfo, lavorare 2 m a m legaccio, lavorare a m rasata e con il motivo come prima fino a quando rimangono 42-46-50-52-56-58 m, 2 m a m legaccio, intrecciare a dir le 40-44-48-50-54-56 m successive per lo scalfo. Tagliare il filo. Mancano 8-8-8-12-12-12 ferri di A.5-A.8. Iniziare il f successivo dal diritto del lavoro. Continuare a lavorare a m legaccio sulle prime 2 e ultime 2 m a ogni lato del lavoro. Quando A.5-A.8 sono stati lavorati, ci sono 23-25-26-27-32-34 m prima del 1° segnapunti, 79-91-99-107-123-135 m tra il 1° e 2° segnapunti e 23-25-26-27-32-34 m dopo il 2° segnapunti = 125-141-151-161-187-203 m in totale sul f. Il lavoro misura circa 21-24-25-27-32-35 cm nel punto più ampio misurati lungo il bordo di avvio. Inserire 1 segnapunti nel lavoro, ORA MISURARE IL LAVORO DA QUI. Sul f successivo dal diritto del lavoro intrecciare senza stringere le prime 22-24-25-26-31-33 m a dir, lavorare 1 m di vivagno a m legaccio, (segnapunti), lavorare A.9 sulle prime 6 m dopo il segnapunti, m rasata sulle 67-79-87-95-111-123 m successive, A.10 sulle ultime 6 m prima del 2° segnapunti, (segnapunti), 1 m di vivagno a m legaccio, intrecciare senza stringere le ultime 22-24-25-26-31-33 m a dir = 81-93-101-109-125-137 m rimaste sul f. Tagliare il filo. Lavorare il f successivo dal rovescio del lavoro sulle m rimaste come segue: 1 m di vivagno a m legaccio, A.10 come prima, m rasata sulle 67-79-87-95-111-123 m successive, A.9 come prima, 1 m di vivagno a m legaccio. Quando A.9 e A.10 sono stati lavorati 1 volta in verticale, continuare a m rasata con 1 m di vivagno a m legaccio a ogni lato del lavoro. Quando il lavoro misura 3 cm dal segnapunti, aumentare 1 m a ogni lato del lavoro all’interno della m di vivagno (= 2 aumenti) – LEGGERE IL SUGGERIMENTO PER GLI AUMENTI. Ripetere gli aumenti ogni 1½-1½-1½-1-1-1 cm 12-10-12-14-12-13 volte in totale = 105-113-125-137-149-163 m sul f. Quando il lavoro misura 23-23-24-24-23-23 cm dal segnapunti (il lavoro misura 53-55-57-59-61-63 cm in totale dalla spalla), aggiustarlo in modo che il f successivo sia dal diritto del lavoro, passare ai f circolari n° 3,5 mm. Lavorare il f successivo dal diritto del lavoro come segue: lavorare 1 m di vivagno a m legaccio, lavorare A.11 (= 2 m) fino a quando rimangono 2 m, lavorare la 1° m in A.11, finire con 1 m di vivagno a m legaccio. Sul ferro con i buchi (cioè il 7° ferro) lavorare la penultima m a dir. Intrecciare quando A.11 è stato lavorato 1 volta in verticale. Il lavoro misura 56-58-60-62-64-66 cm in totale dalla spalla. DIETRO: Lavorato prima in tondo, poi lavorato come il davanti. Avviare 6 m con i f a doppia punta n° 4 mm con Belle, passare ai f circolari quando necessario. Lavorare 1 f dir. Sul f successivo aumentare come segue: * 1 m dir, 1 gettato *, ripetere *-* = 12 m sul f, lavorare 1 gettati a dir ritorto sul f successivo, non devono fare i buchi. Lavorare A.1 4 volte in totale, inserire 1 segnapunti tra ogni A.1 (= 4 segnapunti). Quando A.1 è stato lavorato 1 volta in verticale, ci sono 156-156-156-156-164-164 m sul f. Continuare come segue: A.12 sulle prime 39-39-39-39-41-41 m, lavorare A.3 sulle 39-39-39-39-41-41 m successive e A.13 sulle ultime 39-39-39-39-41-41 m, trasferire le m rimaste su un fermamaglie per il bordo del collo (= 39-39-39-39-41-41 m), dopo A.13 avviare 11 m alla fine del f per la spalla (vedere il diagramma). Poi lavorare avanti e indietro sui f. Lavorare A.13/A.3/A.12 sul f successivo, alla fine di A.12 avviare 11 m alla fine del f per la spalla (vedere il diagramma). Quando A.12/A.3/A.13 sono stato lavorati 1 volta in verticale, ci sono 165-165-183-183-193-193 m sul f. Il lavoro misura circa 15-15-17-17-19-19 cm dal bordo di avvio. Ora continuare avanti e indietro come sul davanti. BORDO DEL COLLO: Lavorato avanti e indietro sui f. Riportare le m per il bordo del collo dal fermamaglie sui f circolari n° 3,5 mm. Lavorare 2 coste. Affrancare le coste dove sono state avviate le m per la spalla. Chiudere e affrancare. CONFEZIONE: Cucire i margini dei lati all’interno della m di vivagno a m legaccio. Cucire i margini delle spalle all’interno della m di vivagno a m legaccio. Tirare al centro (cioè il bordo di avvio) sia sul davanti che sul dietro. |
|||||||||||||||||||||||||||||||
Spiegazioni del diagramma |
|||||||||||||||||||||||||||||||
|
|||||||||||||||||||||||||||||||
 |
|||||||||||||||||||||||||||||||
 |
|||||||||||||||||||||||||||||||
 |
|||||||||||||||||||||||||||||||
 |
|||||||||||||||||||||||||||||||
 |
|||||||||||||||||||||||||||||||
Avete terminato questo modello?Allora taggate le vostre foto con #dropspattern #butterflyhearttop o inviatele alla #dropsfan gallery. Avete bisogno di aiuto con questo modello?Troverete 23 video tutorial, una sezione per i commenti/domande e molto altro guardando il modello su www.garnstudio.com © 1982-2026 DROPS Design A/S. Ci riserviamo tutti i diritti. Questo documento, compreso tutte le sue sotto-sezioni, è protetto dalle leggi sul copyright. Potete leggere quello che potete fare con i nostri modelli alla fine di ogni modello sul nostro sito. |
|||||||||||||||||||||||||||||||


Con oltre 40 anni di esperienza nel design di modelli di maglia e uncinetto, DROPS Design offre la più estesa collezione di modelli gratuiti su internet - tradotti in 17 lingue. Ad oggi vi possiamo fornire 324 cataloghi e 12290 modelli - 9561 dei quali sono tradotti in Italiano.
Ci stiamo impegnando molto per darvi il meglio che vi possiamo offrire in termini di maglia e uncinetto, ispirazioni e consigli così come filati di grande qualità ad un prezzo incredibile! Volete utilizzare i nostri modelli per qualcosa d'altro oltre al vostro uso personale? Potete leggere tutto ciò che è consentito nel testo sul Copyright in basso su tutte le pagine dei nostri modelli. Buon lavoro!
Lasciare un commento sul modello DROPS 170-4
Noi saremmo felici di ricevere i tuoi commenti e opinioni su questo modello!
Se vuoi fare una domanda, fai per favore attenzione a selezionare la categoria corretta nella casella qui sotto per velocizzare il processo di risposta. I campi richiesti sono indicati da *.