
Popular categories
Looking for a yarn?


Comments / Questions (10)
![]() Carmen Barco wrote:
Carmen Barco wrote:
Es decepcionante la falta de respuesta
18.01.2026 - 22:49
![]() Carmen Barco wrote:
Carmen Barco wrote:
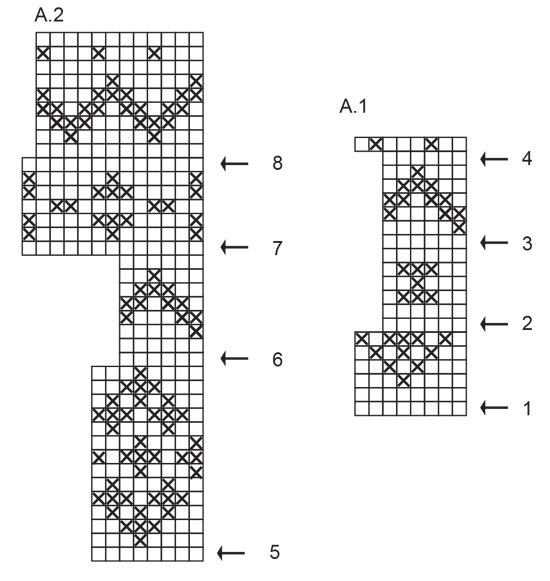
Tengo un problema con la flecha 3. Si hago los aumentos como indica la calculadora, el dibujo no cuadra según el diagrama A1. Entiendo que hay 1 punto blanco y 5 de color. Pero con los aumentos de la calculadora el punto blanco no queda en el punto central de los 3 puntos de color de 2 vueltas atrás. ¿Cómo hago entonces? Es urgente la respuesta por favor. Estoy bloqueada
13.01.2026 - 00:14DROPS Design answered:
Hola Carmen, el patrón debería cuadrar con los aumentos. Por ejemplo, para la talla más pequeña tenemos que aumentar 1 punto después de cada 12º y después de cada 13º punto, alternadamente. En la flecha 3 la vuelta es de 1 sólo color. En la siguiente vuelta tienes 1 punto al inicio de A.1 de blanco y 5 en beige después. Ese punto en blanco forma un pico con las siguientes vueltas, que debería estar entre 2 de las "equis" o "cuadrados" de la anterior sección en blanco de A.1. No en el centro de los 3 puntos en blanco, sino que entre 2 repeticiones de los 3 puntos en blanco. Esta alineación puede variar ligeramente según la talla trabajada.
23.02.2026 - 00:49
![]() Sophie Gore wrote:
Sophie Gore wrote:
When it comes to the sleeves, it says to place the stitches on a thread rather than work them-but then later does not mention overlaying the last row of A.1 over the sleeves. Are you supposed to work the stitches and then place them on a thread? Are they not supposed to have the final row of A.1?
09.08.2024 - 06:35DROPS Design answered:
Dear Sophie, you work the sleeve stitches and then place them on the thread. Otherwise, the working thread won't be in the right place for working the last round over the front/back pieces before starting the body. Happy knitting!
11.08.2024 - 13:37
![]() Sarah Thomas wrote:
Sarah Thomas wrote:
How do I know what size to knit? What does s, m, l, etc. mean in English sizing, or even in inches or cm?
31.08.2023 - 16:23DROPS Design answered:
Hi Sarah, You will find a size chart at the bottom of the pattern, with all the measurements for the different sizes. Happy crafting!
01.09.2023 - 06:40
![]() Catherine Lhouman wrote:
Catherine Lhouman wrote:
Je n'arrive pas à imprimer les explications du pull avec le diagrame pouvez vous m'aider merci.
16.01.2022 - 18:36
![]() Catherine Lhouman wrote:
Catherine Lhouman wrote:
Je n\'arrive pas à imprimer le modèle du pull avec le diagrame pouvez vous m\'aider. Merci
16.01.2022 - 18:34
![]() Eva-lis Westerberg wrote:
Eva-lis Westerberg wrote:
Kan inte skriva ut mönstret.Skrivaren bara bearbetar i evighet.Har inte något problem med något annat som ska skrivas ut. Mvh Eva-Lis Westerberg
24.04.2021 - 09:42DROPS Design answered:
Hei Eva-lis. Klikk på "Skriv ut", ikke skriver ikonet ditt. Eller sjekk innstillingene dine, vi har ingen problem med å få skrevet den ut. mvh DROPS design
26.04.2021 - 15:34
![]() Anne W wrote:
Anne W wrote:
Hvis jeg kun vil strikke med 1 tråd - hvilket garn kan der så bruges? Omregneren på denne side kunne desværre ikke hjælpe. Det skal være uldgarn.
06.01.2021 - 13:09DROPS Design answered:
Hej Anne, Jo denne bluse er strikke i én tråd. Du vælger DROPS Air (som i opskriften) antal gr i din størrelse (feks 350 g i small) og 1 tråd (som i opskriften) så får du 6 alternativer op med 1 tråd uld. Feks 700 g Nepal, eller 750 g Alaska. God fornøjelse!
08.01.2021 - 12:02
![]() Yvanne Pelletier wrote:
Yvanne Pelletier wrote:
Bonjour je suis dans une impasse je fais drops218-9 je ne comprends pas votre diagramme A1 et A2 il n'y a qu' une colonne on dirais qu'il en manque une pour comprendre je suis entré la flèche 3 et 4 c'est le dilemme merci de m'aider 3fois que je recommence grrrr
03.12.2020 - 19:09DROPS Design answered:
Bonjour Mme Pelletier, répétez le diagramme en largeur le nombre de fois indiqué pour votre taille, en même temps, aux rangs avec la flèche, répartissez le nombre d'augmentations indiqués pour ces tours. En fonction du rang, vous répèterez le motif sur un nombre différent de mailles, par ex. A.1 se tricote d'abord sur 8 mailles (après la flèche-1), puis sur 6 m (jusqu'à la flèche-4), puis sur 8 m (après la flèche-4), et ainsi de suite. Raison pour laquelle il n'y a pas le même nombre de mailles à chaque fois, mais vous pourrez à chaque fois répéter ce motif tout le tour car vous aurez le bon nombre de mailles correspondant grâce aux augmentations. Bon tricot!
04.12.2020 - 07:38
![]() Grażyna wrote:
Grażyna wrote:
Piękny sweter w moich kolorach. Podoba mi się to że żakard rozpoczyna się poniżej karczku. Świetny.
05.06.2020 - 11:20
|
|||||||
Nordic Trails Sweater#nordictrailssweater |
|||||||
 |
 |
||||||
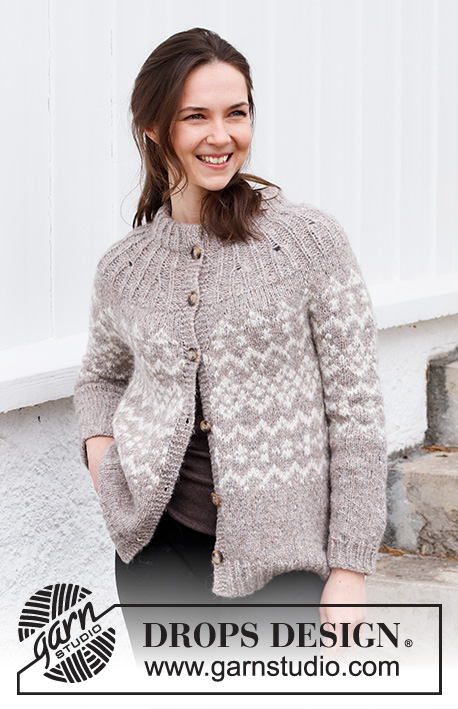
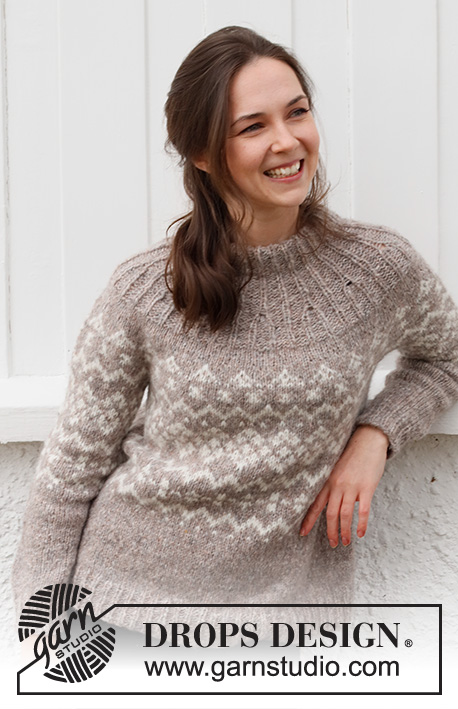
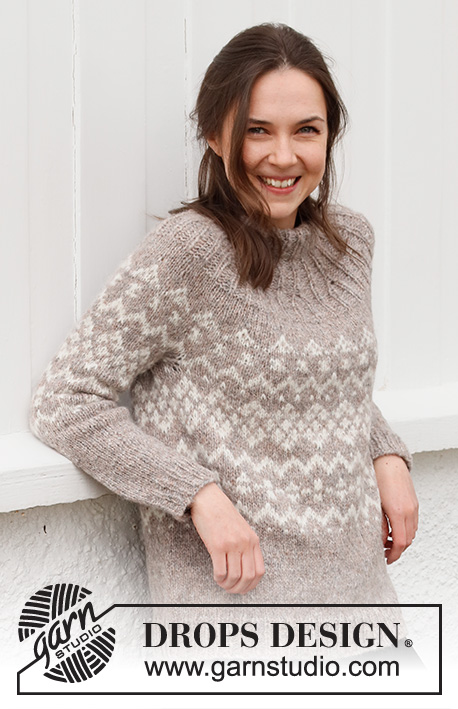
Knitted jumper in DROPS Air. The piece is worked top down with round yoke, rib and Nordic pattern. Sizes S - XXXL.
DROPS 218-9 |
|||||||
|
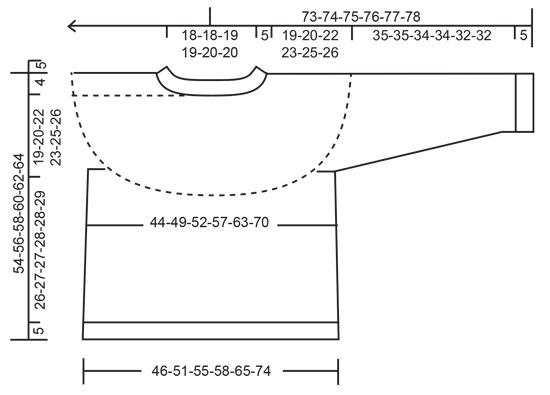
------------------------------------------------------- EXPLANATIONS FOR THE PATTERN: ------------------------------------------------------- PATTERN: See diagrams A.1 and A.2. KNITTING TIP: To avoid the knitting tension becoming tighter when working pattern it is important that the strands at the back are not tight. Use a size larger needle when working pattern if this is a problem. INCREASE 4 STITCHES AS FOLLOWS: Knit 1 in the knitted stitch but do not slip the stitch from the left needle, make 1 yarn over the right needle, knit 1 in the same stitch but do not slip the stitch from the needle, make 1 yarn over the right needle and knit 1 in the same stitch. Slip the stitch off the needle (= 4 stitches increased). INCREASE TIP (evenly spaced): To work out how to increase evenly, count the total number of stitches on the needle (e.g. 156 stitches) and divide by the number of increases to be made (e.g. 28) = 5.5. In this example, increase by making 1 yarn over after alternately each 5th and 6th stitch. On the next round work the yarn overs twisted to avoid holes. DECREASE TIP (for sleeves): Decrease 1 stitch on either side of the marker thread as follows: Work until there are 3 stitches left before the marker thread, knit 2 together, knit 2 (marker thread sits between these 2 stitches), slip 1 stitch as if to knit, knit 1 and pass the slipped stitch over the knitted stitch (= 2 stitches decreased). ------------------------------------------------------- START THE PIECE HERE: ------------------------------------------------------- JUMPER – SHORT OVERVIEW OF THE PIECE: The piece is worked in the round with circular needle, from mid back and top down. The sleeves are worked with double pointed needles/short circular needle, top down. The neck is folded double and sewn down to finish. NECK: Cast on 78-84-90-90-96-96 stitches with circular needle size 4 mm and beige. Knit 1 round, then work rib (knit 1, purl 2) for 10 cm. Insert 1 marker here; the yoke is measured from this marker. YOKE: Change to circular needle size 5 mm. Continue the rib as before but when the piece measures 1 cm, increase 1 stitch in all purled sections = 104-112-120-120-128-128 stitches. Increase by making 1 yarn over at the end of each purled section; the yarn overs are worked twisted on the next round to avoid holes. Continue with purl 3 in all purled sections. When the piece measures 5-5½-6-6½-7-7½ cm, work as follows: * knit 1, purl 3, INCREASE 4 STITCHES in the next stitch – read description above, purl 3 *, work from *-* to the end of the round = 156-168-180-180-192-192 stitches (you have increased in every other knitted stitch). Continue with knit 1, purl 3 over all stitches. Continue this pattern until the piece measures 10-11-12-13-14-15 cm from the marker on the neck. Work stocking stitch for 0-0-1-1-2-2 cm, the piece now measures approx. 10-11-13-14-16-17 cm from the marker. Continue with pattern A.1 over all stitches and increase stitches on each round with an arrow in the diagram as follows. REMEMBER THE KNITTING TENSION! Read KNITTING TIP and INCREASE TIP! ARROW-1: Increase 28-32-36-44-48-56 stitches evenly spaced = 184-200-216-224-240-248 stitches. ARROW-2: Increase 26-28-30-40-42-52 stitches evenly spaced = 210-228-246-264-282-300 stitches. ARROW-3: Increase 18-24-30-36-36-42 stitches evenly spaced = 228-252-276-300-318-342 stitches. ARROW-4: Increase 4-4-4-4-2-2 stitches evenly spaced = 232-256-280-304-320-344 stitches. There is 1 round left in A.1 and the piece measures approx. 19-20-22-23-25-26 cm. Work the last round in the diagram as follows: Work the first 34-38-41-44-48-53 stitches (= half the back piece), place the next 48-52-58-64-64-66 stitches on a thread (sleeve) and cast on 6-6-6-8-10-12 new stitches on the needle (= in side under the sleeve), work the next 68-76-82-88-96-106 stitches (= front piece), place the next 48-52-58-64-64-66 stitches on a thread (sleeve) and cast on 6-6-6-8-10-12 new stitches on the needle (= in side under the sleeve), work the remaining 34-38-41-44-48-53 stitches (= half the back piece). THE PIECE IS NOW MEASURED FROM HERE! BODY: = 148-164-176-192-212-236 stitches. Work A.2 over all stitches, AT THE SAME TIME increase on each round with an arrow as follows: ARROW-5: Increase 4-4-0-0-4-4 stitches evenly spaced = 152-168-176-192-216-240 stitches. ARROW-6: Increase 4-0-4-0-0-0 stitches evenly spaced = 156-168-180-192-216-240 stitches. ARROW-7: Increase 0-1-2-3-5-7 stitches evenly spaced = 156-169-182-195-221-247 stitches. ARROW-8: Increase 0-5-4-3-1-5 stitches evenly spaced = 156-174-186-198-222-252 stitches. When A.2 has been completed in height continue with stocking stitch and beige. When the piece measures 26-27-27-28-28-29 cm, increase 12 stitches evenly spaced = 168-186-198-210-234-264 stitches. Change to circular needle size 4 mm and work rib (knit 1, purl 2) for 5 cm, cast off with knit over knit and purl over purl. The jumper measures approx. 54-56-58-60-62-64 cm from the shoulder down. SLEEVE: Place the 48-52-58-64-64-66 stitches from the thread on the one side of the piece on double pointed needles/short circular needle size 5 mm and knit up 1 stitch in each of the 6-6-6-8-10-12 stitches cast on under the sleeve = 54-58-64-72-74-78 stitches. Insert a marker thread in the middle of the 6-6-6-8-10-12 stitches under the sleeve. Allow the thread to follow your work onwards; it will be used when decreasing under the sleeve. Work last round A.1 then work pattern A.2 in the round. NOTE! Due to decreases under the sleeve the repeats in A.2 will not always fit. Therefore do not increase by the arrows in A.2 as on the body. When the piece measures 4 cm, start to decrease under the sleeve - read DECREASE TIP. Decrease like this every 5-4-3-2½-2-2 cm a total of 6-7-9-12-12-13 times = 42-44-46-48-50-52 stitches. When A.2 has been completed, continue with beige and stocking stitch until the sleeve measures 35-35-34-34-32-32 cm from the division (there is approx. 5 cm left to finished length; you can try the jumper on and work to desired length). NOTE: Shorter measurements in larger sizes due to wider neck and longer yoke. Change to double pointed needles size 4 mm and work 1 round where you increase 0-1-2-0-1-2 stitches evenly spaced = 42-45-48-48-51-54 stitches. Work rib (knit 1, purl 2) for 5 cm. Cast off with knit over knit and purl over purl. The sleeve measures approx. 40-40-39-39-37-37 cm. Work the other sleeve in the same way. ASSEMBLY: Fold the rib at the top of the neck to the wrong side and sew down to give a folded edge. To avoid the edge being tight and rolling down, it is important that the seam is elastic. |
|||||||
Diagram explanations |
|||||||
|
|||||||
 |
|||||||
 |
|||||||
Have you finished this pattern?Tag your pictures with #dropspattern #nordictrailssweater or submit them to the #dropsfan gallery. Do you need help with this pattern?You'll find 29 tutorial videos, a Comments/Questions area and more by visiting the pattern on garnstudio.com. © 1982-2026 DROPS Design A/S. We reserve all rights. This document, including all its sub-sections, has copyrights. Read more about what you can do with our patterns at the bottom of each pattern on our site. |
|||||||


With over 40 years in knitting and crochet design, DROPS Design offers one of the most extensive collections of free patterns on the internet - translated to 17 languages. As of today we count 324 catalogues and 12290 patterns translated into English (UK/cm). 12290
We work hard to bring you the best knitting and crochet have to offer, inspiration and advice as well as great quality yarns at incredible prices! Would you like to use our patterns for other than personal use? You can read what you are allowed to do in the Copyright text at the bottom of all our patterns. Happy crafting!
Post a comment to pattern DROPS 218-9
We would love to hear what you have to say about this pattern!
If you want to leave a question, please make sure you select the correct category in the form below, to speed up the answering process. Required fields are marked *.