
Popular categories
Looking for a yarn?


Comments / Questions (20)
![]() Lappi wrote:
Lappi wrote:
Sekava suomennos.!
10.12.2025 - 17:06
![]() Hacquard wrote:
Hacquard wrote:
Bonjour. Puis je savoir la différence ente la laine karisma uni colour et la laine karisma mix s'il vous plait. Je vous remercie de votre réponse.
05.01.2025 - 10:43DROPS Design answered:
Bonjour Mme Hacquard, c'est juste une question de couleur, les coloris Karisma uni colour sont d'une seule couleur, les coloris mix ne sont pas tout à fait unies et sont légèrement mélangées à des coloris de même nuance; en cliquant sur les photos du nuancier, vous verrez la différence subtile entre les 2 types de coloris. Bon tricot!
06.01.2025 - 10:06
![]() Lene wrote:
Lene wrote:
Hej Drops, jeg har strikket halsen, og har 128 m på pinden. Hvis jeg skal nå hele omgangen rundt og strikke først 6 m, 50 m, 8 m, 14 m, 50 m, 8 m er der for få masker i omgangen. Regner jeg maskerne sammen der skal strikkes i omgangen bliver det til 136 m. Hjælp... 🤗🙏
05.12.2024 - 16:58DROPS Design answered:
Hei Lena. Det skal felles 8x2 masker, ikke strikkes over 8x2 masker. Du har 128 masker på pinnen, så skal du strikke 2 rett/2 vrang over 6 masker, deretter skal det strikkes retstrik over 50 masker samtidig som det felles 8 masker (=42 masker), så strikkes det 2 rett/2 vrang over 14 masker. Så strikkes det retstrik over 50 masker samtidig som det felles 8 masker (=42 masker). Avslutt omgangen med 2 rett/2 vrang over 8 masker = 6+42+14+42+8= 112 masker. mvh DROPS Design
09.12.2024 - 14:21
![]() EJ Pfeiffer wrote:
EJ Pfeiffer wrote:
When it says to "work in the round the opposite way", does that mean to work each stitch as the opposite (knit the purls and purl the knits), or to start at the last stitch and work backwards to the first, working each stitch as presented?
27.07.2023 - 04:31DROPS Design answered:
Hi EJ, It is the second suggestion, to turn and work in the opposite direction with the stitches as presented in the diagrams. Happy knitting!
27.07.2023 - 06:44
![]() Carolina wrote:
Carolina wrote:
Hola necsecito ayuda con el patron Roses so red, el patron dice que al tejer los 5,6,7 cm. tendre aproximadamente 160 puntos en mi caso estoy tejiendo los 5 cm y tengo los 160 puntos cuantos puntos debe haber en cada manga ? y desde donde se empiezan a cerrar los puntos ? estoy confundida , si empiezo por el marcador numero 1 o desde el marcador del inicio del tejido? gracias por su tiempo espero su respuesta , gracias
15.10.2022 - 03:33
![]() Helga Eitel wrote:
Helga Eitel wrote:
Nachdem ich die 8 cm 2 re. 2 li. gestrickt habe weiß ich nicht wie ich innerhalb 54 Maschen gleichmäßig verteilt 8 Maschen abnehmen kann. 54 : 8 sind 6 x 8, also 48 Maschen und 6 bleiben übrig. Hier könnte ich also 7x die 5. und 6. Masche zusammenstricken und bei den letzten 6 Maschen die 5. u. 6. Masche zusammenstricken. Ist das richtig?
23.04.2022 - 20:00DROPS Design answered:
Liebe Frau Eitel, ja richtig, so können Sie abnehmen. Viel Spaß beim stricken!
25.04.2022 - 07:39
![]() Anna Pihl wrote:
Anna Pihl wrote:
När jag ska sticka rätstickning på rundsticka hur ska jag tänka då ...
30.01.2022 - 12:00DROPS Design answered:
Hej Anna. Om du ska sticka rätstickning runt så stickar du så här: Sticka *1 varv rätt och 1 varv avigt*, upprepa *-*. Mvh DROPS Design
01.02.2022 - 09:06
![]() Mary-Ann Edsbäcker wrote:
Mary-Ann Edsbäcker wrote:
Tips! Sticka färdigt fram och bakstycket med vanliga stickor. De andra maskorna kan ju hänga kvar på rundstickan under tiden. Mycket enklare!
02.12.2021 - 13:52
![]() Mary-Ann Edsbäcker wrote:
Mary-Ann Edsbäcker wrote:
I beskrivningen står att man ska göra ökningarna FÖRE första och tredje markören och EFTER andra och fjärde. Ska vara precis tvärtom, Se beskrivningen för barnmodellen Rainbow Unicorn Set där det står rätt.
29.11.2021 - 17:42
![]() Amanda wrote:
Amanda wrote:
Jeg forstår ikke aflukningen af skuldermasker på halsedissen. Hvis jeg gør det som der står, ender jeg med at skulle lukke sidste maske midt i skuldermaskerne i den ene side. Hvordan gør jeg det og kommer videre med arbejdet?
20.11.2021 - 12:36DROPS Design answered:
Hei Amanda. De økte maskene strikkes i riller, slik at du hele tiden har 14 masker på begge skuldrene. Merkene som ble satt (1.-4. merke) vil alltid være i samme maske, slik at når du skal starte å felle, feller du 6 masker av det ene skulderpartiet, deretter strikker du riller til merke nr. 2 (66-70-78 masker), så feller du av 14 masker (over 2. skulderpartiet og til 3. merke). Så strikker du riller til 4. merke (66-70-78 masker). Deretter feller du av de 8 siste maskene over første skulderparti. Nå strikkes hver del ferdig hver for seg. mvh DROPS Design
23.11.2021 - 10:35
|
|||||||||||||||||||
Roses so Red#rosessoredset |
|||||||||||||||||||
 |
 |
||||||||||||||||||
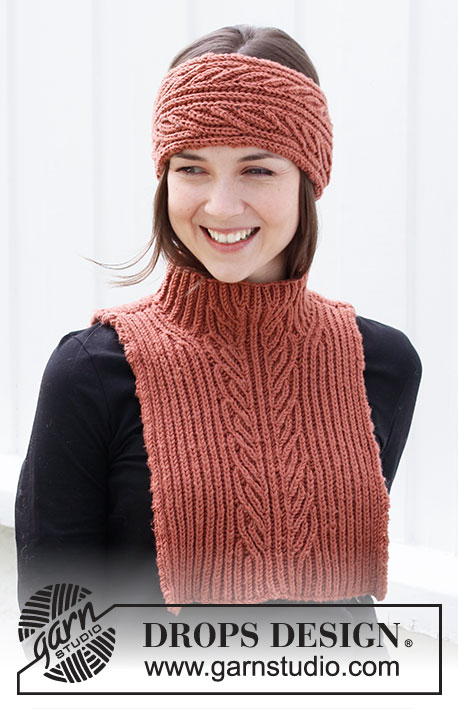
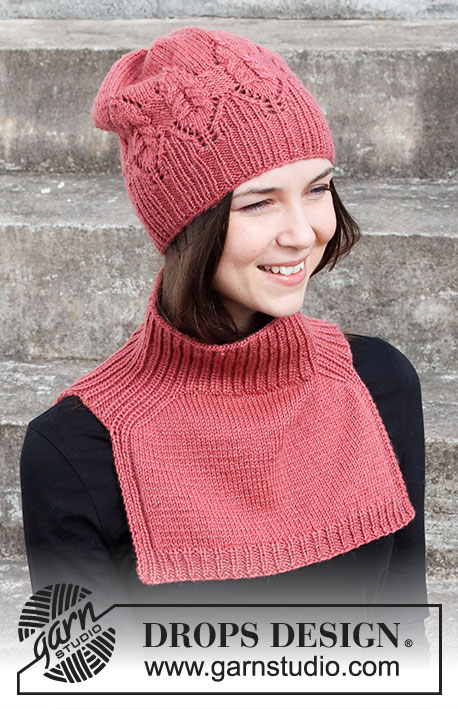
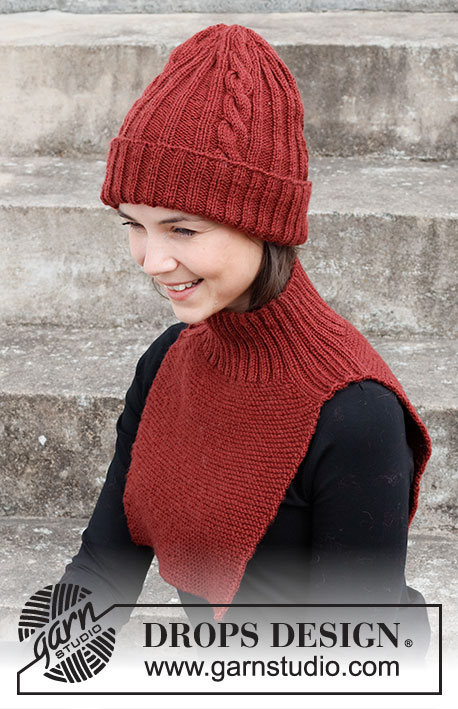
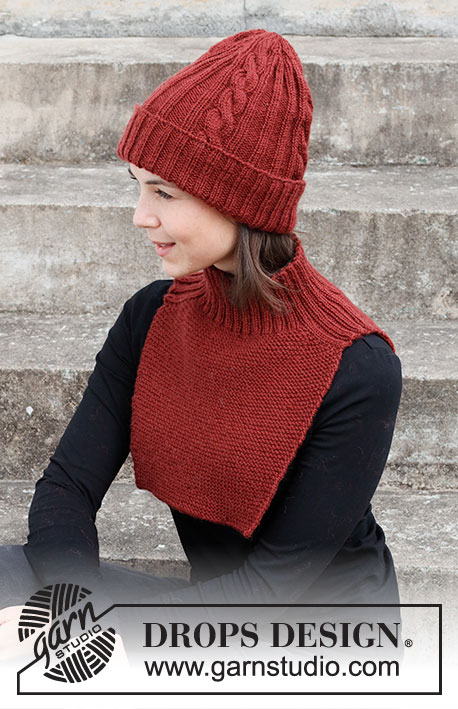
Knitted hat and neck warmer with rib and cables in DROPS Karisma.
DROPS 214-8 |
|||||||||||||||||||
|
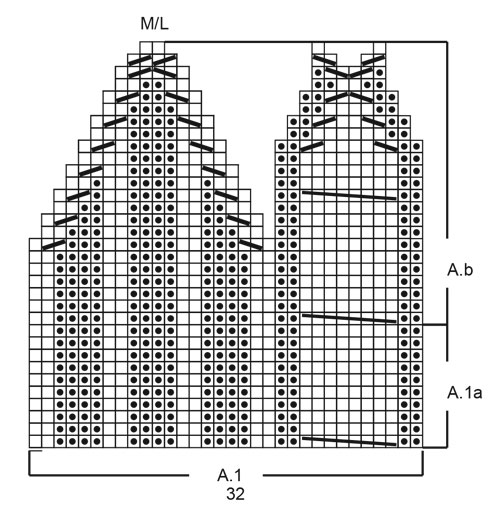
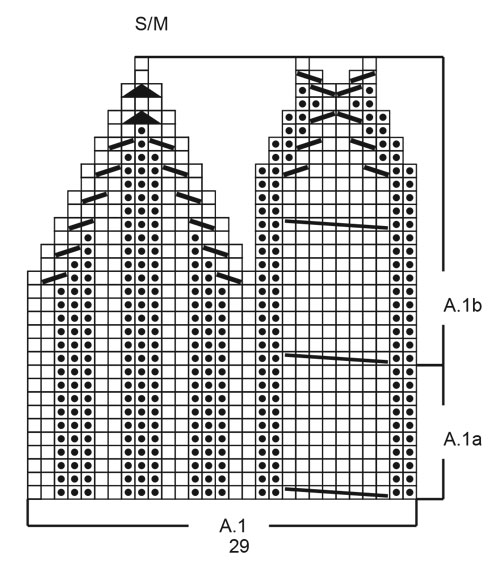
------------------------------------------------------- EXPLANATION FOR THE PATTERN: ------------------------------------------------------- PATTERN: See diagram A.1. See diagram for your size. GARTER STITCH (worked in the round): 1 ridge = 2 rounds. Knit 1 round and purl 1 round. GARTER STITCH (back and forth): 1 ridge = knit 2 rows. INCREASE TIP (applies to neck warmer): Increase on each side of shoulder stitches as follows: BEFORE MARKER: The new stitch will be twisted, leaning towards the right. Use left needle to pick up strand between 2 stitches from the round below, pick up strand from behind and knit stitch in front loop. AFTER MARKER: The new stitch will be twisted, leaning towards the left. Use left needle to pick up strand between 2 stitches from the round below, pick up strand from the front and knit stitch in back loop. DECREASE TIP (applies to neck): All decreases are done on a row from right side. Knit 1, slip 1 stitch on to right needle knitwise, knit 1, pass slipped stitch over stitch worked (= 1 stitch decreased), knit until 3 stitches remain on needle, knit 2 together (= 1 stitch decreased) and finish with knit 1. CAST-OFF TIP: To avoid a tight cast-off edge you may use a larger needle size. If this also is too tight, work a 1 yarn over after approx. every 4th stitch while casting off (cast off yarn overs as regular stitches). ------------------------------------------------------- START THE PIECE HERE: ------------------------------------------------------- HAT - SHORT OVERVIEW OF THE GARMENT: Worked in the round on circular needle, bottom up. Switch to double pointed needles when needed. HAT: Cast on 116-128 stitches on circular needle size 3 mm with Karisma. Knit 1 round. Then work rib = knit 2/purl 2. When piece measures 7 cm, turn the piece in side out so that wrong side is on the outside, and work in the round the opposite way. This is done because folding edge should be folded and right side should be on right side of folding edge. Then work A.1a (= 29-32 stitches) in the round - see diagram for your size (= 4 times in total). REMEMBER THE KNITTING TENSION! Repeat A.1a vertically. When hat measures approx. 19-21 cm, adjust to finish after 1 whole repetition of A.1a (measurement includes 5 cm fold, work longer if you want a longer fold, approx. 8 cm remain), work A.1b over A.1a. When A.1b has been worked 1 time vertically, there are 12-16 stitches on needle. Cut the yarn and pull it through the remaining stitches, tighten together and fasten. Piece now measures approx. 27-29 cm from cast-on edge. Fold approx. 5 cm at the bottom upwards. ------------------------------------------------------- NECK WARMER - SHORT SUMMARY OF PIECE: Worked top down. Work first in the round on circular needle and increase stitches for saddle shoulders. Cast off shoulder stitches and work each part back and forth on circular needle. NECK WARMER: Cast on 120-128-136 stitches on circular needle size 3.5 mm with Karisma. Work rib (= knit 2/purl 2). When piece measures 8 cm, switch to circular needle size 4 mm and continue as follows (from mid on top of shoulder): Insert 1 marker thread at the beginning of round (leave marker thread in piece, use for measurements later). Knit 2, purl 2, knit 2 (= 6 stitches), insert 1st marker, work 46-50-54 stitches in GARTER STITCH – read explanation above, and decrease 8 stitches evenly, insert 2nd marker, knit 2, purl 2, knit 2, purl 2, knit 2, purl 2, knit 2 (= 14 stitches), insert 3rd marker, work 46-50-54 stitches in garter stitch and decrease 8 stitches evenly, insert 4th marker and finish with knit 2, purl 2, knit 2 and purl 2 (= 8 stitches) = 104-112-120 stitches. Shoulder stitches are stitches between 1st and 4th marker and 2nd and 3rd marker. Continue rib over shoulder stitches and garter stitch over stitches on front/back piece while increasing 1 stitch at every marker on every round. Increase 1 stitch AFTER 1st and 3rd marker, and BEFORE 2nd and 4th marker - read INCREASE TIP (= 4 stitches increased on every round). REMEMBER THE KNITTING TENSION! Work the increased stitches in garter stitch. Continue like this until piece measures 5-6-7 cm from marker thread = approx. 160-176-196 stitches. On next round, cast off shoulder stitches as follows: Cast of the first 6 stitches, work in garter stitch as before until 2nd marker, cast off the next 14 shoulder stitches, work in garter stitch as before until 4th marker, cast off the last 8 stitches. Then finish each part separately. Work ridges in GARTER STITCH back and forth - read explanation above, over the approx. 66-74-84 stitches on front/back piece, AT THE SAME TIME on every 8th row decrease 1 stitch in each side - read DECREASE TIP. I.e. there are 2 stitches less on every 8th row until finished measurements. Continue like this until piece measures 24-26-28 cm, measured from marker thread. Cast off by knitting– read CAST-OFF TIP. Work the other front piece/back piece the same way. |
|||||||||||||||||||
Diagram explanations |
|||||||||||||||||||
|
|||||||||||||||||||
 |
|||||||||||||||||||
 |
|||||||||||||||||||
Have you finished this pattern?Tag your pictures with #dropspattern #rosessoredset or submit them to the #dropsfan gallery. Do you need help with this pattern?You'll find 30 tutorial videos, a Comments/Questions area and more by visiting the pattern on garnstudio.com. © 1982-2026 DROPS Design A/S. We reserve all rights. This document, including all its sub-sections, has copyrights. Read more about what you can do with our patterns at the bottom of each pattern on our site. |
|||||||||||||||||||


With over 40 years in knitting and crochet design, DROPS Design offers one of the most extensive collections of free patterns on the internet - translated to 17 languages. As of today we count 324 catalogues and 12290 patterns translated into English (UK/cm). 12290
We work hard to bring you the best knitting and crochet have to offer, inspiration and advice as well as great quality yarns at incredible prices! Would you like to use our patterns for other than personal use? You can read what you are allowed to do in the Copyright text at the bottom of all our patterns. Happy crafting!
Post a comment to pattern DROPS 214-8
We would love to hear what you have to say about this pattern!
If you want to leave a question, please make sure you select the correct category in the form below, to speed up the answering process. Required fields are marked *.