
Popular categories
Looking for a yarn?


Comments / Questions (20)
![]() Martina Ebben wrote:
Martina Ebben wrote:
Hallo, ich möchte für die hintere Mitte eine Erhöhung stricken, wie es auch in einem Ihrer Videos gezeigt wird. Muss ich dann während der verkürzten Reihen bereits die Raglanärmel-Zunahmen arbeiten, wenn ich an den gemäß der Anleitung entsprechend markierten Maschen ankomme? Oder stricke ich diese erst in der ersten Runde nach Ende aller verkürzten Reihen? Vielen Dank im Voraus!
19.02.2023 - 21:31DROPS Design answered:
Liebe Frau Ebben, vielleicht kann Ihnen damit dieses Video helfen - (die Zunahmen stricken Sie wie bei der Anleitung, auch wenn Sie im Video verschieden sind). Viel Spaß beim stricken!
20.02.2023 - 10:14
![]() Leora Noam wrote:
Leora Noam wrote:
In the top description, it says you will need 5 mm needles and 8 mm needles. but it says to cast on using 4 mm needles. Can you please clarify for me if I need to cast on with 5 mm or 4mm? I am really confused. The pattern calls for 5 mm needles for the sleave cufs.
21.03.2022 - 08:51DROPS Design answered:
Dear Mrs Noam, there was a typo there, stitches should be cast on with needle size 5 mm, thanks for noticing, pattern has been now edited. Happy knitting!
21.03.2022 - 09:37
![]() Maria wrote:
Maria wrote:
Ovatko ohjeen etu- ja takakappale täysin identtiset? En löytänyt ohjeesta eroa millä erottaa etu- ja takakappaleen toisistaan.
14.01.2022 - 17:13DROPS Design answered:
Kyllä, etukappale ja takakappale ovat samanlaiset.
18.01.2022 - 18:02
![]() Tanja wrote:
Tanja wrote:
Hallo, bei der Passe heißt es in der 1. Runde schon die erste Raglan-Zunahme vornehmen. Dann 6x (Gr. S) jeweils in der 4. Runde zunehmen? Zählt die 1. Runde dann schon mit oder fängt man bei der 2. Runde mit Runde 1 zu zählen an? D.h. es sind immer 3 Runden ohne Zunahmen, oder? Vielen Dank für die Antwort.
08.12.2021 - 21:48DROPS Design answered:
Liebe Tanja, genau es sind immer 3 Runden ohne Zunahmen, die Raglanzunahmen beginnen Sie bei der 1. Runde der Passe, dann 3 Runden ohne Zunahmen stricken, diese 4 Runden isngesamt 5 Mal wiederholen, dann stricken Sie noch eine Runde mit Zunahmen (= 6 Mal insgesamt),. Stricken Sie nun 3 Runden ohne Zunahmen und bei der nächsten Runde nehmen Sie jetzt nur 8 Maschen (anstatt 16 M) = es sind dann 168 Maschen. Viel spaß beim stricken!
09.12.2021 - 07:32
![]() Louise wrote:
Louise wrote:
Hej, Jag får inte summeringen av stl. S att stämma av markeringarna vid övergång från hals till att börja med raglan. Det är 64 maskor inkl. 2 maskor ökade på 1a varvet slätstickat. 12 + 6 + 24 + 6 + 12 = 60 inte 64 som är antalet jag har på stickan i stl. S. Tack på förhand!
29.03.2021 - 21:03DROPS Design answered:
Hej Louise. Om du räknar med de maskorna man ska sätta markörerna i så blir det 64 maskor. Du räknar 12 m sätter en markör i nästa maska (=13 maskor inkl. maskan med markör) osv. Mvh DROPS Design
13.04.2021 - 08:17
![]() Beraud wrote:
Beraud wrote:
Vous ne dites pas le nombre de pelotes qu’il faut.
23.01.2021 - 17:03DROPS Design answered:
Bonjour Mme Beraud, vous trouverez la quantité nécessaire pour chaque taille, au poids, sous l'en-tête, autrement dit: en XS il faut 200 g DROPS Melody/50 g la pelote = 4 pelotes. Bon tricot!
25.01.2021 - 12:59
![]() Lena Bindocci wrote:
Lena Bindocci wrote:
Grazie mille per la sollecita risposta. Purtroppo le mie punte sono fisse! ....essendo alle prime armi non ne conoscevo l'esistenza ...e ora come faccio? Non posso neppure acquistarli siamo in lockdown. Esiste un altro modo? Grazie mille
11.11.2020 - 00:33DROPS Design answered:
Buongiorno Lena, nessun problema: tiene a sinistra il lavoro già avviato e lavora le maglie sul nuovo ferro circolare, alla fine del giro tutte le maglie saranno sul nuovo ferro. Buon lavoro!
13.11.2020 - 13:40
![]() Lena Bindocci wrote:
Lena Bindocci wrote:
Grazie mille per la sollecita risposta. Purtroppo le mie punte sono fisse! ....essendo alle prime armi non ne conoscevo l'esistenza ...e ora come faccio? Non posso neppure acquistarli siamo in lockdown. Esiste un altro modo? Grazie mille
11.11.2020 - 00:32DROPS Design answered:
Buongiorno Lena, nessun problema: tiene a sinistra il lavoro già avviato e lavora le maglie sul nuovo ferro circolare, alla fine del giro tutte le maglie saranno sul nuovo ferro. Buon lavoro!
13.11.2020 - 13:38
![]() Lena Bindocci wrote:
Lena Bindocci wrote:
Ho iniziato come descritto e sono arrivata dove si dice di passare il lavoro da ferri circolari 4 a ferri circolari 8 come faccio? le maglie sono strette avete un tutorial? e poi ferri 8 che devo usare lunghi o corti? scusate ma sono alle prime armi. Grazie infinite
10.11.2020 - 19:57DROPS Design answered:
Buonasera Lena, quando cambia i ferri deve anche inserire i segnapunti, per cui può sostituire la punta del ferro di destra e passare le maglie inserendo i segnapunti e poi sostituire la punta del ferro di sinistra. Buon lavoro!
10.11.2020 - 22:23
![]() Brigitte LEENEN wrote:
Brigitte LEENEN wrote:
Beste, ik ga deze trui breien en heb de wol al besteld (en gekregen ;-)). Maar ik vind de gepaste breinaalden niet... de rondbreinaalden heb ik, maar de naalden zonder kop 8mm, zijn nergens te vinden, niet op jullie website, noch bij veritas, noch bij Créacorner, noch bij Draad enzo... En ze zijn ook altijd maar 20cm, hetgeen mij kort lijkt. Dus de 5mm heb ik ook nog niet durven bestellen .. Kloppen de geven van jullie naalden zonder kop ? En zo ja waar kan ik ze bestellen ? Bedankt!
03.10.2020 - 13:11DROPS Design answered:
Dag Brigitte,
Niet al onze winkels verkopen al onze producten. Je kunt het beste even contact opnemen met de winkel waar je ook het garen hebt besteld, en daar je vraag neerleggen. Waarschijnlijk kunnen zij je wel verder helpen.
05.10.2020 - 11:35
|
|
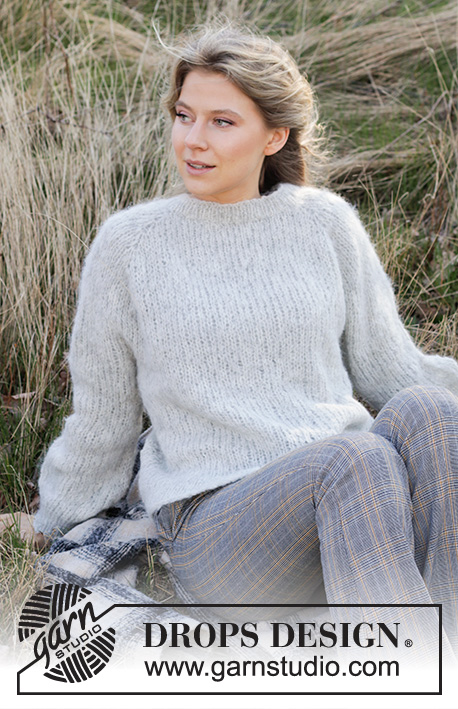
Salt Sea Air#saltseaairsweater |
|
 |
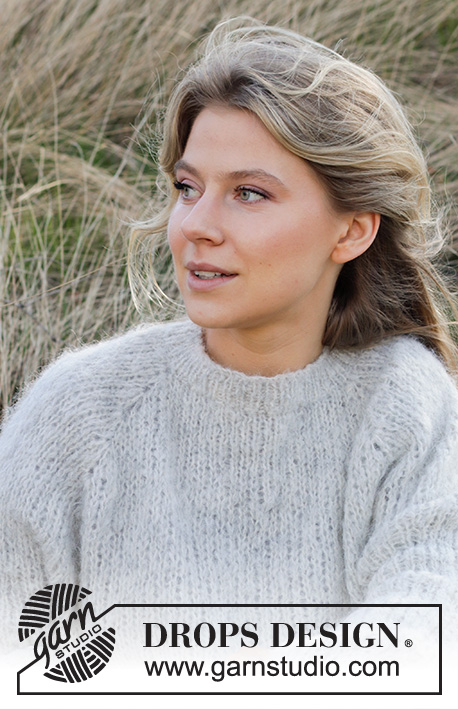 |
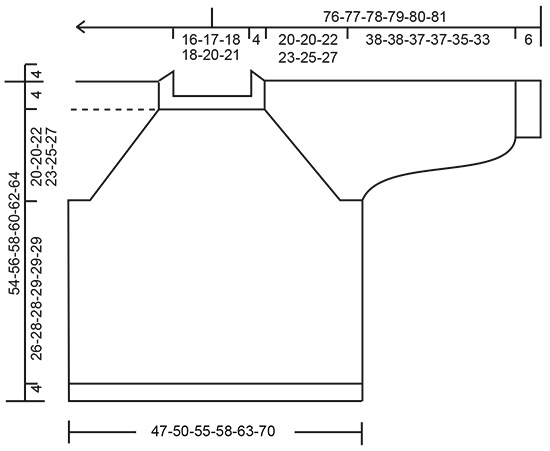
Knitted jumper in DROPS Melody. The piece is worked top down with raglan. Sizes XS - XXL.
DROPS 217-31 |
|
|
------------------------------------------------------- EXPLANATIONS FOR THE PATTERN: ------------------------------------------------------- INCREASE/DECREASE TIP (evenly spaced): To work out how to increase/decrease evenly, count the total number of stitches on needle (e.g. 112 stitches) and divide by the number of increases/decreases to be made (e.g. 22) = 5.1. In this example, increase by making 1 yarn over after each 5th stitch. On the next row knit the yarn overs twisted to avoid holes. When decreasing, knit together each 4th and 5th stitch. RAGLAN: Increase to raglan in each transition between body and sleeves as described below: INCREASE 4 STITCHES: Knit 1 in the stitch under the next stitch (under the stitch with the marker), but do not slip this stitch from the left needle, * make 1 yarn over the right needle, knit 1 in the same stitch on the left needle *, work from *-* a total of 2 times, then slip the stitches from the left needle = 5 stitches (4 stitches increased). Insert 1 marker in the middle of these 5 stitches (for the next increase). INCREASE 2 STITCHES: Knit 1 in the stitch under the next stitch (under the stitch with the marker), but do not slip this stitch from the left needle, make 1 yarn over the right needle, knit 1 in the same stitch on the left needle, then slip the stitches from the left needle = 3 stitches (2 stitches increased). DECREASE TIP (mid-under sleeve): DECREASE 1 STITCH BEFORE THE MARKER THREAD: Work until there are 3 stitches left before the marker thread, knit 2 together, knit 1 (= 1 stitch decreased). DECREASE 1 STITCH AFTER THE MARKER THREAD: Knit 1, slip 1 stitch as if to knit, knit 1, pass the slipped stitch over the knitted stitch (= 1 stitch decreased). INCREASE TIP (for sleeves): Work until there is 1 stitch left before the marker thread, 1 yarn over, knit 2 (marker thread sits between these 2 stitches), 1 yarn over (2 stitches increased). On the next round knit the yarn overs twisted to avoid holes. Then work the new stitches in stocking stitch. CASTING-OFF TIP: To avoid the cast-off edge being tight you can cast off with a larger size needle. If the edge is still tight, make 1 yarn over after approx. each 6th stitch at the same time as casting off; the yarn overs are cast off as normal stitches. ------------------------------------------------------- START THE PIECE HERE: ------------------------------------------------------- JUMPER – SHORT OVERVIEW OF THE PIECE: The neck and yoke are worked in the round with circular needle, top down from mid back. The yoke is divided for body and sleeves and the body continued in the round with circular needle. The sleeves are worked in the round with short circular needle/double pointed needles, top down. NECK: Cast on 58-62-66-66-70-72 stitches with short circular needle size 5 mm and Melody. Knit 1 round. Then work rib in the round (= knit 1, purl 1) for 4 cm. Knit 1 round where you increase 2-2-2-2-2-8 stitches evenly spaced – read INCREASE/DECREASE TIP = 60-64-68-68-72-80 stitches Insert 1 marker in the middle of the round (= mid-front); the yoke is measured from this marker! YOKE: Change to circular needle size 8 mm and insert 4 markers in the piece as follows; for increasing to raglan. Count 11-12-13-13-14-16 stitches (= ½ back piece), insert 1 marker in the next stitch, count 6 stitches (= sleeve), insert 1 marker in the next stitch, count 22-24-26-26-28-32 stitches (= front piece), insert 1 marker in the next stitch, count 6 stitches (= sleeve), insert 1 marker in the next stitch. There are 11-12-13-13-14-16 stitches left after the last marker. Start mid-back and work stocking stitch in the round. REMEMBER THE KNITTING TENSION! AT THE SAME TIME on the first round increase to RAGLAN – read description above; increase 4 stitches in each stitch with a marker (= a total of 16 stitches increased on the round). Increase to raglan every 4th round a total of 6-6-7-8-9-10 times = 156-160-180-196-216-240 stitches. In sizes XS, S and M continue to increase on the 4th round one more time, but now with just 2 stitches increased in each stitch with a marker as described under RAGLAN (= a total of 8 stitches increased on the round). After the last increase there are 164-168-188-196-216-240 stitches on the needle. Continue with stocking stitch but without further increases, until the piece measures 20-20-22-23-25-27 cm from the marker on the neck. Now divide the yoke for the body and sleeves on the next round as follows: Work 25-26-29-30-33-37 stitches in stocking stitch (= ½ back piece), place the next 32-32-36-38-42-46 stitches on 1 thread for the sleeve and cast on 6-8-8-10-10-10 new stitches on the needle (= in side under sleeve), work 50-52-58-60-66-74 stitches in stocking stitch (= front piece), place the next 32-32-36-38-42-46 stitches on 1 thread for the sleeve and cast on 6-8-8-10-10-10 new stitches on the needle (= in side under sleeve) and work the remaining 25-26-29-30-33-37 stitches in stocking stitch (= ½ back piece). Body and sleeves are finished separately. THE PIECE IS NOW MEASURED FROM HERE! BODY: = 112-120-132-140-152-168 stitches. Work as far as to the middle of the 6-8-8-10-10-10 stitches cast on under the first sleeve (the round now starts from here). Work stocking stitch in the round until the piece measures 26-28-28-29-29-29 cm from the division. There is approx. 4 cm left to finished length; try the jumper on and work to desired length. Knit 1 round where you increase 22-24-26-28-30-34 stitches evenly spaced – remember INCREASE/DECREASE TIP = 134-144-158-168-182-202 stitches. Change to circular needle size 5 mm and work rib (= knit 1, purl 1) for 4 cm. Cast off with knit over knit and purl over purl – read CASTING-OFF TIP! The jumper measures approx. 54-56-58-60-62-64 cm from the shoulder down. SLEEVE: Place the 32-32-36-38-42-46 stitches from the thread on the one side of the piece on double pointed needles/short circular needle size 8 mm and knit up 1 stitch in each of the 6-8-8-10-10-10 stitches cast on under the sleeve = 38-40-44-48-52-56 stitches. Insert a marker thread in the middle of the 6-8-8-10-10-10 stitches under the sleeve. Allow the thread to follow your work onwards; it will be used when decreasing under the sleeve. Start at the marker thread and work stocking stitch in the round. When the sleeve measures 4 cm from the division, decrease 1 stitch before the marker thread– read DECREASE TIP = 37-39-43-47-51-55 stitches. When the sleeve measures 8 cm from the division, decrease 1 stitch after the marker thread = 36-38-42-46-50-54 stitches. When the sleeve measures 14 cm, increase 2 stitches mid under the sleeve – read INCREASE TIP = 38-40-44-48-52-56 stitches. Repeat this increase when the sleeve measures 18 cm from the division = 40-42-46-50-54-58 stitches. Continue working until the sleeve measures 38-38-37-37-35-33 cm. There is approx. 6 cm left to finished length; try the jumper on and work to desired length. Knit 1 round where you decrease 10-10-12-14-16-18 stitches evenly spaced = 30-32-34-36-38-40 stitches. Change to double pointed needles size 5 mm and work rib (= knit 1, purl 1) for 6 cm. Cast off with knit over knit and purl over purl – remember CASTING-OFF TIP. The sleeve measures approx. 44-44-43-43-41-39 cm from the division. Work the other sleeve in the same way. |
|
 |
|
Have you finished this pattern?Tag your pictures with #dropspattern #saltseaairsweater or submit them to the #dropsfan gallery. Do you need help with this pattern?You'll find 28 tutorial videos, a Comments/Questions area and more by visiting the pattern on garnstudio.com. © 1982-2026 DROPS Design A/S. We reserve all rights. This document, including all its sub-sections, has copyrights. Read more about what you can do with our patterns at the bottom of each pattern on our site. |
|


With over 40 years in knitting and crochet design, DROPS Design offers one of the most extensive collections of free patterns on the internet - translated to 17 languages. As of today we count 324 catalogues and 12290 patterns translated into English (UK/cm). 12290
We work hard to bring you the best knitting and crochet have to offer, inspiration and advice as well as great quality yarns at incredible prices! Would you like to use our patterns for other than personal use? You can read what you are allowed to do in the Copyright text at the bottom of all our patterns. Happy crafting!
Post a comment to pattern DROPS 217-31
We would love to hear what you have to say about this pattern!
If you want to leave a question, please make sure you select the correct category in the form below, to speed up the answering process. Required fields are marked *.