
Popular categories
Looking for a yarn?


Comments / Questions (167)
![]() Edita Hermann wrote:
Edita Hermann wrote:
Hej Jeg plejer ellers at være skarp til at læse opskrifter, men denne kan jeg simpelthen ikke gennemskue. Når der fx i mønsteret a1 = 31 masker i str L - når jeg tæller disse i diagrammet får jeg ikke 31 maler men derimod 33, eller kun 25 hvis jeg ikke tæller opslagene med. Hvad gør jeg forkert?? Mvh Edita
06.04.2025 - 21:09DROPS Design answered:
Hej Edita, jo men ved startpilen for str L i A.1 er der 31 masker i diagrammet, 4r, 3sm, 7r, 3sm, 7r, 3sm, 4r=31 masker og så de 8 omslag selvfølgelig :)
09.04.2025 - 14:10
![]() Mar wrote:
Mar wrote:
Im currently doing A3 and a little confused about increasing and keeping the pattern, after my increase row i have 2 extra stitches that dont line up to keep A3 as a whole, should i knit the last two as stockinnette or add 2 A3B stitches that dont line up with A3C
05.03.2025 - 05:23DROPS Design answered:
Dear Mar, when working A.3 you should continue to increase as before, you can get help from the matching row at the beg of A.1/A.2 to know how to increase and how to work the new stitches. Increase before A.3a and after A.3c (A.3 shows how to work the stitches after A.1/A.2) Happy knitting!
05.03.2025 - 08:37
![]() Ulrika wrote:
Ulrika wrote:
Börjar vid pilen för L på A1 o längst ner på A2. Man ska ju sticka A1 o A2 på höjden en gång o sedan gå över til A3, men i stl L är det ju bara 20 rader på A1 men 30rader på A2, jag gissar att jag bara gör 20 rader på både A1 o A2 o sedan går över till A3? När jag stickar A3 så ska jag väl inte ha räta maskor emellan som mellannA1 o A2? Jag ska väl inte tillbaka till A1 o A2 efter A3 utan bara sticka A3 tills jag gjort 30 varv med ökningar i stl L?
10.02.2025 - 20:51DROPS Design answered:
Hej Ulrika, det er samme mønster, men du skal strikke hele A.2 i højden for at få alle udtagninger med :)
18.02.2025 - 09:07
![]() Eugenia wrote:
Eugenia wrote:
Hello, I have some questions to make because it is my first time that I use Drops diagrama. Are all the rows present , even and odd ones ? I am size M : Do I knit A1 until size L start, or do I have to continue? Thank you so much for giving me the opportunity of asking you.
27.01.2025 - 03:25DROPS Design answered:
Hi Eugenia, Yes, all the rows in the diagrams are present and you read from right to left (starting at the bottom of the diagram) on all rows when working in the round as you are doing in this pattern. You work A.1 and A.2 until they are completed in height; in your size you begin A.1 at the bottom and work all the way up. Happy knitting!
27.01.2025 - 07:13
![]() Anne wrote:
Anne wrote:
Hei, teen kokoa L ja olen neulonut A1 ja A2 ohjeen mukaan ja silmukoita on yhteensä 172. En ymmärrä kuinka saan 332 silmukkaa, jos teen lisäykset ohjeen mukaan joka 2.kerros 30x8 silmukkaa = 240 silmukkaa. Silmukoita on jo 412.
21.01.2025 - 02:01DROPS Design answered:
Hei, piirrosten A.1 ja A.2 lisäykset tehdään yhteensä 30 kertaa, eli työhön lisätään 240 silmukkaa (92 + 240 = 332 silmukkaa).
21.01.2025 - 17:52
![]() Pia wrote:
Pia wrote:
Hallo Ich verstehe nicht, wo die Zunahmen in A1/A2 gemacht werden sollen. In den ersten Umschlag? Gibt es hierzu ein passendes Video? Herzlichen Dank
19.01.2025 - 09:41DROPS Design answered:
Liebe Pia, die Zunahmen sind in den Diagrammen gezeichnet: Umschlag der Umschlag am Anfang + am Ende A.1/A.2 = die Zunahmen am Anfang/Ende vom Diagram. Viel Spaß beim Stricken!
20.01.2025 - 09:18
![]() Sara wrote:
Sara wrote:
Jag får tyvärr inte mönster att stämma där man börjar sticka A4, FRAM- OCH BAKSTYCKE. Jag har 200 maskor på stickan ( stl. L ) men om jag börjar A4, 3 maskor före de 7 maskorna under ärmen så hamnar mönstret helt fel. Men försöker jag istället börja med A4 där den ser ut som att den borde kunna börja, så blir det en maska för mycket samt för lite vartannat varv. Jag förstår inte vad det är som gör att det blir såhär?
06.01.2025 - 23:03DROPS Design answered:
Hei Sara. Usikker på hvor det har blitt feil hos deg, men om du har 200 masker så skal A.4 gå opp (200/4=50 ganger). Sett maskemarkører mellom hvert diagram og tell deg fram til hvordan diagrammene skal passe over hverandre. mvh DROPS Design
13.01.2025 - 10:00
![]() Maria wrote:
Maria wrote:
Hei! Olen neulonut kaaviot A.1 ja A.2 loppuu . En ymmärrä miten neuletta on mahdollista jatkaa A. 3 mukaisesti niin että ruutukuvio pysyy kohdikkain. Kaavioiden A.1 ja A.2 väliin neulottiin 2 sileää silmukkaa, mutta A. 3. kuviossa niitä ei näytä olevan. Jos aloitan A.3.A kierroksen alusta, kuten ohje neuvoo, ruudun keskelle tuleva kavennus ei osu keskelle. Mitenhän neuletta on tarkoitus jatkaa? Ja miten neulominen käytännössä muuttuu kun A1. ja A2. on neulottu loppuun?
12.11.2024 - 10:34DROPS Design answered:
Hei, samalla kun neulot piirroksen A.3 mallineuletta sinun tulee tehdä raglanlisäykset kuten aiemmin (samalla tavalla kuin piirrosten A.1 ja A.2 alussa/lopussa). Eli piirros A.3 näyttää, miten kuviot toistetaan.
29.11.2024 - 17:31
![]() Anya wrote:
Anya wrote:
Picture 3A and 3C should be similar to A1. Only that way you will get increases and the holes at the sides to the arms. IN the pattern A3 has the sides cut off => this is incorrect.
09.11.2024 - 09:39DROPS Design answered:
Dear Anya, diagrams A.3 show how to work diagrams at the beg/end and how to repeat them, but as long as raglan is not done, continue increasing as before, just as you did at the beg/end of A.1. Happy knitting!
11.11.2024 - 10:30
![]() Anja wrote:
Anja wrote:
Hallo, wenn ich anfange A.3A zu stricken habe ich keine Ueberschlaege neben den 2 glatt rechten Maschen, welche den Wechsel zu den Armen machen. Ich sehe aber auf allen Fotos, dass dort Ueberschlaege sind. Was verstehe ich an A3 falsch? Sollte A.3A nicht auch mit Ueberschlaegen beginnen? Danke
08.11.2024 - 18:35DROPS Design answered:
Liebe Anja, wenn man A.3 strickt muss man auch wie zuvor zunehmen; so nehmen Sie wie zuvor in A.1 zu gleichzeitig als Sie A.3 Stricken. Viel Spaß beim Stricken!
11.11.2024 - 07:51
|
||||||||||||||||
Frosted Leaves#frostedleavessweater |
||||||||||||||||
 |
 |
|||||||||||||||
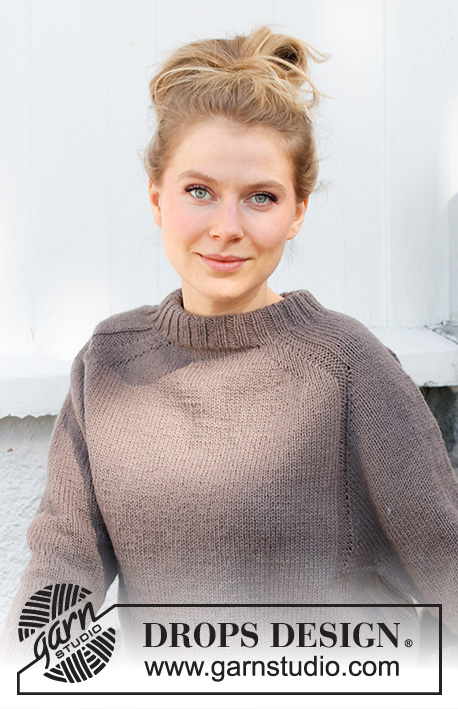
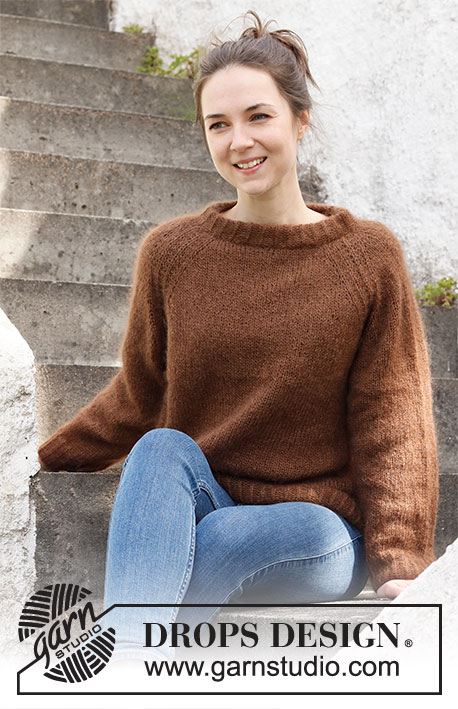
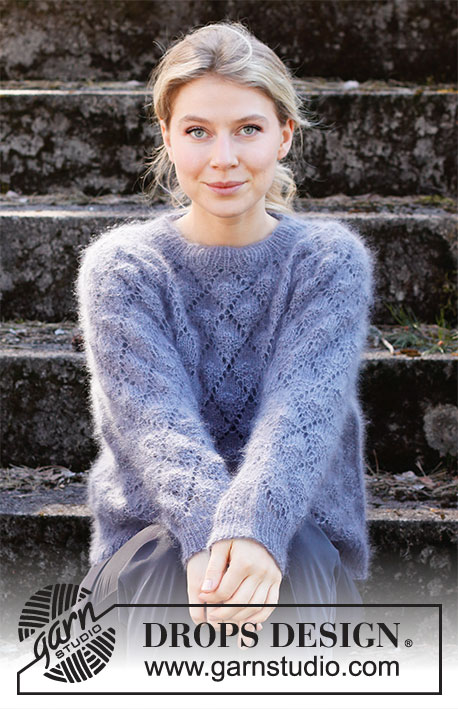
Knitted jumper in 1 strand DROPS Brushed Alpaca Silk or 2 strands DROPS Kid-Silk. The piece is worked top down with raglan and lace pattern. Sizes S - XXXL.
DROPS 216-3 |
||||||||||||||||
|
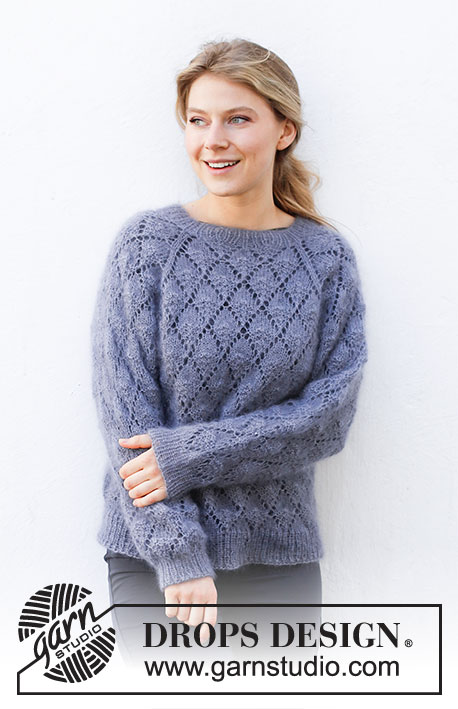
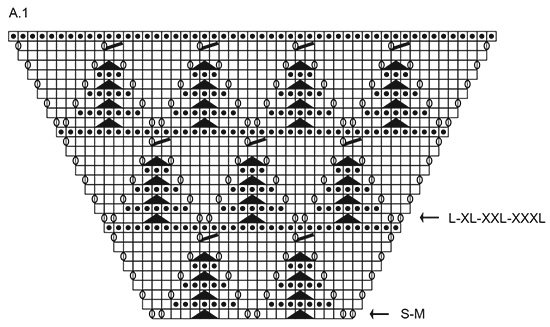
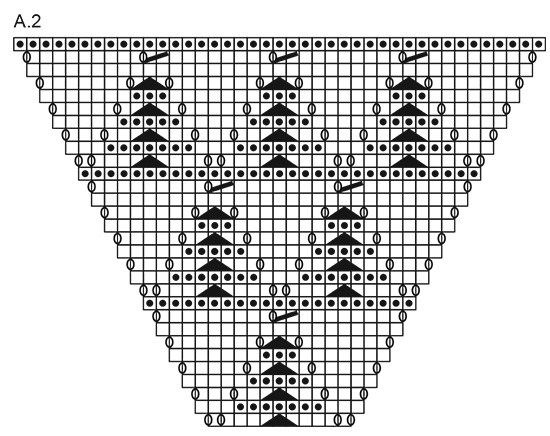
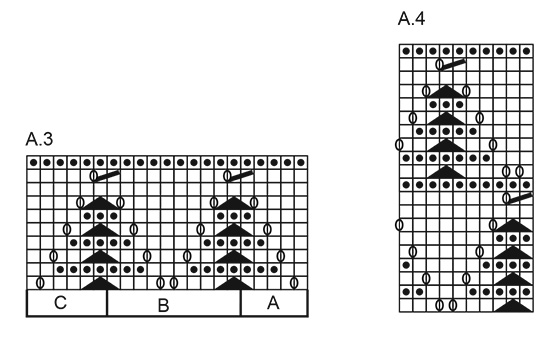
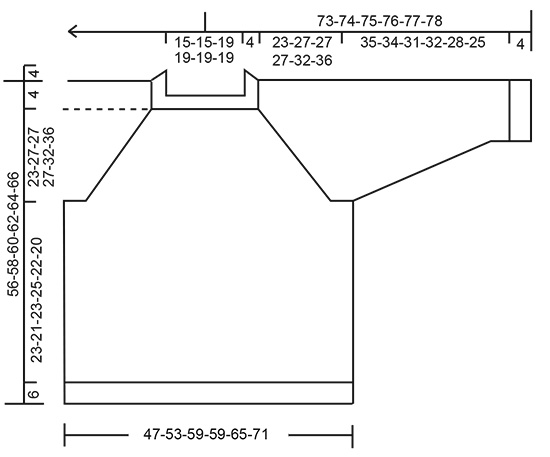
------------------------------------------------------- EXPLANATIONS FOR THE PATTERN: ------------------------------------------------------- PATTERN: See diagrams A.1 to A.4 DECREASE TIP-1 (evenly spaced): To work out how to decrease evenly, count the total number of stitches on needle (e.g. 48 stitches) and divide by number of decreases to be made (e.g. 8) = 6. In this example decrease by knitting each 5th and 6th stitch together. DECREASE TIP-2 (for sleeves): Decrease 1 stitch on either side of the marker thread as follows: Work until there are 3 stitches left before the marker thread, knit 2 together, knit 2 (marker thread sits between these 2 stitches), slip 1 stitch as if to knit, knit 1 and pass the slipped stitch over the knitted stitch (= 2 stitches decreased). CASTING-OFF TIP: To avoid the cast-off edge being tight you can cast off with a larger size needle. If the edge is still tight, make 1 yarn over after approx. each 4th stitch at the same time as casting off; the yarn overs are cast off as normal stitches. ------------------------------------------------------- START THE PIECE HERE: ------------------------------------------------------- JUMPER – SHORT OVERVIEW OF THE PIECE: The neck and yoke are worked in the round with circular needle, top down. The yoke is divided for body and sleeves and the body continued in the round with circular needle. The rounds start at the transition between sleeve and back piece. The sleeves are worked in the round with short circular needle/double pointed needles, top down. The piece is worked with 1 strand Brushed Alpaca Silk or 2 strands Kid-Silk. NECK: Cast on 72-72-92-92-92-92 stitches with circular needle size 4 mm and 1 strand Bruched Alpaca Silk or 2 strands Kid-Silk. Knit 1 round. Then work rib (knit 1, purl 1) for 4 cm. Insert 1 marker at the beginning of the round. The yoke will be measured from this marker. Change to circular needle size 5 mm and work the yoke as described below. REMEMBER THE KNITTING TENSION! YOKE: On the next round work pattern as follows: Work 1 stitch in stocking stitch, A.1 (= 21-21-31-31-31-31 stitches, see start-arrow for your size), 2 stitches in stocking stitch, A.2 (= 11 stitches), 2 stitches in stocking stitch, A.1 (= 21-21-31-31-31-31 stitches, see start-arrow for your size), 2 stitches in stocking stitch, A.2 (= 11 stitches) and 1 stitch in stocking stitch. Continue this pattern; all increases are drawn into the diagrams. 8 stitches are increased every 2nd round. When A.1 and A.2 have been worked 1 time in height, continue with A.3. Work A.3 A over the first 5 stitches, repeat A.3 B until there are 6 stitches left on the row and work A.3 C over the last 6 stitches. Each time A.3 has been worked 1 time in height there is room for 1 more repeat of A.3 B in width. Continue the increases as shown in A.1 and A.2. Increase every 2nd round a total of 25-30-30-30-35-40 times = 272-312-332-332-372-412 stitches. The piece measures approx. 23-27-27-27-32-36 cm from the marker thread. Now divide the yoke for body and sleeves as follows (continue the pattern as before; you should be on the last round in a repeat of A.3, where all stitches are purled): Work 73-83-93-93-103-113 stitches (= back piece), place the next 63-73-73-73-83-93 stitches on 1 thread for the sleeve, cast on 7 new stitches on the needle (= in side under sleeve), work 73-83-93-93-103-113 stitches as before (= front piece), place the next 63-73-73-73-83-93 stitches on 1 thread for the sleeve and cast on 7 new stitches on the needle (= in side under sleeve). Body and sleeves are finished separately. Cut the strand. BODY: = 160-180-200-200-220-240 stitches. Start 3 stitches before the 7 new stitches cast on in the side and work A.4 over all stitches; make sure the pattern matches the pattern on the yoke. Continue working until the piece measures 23-21-23-25-22-20 cm from the division (there is approx. 6 cm left to finished length; you can try the jumper on and work to desired length). Change to circular needle size 4 mm and work rib (knit 1, purl 1) for 6 cm. Cast off with knit over knit and purl over purl – read CASTING-OFF TIP! The jumper measures approx. 56-58-60-62-64-66 cm from the shoulder down. SLEEVES: Place the 63-73-73-73-83-93 stitches from the thread on the one side of the piece on short circular needle/double pointed needles size 5 mm and knit up 1 stitch in each of the 7 stitches cast on under the sleeve = 70-80-80-80-90-100 stitches. Insert a marker thread in the middle of the 7 stitches under the sleeve. Allow the thread to follow your work onwards; it will be used when decreasing under the sleeve. Cut the strand and start working 3 stitches before the new stitches under the sleeve and continue the pattern in the round according to A.4; make sure the pattern matches the pattern on the yoke. When the sleeve measures 3 cm from the division in all sizes, decrease 2 stitches mid under the sleeve – read DECREASE TIP-2. Decrease like this every 3-2-1½-2-1-1 cm a total of 11-15-15-13-17-21 times = 48-50-50-54-56-58 stitches. The stitches which do not fit into the pattern when decreasing are worked in stocking stitch. Continue working until the sleeve measures 35-34-31-32-28-25 cm from the division (there is approx. 4 cm left to finished length; you can try the jumper on and work to desired length). NOTE: Shorter measurements in larger sizes due to wider neck and longer yoke. Knit 1 round where you decrease 8 stitches evenly spaced – read DECREASE TIP-1 = 40-42-42-46-48-50 stitches. Change to double pointed needles size 4 mm and work rib (knit 1, purl 1) for 4 cm. Cast off with knit over knit and purl over purl – remember CASTING-OFF TIP! The sleeve measures approx. 39-38-35-36-32-29 cm from the division. Work the other sleeve in the same way. |
||||||||||||||||
Diagram explanations |
||||||||||||||||
|
||||||||||||||||
 |
||||||||||||||||
 |
||||||||||||||||
 |
||||||||||||||||
 |
||||||||||||||||
Have you finished this pattern?Tag your pictures with #dropspattern #frostedleavessweater or submit them to the #dropsfan gallery. Do you need help with this pattern?You'll find 26 tutorial videos, a Comments/Questions area and more by visiting the pattern on garnstudio.com. © 1982-2026 DROPS Design A/S. We reserve all rights. This document, including all its sub-sections, has copyrights. Read more about what you can do with our patterns at the bottom of each pattern on our site. |
||||||||||||||||


With over 40 years in knitting and crochet design, DROPS Design offers one of the most extensive collections of free patterns on the internet - translated to 17 languages. As of today we count 324 catalogues and 12290 patterns translated into English (UK/cm). 12290
We work hard to bring you the best knitting and crochet have to offer, inspiration and advice as well as great quality yarns at incredible prices! Would you like to use our patterns for other than personal use? You can read what you are allowed to do in the Copyright text at the bottom of all our patterns. Happy crafting!
Post a comment to pattern DROPS 216-3
We would love to hear what you have to say about this pattern!
If you want to leave a question, please make sure you select the correct category in the form below, to speed up the answering process. Required fields are marked *.