
Popular categories
Looking for a yarn?


Comments / Questions (62)
![]() Nina wrote:
Nina wrote:
Ich habe eine Frage zu Diagramm A.2. Was mache ich mit den Maschen in der Lücke? Ich stricke erst die 9 Maschen, also 4l, 1r, 4l, aber was dann? Ich fürchte ich stehe gerade echt auf dem Schlauch.
28.03.2021 - 17:49DROPS Design answered:
Liebe Nina, einfach ignorieren :-) - die Lücken überspringen Sie einfach. Die Darstellung im Diagramm ergibt sich durch die Abnahmen und die Zunahmen (am Stern nehmen Sie 8 Maschen zu, d.h. Sie stricken nicht 1 Masche in 1 Masche, sondern 9 Maschen in 1 Masche) - aus den 10 Maschen in der 1. Reihe (= 4 li, 1 re, 4 li und 1 re) werden dann 16 Maschen in der 4. Reihe (2 Maschen abgenommen + 8 Maschen zugenommen). Gutes Gelingen!
05.04.2021 - 00:13
![]() Carolina Selman wrote:
Carolina Selman wrote:
Hola a todas. No logro hacer el punto que tiene la estrella. Habrá algún video?. Gracias
28.03.2021 - 01:06DROPS Design answered:
Hola Carolina, la tecnica es como en el video AQUI, pero debes trabajar puntos derechos (no revés como el el video). Buen trabajo!
28.03.2021 - 21:28
![]() Marian Stagelund wrote:
Marian Stagelund wrote:
Sød bluse, den første jeg strikket oppe fra og ned, jeg startede med en L, alt for stor i halsen, så en M, også for stor i halsen, så en S, og med en ekstre stjerne i bærestykket, endte jeg med en str M
27.03.2021 - 07:11
![]() Maria wrote:
Maria wrote:
Bei A2 werden in der 3 Reihe 2 Maschen abgenommen und 3 Zugenommen bei der Rechten Masche . für mich geht das einfach nicht auf. Heisst das ich mache ein Abnehmen eine links 1 rechts ein Abnehmen dann 3 aus einer wieder ein Abnehmen 1 links eine rechts i links Abnehmen wieder 3 aus einer. In der dritten Reihe sollten es laut Muster dann 12 Maschen sein? Es geht einfach nicht auf für mich. Wo liegt mein Fehler? Sind neben den Abnehmen evtl jeweils Umschläge? Denkfehler?
25.11.2020 - 19:45DROPS Design answered:
Liebe Maria, also ja, am Anfang A.2 (S-M-L) sollen Sie so stricken: 1 Abnahme, 1 li, 1 re, 1 li, 1 Abnahme, dann stricken Sie die Masche mit dem Sternchen = siehe 3. Symbol under Diagram Text: diese Masche stricken Sie 7 Mal insgesamt = es werden so 6 Maschen zugenommen, so haben Sie 7 M über diese Masche. Viel Spaß beim stricken!
26.11.2020 - 09:58
![]() Adriana wrote:
Adriana wrote:
Zdravím-- chcem sa spýtať, kedže je to pletenie na kruhových ihliciach, v schéme sú naznačené lícové riadky? čiže pletiem všetky riadky? Dakujem pekne za odpoved
16.11.2020 - 09:01DROPS Design answered:
Dobrý den, Adriano! Schéma zobrazuje všechny řady vzoru (vzory ve schématech zakreslujeme tak, jak vypadají při pohledu z lícové strany). Takže ano, pleteme všechny řady vzoru. Hodně zdaru! Hana
28.11.2020 - 08:59
![]() Joy wrote:
Joy wrote:
What a lovely pattern! I see you suggest 350 g for size L. Can you give me an idea of how many yards it would need? I'm pretty new at this. Thank you!
14.09.2020 - 22:57DROPS Design answered:
Hi Joy, There is approx 175 yards to each 50 g ball of yarn. Happy knitting!
15.09.2020 - 08:16
![]() Thérèse wrote:
Thérèse wrote:
Bonjour, A propos des diminutions des manches; si je fais les diminutions (taille L) 13 fois cela fait 26 mailles. J'enlève 26 de 80 et il m'en reste 54 et non 64 comme indiqué. Est-ce que je fais une erreur?
16.08.2020 - 16:46DROPS Design answered:
Bonjour Thérèse, en taille L on a 90 mailles pour la manche = 80 mailles en attente + 1 maille relevée dans chacune des 10 mailles montées sous l'emmanchure (quand on a mis les mailles en attente) = 90 m - on diminue 13 x 2 m = 26 m, il reste: 90-26=64 m. Bon tricot!
17.08.2020 - 08:47
![]() Catherine wrote:
Catherine wrote:
D'accord, mais à quel moment, au 3e rang, l'augmentation se fait-elle? Elle n'est pas indiquée dans le premier ''bloc'' de diagramme. Merci
05.08.2020 - 17:02DROPS Design answered:
Bonjour Catherine, au 3ème rang de A.2 (taille S), on va diminuer 2 m (1ère partie du diagramme) et augmenter 7 m (étoile = 3ème symbole de la légende), on continue à diminuer tous les 2 rangs encore 2 fois dans la 1ère partie du diagramme puis on va augmenter 7 m (= étoile) et diminuer le triangle augmenté au début. Essayez de vous entraîner sur un échantillon pour bien maîtriser le point. Bon tricot!
06.08.2020 - 08:56
![]() Catherine wrote:
Catherine wrote:
*Correction sur ma propre question. J'ai écrit ''on lis de haut en bas, mais je voulais dire de bas en haut.
05.08.2020 - 16:54
![]() Catherine wrote:
Catherine wrote:
Bonjour. Je ne comprend pas le sens de lecture du diagramme A.2. On lis de droite à gauche et de haut en bas, mais dans quel ordre on doit faire les différents ''blocs'' de diagramme? Par exemple, le premier rang en Small, il y aurait 3 mailles envers, 1 maille endroit, 3 mailles envers, puis de l'espace vide (qu'est-ce que ça signifie?) et encore une maille endroit. Est-ce bien cela?
05.08.2020 - 16:47DROPS Design answered:
Bonjour Catherine, les diagrammes se lisent bien de bas en haut et de droite à gauche, par ex au 1er rang, vous tricotez: 3 m env, 1 m end, 3 m env, 1 m end (= 8 m). L'espace vide avant la dernière m end correspond aux augmentations qui seront faites dans cette maille au 3ème rang, pour représenter ce motif "à plat", nous sommes obligés de procéder ainsi. Bon tricot!
05.08.2020 - 16:55
|
||||||||||||||||||||||||||||
Alberta Rose#albertarosesweater |
||||||||||||||||||||||||||||
 |
 |
|||||||||||||||||||||||||||
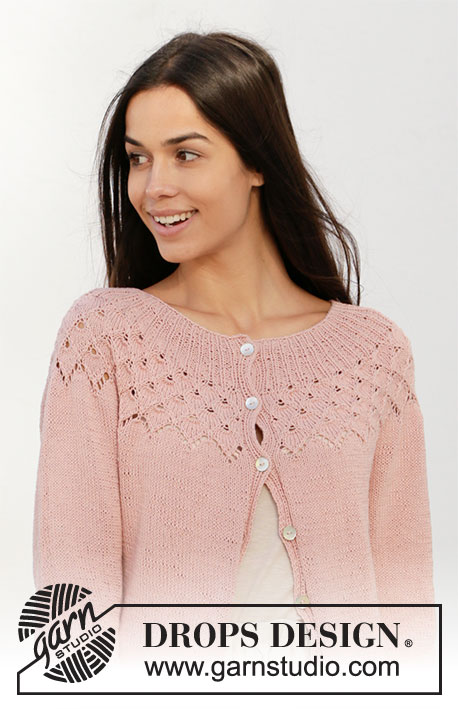
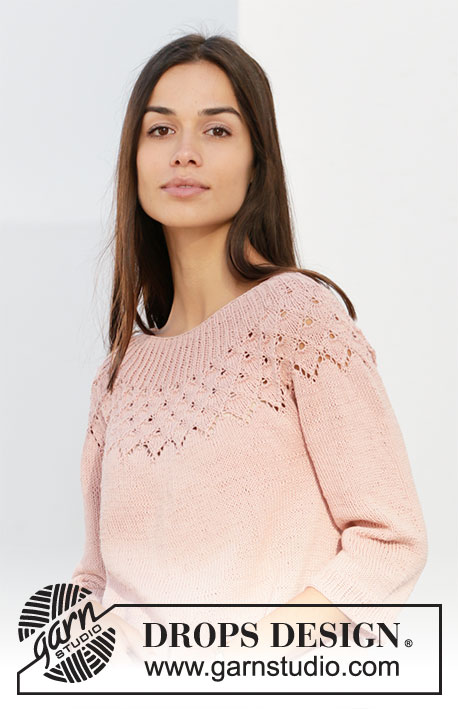
Knitted jumper with round yoke in DROPS Safran. The piece is worked top down with lace pattern, leaf pattern and ¾-length sleeves. Sizes S - XXXL.
DROPS 212-5 |
||||||||||||||||||||||||||||
|
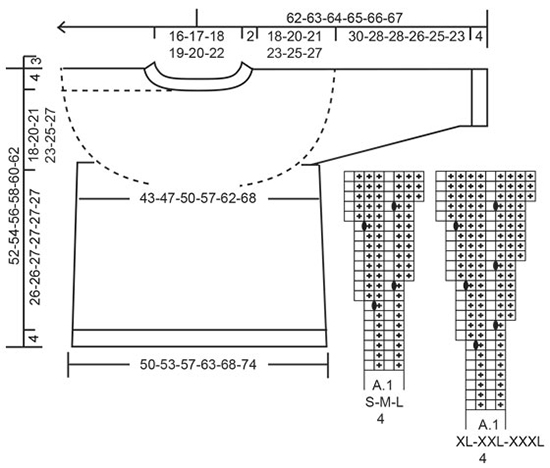
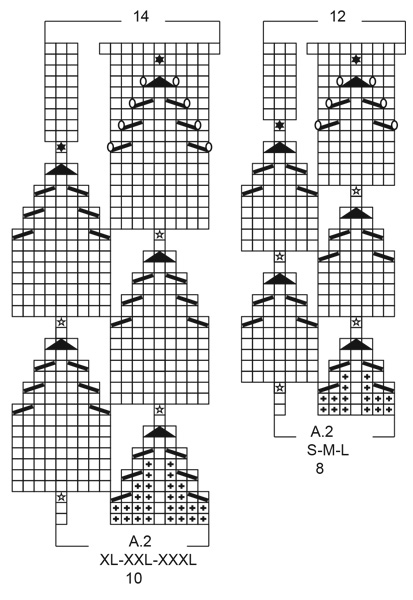
------------------------------------------------------- EXPLANATIONS FOR THE PATTERN: ------------------------------------------------------- PATTERN: See diagrams A.1 and A.2. Choose diagrams for your size. INCREASE TIP-1 (for sides of body): Work until there are 2 stitches left before the marker thread, make 1 yarn over, knit 4 (marker thread sits between these 4 stitches), make 1 yarn over. On the next round work the yarn overs twisted to avoid holes. Then work the new stitches in stocking stitch. INCREASE TIP-2 (evenly spaced): To work out how to increase evenly, count the total number of stitches on the needle (e.g. 244 stitches) and divide by the number of increases to be made (e.g. 62) = 3.93. In this example, increase by making 1 yarn over after approx. each 4th stitch. On the next round work the yarn overs twisted to avoid holes. DECREASE TIP (for sleeves): Decrease 1 stitch on each side of the marker thread as follows: Work until there are 3 stitches left before the marker thread, knit 2 together, knit 2 (marker thread sits between these 2 stitches), slip 1 stitch as if to knit, knit 1 and pass the slipped stitch over the knitted stitch. CASTING-OFF TIP: To avoid the cast-off edge being tight you can cast off with a larger size needle. If the edge is still tight, make 1 yarn over after approx. each 4th stitch at the same time as casting off and the yarn overs are cast off as normal stitches. ------------------------------------------------------- START THE PIECE HERE: ------------------------------------------------------- JUMPER – SHORT OVERVIEW OF THE PIECE: The neck and yoke are worked in the round with circular needle, from mid back and top down. The yoke is divided for body and sleeves and the body is continued in the round with circular needle. The sleeves are worked in the round with double pointed needles, top down. NECK: Cast on 108-116-124-124-128-140 stitches with circular needle size 2.5 mm and Safran. Knit 1 round. Work A.1 (= 4 stitches) in the round (= 27-29-31-31-32-35 times in width). When the first 6 rounds of the pattern are worked, change to circular needle size 3.5 mm. Insert 1 marker at the beginning of the round, mid back; the yoke will be measured from this marker! YOKE: When A.1 has been worked 1 time in height there are 216-232-248-310-320-350 stitches on the needle. The piece measures approx. 5-5-5-6-6-6 cm from the marker. Work A.2 (= 8-8-8-10-10-10 stitches) in the round (= 27-29-31-31-32-35 times in width). REMEMBER THE KNITTING TENSION! When A.2 has been worked 1 time in height there are 324-348-372-434-448-490 stitches on the needle. The piece measures approx. 16-16-16-21-21-21 cm from the marker. Continue with stocking stitch until the piece measures 18-20-21-23-25-27 cm from the marker. Now divide the piece for body and sleeves as follows: Knit 46-50-53-62-65-73 (= half back piece), place the next 70-74-80-93-94-98 stitches on a thread for the sleeve and cast on 8-8-10-8-12-10 stitches under the sleeve, knit 92-100-106-124-130-148 (= front piece), place the next 70-74-80-93-94-98 stitches on a thread for the sleeve and cast on 8-8-10-8-12-10 stitches under the sleeve and finish with knit 46-50-53-62-65-73 (= half back piece). BODY: = 200-216-232-264-284-314 stitches. Insert 1 marker thread in the middle of the 8-8-10-8-12-10 stitches cast on under each sleeve (= sides of body). There are 100-108-116-132-142-156 stitches on the back piece and 100-108-116-132-142-158 stitches on the front piece. Allow the threads to follow your work onwards; they will be used when increasing in the sides. Work stocking stitch in the round. When the piece measures 3 cm from the division increase 1 stitch on each side of both marker threads – read INCREASE TIP-1 (= 4 stitches increased). Increase like this every 2½ cm a total of 7 times = 228-244-260-292-312-342 stitches. Continue working until the piece measures 26-26-27-27-27-27 cm from the division. Knit 1 round and increase 60-62-64-65-66-66 stitches evenly spaced – read INCREASE TIP-2 = 288-306-324-357-378-408 stitches. Change to circular needle size 2.5 mm and work rib (= knit 1 / purl 2). Continue this rib for 4 cm. Cast off with knit – read CASTING-OFF TIP. SLEEVES: Place the 70-74-80-93-94-98 stitches from the thread on the one side of the piece onto double pointed needles size 3.5 mm and knit up 1 stitch in each of the 8-8-10-8-12-10 stitches cast on under the sleeve = 78-82-90-101-106-108 stitches. Insert 1 marker thread in the middle of these 8-8-10-8-12-10 new stitches under the sleeve. Allow the thread to follow your work onwards; it will be used when decreasing mid under sleeve. Work in the round in stocking stitch. When the piece measures 2 cm from the division decrease 1 stitch on each side of the marker thread – read DECREASE TIP (= 2 stitches decreased). Decrease like this every 2½-2-1½-1-1-1 cm a total of 9-10-13-17-18-18 times = 60-62-64-67-70-72 stitches. When the sleeve measures 30-28-28-26-25-23 cm from where the sleeve was divided from the body, increase 6-7-8-5-8-6 stitches evenly spaced = 66-69-72-72-78-78 stitches. Change to double pointed needles size 2.5 mm and work rib (= knit 1 / purl 2) over all stitches. Cast off with knit when the sleeve measures 34-32-32-30-29-27 cm from the division. Work the other sleeve in the same way. |
||||||||||||||||||||||||||||
Diagram explanations |
||||||||||||||||||||||||||||
|
||||||||||||||||||||||||||||
 |
||||||||||||||||||||||||||||
 |
||||||||||||||||||||||||||||
Have you finished this pattern?Tag your pictures with #dropspattern #albertarosesweater or submit them to the #dropsfan gallery. Do you need help with this pattern?You'll find 24 tutorial videos, a Comments/Questions area and more by visiting the pattern on garnstudio.com. © 1982-2026 DROPS Design A/S. We reserve all rights. This document, including all its sub-sections, has copyrights. Read more about what you can do with our patterns at the bottom of each pattern on our site. |
||||||||||||||||||||||||||||


With over 40 years in knitting and crochet design, DROPS Design offers one of the most extensive collections of free patterns on the internet - translated to 17 languages. As of today we count 324 catalogues and 12290 patterns translated into English (UK/cm). 12290
We work hard to bring you the best knitting and crochet have to offer, inspiration and advice as well as great quality yarns at incredible prices! Would you like to use our patterns for other than personal use? You can read what you are allowed to do in the Copyright text at the bottom of all our patterns. Happy crafting!
Post a comment to pattern DROPS 212-5
We would love to hear what you have to say about this pattern!
If you want to leave a question, please make sure you select the correct category in the form below, to speed up the answering process. Required fields are marked *.