
Popular categories
Looking for a yarn?


Comments / Questions (32)
![]() Jessie wrote:
Jessie wrote:
I can’t find the new chart A1 row 15 which is a correction to the original pattern. I also am not able to access the new diagram. Many thanks
01.08.2023 - 20:49DROPS Design answered:
Dear Jessie, if you printed the pattern after the correction date, this means you printed the correct diagram, correction applies only if you printed the pattern before this day. Happy knitting!
02.08.2023 - 08:01
![]() Luisa wrote:
Luisa wrote:
Buongiorno, nel diagramma A1 quando arrivo alla riga 6 devo aggiungere una maglia? Perchè i quadratini nella fila 5 sono 5 e nella fila 6 aumentano di uno. In caso devo aggiungere una maglia quale tecnica uso?
15.05.2023 - 14:12DROPS Design answered:
Buonasera Luisa, il rombo bianco nella riga 5 rappresenta un aumento: segua la legenda per aumentare la maglia. Buon lavoro!
15.05.2023 - 21:40
![]() Dani wrote:
Dani wrote:
How much positive or negative ease is there in this pattern, if any?
09.12.2021 - 15:00DROPS Design answered:
Dear Dani, you will find all finished measurements in chart (in cm, taken flat from side to side), compare these to the measurements a similar garment you have and like the shape to find out the matching size and decide which ease you like to. Read more here. Happy knitting!
09.12.2021 - 15:20
![]() Elisabeth Lønnkvist wrote:
Elisabeth Lønnkvist wrote:
Jeg har nettopp mottatt strikkepakken fra strikk.no med oppskriften på genseren Dots and Drops Muskat. Da jeg er i gang med knutemønsteret, opplever jeg at garnet ryker. Jeg har forsøkt flere ganger, men tråden ryker ved hvert forsøk på lage en knute. Jeg har riktig strikkefasthet. Det er veldig trangt når jeg skal gjennom den siste operasjonen på knuten ( siste vrang av de 3 maskene ) Og så er det er det som om pinnen kutter tråden på neste maske. Hvorfor?
30.09.2021 - 13:20DROPS Design answered:
Hej Elisabeth, prøv at lave en lille strikkeprøve først, så du lær dig teknikken. Se i videoen hvordan du gør: Hvordan strikke en knute over 3 masker
06.10.2021 - 14:14
![]() Emily wrote:
Emily wrote:
When dividing for the sleeves, should the 8-10 cast on stitches be on the left hand needle, and worked again as the first stitches of the front piece? Or should they be slipped into the right needle?
11.03.2021 - 08:29DROPS Design answered:
Hi Emily, The new stitches will be on the right needle and are first worked on the next row. Happy knitting!
12.03.2021 - 08:49
![]() Giulia wrote:
Giulia wrote:
Buongiorno, per fare questo modello con le maniche lunghe è sufficiente continuare con la maglia rasata (e con le 2 diminuzioni al centro sotto la manica) fino alla lunghezza desiderata? Grazie
15.02.2021 - 15:04DROPS Design answered:
Buonasera Giulia, può proseguire fino alla lunghezza desiderata; se dovesse risultare troppo larga, può lavorare delle ulteriori diminuzioni. Buon lavoro!
16.02.2021 - 22:27
![]() Birgitte wrote:
Birgitte wrote:
Jeg har strikket et par sommerbluser i glatstrik med Muskat, hvor jeg får strikkefasthed til 17 m på pind 4. Når jeg laver strikkeprøve til denne model, kan jeg få det op på 19 masker ved at bruge pind 3½, men så bliver det lidt stift. Jeg overvejer at købe Drops Safran i stedet, for at se om et tyndere garn kan få maskeantallet til at passe. Men jeg kan ikke bruge jeres omregner, da Safran og Muskat ikke er samme garngruppe. Kan I hjælpe?
15.02.2021 - 14:34DROPS Design answered:
Hej Birgitte, DROPS Muskat passer fint til 21 masker på 10 cm uden at det bliver stift. Nej vi kan ikke omregne til DROPS Safran, da de ikke modsvarer hinanden i strikkefastheden, men du skal nok bruge et par nøgler mindre :)
16.02.2021 - 16:01
![]() Nina wrote:
Nina wrote:
Hallo, kann man den Pulli auch aus Drops Safran stricken und wenn ja, wie genau kann man die Anleitung umrechnen?
05.02.2021 - 20:26DROPS Design answered:
Liebe Nina, dieser Pulli wird mit Muskat, dh Garngruppe B gestrickt - Safran gehört zu der Garngruppe A und wird hier keine Alternative sein. Leider können wir nicht jede Anleitung nach jeder Anfrage umrechnen, gerne können Sie sich von einem ähnlichen Modell in Safran/Garngruppe A inspirieren lassen - oder ein anderes Modell mit Garngruppe A aussuschen, oder an Ihrem DROPS Laden wenden, um persönlicher Hilfe zu bekommen. Danke für Ihr Verständnis. Viel Spaß beim stricken!
08.02.2021 - 07:44
![]() Elvira wrote:
Elvira wrote:
This increase description has me confused. " increase 1 stitch by knitting 1 in the stitch from the previous row (i.e. in the loop behind the first stitch on the left needle), do not slip this stitch from the needle, then knit the stitch on the row and drop the stitch off the needle" Does this refer to the "How to increase using loop under" video? Is it a standard invisible increase or does it create a hole? if not can I substitute it with any increase I enjoy? many thanks, Elvira
25.01.2021 - 22:20DROPS Design answered:
Dear Elvira, correct, this refers to the technique increase using loop under. This makes a smal hole as shown in the video and in the pattern - you can of course increase any other way if you rather, maybe try on a swatch both techniques so that you can see how it looks befoer choosing how to increase. Happy knitting!
26.01.2021 - 09:23
![]() Loulou wrote:
Loulou wrote:
Veuillez oublier à ques5. En circulaire, on tricote le jersey toujours sur l'endroit. J'avais mal lu les indications. Désolée
16.09.2020 - 22:22
|
||||||||||
Dots and Drops#dotsanddropssweater |
||||||||||
 |
 |
|||||||||
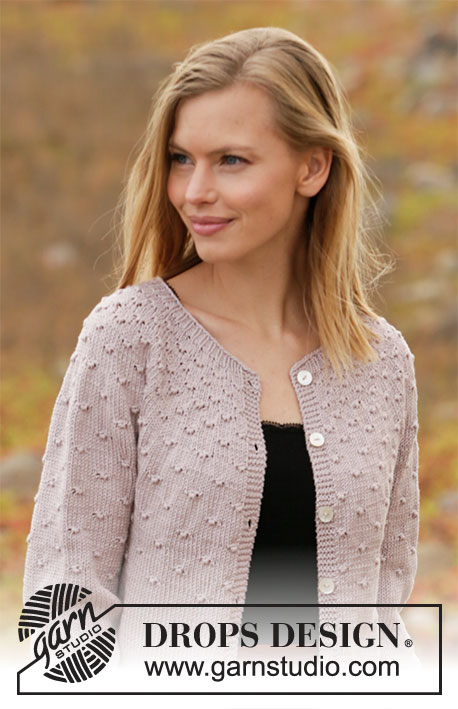
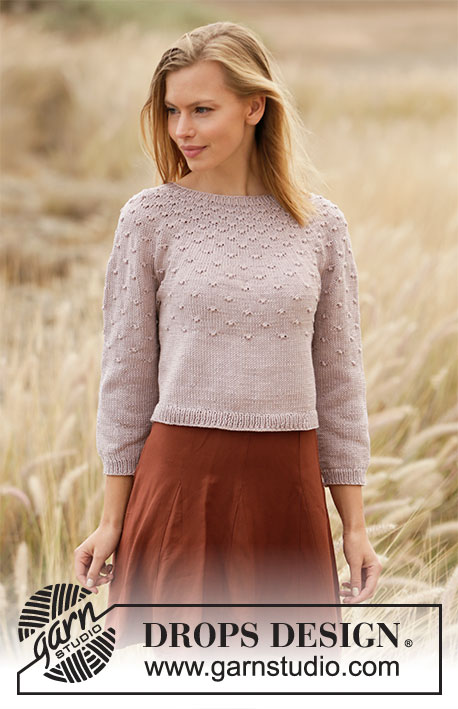
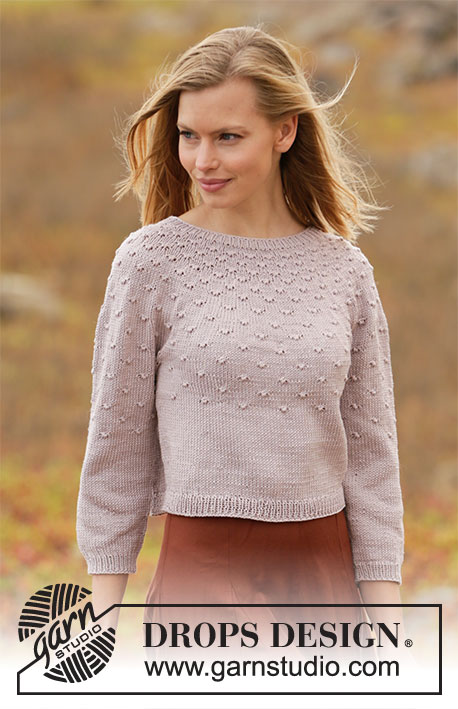
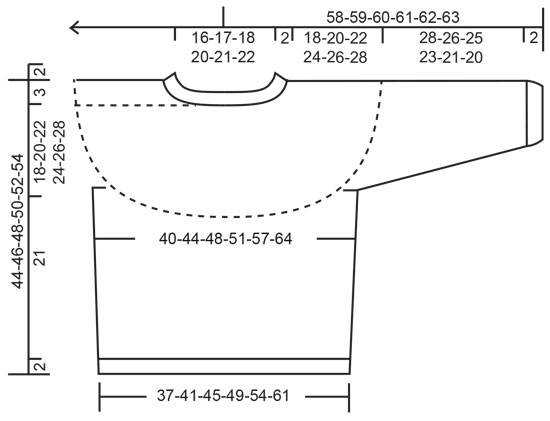
Knitted jumper in DROPS Muskat. The piece is worked top down with round yoke, knotted pattern and ¾-length sleeves. Sizes XS - XXL.
DROPS 213-9 |
||||||||||
|
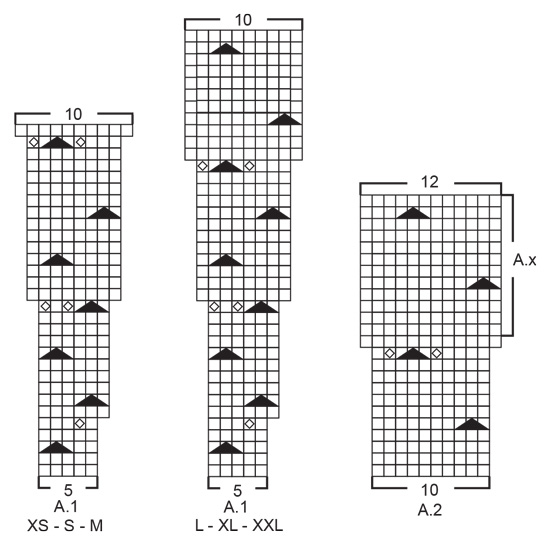
------------------------------------------------------- EXPLANATIONS FOR THE PATTERN: ------------------------------------------------------- PATTERN: See diagrams A.1 and A.2. Choose diagram for your size (applies to A.1). INCREASE TIP (evenly spaced): To work out how to increase evenly, count the total number of stitches on the needle (e.g. 92 stitches) and divide by the number of increases to be made (e.g. 18) = 5.1. In this example, increase by making 1 yarn over after approx. each 5th stitch. On the next round knit the yarn overs twisted to avoid holes. DECREASE TIP (for sides of body and mid under sleeves): Decrease 1 stitch on each side of the marker thread as follows: Work until there are 3 stitches left before the marker thread, knit 2 together, knit 2 (marker thread sits between these 2 stitches) slip 1 stitch as if to knit, knit 1 and pass the slipped stitch over the knitted stitch (= 2 stitches left). CASTING-OFF TIP: To avoid the cast-off edge being tight you can cast off with a larger size needle. If the edge is still tight, make 1 yarn over after approx. each 8th stitch at the same time as casting off and the yarn overs are cast off as normal stitches. ------------------------------------------------------- START THE PIECE HERE: ------------------------------------------------------- JUMPER – SHORT OVERVIEW OF THE PIECE: The neck and yoke are worked in the round with circular needle from mid back and top down. The yoke is divided for body and sleeves and the body continued in the round from the side. The sleeves are worked in the round with double pointed needles/short circular needle, top down. NECK: Cast on 92-96-100-110-114-118 stitches with circular needle size 3 mm and Muskat. Knit 1 round, then work rib in the round (= knit 1 / purl 1) for 2 cm. Knit 1 round where you increase 18-24-30-30-41-52 stitches evenly spaced – read INCREASE TIP = 110-120-130-140-155-170 stitches. Knit 1 round (yarn overs are knitted twisted). Insert 1 marker in the middle of the round (= mid front). The yoke is measured from this marker! Then work the yoke as described below. YOKE: Change to circular needle size 4 mm and work A.1 in the round (= 22-24-26-28-31-34 repeats of 5 stitches). Continue this pattern and increase as shown in A.1. REMEMBER THE KNITTING TENSION! When A.1 has been completed there are 220-240-260-280-310-340 stitches on the needle. Continue with A.2 in the round (= 22-24-26-28-31-34 repeats of 10 stitches). Continue this pattern and increase as shown in A.2. After the last increase in A.2 there are 264-288-312-336-372-408 stitches on the needle. Continue working until the piece measures 18-20-22-24-26-28 cm from the marker on the neck – NOTE: In the smallest size A.2 is not finished at this point and in the other sizes A.x needs to be repeated to the correct length (the patterns will continue on the body and sleeves). Now divide the piece for the body and sleeves on the next round as follows: Work 38-42-46-49-55-62 stitches in pattern as before (= ½ back piece), place the next 56-60-64-70-76-80 stitches on 1 thread for sleeve, cast on 8-8-8-10-10-10 new stitches on the needle (= in side under the sleeve), work 76-84-92-98-110-124 stitches in pattern as before (= front piece), place the next 56-60-64-70-76-80 stitches on 1 thread for sleeve, cast on 8-8-8-10-10-10 new stitches on the needle (= in side under the sleeve) and work the remaining 38-42-46-49-55-62 stitches in pattern as before (= ½ back piece). Cut the strand. Body and sleeves are finished separately. THE PIECE IS NOW MEASURED FROM HERE! BODY: = 168-184-200-216-240-268 stitches. Insert 1 marker thread in each side of the body, in the middle of the 8-8-8-10-10-10 stitches cast on under each sleeve. Allow the threads to follow your work onwards; they will be used when decreasing on each side of the body. Now continue the pattern AT THE SAME TIME as decreasing in the sides of the body as described below: Continue A.x in the round making sure you continue on the right row in the diagram after the yoke and make sure the knots are worked above the knots on the yoke. The 8-8-8-10-10-10 stitches cast on under each sleeve are worked in stocking stitch. When the piece measures approx. 6 cm from the division in all sizes finish A.x after a round of knots. Continue with stocking stitch in the round over all stitches. AT THE SAME TIME when the piece measures 6 cm from the division in all sizes decrease 1 stitch on each side of both marker threads – read DECREASE TIP (= 4 stitches decreased). Decrease like this every 5 cm a total of 3 times on each side = 156-172-188-204-228-256 stitches. Continue working until the piece measures 21 cm from the division in all sizes (there are 2 cm left to finished length; you can try the jumper on and work to desired length). Knit 1 round where you increase 16-16-18-20-22-24 stitches evenly spaced – remember INCREASE TIP = 172-188-206-224-250-280 stitches (the increase prevents the rib being tight). Change to circular needle size 3 mm and work rib in the round (= knit 1 / purl 1) for 2 cm. Cast off with knit over knit and purl over purl – read CASTING-OFF TIP! The jumper measures approx. 44-46-48-50-52-54 cm from the shoulder down. SLEEVE: Place the 56-60-64-70-76-80 stitches from the thread on the one side of the piece on double pointed needles/short circular needle size 4 mm and knit up 1 stitch in each of the 8-8-8-10-10-10 stitches cast on under the sleeve = 64-68-72-80-86-90 stitches. Insert a marker thread in the middle of the 8-8-8-10-10-10 stitches under the sleeve and allow the thread to follow your work onwards; it will be used when decreasing mid under sleeve. Now continue with pattern AT THE SAME TIME as you decrease mid under sleeve as follows: Start the round at the marker thread and work A.x in the round making sure you continue on the right row in the diagram after the yoke and that the knots are worked above the knots on the yoke. The 8-8-8-10-10-10 stitches cast on under the sleeve are worked in stocking stitch. When the sleeve measures 12 cm from the division in all sizes, finish A.x after a round of knots. Continue with stocking stitch in the round over all stitches. AT THE SAME TIME when the piece measures 2-2-2-2-3-3 cm from the division decrease 2 stitches mid under the sleeve – read DECREASE TIP. Decrease like this every 3½-3-2½-1½-1-1 cm a total of 7-8-9-12-14-15 times = 50-52-54-56-58-60 stitches. Continue working until the piece measures 28-26-25-23-21-20 cm from the division (there are 2 cm left to finished length; you can try the jumper on and work to desired length). NOTE: Shorter measurements in larger sizes due to wider neck and longer yoke. Change to double pointed needles size 3 mm and work rib in the round (= knit 1 / purl 1) for 2 cm. Cast off with knit over knit and purl over purl – remember CASTING-OFF TIP. The sleeve measures approx. 30-28-27-25-23-22 cm from the division. Work the other sleeve in the same way. |
||||||||||
Diagram explanations |
||||||||||
|
||||||||||
 |
||||||||||
 |
||||||||||
Have you finished this pattern?Tag your pictures with #dropspattern #dotsanddropssweater or submit them to the #dropsfan gallery. Do you need help with this pattern?You'll find 24 tutorial videos, a Comments/Questions area and more by visiting the pattern on garnstudio.com. © 1982-2026 DROPS Design A/S. We reserve all rights. This document, including all its sub-sections, has copyrights. Read more about what you can do with our patterns at the bottom of each pattern on our site. |
||||||||||


With over 40 years in knitting and crochet design, DROPS Design offers one of the most extensive collections of free patterns on the internet - translated to 17 languages. As of today we count 324 catalogues and 12290 patterns translated into English (UK/cm). 12290
We work hard to bring you the best knitting and crochet have to offer, inspiration and advice as well as great quality yarns at incredible prices! Would you like to use our patterns for other than personal use? You can read what you are allowed to do in the Copyright text at the bottom of all our patterns. Happy crafting!
Post a comment to pattern DROPS 213-9
We would love to hear what you have to say about this pattern!
If you want to leave a question, please make sure you select the correct category in the form below, to speed up the answering process. Required fields are marked *.