
Popular categories
Looking for a yarn?


Comments / Questions (48)
![]() Diannw wrote:
Diannw wrote:
Dear Drops, Have you an advise for a jogless joint of the fair Ilse part? I reconstructie the joint will stand out top obvious when knit in the round. Thank you in advance, Dianne
29.04.2026 - 11:44DROPS Design answered:
Dear Diannw, you can maybe try this tip used often for stripes, but with faire isle it doesn't always work fine, so you can also try to tighten yarns at the transition of rounds - your yarn store might have any other tipps they will be happy to share even per mail or telephone. Happy knitting!
29.04.2026 - 16:15
![]() Lucia Pecori wrote:
Lucia Pecori wrote:
Buongiorno,utilizzo spesso i vostri pattern perché sono belli espiegati benissimo grazie infinite!Riguardo a questo modello ho notato che aumentando le maglie del corpo davanti e dietro(16 maglie per la L) il lavoro viene molto largo sui fianchi dove dovrebbe invece risultare un po' avvitato. Il lavoro si allarga ancora di più aumentando le maglie prima della Costa finale che infatti non ho inserito) cosa mi consigliate? Pensavo di inserire qualche diminuzione al posto degli aumenti.grazie
24.02.2026 - 13:04DROPS Design answered:
Buonasera Lucia, può apportare le modifiche che preferisce al modello. Il suo campione corrispondeva a quello indicato? Buon lavoro!
15.04.2026 - 22:51
![]() Lone wrote:
Lone wrote:
Hej! Jeg har set denne opskrift i en udgave med korte ærmer, men kan desværre ikke genfinde den. Kan I hjælpe? Venlig hilsen Lone
01.01.2026 - 16:55DROPS Design answered:
Hi Lone, you can find short sleeve jumpers HERE. You can also make this sweater with short sleeves :) Happy knitting!
02.01.2026 - 12:38
![]() Idoia wrote:
Idoia wrote:
Muchas gracias por vuestro patrón, me queda muy poquito para terminarlo y sienta de primera. Estoy deseando de ponermelo todos los días ahora que ha llegado el frío.
21.11.2025 - 17:20
![]() Anne-Marie wrote:
Anne-Marie wrote:
Bonjour, j'ai tricoté ce modèle en suivant les instructions et il est super. Mais...le col est très échancré. Une idée pour réduire ce (petit) défaut qui m'arrive avec de nombreux top down ? Merci
01.03.2025 - 13:33DROPS Design answered:
Bonjour Anne-Marie, vous pouvez peut-être utiliser cette astuce pour corriger une encolure trop large? Votre magasin peut avoir une autre idée ou d'autres astuces, pensez à lui demander conseil, même par mail ou téléphone. Bon tricot!
03.03.2025 - 08:59
![]() Nancy Smith wrote:
Nancy Smith wrote:
Thank you for this pattern it was easy to follow. I absolutely love mine!
14.12.2024 - 16:08
![]() Elisa LG wrote:
Elisa LG wrote:
Très joli modèle. Est-il possible de le réaliser en laine du groupe 1, ALPACA ou LIMA. Merci.
08.12.2024 - 18:07DROPS Design answered:
Bonjour Elsa, vous pouvez tout à fait remplacer DROPS Karisma par DROPS Lima car elles appartiennent toutes deux au groupe de fils B, mais en revanche DROPS Alpaca appartient au groupe de fils A et n'est donc pas une alternative ici. Bon tricot!
09.12.2024 - 09:16
![]() Sylviane DB wrote:
Sylviane DB wrote:
Pour une première expérience avec aiguilles circulaires, je suis très satisfaite ! La laine est de belle qualité avec un effet moiré et les explications étaient faciles à suivre. La reprise des manches n est pas impeccable même en rajoutant une maille de chaque côté (en plus des 6m.à remonter) ;). Je n ai pas fait d augmentations pour les côtes trouvant le modèle un peu large.
09.09.2024 - 17:24
![]() Jonna Clausen wrote:
Jonna Clausen wrote:
Der bliver hak i mønsteret når jeg skifter farve ved den nye omgang.
24.05.2023 - 21:42DROPS Design answered:
Hej Jonna, vi har en video som viser hvordan man kan strikke striber/mønster uden at få hak i overgangen: Hvordan strikkes striber rundt uden hak
25.05.2023 - 07:57
![]() Tanis Day wrote:
Tanis Day wrote:
Is there any ease accounted for in the measurements or should I add it to the body measurements? Thank you!
02.01.2023 - 02:52DROPS Design answered:
Dear Mrs Day, we don't work with the concept of "ease", measure a similar garment you have and like the shape and compare the measurements to those in the chart, that's the best way to find your size (and decide if you rather get it fitting or loose). Read more here. Happy knitting!
02.01.2023 - 16:09
|
||||||||||
Idun#idunsweater |
||||||||||
 |
 |
|||||||||
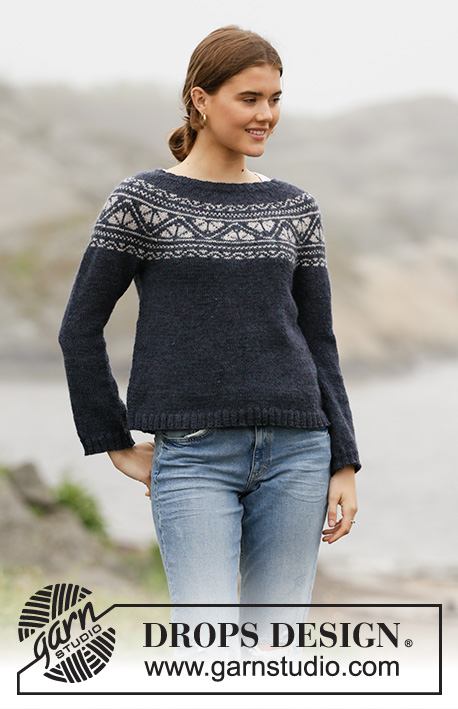
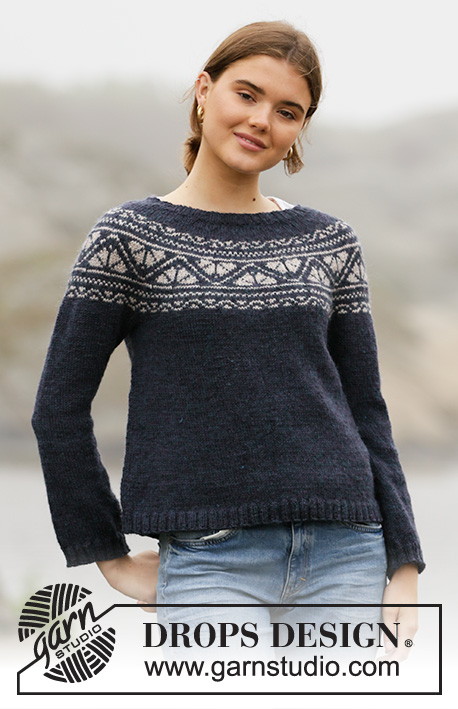
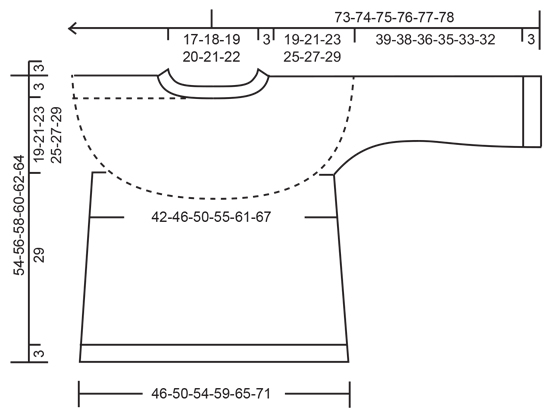
Knitted jumper in DROPS Karisma. The piece is worked top down with round yoke and Nordic pattern on the yoke. Sizes S - XXXL.
DROPS 206-4 |
||||||||||
|
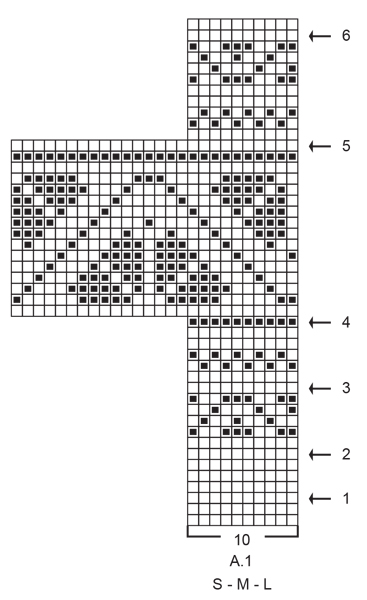
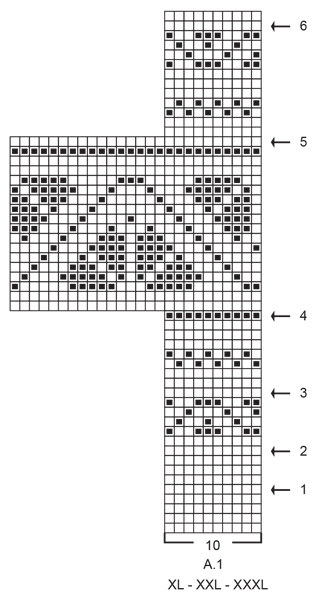
------------------------------------------------------- EXPLANATIONS FOR THE PATTERN: ------------------------------------------------------- INCREASE TIP-1 (evenly spaced): To work out how to increase evenly, count the total number of stitches on the needle (e.g. 92 stitches) and divide by the number of increases to be made (e.g. 30) = 3.1. In this example, increase by making 1 yarn over after each 3rd stitch (approx.). On the next round knit the yarn overs twisted to avoid holes. ELEVATION (back of neck): To make the jumper slightly higher at the back of the neck, you can work an elevation as described here. Skip this section if you do not want an elevation. Insert 1 marker at the beginning of the round = mid back. Start from the right side with petrol cerise and knit 13-14-15-15-16-17 stitches, turn, tighten strand and purl 26-28-30-30-32-34 stitches back. Turn, tighten strand and knit 39-42-45-45-48-51 stitches, turn, tighten strand and purl 52-56-60-60-64-68 stitches back. Turn, tighten strand and knit 65-70-75-75-80-85 stitches, turn, tighten strand and purl 78-84-90-90-96-102 stitches, turn, tighten the strand and knit to mid back. Then work YOKE as described in the text. PATTERN: See diagram A.1. Choose diagram for your size. The whole pattern is worked in stocking stitch. KNITTING TIP: To avoid the knitting tension becoming tighter when working pattern, it is important that the strands at the back are not tight. You can use a larger size needle when working pattern if this is a problem. INCREASE TIP-2 (for sides of body and mid under sleeves): Work until there are 2 stitches left before the marker thread, make 1 yarn over, knit 4 (marker thread sits in the middle of these 4 stitches), make 1 yarn over (= 2 stitches increased at the marker thread). On the next round knit the yarn overs twisted to avoid holes. Then work the new stitches in stocking stitch. DECREASE TIP (for mid under sleeves): Work until there are 3 stitches left before the marker thread, knit 2 together, knit 2 (marker thread sits between these 2 stitches), slip 1 stitch as if to knit, knit 1 and pass the slipped stitch over the knitted stitch (= 2 stitches decreased). CASTING OFF TIP: To avoid the cast-off edge being tight you can cast off with a larger size needle or make 1 yarn over after approx. each 8th stitch at the same time as casting off (yarn overs cast off as normal stitches). ------------------------------------------------------- START THE PIECE HERE: ------------------------------------------------------- JUMPER – SHORT OVERVIEW OF THE PIECE: The neck and yoke are worked in the round with circular needle, top down. Then the yoke is divided for body and sleeves and the body continued in the round with circular needle. The sleeves are worked in the round with short circular needle/double pointed needles, top down. NECK: Cast on 92-96-100-104-108-112 stitches with short circular needle size 3.5 mm and petrol cerise. Knit 1 round then work rib in the round (= knit 2 / purl 2) for 3 cm. Knit 1 round where you increase 30-32-34-34-36-38 stitches evenly spaced – read INCREASE TIP-1 = 122-128-134-138-144-150 stitches. Insert 1 marker in the middle of the round (= mid front) – the yoke is measured from this marker. Change to circular needle size 4.5 mm and knit 1 round (yarn overs knitted twisted). You can now work an ELEVATION in the back of the neck – read description above. If you do not want an elevation go straight to YOKE. YOKE: Work A.1 in the round (the number of stitches does not fit to begin with as each repeat has 10 stitches, but this does not matter as the first rounds are one-coloured). Continue the pattern. Read KNITTING TIP and REMEMBER THE KNITTING TENSION! AT THE SAME TIME on each round marked with an arrow in A.1, increase stitches evenly spaced as described below – remember INCREASE TIP-1: Arrow-1: Increase 40-44-46-46-48-56 stitches evenly spaced = 162-172-180-184-192-206 stitches. Arrow-2: Increase 28-28-30-36-38-44 stitches evenly spaced = 190-200-210-220-230-250 stitches (there is now room for 19-20-21-22-23-25 repeats of A.1 with 10 stitches). Arrow-3: Increase 22-30-40-48-54-58 stitches evenly spaced = 212-230-250-268-284-308 stitches. Arrow-4: Increase 22-30-36-44-54-56 stitches evenly spaced = 234-260-286-312-338-364 stitches (there is now room for 9-10-11-12-13-14 repeats of A.1 with 26 stitches). Arrow-5: Increase 16-20-24-28-22-26 stitches evenly spaced = 250-280-310-340-360-390 stitches (there is now room for 25-28-31-34-36-39 repeats of A.1 with 10 stitches). Arrow-6: Increase 12-14-8-6-10-12 stitches evenly spaced = 262-294-318-346-370-402 stitches. When A.1 has been completed the piece measures approx. 18-18-18-21-21-21 cm from the marker on the neck. Continue with stocking stitch and petrol cerise until the piece measures 19-21-23-25-27-29 cm from the marker on the neck. Now divide the yoke for body and sleeves by working the next round as follows: Work 38-42-45-50-55-61 stitches in stocking stitch (= ½ back piece), place the next 54-62-68-72-74-78 stitches on 1 thread for sleeve, cast on 6-6-8-8-10-10 new stitches on the needle (= in side under sleeve), work 77-85-91-101-111-123 stitches in stocking stitch (= front piece), place the next 54-62-68-72-74-78 stitches on 1 thread for sleeve, cast on 6-6-8-8-10-10 new stitches on the needle (= in side under sleeve) and work the remaining 39-43-46-51-56-62 stitches in stocking stitch (= ½ back piece). Body and sleeves are finished separately. THE PIECE IS NOW MEASURED FROM HERE! BODY: = 166-182-198-218-242-266 stitches. Insert 1 marker thread on each side of the body in the middle of the 6-6-8-8-10-10 stitches cast on under each sleeve. Allow the threads to follow your work onwards; they are used when increasing in the sides. Start the round at one of the marker threads and work stocking stitch in the round with petrol cerise. When the piece measures 6 cm from the division in all sizes increase 1 stitch on each side of both marker threads – read INCREASE TIP-2 (= 4 stitches increased). Increase like this every 6th round a total of 4 times in each side = 182-198-214-234-258-282 stitches. Continue working until the piece measures 29 cm from the division in all sizes (there is approx. 3 cm left to finished length; you can try the jumper on and continue working to desired length). Knit 1 round where you increase 50-54-58-66-70-78 stitches evenly spaced = 232-252-272-300-328-360 stitches. This is done to avoid the rib being tight. Change to circular needle size 3.5 mm and work rib (= knit 2 / purl 2) for 3 cm. Cast off with knit over knit and purl over purl – read CASTING OFF TIP! The jumper measures approx. 54-56-58-60-62-64 cm from the shoulder down. SLEEVE: Place the 54-62-68-72-74-78 stitches from the thread on the one side of the piece on double pointed needles/short circular needle size 4.5 mm and knit up 1 stitch in each of the 6-6-8-8-10-10 stitches cast on under the sleeve = 60-68-76-80-84-88 stitches. Insert 1 marker thread in the middle of the 6-6-8-8-10-10 stitches under the sleeve and allow the thread to follow your work onwards; it will be used when decreasing mid under sleeve. Start the round at the marker thread and work stocking stitch in the round with petrol cerise. When the sleeve measures 3-3-3-2-2-2 cm from the division decrease 2 stitches mid under sleeve – read DECREASE TIP. Decrease like this every 4-1½-1-1-1-1cm a total of 3-7-10-11-11-13 times = 54-54-56-58-62-62 stitches. When the sleeve measures 15-15-16-16-16-17 cm from the division increase 2 stitches mid under sleeve – read INCREASE TIP-2. Increase like this every 4-4-3-3-2-2 cm a total of 3 times = 60-60-62-64-68-68 stitches. Continue working until the sleeve measures 39-38-36-35-33-32 cm from the division (there is approx. 3 cm left to finished length; you can try the jumper on and continue working to desired length). Knit 1 round where you increase 16-16-18-20-20-20 stitches evenly spaced = 76-76-80-84-88-88 stitches. Change to double pointed needles size 3.5 mm and work rib (= knit 2 / purl 2) for 3 cm. Cast off loosely with knit over knit and purl over purl – remember CASTING OFF TIP! The sleeve measures approx. 42-41-39-38-36-35 cm from the division. Work the other sleeve in the same way. |
||||||||||
Diagram explanations |
||||||||||
|
||||||||||
 |
||||||||||
 |
||||||||||
 |
||||||||||
Have you finished this pattern?Tag your pictures with #dropspattern #idunsweater or submit them to the #dropsfan gallery. Do you need help with this pattern?You'll find 27 tutorial videos, a Comments/Questions area and more by visiting the pattern on garnstudio.com. © 1982-2026 DROPS Design A/S. We reserve all rights. This document, including all its sub-sections, has copyrights. Read more about what you can do with our patterns at the bottom of each pattern on our site. |
||||||||||


With over 40 years in knitting and crochet design, DROPS Design offers one of the most extensive collections of free patterns on the internet - translated to 17 languages. As of today we count 324 catalogues and 12290 patterns translated into English (UK/cm). 12290
We work hard to bring you the best knitting and crochet have to offer, inspiration and advice as well as great quality yarns at incredible prices! Would you like to use our patterns for other than personal use? You can read what you are allowed to do in the Copyright text at the bottom of all our patterns. Happy crafting!
Post a comment to pattern DROPS 206-4
We would love to hear what you have to say about this pattern!
If you want to leave a question, please make sure you select the correct category in the form below, to speed up the answering process. Required fields are marked *.