
Popular categories
Looking for a yarn?


Comments / Questions (64)
![]() Gloria wrote:
Gloria wrote:
I am reading the directions for the hat. After doing multiple rows of round one and round two I reach two and three-quarter inches, it says work the same way but without increases. I do not understand where there were increases that I am now going to leave out? can you write out exactly what the next lines would look like without the increases? Thank you for your help.
14.10.2025 - 03:38DROPS Design answered:
Hi Gloria, a yarn over means 1 increase. So now you are doing exactly the same (2 rounds as before) but in round 1 you don't do yarn overs anymore. Happy knitting!
14.10.2025 - 08:35
![]() Brun Frédérique wrote:
Brun Frédérique wrote:
Je suis étonnée que la hauteur sans diminutions ( c\'est à dire droite) soit la même pour toutes les tailles. Et où cette hauteur doit elle être mesurée ( oreillettes ou endroit \'e plus court?) ? Merci
24.09.2025 - 07:48
![]() Andrea wrote:
Andrea wrote:
Sehr gut beschriebene Anleitung.
06.09.2025 - 11:40
![]() Disa wrote:
Disa wrote:
Hey, sorry, I see you've answered this question already in other languages but the translations aren't helping. Do I meassure the 7cm from the beginning of the round or the longest part of the hat? (Maybe add this detail to the pattern instructions? :) Million thanks.
29.08.2025 - 20:04DROPS Design answered:
Hi Disa, please see the lesson DROPS HERE how to make this type of hat, step by step. Happy knitting!
19.09.2025 - 11:18
![]() Seif wrote:
Seif wrote:
Hello
04.08.2025 - 19:25
![]() Suzanne wrote:
Suzanne wrote:
Bonjour, Le 1er rg du bonnet apres les cotes j ai 3 aiguilles de 28 mailles et j arrive a la fin de l aiguille par 1 jete. Que dois-je faire alorsÉ Merci
20.06.2025 - 04:51DROPS Design answered:
Bonjour Suzanne, c'est juste ainsi, les 28 m de chaque aiguille se tricotent de *à* et vous terminez donc par 1 jeté à la fin des 3 aiguilles = vous avez toujours 28 mailles sur chaque aiguille. Tricotez toutes les mailles à l'endroit au tour suivant puis répétez ces 2 tours. Bon tricot!
23.06.2025 - 08:31
![]() REINE MARIE wrote:
REINE MARIE wrote:
Bonjour ,je fais ce mignon petit bonnet : faut il toujours continuer les diminutions tous les deux rangs car le haut fait pointu et a la fin il me reste 4maiilles ,es ce normal ? Merci de votre réponse
28.03.2025 - 17:22DROPS Design answered:
Bonjour Reine Marie, tout à fait, au début vous répétez les tours 1 et 2 = le nombre de mailles reste le même car on compense les diminutions par des jetés, puis, on va former le haut du bonnet: on va diminuer sans faire les jetés, le nombre de mailles diminue tous les 2 tours et il ne reste plus que 4 mailles, passez le fil dans les mailles restantes, serrez et arrêtez. Bon tricot!
31.03.2025 - 07:34
![]() Evelyne SENNELIER wrote:
Evelyne SENNELIER wrote:
Je ne comprends pas comment il faut "Répartir les mailles sur les aiguilles doubles pointes 4 " pour continuer à tricoter les jambes. Merci de votre réponse
03.02.2025 - 09:38DROPS Design answered:
Bonjour Mme Sennelier, divisez simplement votre nombre de mailles par 3 si vous tricotez sur 4 aiguilles / par 4 si vous tricotez sur 5 aiguilles et tricotez avec la dernière; si votre nombre de mailles n'est multiple ni de 3 ni de 4, ajoutez 1 maille en plus sur 1 aiguille ou plus pour les répartir le plus équitablement possible et continuez à tricoter en rond. Bon tricot!
03.02.2025 - 13:44
![]() Ulla wrote:
Ulla wrote:
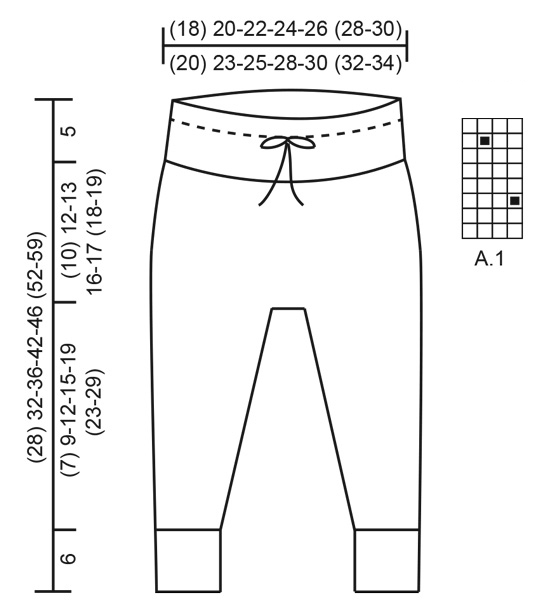
Jeg forstår ikke hvad diagrammet A1 skal bruges til?? Er det et mønster?
03.01.2025 - 15:47DROPS Design answered:
Hei Ulla. Ja, det er mønstret til buksen. Slik står det i oppskriften: MØNSTER (gjelder bukse): Se diagram A.1. Om du strikker luen, skal ikke A.1 brukes. mvh DROPS Design
07.01.2025 - 13:44
![]() Gabriela wrote:
Gabriela wrote:
Buongiorno. Volevo chiedere una cosa. Da dove devo misurare i 7 cm del capello? Dalla punta che va sul orecchio o da dove ci sono i buchi? Grazie e volevo farvi i complimenti per il vostro sito. Mi piace molto e trovo di tutto e di più ☺️
04.11.2024 - 08:40DROPS Design answered:
Buongiorno Gabriela, se non diversamente indicato le misure si intendono dal bordo di avvio. Buon lavoro!
04.11.2024 - 08:49
|
|||||||
Winter Baby#winterbabyset |
|||||||
 |
 |
||||||
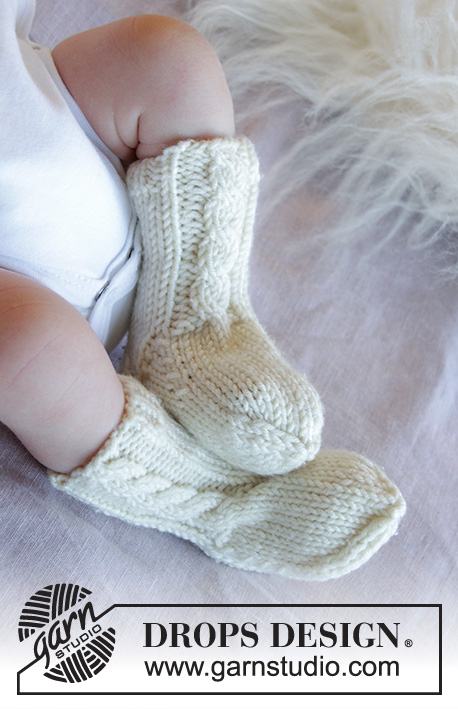
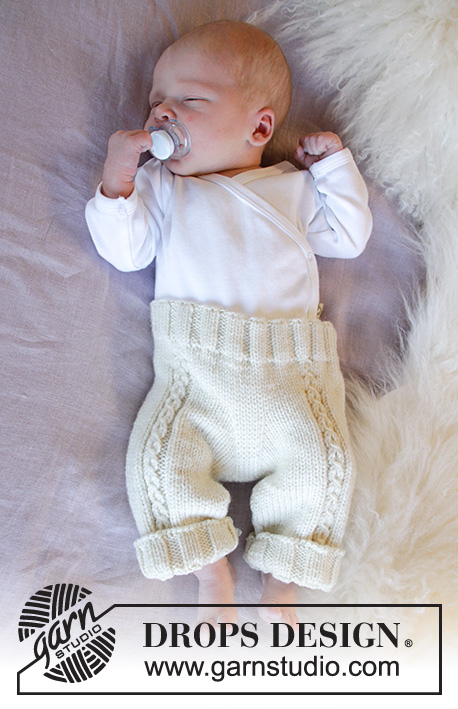
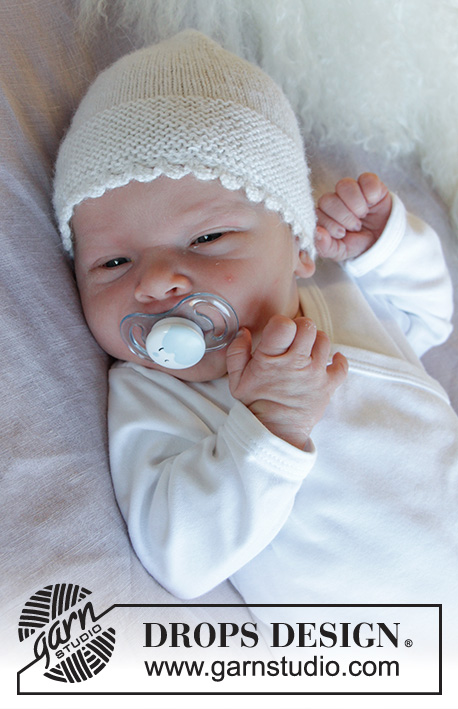
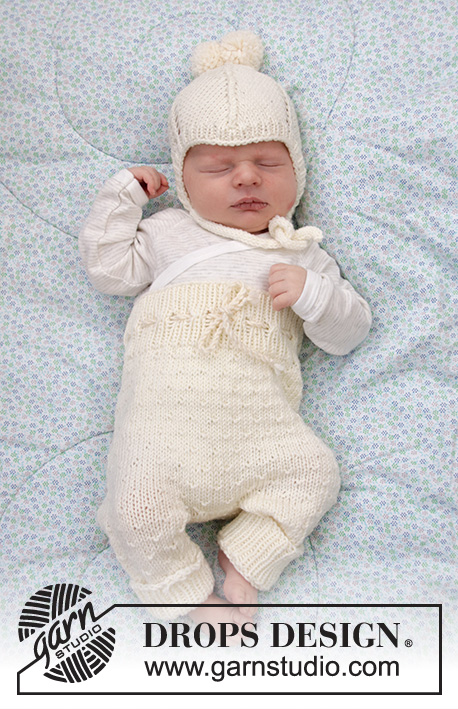
Knitted set of trousers and hat for baby in DROPS Merino Extra Fine. Size: Premature to 4 years
DROPS Baby 33-12 |
|||||||
|
---------------------------------------------------------- EXPLANATION FOR THE PATTERN: ---------------------------------------------------------- PATTERN (applies to pants): See diagram A.1. DECREASE TIP (applies to inside of legs): Begin 3 stitches before marker and knit 2 together, knit 2 (marker is between these 2 stitches), slip 1 stitch knitwise, knit 1, pass slipped stitch over stitch worked. INCREASE TIP (applies to pants): Increase 1 stitch by making 1 yarn over, on next round work yarn over twisted to avoid holes. ---------------------------------------------------------- START THE PIECE HERE: ---------------------------------------------------------- TROUSERS - SHORT OVERVIEW OF THE PIECE: Worked in the round on circular needles/double pointed needles, top down. Cast on (84) 96-104-116-124 (136-144) stitches on circular needle size 3 mm with Merino Extra Fine. Knit 1 round. Then work rib in the round = knit 1/ purl 1. When rib measures 2½ cm, work a round with eyelet holes for tie as follows: * Knit 1, purl 1, make 1 yarn over, purl 2 together *, work from *-* the entire round (= (21) 24-26-29-31 (34-36) holes on round). Then continue rib = knit 1/purl 1 until piece measures 5 cm from cast-on edge. Switch to circular needle size 4 mm and work an elevation at the back of pants as explained below. ELEVATION AT THE BACK: To get a better fit work the pants higher at the back than at the front. This is done by working short rows back and forth as follows: Insert 1 marker at beginning of round = mid back. Work from right side and knit 10 past marker, turn, tighten yarn and purl 20 stitches back. Turn, tighten yarn and knit 30, turn, tighten yarn and purl 40. Turn, tighten yarn and knit 50, turn, tighten yarn and purl 60. Continue this way until (60) 60-80-80-100 (100-100) stitches have been purled. Turn piece, tighten yarn and knit until mid back. TROUSERS: Now work A.1 in the round over all stitches. REMEMBER THE KNITTING TENSION! When pants measures (15) 17-18-21-22 (23-24) cm from cast-on edge mid front, work next round as follows: Cast off 4 stitches (= mid back), knit (34) 40-44-50-54 (60-64) stitches, cast off 8 stitches mid front, knit (34) 40-44-50-54 (60-64) stitches and cast off the remaining 4 stitches mid back. Cut the yarn. Slip stitches in one side of piece on 1 stitch holder and work leg as explained below. NOW MEASURE THE PIECE FROM HERE! LEG: = (34) 40-44-50-54 (60-64) stitches. Distribute the stitches on double pointed needles size 4 mm and continue A.1 in the round. Knit the stitches that do not fit A.1. When piece measures 2 cm from division, decrease 2 stitches on inside of leg - read DECREASE TIP. Decrease like this every (1½) 1½-1½-1½-2 (2½-3½) cm (4) 5-7-8-8 (8-8) times in total = (26) 30-30-34-38 (44-48) stitches. Continue to work until leg measures (7) 9-12-15-19 (23-29) cm. Knit 1 round while increasing (6) 6-8-6-8 (8-10) stitches evenly (increase after every 5th stitch) – read INCREASE TIP = (32) 36-38-40-46 (52-58) stitches. Switch to double pointed needles size 3 mm and work rib in the round = knit 1/purl 1 for 6 cm (or desired measurements). Loosely cast off stitches with knit over knit and purl over purl. Work the other leg the same way. ASSEMBLY: Sew tog the opening between the legs. TWINED STRING FOR TIE: Cut 2 lengths of approx. 3 metres each. Twine the strands tog until they resist, fold the string double so that it twines again. Make a knot at each end. Thread tie up and down through eyelet row in pants, begin mid front and tie a bow. ---------------------------------------------------------- BEGIN PIECE FOR HAT HERE: ---------------------------------------------------------- HAT: Worked in the round on double pointed needles from mid back. Cast on (60) 66-72-78-84 (90-96) stitches on double pointed needles size 3.5 mm with Merino Extra Fine. Knit 1 round. Then work 4 rounds rib = knit 1/purl 1. Switch to double pointed needles size 4 mm. Knit 1 round. Insert 1 marker at beginning of round = mid back. Then work as follows: ROUND 1: * Knit 1, make 1 yarn over, knit (8) 9-10-11-12 (13-14) stitches, slip 2 stitches knitwise, knit 1 and pass the 2 slipped stitches over stitch worked, knit (8) 9-10-11-12 (13-14) stitches, make 1 yarn over *, work from *-* 3 times in total. ROUND 2: Knit all stitches. Repeat round 1 and 2 until piece measures 7 cm in all sizes. Then work the same way but without increases. I.e. continue decreases the same way until no stitches remain between decreases. On next round knit all stitches together 2 by 2. Cut the yarn and pull it through the remaining stitches, tighten together and fasten. Hat measures approx. (14) 14-15-16-17 (17-18) cm measured form one of the bottom tips. TIE RIBBON: Work back and forth with 2 double pointed needles size 3.5 mm. Pick up 4 stitches in the tip on one side of hat (a tip to cover the ear). Knit 4 stitches, * do not turn piece, but push stitches over to the other side of needle, place the thread behind the 4 stitches, tighten yarn and knit the 4 stitches from the right side again *, work from *-* until tie measures approx. (14)16-18-20-22 (24-26) cm, cast off and fasten the yarn. Work the other tie the same way in the tip on the opposite side of hat. POMPOM: Make 2 pompoms with an approx. diameter of 3 cm. Fasten them at the top of hat. |
|||||||
Diagram explanations |
|||||||
|
|||||||
 |
|||||||
Have you finished this pattern?Tag your pictures with #dropspattern #winterbabyset or submit them to the #dropsfan gallery. Do you need help with this pattern?You'll find 29 tutorial videos, a Comments/Questions area and more by visiting the pattern on garnstudio.com. © 1982-2026 DROPS Design A/S. We reserve all rights. This document, including all its sub-sections, has copyrights. Read more about what you can do with our patterns at the bottom of each pattern on our site. |
|||||||


With over 40 years in knitting and crochet design, DROPS Design offers one of the most extensive collections of free patterns on the internet - translated to 17 languages. As of today we count 324 catalogues and 12290 patterns translated into English (UK/cm). 12290
We work hard to bring you the best knitting and crochet have to offer, inspiration and advice as well as great quality yarns at incredible prices! Would you like to use our patterns for other than personal use? You can read what you are allowed to do in the Copyright text at the bottom of all our patterns. Happy crafting!
Post a comment to pattern DROPS Baby 33-12
We would love to hear what you have to say about this pattern!
If you want to leave a question, please make sure you select the correct category in the form below, to speed up the answering process. Required fields are marked *.