
Popular categories
Looking for a yarn?


Comments / Questions (10)
![]() Wilma Van Der Vliet wrote:
Wilma Van Der Vliet wrote:
Als jullie voor maat l/xl 500 gram gebruiken in totaal met dubbele draad, dan zou het vestje slechts 250 gram enkel draads gebruiken? Dat lijkt me erg weinig. Of is het 2x 500 gram omdat dubbele draad?
02.04.2024 - 22:38DROPS Design answered:
Dag Wilma,
Je gebruikt 300 gram oker en 200 gram naturel voor maat XL en volgens mij kloppen deze hoeveelheden wel. Ook als ik vergelijk met gelijksoortige patronen. Alpaca heeft een vrij grote looplengte.
03.04.2024 - 20:22
![]() Leibe Segal wrote:
Leibe Segal wrote:
I would like to make this jacket with long sleeves. Could you advise me on how to adjust the pattern, please?
27.08.2020 - 15:39DROPS Design answered:
Dear Mrs Segal, we are unfortunately not able to adjust every pattern to every single request but you can take inspiration from a pattern with long sleeves and same tension. Happy knitting!
27.08.2020 - 16:15
![]() Susanne wrote:
Susanne wrote:
Jeg fandt ud af det med knaphullet, som jeg spurgte om. Det var bare mig som var lidt forvirret. Tak for nogle dejlige opskrifter :-)
11.06.2019 - 06:44
![]() Susanne wrote:
Susanne wrote:
Hej Hvordan kan knaphullet komme til at være på højre forkant, når tøjet er på, hvis jeg først laver knaphullet sidst på en ret pind? Så vil det, så vidt jeg kan regne ud, komme til at sidde på venstre forkant.
10.06.2019 - 23:11DROPS Design answered:
Hei Susanne. Det strikkes ovenfre og ned, så da blir begynnelsen av pinnen på venstre forstykke og slutten av pinnen på høyre forstykke (når plagget has på). Knapphullene strikkes på slutten av en pinne fra retten = høyre forstykke. God fornøyelse
11.06.2019 - 07:13
![]() Solvejg Pedersen wrote:
Solvejg Pedersen wrote:
Super sød sommer trøje, håber opskriften snart er klar
25.02.2019 - 16:56
![]() Rini C wrote:
Rini C wrote:
Sunny Summer
24.02.2019 - 18:09
![]() Hanne Enghave wrote:
Hanne Enghave wrote:
Venter dagligt på opskriften. Skøn trøje
19.02.2019 - 17:56
![]() Golden Sun wrote:
Golden Sun wrote:
Ik vindt het op gouden zonnestralen lijken
15.02.2019 - 19:28
![]() Gerda Pennekamp wrote:
Gerda Pennekamp wrote:
Happy yellow stripes
30.01.2019 - 12:57
![]() Anne Marie wrote:
Anne Marie wrote:
Very nice summer cardigan with graduated stripes.
13.01.2019 - 15:53
|
|||||||
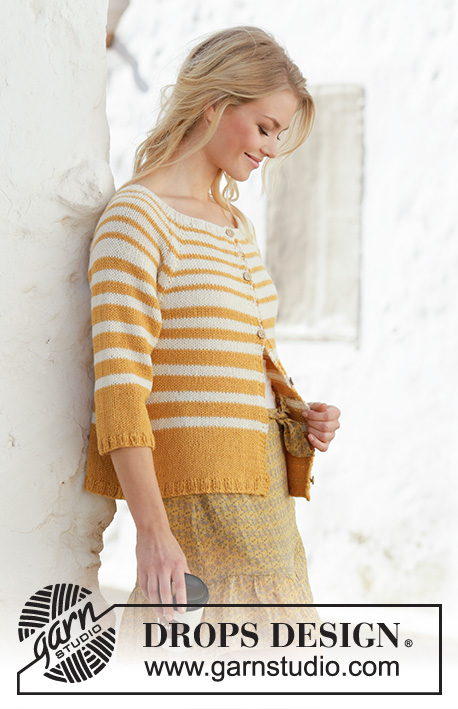
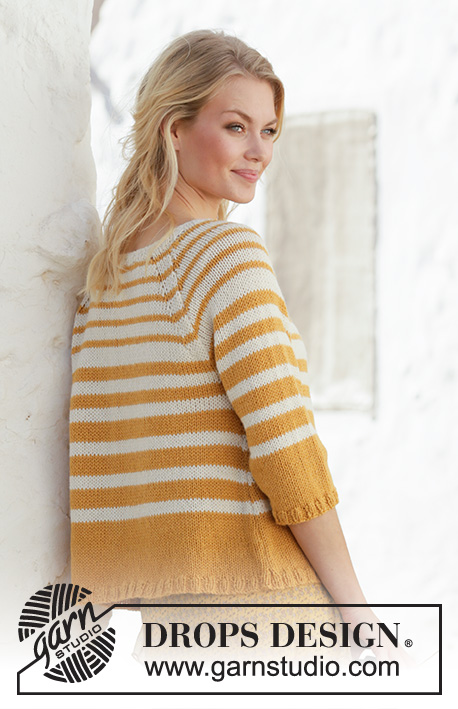
Let the Sun In#letthesunincardigan |
|||||||
 |
 |
||||||
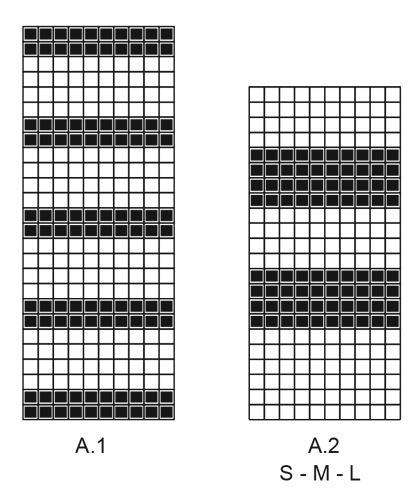
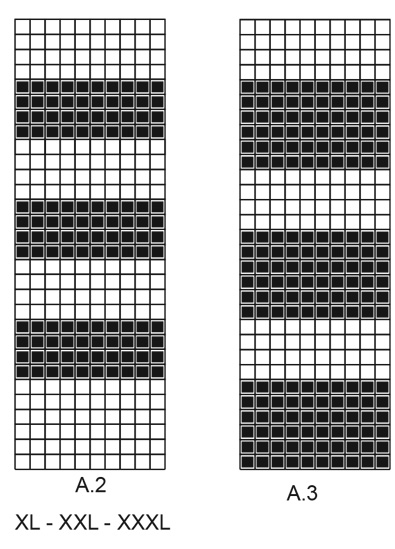
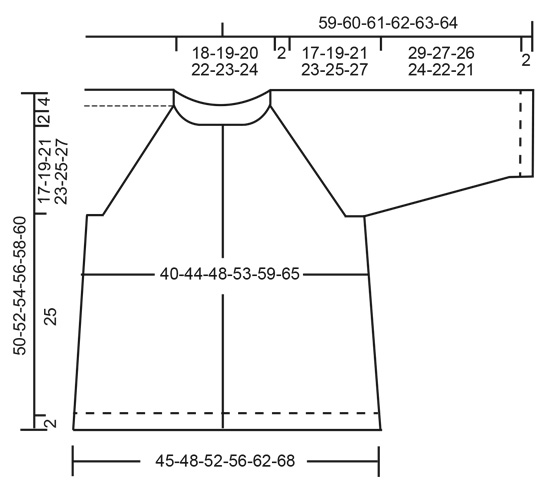
Knitted jacket with raglan and stripes in 2 strands DROPS Alpaca. Worked top down. Size: S - XXXL
DROPS 200-15 |
|||||||
|
---------------------------------------------------------- EXPLANATION FOR THE PATTERN: ---------------------------------------------------------- GARTER STITCH (back and forth): Knit all rows. 1 ridge vertically = knit 2 rows. STRIPES: Work stripes with 2 strands and stocking stitch as follows: Work diagram A.1. When A.1 has been worked vertically, work diagram A.2 - choose diagram for your size. When A.2 has been worked vertically, work A.3. Then work with goldenrod until finished measurements. DECREASE TIP-1 (evenly): To calculate how to decrease evenly, use the total number of stitches on row (e.g. 102 stitches), minus band stitches (8 stitches) and divide the remaining stitches by number of decreases to be done (e.g. 6) = 15.6. In this example decrease by knitting alternately approx. every 14th and 15th stitch and every 15th and 16th stitch together (do not decrease over bands). INCREASE TIP-1 (applies to sides of body): All increases are done from the right side. Work until 2 stitches remain before marker thread, 1 yarn over, knit 4 (marker thread is in the middle of these stitches), 1 yarn over. Repeat in the other side (= 4 stitches increased on row). On next row (wrong side) purl yarn overs twisted to avoid holes. Then work the new stitches in stocking stitch. INCREASE TIP-2 (evenly): To calculate how to increase evenly, use the total number of stitches on row (e.g. 160 stitches), minus band stitches (= 8 stitches) and divide the remaining stitches by number of increases to be done (e.g. 30) = 5. In this example increase by making 1 yarn over after every 5th stitch (do not increase over bands). On next row (wrong side) purl yarn overs twisted to avoid holes. RAGLAN: All increases are done from the right side. Work until 2 stitches remain before first marker thread, make 1 yarn over, knit 4 (marker thread is in the middle of these 4 stitches), make 1 yarn over. Repeat at each of the remaining marker threads (= 8 stitches increased on row). On next row (wrong side) purl yarn overs twisted to avoid holes. Then work the new stitches in stocking stitch. DECREASE TIP-2 (applies to sleeves): Decrease 1 stitch on each side of marker thread as follows: Work until 3 stitches remain before marker thread and knit 2 together, knit 2 (marker thread is between these stitches), slip 1 stitch knitwise, knit 1, pass slipped stitch over stitch worked. BUTTONHOLES: Decrease for buttonholes on right band (when garment is worn). Decrease from right side when 3 stitches remain on row as follows: Make 1 yarn over, knit the next 2 stitches together, knit last stitch. On next row knit yarn over to make holes. Decrease first buttonhole when rib in neck measures approx. 1½-2 cm. Then decrease the next 5 approx. 8-8-9-9-10-10 cm between each. ---------------------------------------------------------- START THE PIECE HERE: ---------------------------------------------------------- JACKET - SHORT OVERVIEW OF THE PIECE: Worked back and forth on circular needle, top down. Work sleeves in the round on a short circular needle/double pointed needles. Work entire piece is knitted in 2 strands and stripes. YOKE: Cast on 102-106-110-114-118-122 stitches on circular needle size 4 mm with 2 strands off white. Purl 1 row from wrong side. Then work rib as follows (1st row = right side): 4 band stitches in GARTER STITCH - read explanation above, (knit 2/purl 2) until 6 stitches remain on needle, knit 2, 4 band stitches in garter stitch. Remember BUTTONHOLES - read explanation above. When rib measures 2 cm, knit 1 row from right side while at the same time decreasing 6 stitches evenly - read DECREASE TIP-1 = 96-100-104-108-112-116 stitches. Switch to circular needle size 5 mm. Purl 1 row from wrong side (with 4 band stitches in garter stitch in each side). Now insert 4 marker threads in the piece as follows: Insert a marker thread 19-20-21-22-23-24 stitches in from each side (= transition between front pieces and sleeves), insert a marker thread after another 14 stitches in each side (= transition between sleeves and back piece). There are now 30-32-34-36-38-40 stitches between the last 2 marker threads inserted (= back piece). Now work in stocking stitch with 4 band stitches in garter stitch in each side towards mid front side and STRIPES - read explanation above, AT THE SAME TIME on first row from right side begin increase for RAGLAN – read explanation above. Increase like this every other row 16-19-21-23-25-28 times in total = 224-252-272-292-312-340 stitches. REMEMBER THE KNITTING TENSION! When all increases are done, continue until piece measures 19-21-23-25-27-29 cm from cast-on edge and down mid back. Work next row from wrong side as follows: Work the first 34-37-40-44-48-53 stitches (= right front piece), slip the next 48-56-60-62-64-68 stitches on a stitch holder (= sleeve), cast on 8-8-10-10-12-12 new stitches on needle (= in the side under sleeves), work the next 60-66-72-80-88-98 stitches (= back piece), slip the next 48-56-60-62-64-68 stitches on a stitch holder (= sleeve), cast on 8-8-10-10-12-12 new stitches on needle (= in the side under sleeves), work the remaining 34-37-40-44-48-53 stitches on row (= left front piece). NOW MEASURE PIECE FROM HERE! BODY: = 144-156-172-188-208-228 stitches. Insert a marker thread in the middle of the new stitches cast-on in the side under the sleeves (= 4-4-5-5-6-6 new stitches on each side of marker thread). Move the marker thread upwards when working. Continue with stocking stitch, 4 band stitches in garter stitch in each side towards mid front as before and stripes. When piece measures 4 cm, increase 1 stitch on each side of marker thread - read INCREASE TIP-1. Increase like this approx. every 5-5-8-8-8-8 cm 4-4-3-3-3-3 times in total = 160-172-184-200-220-240 stitches. When piece measures 25 cm, increase 30-34-38-42-46-50 stitches evenly – read INCREASE TIP-2 = 190-206-222-242-266-290 stitches. Switch to circular needle size 4 mm. Now work rib as follows: 4 band stitches in garter stitch, (knit 2/purl 2) until 6 stitches remain on row, knit 2, 4 band stitches in garter stitch. Continue like this until rib measures 2 cm. Cast off stitches with knit over knit and purl over purl. Make sure that the cast-off edge is not too tight. Use a larger needle size when casting off. Jacket measures approx. 50-52-54-56-58-60 cm from shoulder and down. SLEEVE: Slip the 48-56-60-62-64-68 stitches from stitch holder in one side of piece back on a short circular needle/double pointed needles size 5 mm and pick in addition up 1 stitch in each of the new 8-8-10-10-12-12 stitches cast on under sleeve = 56-64-70-72-76-80 stitches. Insert a marker thread in the middle of the new stitches (= 4-4-5-5-6-6 new stitches on each side of marker thread). Work in stocking stitch and stripes as before. When sleeve measures 3-3-3-4-4-4 cm, decrease 1 stitch on each side of marker thread mid under sleeve - read DECREASE TIP-2. Decrease in the different sizes as follows: Size S: Decrease approx. every 4 cm 7 times in total. Size M: Decrease alternately every 2 and 3 cm 10 times in total. Size L: Decrease approx. every 2 cm 12 times in total. Size XL: Decrease alternately every 1 and 2 cm 13 times in total. Size XXL: Decrease every cm 14 times in total. Size XXXL: Decrease every cm 14 times in total. When all decreases are done, there are 42-44-46-46-48-52 stitches on round. When sleeve measures 29-27-26-24-22-21 cm, increase 10-12-14-14-16-16 stitches evenly = 52-56-60-60-64-68 stitches. Switch to double pointed needles size 4 mm. Work rib (knit 2/purl 2) for 2 cm. Cast off stitches with knit over knit and purl over purl. Make sure that the cast-off edge is not too tight. Use a larger needle size when casting off. Sleeve measures approx. 31-29-28-26-24-23 cm. Work the other sleeve the same way. ASSEMBLY: Sew the buttons on to left band. |
|||||||
Diagram explanations |
|||||||
|
|||||||
 |
|||||||
 |
|||||||
 |
|||||||
Have you finished this pattern?Tag your pictures with #dropspattern #letthesunincardigan or submit them to the #dropsfan gallery. Do you need help with this pattern?You'll find 26 tutorial videos, a Comments/Questions area and more by visiting the pattern on garnstudio.com. © 1982-2026 DROPS Design A/S. We reserve all rights. This document, including all its sub-sections, has copyrights. Read more about what you can do with our patterns at the bottom of each pattern on our site. |
|||||||


With over 40 years in knitting and crochet design, DROPS Design offers one of the most extensive collections of free patterns on the internet - translated to 17 languages. As of today we count 325 catalogues and 12298 patterns translated into English (UK/cm). 12298
We work hard to bring you the best knitting and crochet have to offer, inspiration and advice as well as great quality yarns at incredible prices! Would you like to use our patterns for other than personal use? You can read what you are allowed to do in the Copyright text at the bottom of all our patterns. Happy crafting!
Post a comment to pattern DROPS 200-15
We would love to hear what you have to say about this pattern!
If you want to leave a question, please make sure you select the correct category in the form below, to speed up the answering process. Required fields are marked *.